Homemade Cream Cheese Mints Recipe
Homemade Cream Cheese Mints Recipe
Homemade Cream Cheese Mints: A Sweet Little Treat That’ll Change Your Dessert Game
I discovered cream cheese mints completely by accident on a random Tuesday night when I was stress-baking at 10 PM. You know that feeling when you need something to do with your hands, and your brain is just spinning? Yeah, that was me. I had cream cheese sitting in my fridge left over from a cheesecake experiment, and I thought, “What if I just… made candy?” No fancy equipment, no tempering chocolate, no fuss. Just butter, cream cheese, powdered sugar, and mint extract.
The first batch was honestly a little weird-looking. They were lumpy, slightly too soft, and honestly kind of ugly. But I popped one in my mouth, and something magical happened. It was like eating the best part of an after-dinner mint, but somehow richer and creamier. My husband walked into the kitchen, tried one, and just gave me that look that means, “Why aren’t you making these every single day?”
That was three years ago. Now, homemade cream cheese mints are my go-to gift for neighbors, my emergency dessert when someone’s coming over, and the thing I make when I just need a little moment of sweetness in my day. They’re foolproof, deeply satisfying, and honestly kind of therapeutic to make.
Here’s the thing: these aren’t complicated. They’re not precious. They’re just genuinely good, and they taste like you spent way more time on them than you actually did. If you’ve ever bought those fancy mints at a boutique candy shop and thought “I could probably make these,” you absolutely can. And they’ll taste even better because you made them in your own kitchen.
If you love easy, elegant desserts that make you feel like a kitchen wizard, follow me on HaileeRecipes on Pinterest for more treats just like this one.
Why You’ll Love This Recipe
Let me be honest about what makes these so special.
- They’re ridiculously easy. Seriously, if you can mix butter and powdered sugar, you can make these. No double boiler, no thermometer, no stress.
- They taste expensive. People will think you bought them from a fancy candy shop. I won’t tell if you don’t.
- They’re customizable. Mint is just the beginning. I’ll show you all the fun variations I’ve tested.
- They keep for ages. Make them Sunday, enjoy them all week. They actually get better as they sit.
- They’re the perfect gift. Put them in a little box with tissue paper, and you’ve got something thoughtful and homemade that people genuinely love.
- Your kitchen will smell amazing. That mint-butter-sugar smell? It’s basically free aromatherapy.
Ingredients
- 8 ounces cream cheese, softened to room temperature
- 4 tablespoons unsalted butter, softened
- 2 cups powdered sugar, sifted
- 1 teaspoon peppermint extract (or 1/2 teaspoon if you want it more subtle)
- 1/4 teaspoon salt
- 6 ounces semi-sweet or dark chocolate for coating
- 1 tablespoon coconut oil or shortening (helps the chocolate coating stay smooth)
Hailee’s Tip: Room temperature is non-negotiable here. Cold cream cheese will be lumpy and frustrating. I usually set mine out 30 minutes before I start, or I cut it into chunks so it softens faster.
Hailee’s Tip: Sift your powdered sugar. I know it seems fussy, but it makes such a difference. Lumpy powdered sugar means lumpy mints, and we’re not about that.
Hailee’s Tip: Don’t skip the salt. It sounds weird, but it balances the sweetness and makes the mint flavor pop. Trust me on this.
Optional Add-Ins and Variations
This is where you get to play. The base recipe is the star, but here’s what I’ve tested and loved:
- Spearmint instead of peppermint: More delicate and floral. Great if you want something less intense.
- Lemon extract: Make these lemony and bright. I coat them in white chocolate instead of dark.
- Almond extract: Just 1/2 teaspoon. It adds this subtle, sophisticated flavor.
- A tiny pinch of cayenne pepper: Sounds weird, tastes incredible. It adds a little warmth that plays beautifully with chocolate.
- Crushed candy canes: Add 2 tablespoons finely crushed candy canes to the mixture for texture and extra holiday vibes.
- White chocolate coating: If dark chocolate feels too heavy, go white. It’s sweeter and more delicate.
Step-by-Step Method
Step 1: Cream Your Base
In a medium bowl, beat the softened cream cheese and butter together until they’re completely smooth and fluffy. This takes about 2 minutes with an electric mixer. I use a hand mixer because I like watching it come together, but a stand mixer works too. The mixture should look pale and light.
What I Messed Up: The first time I made these, I didn’t beat it long enough, and the texture was grainy. Now I go a full 2 minutes and it’s perfect every time.
Step 2: Add the Sugar Slowly
Add your sifted powdered sugar a little bit at a time, mixing on low speed. If you dump it all in at once, you’ll have a powdered sugar explosion in your kitchen. Trust me. I learned this the hard way. Mix until the texture is smooth and creamy, kind of like frosting. This takes about 3 minutes total.
Step 3: Flavor It
Add the peppermint extract, salt, and any other flavorings you’re using. Mix well. Taste a tiny bit on your finger. Does it taste good? Great. Does it need more mint? Add another 1/4 teaspoon. This is your candy, make it taste how you want it.
Step 4: Chill and Shape
Spread the mixture onto a parchment-lined baking sheet in a thin, even layer (about 1/4 inch thick). Pop it in the freezer for 30 minutes until it’s firm but not rock-hard. You want it firm enough to cut into shapes, but not so frozen that it shatters.
Step 5: Cut Into Shapes
Once it’s firm, cut it into small squares, rectangles, or use small cookie cutters for fun shapes. I use a sharp knife and just go for rough squares because I like the rustic look, but you do you. This is also where I sometimes make mistakes by cutting too early, and the pieces stick to the knife. If that happens, just chill it another 10 minutes and try again.
Step 6: Prepare Your Chocolate Coating
Chop your chocolate into small pieces and place it in a microwave-safe bowl with the coconut oil. Microwave in 30-second intervals, stirring between each one, until it’s completely smooth. Don’t overheat it or it’ll get grainy and weird. The coconut oil helps it stay smooth and silky for coating.
Step 7: Dip and Set
Using a fork or small dipping tool, dip each mint piece into the chocolate, tap off the excess, and place it on a parchment-lined baking sheet. I like to place them close together because they look pretty that way. Pop the whole sheet into the fridge for 20 minutes until the chocolate sets completely.
What I Messed Up: I once tried to dip them while the chocolate was too thick, and they came out lumpy and uneven. Now I keep the chocolate warm by setting the bowl over a pot of warm (not hot) water while I’m dipping. It stays silky smooth.
Common Mistakes to Avoid
Using cold cream cheese: This is the number one issue. Cold cream cheese won’t blend smoothly, and you’ll end up with a grainy texture. Set it out first.
Not sifting the powdered sugar: Lumps in the powdered sugar mean lumps in your mints. Spend the 30 seconds sifting.
Overmixing after you add the sugar: Once the sugar is in, mix until combined, but don’t go crazy. Overmixing can make the texture dense.
Cutting before it’s firm enough: If your mixture is too soft, the pieces will be mushy and won’t hold their shape. Give it the full 30 minutes in the freezer.
Chocolate that’s too hot: If your chocolate is smoking or too hot, it’ll melt the mint layer. Let it cool slightly before dipping.
Forgetting the coconut oil: This isn’t a mistake exactly, but the chocolate will be thicker and harder to work with. The coconut oil really does make a difference.
My Tested Substitutions
Can I use margarine instead of butter? Technically yes, but don’t. Butter tastes better. If you’re dairy-free, use dairy-free butter and make sure your cream cheese is dairy-free too.
What about allulose or monk fruit instead of powdered sugar? I’ve tested both. They work, but the texture is slightly different. Allulose works better than monk fruit because it has a more similar texture to sugar. Use the same amount.
Can I use milk chocolate instead of dark? Absolutely. It’ll be sweeter, which some people love. White chocolate works too if you’re into that.
What if I don’t have peppermint extract? Fresh peppermint oil works (use less, like 1/2 teaspoon). You can also crush fresh mint leaves really finely and add them, though the flavor will be more subtle.
Can I make these without the chocolate coating? Yes, but they’re softer and need to be stored in the fridge. They’re also less pretty, but they still taste amazing. Some people like them that way.
How to Customize
Here’s the beautiful part: once you make the base recipe once, you’ll feel confident playing with it.
Holiday versions: Add crushed candy canes in December. Make them in festive colors by adding a tiny drop of food coloring. Use holiday-themed cookie cutters for shapes.
Flavor combinations: Try peppermint plus a tiny pinch of cayenne. Or lemon and lavender. Or almond and vanilla. Start with the base and add small amounts of extract until it tastes right to you.
Texture play: Add finely chopped pistachios or crushed freeze-dried berries to the mixture for texture and color.
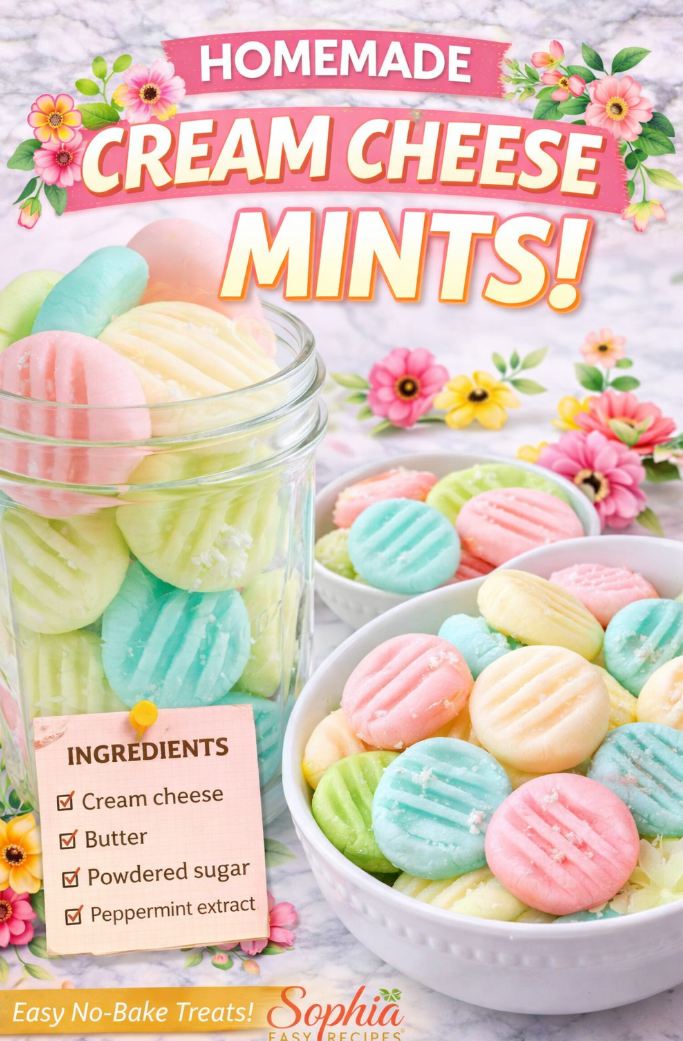
Color: A single drop of food coloring goes a long way. I’ve made pale green mints, pale pink ones, even pale blue ones. They look fancy but taste exactly the same.
Serving Ideas
These aren’t just for eating straight from the box, though that’s absolutely valid.
- After-dinner treat: Set out a little bowl after dinner. People love it.
- In a gift box: Line a small box with tissue paper, add mints, tie with ribbon. Done.
- Crushed on top of desserts: Crush them up and sprinkle on chocolate cake or brownies.
- In a candy dish: Put them in a pretty bowl on your coffee table. They disappear fast.
- Paired with coffee: One mint and a cup of coffee is basically a fancy dessert.
- For parties: Make a big batch and put them in little paper cups. People think you’re fancy.
Meal Prep and Storage
Here’s where homemade cream cheese mints really shine: they keep beautifully.
Room temperature: In an airtight container, they last about 3 days. After that, they start to soften. They still taste good, but they get a bit mushy.
In the refrigerator: They last about 2 weeks in an airtight container. This is my preferred storage method. They stay firm and perfect.
In the freezer: They last about 3 months. I’ve frozen batches and honestly forgotten about them, then been delighted to find them months later. Let them come to room temperature for about 10 minutes before eating so the chocolate isn’t too hard.
Make-ahead tip: You can make these up to 5 days ahead. Store them in the fridge and they’ll be perfect when you need them. This is great for parties or gifts.
Pro tip: Layer them between parchment paper in your storage container so they don’t stick together.
Nutritional Breakdown
These are a treat, so let’s be real about the numbers. Each mint (assuming about 24 pieces from this batch) contains approximately:
- Calories: 95
- Protein: 1g
- Carbohydrates: 12g
- Fat: 5g
- Fiber: 0g
They’re not health food, but they’re also not crazy indulgent. One or two after dinner feels totally reasonable to me.
Final Thoughts
Making homemade cream cheese mints changed something for me. It’s one of those recipes that proves you don’t need fancy equipment or complicated techniques to make something genuinely delicious and impressive. You just need good ingredients, a little patience, and the willingness to try something new.
I love that these are simple enough to make on a random Tuesday night, but special enough to give as gifts or serve at a dinner party. They’re the kind of recipe that makes you feel like you’ve got your life together, even when you’re stress-baking at 10 PM.
If you make these, I’d love to know how they turn out. Did you try a different flavor? Did someone ask for your recipe? Send me a message. I genuinely love hearing about the recipes people make from my blog, especially when they add their own twist to them.
Now go make some mints. Your kitchen is about to smell amazing, and your friends and family are about to think you’re a candy-making wizard.
Recipe Card
**Homemade Cream Cheese Mints**
Homemade Cream Cheese Mints Recipe
Ingredients
Method
- Beat softened cream cheese and butter together until fluffy, about 2 minutes.
- Add sifted powdered sugar gradually, mixing on low speed until smooth.
- Stir in peppermint extract and salt. Taste and adjust flavoring if desired.
- Spread mixture onto parchment-lined baking sheet in thin, even layer (about 1/4 inch thick).
- Freeze for 30 minutes until firm but not rock-hard.
- Cut into small squares or shapes using a sharp knife or cookie cutters.
- Chop chocolate and combine with coconut oil in microwave-safe bowl.
- Microwave chocolate in 30-second intervals, stirring between each, until smooth.
- Dip each mint piece into chocolate using a fork, tap off excess, place on parchment-lined sheet.
- Refrigerate for 20 minutes until chocolate sets completely.
- Store in airtight container in refrigerator for up to 2 weeks.