Batch Dessert Bars for Crowds | Feed Everyone
Batch Dessert Bars for Crowds | Feed Everyone
When you’re feeding a crowd, the last thing you want is to spend hours in the kitchen making individual desserts. That’s why I’m sharing my favorite big batch dessert bars perfect for huge crowds, because let’s be honest, one pan of brownies isn’t going to cut it when you’ve got twenty people showing up to your gathering. These recipes are absolute lifesavers for parties, potlucks, and family celebrations.
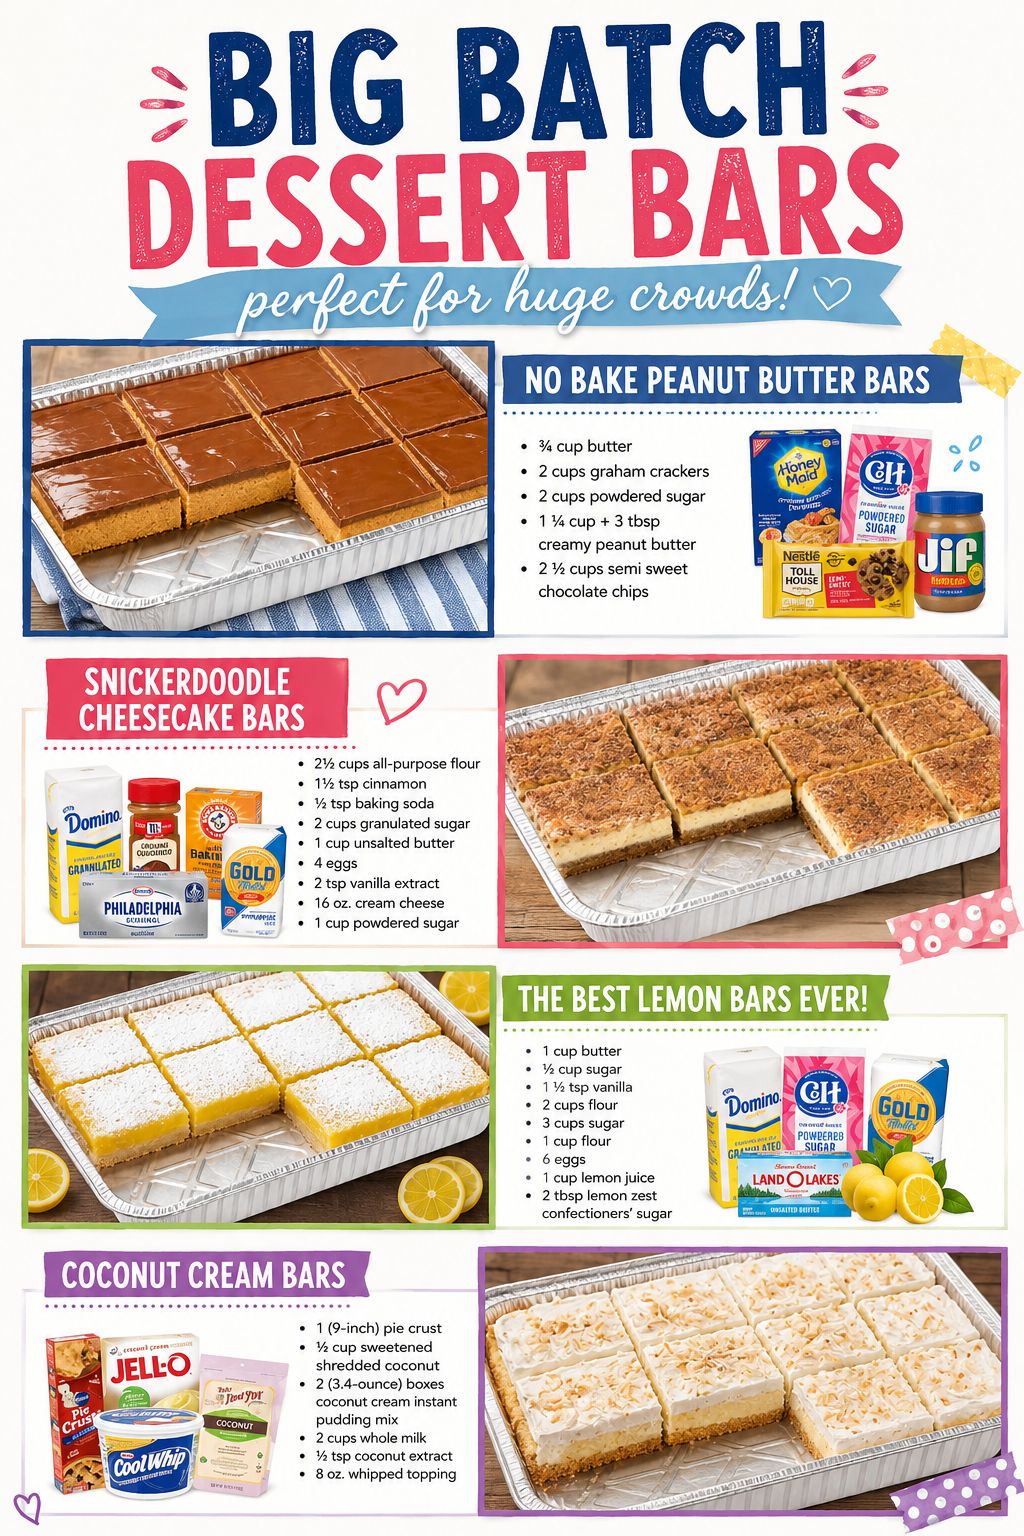
I’ve tested each of these bars over and over because I wanted to make sure they’re not just delicious, but also practical for feeding a lot of people at once. No Bake Peanut Butter Bars, Snickerdoodle Cheesecake Bars, The Best Lemon Bars Ever, and Coconut Cream Bars are the kind of desserts that disappear fast and leave everyone asking for seconds. They’re the perfect balance of impressive-looking and totally manageable to make.
These are the recipes I keep coming back to, and I think you will too. Whether you’re planning a summer barbecue or a holiday party, you’ll want to save these to your collection. Follow me on HaileeRecipes on Pinterest for more crowd-pleasing recipes that actually work in real life.
1. No Bake Peanut Butter Bars
These no-bake peanut butter bars deliver creamy, nutty perfection with a chocolate finish that crowds absolutely love. The combination of rich peanut butter filling and dark chocolate topping creates an irresistible treat with a fudgy texture that melts on your tongue. Since there’s no baking required, you can prepare enormous batches without heating up your kitchen, making them ideal for summer gatherings, potlucks, and outdoor events. They’re simple enough for beginners yet impressive enough to serve at any occasion.
Why You’ll Love It
- No oven needed, so you can make massive quantities without kitchen stress.
- Ready in under 30 minutes plus chilling time, perfect for last-minute entertaining.
- Naturally crowd-pleasing flavor that appeals to both kids and adults.
Ingredients
- 2 cups creamy peanut butter
- 4 tablespoons unsalted butter, softened
- 2 cups powdered sugar
- 1 teaspoon vanilla extract
- 2 cups semi-sweet chocolate chips
- 2 tablespoons coconut oil
- Pinch of sea salt
How To Make It
- Line a 9×13-inch baking pan with parchment paper, allowing edges to overhang for easy removal.
- In a large bowl, combine peanut butter, softened butter, powdered sugar, and vanilla extract. Mix until smooth and well combined.
- Press the peanut butter mixture firmly and evenly into the prepared pan, using the back of a spatula to create a smooth surface.
- Place the pan in the refrigerator for 15 minutes to firm up the base layer.
- Combine chocolate chips and coconut oil in a microwave-safe bowl. Microwave in 30-second intervals, stirring between each, until completely melted and smooth.
- Pour the melted chocolate over the peanut butter layer, spreading it evenly to the edges with an offset spatula.
- Sprinkle with sea salt if desired, then refrigerate for at least 2 hours until the chocolate is completely set.
- Remove from the pan using the parchment paper overhang, cut into squares with a sharp knife, and serve chilled.
Variations And Substitutions
Swap creamy peanut butter for almond or cashew butter for a different flavor profile. Use white chocolate instead of semi-sweet for a sweeter version, or add a layer of caramel between the peanut butter and chocolate. For extra richness, drizzle a thin layer of chocolate over the peanut butter before adding the final chocolate topping. You can also press crushed pretzels or graham crackers into the peanut butter layer for added texture and crunch.
Make-Ahead, Storage, And Serving Tips
These bars can be made up to 3 days ahead and stored in an airtight container in the refrigerator, making them perfect for advance party prep. Keep them chilled until serving, as they soften at room temperature. For easier cutting, dip your knife in hot water and wipe it clean between cuts. If the chocolate cracks when cutting, let the bars sit at room temperature for 5 minutes before trying again. You can also freeze them for up to 2 weeks for even longer storage.
2. Snickerdoodle Cheesecake Bars
These Snickerdoodle Cheesecake Bars combine the beloved warmth of cinnamon-sugar snickerdoodles with creamy cheesecake filling, creating an irresistible treat that feeds a crowd. The buttery shortbread base supports a smooth cheesecake layer topped with cinnamon-sugar crumble, delivering both textural contrast and comforting flavor. Perfect for potlucks, holiday gatherings, or any occasion where you need to impress dozens of people, these bars are elegant enough for special events yet simple enough for weeknight baking.
Why You’ll Love It
- One 9×13 pan yields 24 bars, making it ideal for feeding large groups without multiple batches.
- Combines two crowd-favorite flavors in one dessert, appealing to both cheesecake and cookie lovers.
- Can be made a day ahead, reducing day-of stress and allowing flavors to meld beautifully.
Ingredients
- 2 cups all-purpose flour
- 1 cup butter, softened
- 3/4 cup granulated sugar
- 32 ounces cream cheese, softened
- 1 cup sour cream
- 3 large eggs
- 2 tablespoons ground cinnamon
- 1/2 cup brown sugar
How To Make It
- Preheat your oven to 350°F and line a 9×13 inch baking pan with parchment paper, leaving slight overhang for easy removal.
- Mix flour, softened butter, and 3/4 cup granulated sugar until crumbly, then press firmly into the prepared pan as your base layer. Bake for 10 minutes until lightly golden.
- Beat softened cream cheese until smooth, then add sour cream and mix until combined. Add eggs one at a time, beating on low speed after each addition until just combined.
- Pour the cheesecake mixture over the warm crust, spreading evenly to all edges.
- In a small bowl, combine cinnamon and brown sugar. Sprinkle this mixture generously over the cheesecake layer.
- Bake for 25-30 minutes until the cheesecake is set but still slightly jiggly in the center. The top should look dry.
- Cool completely in the pan on a wire rack, then refrigerate for at least 4 hours or overnight before cutting into squares.
Variations And Substitutions
Swap the sour cream for Greek yogurt for a tangier flavor and slightly denser texture. Add 1 teaspoon vanilla extract to the cheesecake filling for extra depth. For a nuttier version, sprinkle chopped pecans or walnuts over the cinnamon-sugar topping before baking. You can also substitute graham cracker crumbs mixed with melted butter for the shortbread base if preferred.
Make-Ahead, Storage, And Serving Tips
Prepare these bars up to two days in advance, keeping them covered in the refrigerator. They actually taste better after sitting overnight as the flavors develop. Store in an airtight container for up to five days. For longer storage, freeze unbaked bars after assembling, then bake directly from frozen, adding 5-10 minutes to baking time. Serve chilled or at room temperature, and cut with a hot, wet knife wiped clean between cuts for neat squares.
3. The Best Lemon Bars Ever!
These bright and tangy lemon bars deliver that perfect balance of sweet and tart with a buttery shortbread crust and a silky custard-like filling. The combination of fresh lemon juice and zest creates an intense citrus flavor that’s refreshing without being overwhelming. With a tender crumb and smooth topping, these bars are ideal for feeding a crowd at potlucks, picnics, or summer gatherings. They’re simple enough for beginners yet impressive enough to earn compliments, making them a reliable choice when you need a make-ahead dessert that actually tastes homemade.
Why You’ll Love It
- One 9×13 pan feeds 12-16 people, making it perfect for large groups without complicated scaling.
- Bright, refreshing lemon flavor cuts through rich dessert fatigue and pairs well with coffee or tea.
- Can be assembled the night before and baked the morning of your event, saving last-minute stress.
Ingredients
- 2 cups all-purpose flour
- 1/2 cup powdered sugar
- 1 cup cold butter, cubed
- 4 large eggs
- 1 3/4 cups granulated sugar
- 1/4 cup all-purpose flour
- 1/2 cup fresh lemon juice
- 2 tablespoons lemon zest
- 1/4 teaspoon salt
- Powdered sugar for dusting
How To Make It
- Preheat your oven to 350°F and line a 9×13-inch baking pan with parchment paper, leaving slight overhang on two sides for easy removal.
- Make the crust by combining 2 cups flour and 1/2 cup powdered sugar in a bowl, then cut in the cold cubed butter until the mixture resembles coarse crumbs. Press firmly into the prepared pan and bake for 12-15 minutes until light golden.
- While the crust bakes, whisk together the eggs and granulated sugar in a large bowl until well combined and pale, about 2 minutes.
- Stir in the 1/4 cup flour, fresh lemon juice, lemon zest, and salt until smooth, making sure no flour lumps remain.
- Pour the lemon filling over the warm crust and return the pan to the oven for 20-25 minutes, until the filling is set but still slightly jiggly in the very center.
- Remove from the oven and let cool completely on a wire rack, about 2 hours, before refrigerating for at least 1 hour.
- Once chilled, lift the bars out using the parchment overhang and cut into 12-16 squares with a sharp knife, wiping the blade between cuts for clean edges.
- Dust generously with powdered sugar just before serving for a fresh, finished look.
Variations And Substitutions
For a deeper flavor, use Meyer lemons or substitute half the lemon juice with lime juice for a tropical twist. If you prefer less tartness, reduce the lemon juice to 1/3 cup and increase the granulated sugar to 2 cups. You can also swap the butter crust for a graham cracker crust by combining 2 cups graham cracker crumbs with 1/2 cup melted butter and 2 tablespoons sugar. For a dairy-free version, use coconut oil in the crust and the filling remains the same.
Make-Ahead, Storage, And Serving Tips
Prepare the crust and filling the night before, then bake fresh the morning of your event. Store cooled bars in an airtight container in the refrigerator for up to 5 days, or freeze unwrapped bars on a baking sheet and transfer to a freezer bag for up to 3 months. Dust with powdered sugar just before serving to prevent it from dissolving into the filling. If your bars seem too soft when cutting, chill them for another 30 minutes. For transport to gatherings, keep them in the pan covered with foil and cut on-site for the neatest presentation.
4. Coconut Cream Bars
These coconut cream bars deliver tropical indulgence with a buttery shortbread base, creamy coconut filling, and a toasted coconut topping that adds wonderful texture and depth. The combination of sweet, chewy, and crispy layers makes them irresistible at any gathering. Perfect for potlucks and celebrations, these bars stay fresh for days and actually taste better as flavors meld. Their make-ahead nature and crowd-pleasing appeal make them ideal for feeding large groups without last-minute stress.
Why You’ll Love It
- Three-layer construction creates complex flavor and texture that keeps people coming back for more.
- Bakes in one large pan, making it simple to transport and serve to crowds.
- Naturally gluten-free option available, accommodating various dietary needs at your event.
Ingredients
- 2 cups all-purpose flour
- 1 cup unsalted butter, softened
- 1/2 cup granulated sugar
- 1 teaspoon vanilla extract
- 1 can (14 ounces) sweetened condensed milk
- 2 cups shredded coconut, divided
- 2 large eggs
- 1/4 teaspoon salt
How To Make It
- Preheat your oven to 350°F and line a 9×13-inch baking pan with parchment paper for easy removal.
- Mix together flour, softened butter, half the sugar, and vanilla until the mixture resembles coarse crumbs, then press firmly into the prepared pan.
- Bake the crust for 12 to 15 minutes until light golden, then remove and let cool slightly.
- Whisk together sweetened condensed milk, eggs, remaining sugar, salt, and 1.5 cups of the shredded coconut until well combined.
- Pour the coconut mixture evenly over the cooled crust and spread to the edges.
- Sprinkle the remaining 1/2 cup of coconut over the top, pressing gently so it adheres.
- Bake for 25 to 30 minutes until the filling is set and the top is golden brown.
- Cool completely in the pan before cutting into squares and serving.
Variations And Substitutions
Toast the coconut topping in a dry skillet before sprinkling for deeper flavor. Add 1 teaspoon of almond extract to the filling for complexity. Substitute half the shredded coconut with chopped macadamia nuts or white chocolate chips. For a darker crust, use brown butter instead of regular butter. A splash of coconut extract in the filling intensifies the tropical notes.
Make-Ahead, Storage, And Serving Tips
Prepare the crust up to two days ahead and store covered at room temperature. The fully baked bars keep in an airtight container for five days and actually improve as flavors develop. Freeze uncut bars for up to three months; thaw at room temperature before serving. Cut into 24 to 32 squares depending on desired size. For transport, leave bars in the pan and cover with foil, or individually wrap squares. Serve at room temperature for the best texture and flavor.
Final Thoughts
Whether you’re hosting a backyard barbecue, planning a bake sale, or bringing treats to a community event, these big batch dessert bars are your secret weapon for feeding a crowd without spending all day in the kitchen. Each recipe scales beautifully and comes together with straightforward ingredients you likely already have on hand. The beauty of bar desserts is that they’re forgiving, impressive, and genuinely delicious—no fancy piping skills required.
Pick one recipe that speaks to you and give it a try this weekend. Start with a classic like brownies or lemon bars if you want something foolproof, or go bold with a flavor combination that excites you. Once you nail your go-to recipe, you’ll have a reliable crowd-pleaser ready whenever you need to serve a group. Your guests will be asking for the recipe, and you’ll love having a simple solution that always delivers.
No Bake Peanut Butter Bars
Ingredients
Method
- Line an 8x8 inch baking pan with parchment paper.
- In a large bowl, combine graham cracker crumbs, peanut butter, powdered sugar, melted butter, vanilla extract, and salt. Mix until well combined.
- Press the mixture firmly into the prepared pan, creating an even layer.
- In a microwave-safe bowl, combine chocolate chips and coconut oil. Microwave in 30-second intervals, stirring between each, until melted and smooth.
- Pour the melted chocolate over the peanut butter layer and spread evenly to the edges.
- Refrigerate for at least 15 minutes until the chocolate is set.
- Cut into 16 equal squares and serve chilled.