Icebox Cake Recipes That’ll Make You Swoon
Icebox Cake Recipes That'll Make You Swoon
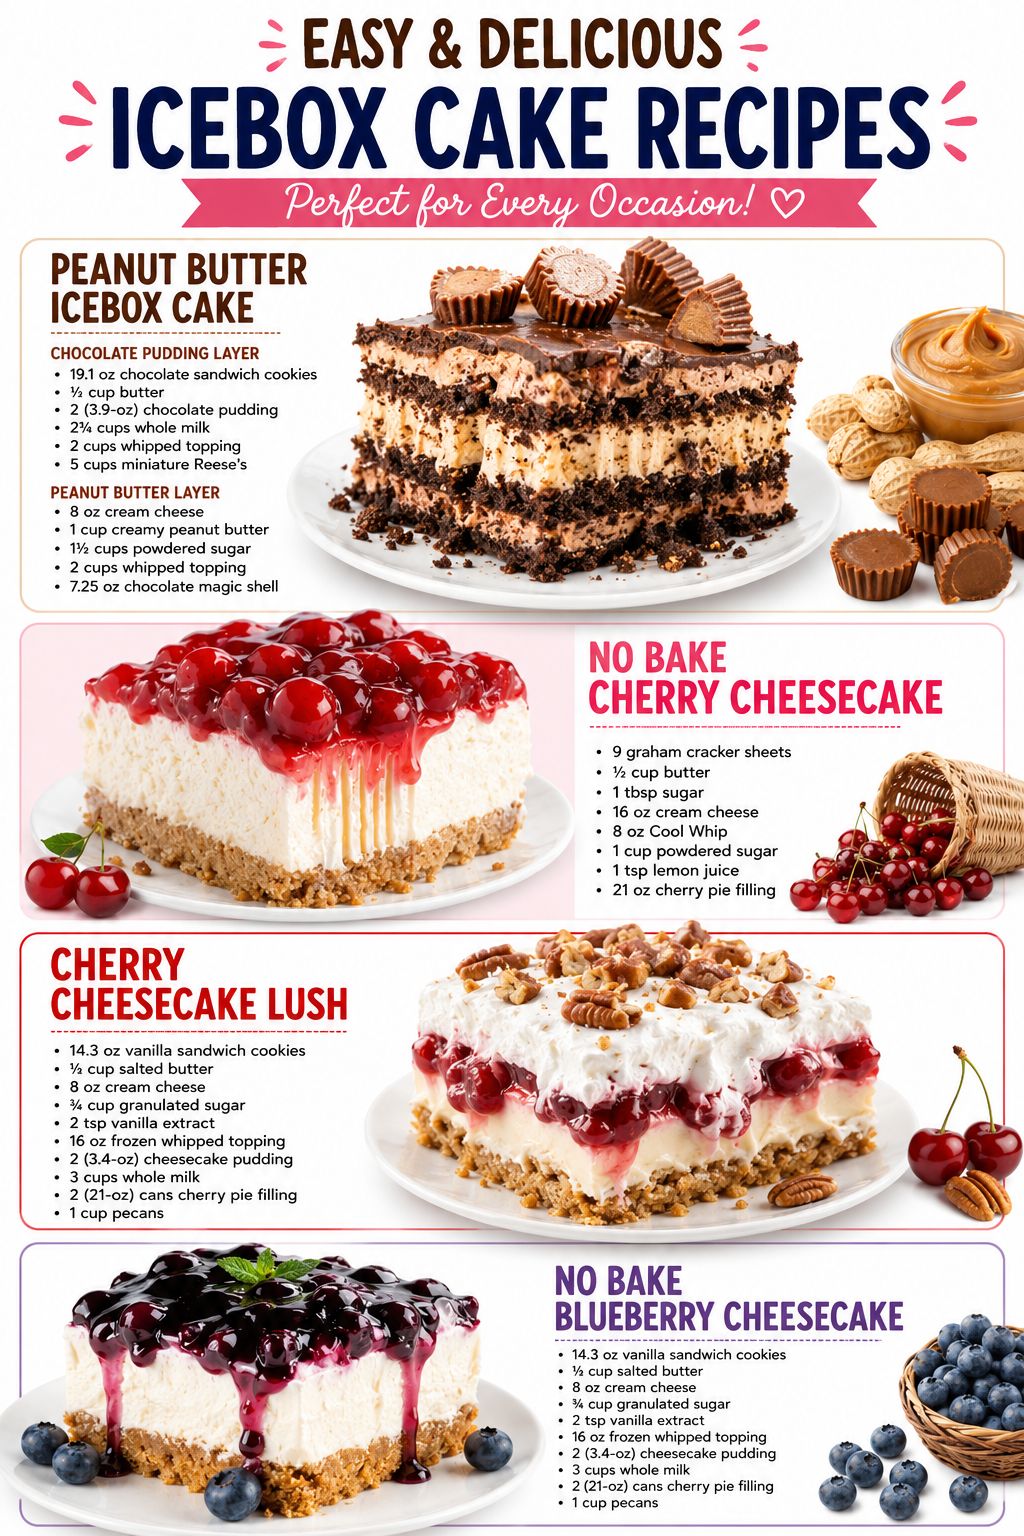
There’s something magical about icebox cakes, isn’t there? They’re the kind of desserts that look fancy enough to impress your dinner guests, but they’re actually so easy to make that you’ll find yourself whipping them up on a regular Tuesday. I’ve rounded up my favorite easy and delicious icebox cake recipes because I know how much you love desserts that don’t require turning on the oven. These are the recipes I make again and again, and I have a feeling they’re going to become your go-to favorites too.
What I love most about icebox cakes is that they’re perfect for meal planning. You can make them the day before, pop them in the fridge, and have a stunning dessert ready whenever you need it. Whether you’re hosting a summer gathering or just craving something cool and creamy on a hot day, these recipes deliver every single time. Plus, most of them come together in about 15 minutes of actual work, which means more time for you to enjoy your day.
I’ve gathered four of my absolute favorite icebox cake recipes here, including a show-stopping peanut butter version and three different takes on no-bake cheesecake that will have everyone asking for your secret. These are the recipes worth saving and making over and over. If you love easy dessert ideas like these, Follow me on HaileeRecipes on Pinterest where I’m always sharing new recipes and kitchen inspiration.
1. Peanut Butter Icebox Cake
This creamy peanut butter icebox cake is a no-bake dream that combines layers of chocolate graham crackers with a luscious peanut butter filling and whipped cream topping. The rich, nutty flavor pairs beautifully with the subtle chocolate notes, creating a dessert that’s both indulgent and refreshingly light. The texture is perfectly smooth and spoonable, making it ideal for warm weather entertaining or whenever you want dessert without turning on the oven. This cake works wonderfully because the flavors meld together as it chills, and it’s forgiving enough for beginner bakers.
Why You’ll Love It
- Completely no-bake, requiring no oven time or baking skills whatsoever.
- Ready to serve in just four hours of chilling, perfect for last-minute entertaining.
- Uses simple pantry staples like peanut butter, graham crackers, and cream cheese that most home cooks already have on hand.
Ingredients
- 2 cups heavy whipping cream
- 1 cup creamy peanut butter
- 8 ounces cream cheese, softened
- 1 cup powdered sugar
- 1 teaspoon vanilla extract
- 16 chocolate graham crackers
- 3 tablespoons unsalted butter, melted
- 2 tablespoons cocoa powder for topping
How To Make It
- Line an 8-by-8-inch baking dish with parchment paper, leaving some overhang on the sides for easy removal later.
- Whip the heavy cream to stiff peaks using an electric mixer, then transfer to a separate bowl and set aside.
- In the same mixer bowl, beat together the softened cream cheese and peanut butter until smooth and well combined, about two minutes.
- Add the powdered sugar and vanilla extract to the peanut butter mixture and beat until fluffy and light, about three minutes total.
- Gently fold the whipped cream into the peanut butter mixture in two additions, being careful not to deflate the cream.
- Spread a thin layer of the peanut butter filling on the bottom of the prepared baking dish, then arrange eight graham crackers on top in a single layer.
- Spread half of the remaining peanut butter filling over the crackers, then add another layer of eight graham crackers followed by the remaining filling.
- Cover with plastic wrap and refrigerate for at least four hours or overnight until the graham crackers have softened and the layers have set together.
Variations And Substitutions
For a chocolate twist, replace half the peanut butter with chocolate peanut butter spread. You can also use vanilla wafers or digestive biscuits instead of graham crackers for different flavors. If you prefer less sweetness, reduce the powdered sugar to three-quarters cup. For a salted caramel variation, drizzle salted caramel sauce between the layers. Those with peanut allergies can substitute the peanut butter with almond butter or sunflower seed butter in equal amounts.
Make-Ahead, Storage, And Serving Tips
This cake actually improves when made a day ahead, as the flavors deepen and the texture becomes more cohesive. Store it covered in the refrigerator for up to five days. You can assemble it up to two days in advance without any issues. For serving, use a sharp knife dipped in hot water and wiped clean between cuts for neat slices. If the cake becomes too soft, simply refrigerate for thirty minutes before serving. You can also freeze the assembled cake for up to three months; thaw in the refrigerator overnight before serving.
2. No Bake Cherry Cheesecake
This elegant no-bake cherry cheesecake combines creamy, tangy cheesecake filling with sweet-tart cherry topping for a dessert that tastes like you spent hours in the kitchen. The graham cracker crust provides satisfying crunch against the smooth, cloud-like filling, while the cherry layer adds gorgeous color and fruity flavor. Serve this chilled beauty at summer dinner parties, potlucks, or whenever you want an impressive dessert without turning on the oven. It’s the perfect make-ahead option because it actually tastes better after a night in the refrigerator.
Why You’ll Love It
- Completely no-bake and requires just 20 minutes of hands-on time.
- Rich, creamy cheesecake texture rivals traditional baked versions.
- Beautiful presentation with vibrant cherry topping that impresses guests.
Ingredients
- 1 1/2 cups graham cracker crumbs
- 6 tablespoons melted butter
- 3 tablespoons sugar
- 16 ounces cream cheese, softened
- 1/2 cup powdered sugar
- 1 teaspoon vanilla extract
- 1 1/2 cups heavy whipping cream
- 1 can (21 ounces) cherry pie filling
How To Make It
- Mix graham cracker crumbs, melted butter, and sugar in a bowl until the texture resembles wet sand. Press firmly into the bottom of a 9-inch springform pan and refrigerate while preparing the filling.
- In a large bowl, beat softened cream cheese, powdered sugar, and vanilla extract with an electric mixer until smooth and fluffy, about 2 minutes.
- In a separate bowl, whip the heavy cream to stiff peaks using clean beaters.
- Gently fold the whipped cream into the cream cheese mixture in two additions, being careful not to deflate the whipped cream.
- Spread the cheesecake filling evenly over the prepared crust, smoothing the top with a spatula.
- Pour the cherry pie filling over the cheesecake layer and spread gently to cover.
- Refrigerate for at least 8 hours or overnight until the cake is completely set and chilled.
- Remove the springform pan sides just before serving for the best presentation.
Variations And Substitutions
Swap the cherry topping for blueberry, strawberry, or mixed berry pie filling depending on your preference. Use digestive biscuits or vanilla wafers instead of graham crackers for a different crust flavor. For a lighter version, replace half the heavy cream with Greek yogurt. Add a tablespoon of lemon zest to the cheesecake filling for brightness, or stir in a teaspoon of almond extract for a subtle flavor twist.
Make-Ahead, Storage, And Serving Tips
This dessert is best made one day ahead, allowing flavors to meld and the texture to set perfectly. Store covered in the refrigerator for up to 4 days. For longer storage, freeze the cake without the cherry topping for up to 2 months, then add fresh or canned cherries after thawing. If the filling seems too soft, ensure your cream cheese was fully softened before mixing. Serve slices with a warm knife dipped in hot water for clean cuts.
3. Cherry Cheesecake Lush
This elegant Cherry Cheesecake Lush combines creamy cheesecake layers with tart cherry filling and a buttery graham cracker crust, all chilled to perfection without baking. The result is a light, refreshing dessert with complex flavors that feels restaurant-worthy yet requires minimal effort. Its no-bake nature makes it ideal for hot summer days or when you want to skip the oven. The contrast between smooth cheesecake, fruity cherries, and crispy crust creates a dessert that impresses guests while being surprisingly simple to assemble.
Why You’ll Love It
- No oven required, making it perfect for warm weather entertaining and keeping your kitchen cool.
- Combines classic cheesecake and cherry pie flavors in one stunning layered dessert.
- Can be made entirely the day before, eliminating last-minute stress for gatherings.
Ingredients
- 2 cups graham cracker crumbs
- 6 tablespoons melted butter
- 3 tablespoons sugar
- 16 ounces cream cheese, softened
- 1 cup heavy whipping cream
- 1/2 cup powdered sugar
- 1 teaspoon vanilla extract
- 21 ounces cherry pie filling
- 2 tablespoons lemon juice
How To Make It
- Mix graham cracker crumbs, melted butter, and 3 tablespoons sugar in a bowl until the texture resembles wet sand. Press firmly into the bottom of a 9-by-13-inch dish, creating an even layer. Refrigerate while preparing remaining layers.
- In a large bowl, beat softened cream cheese for 2 minutes until smooth and creamy, scraping down the sides as needed.
- In a separate bowl, whip heavy cream with powdered sugar and vanilla extract until stiff peaks form, about 3 minutes.
- Gently fold the whipped cream into the cream cheese in two additions, stirring until no white streaks remain. Spread this mixture evenly over the cooled crust.
- Stir the cherry pie filling with lemon juice to brighten the flavor, then spread evenly over the cheesecake layer.
- Cover the dish with plastic wrap and refrigerate for at least 4 hours, preferably overnight, allowing the flavors to meld and the texture to set properly.
- Cut into squares and serve chilled, optionally topping individual portions with a dollop of whipped cream or a sprinkle of graham cracker crumbs for added texture.
Variations And Substitutions
Swap cherry pie filling with blueberry, strawberry, or blackberry versions for different flavor profiles. For a more decadent version, add 2 tablespoons of cherry liqueur to the cream cheese mixture. Use digestive biscuits or vanilla wafer crumbs instead of graham crackers for a different crust flavor. Create a chocolate variation by mixing 2 tablespoons cocoa powder into the cheesecake layer, then top with cherry filling as usual.
Make-Ahead, Storage, And Serving Tips
This dessert is ideal for make-ahead preparation and tastes even better the next day once flavors have melded. Store covered in the refrigerator for up to 3 days. For longer storage, freeze for up to 2 months; thaw overnight in the refrigerator before serving. Serve directly from the refrigerator for the best texture. If the cheesecake layer seems too soft after spreading, chill for 30 minutes before adding the cherry topping to prevent layers from mixing.
4. No Bake Blueberry Cheesecake
This creamy no-bake blueberry cheesecake combines the best of both worlds: the rich, tangy flavor of classic cheesecake with the refreshing brightness of fresh blueberries. The graham cracker crust provides a satisfying crunch, while layers of whipped cream and blueberry filling create a light, airy texture that melts on your tongue. Perfect for summer gatherings or whenever you want an elegant dessert without turning on the oven, this icebox cake delivers restaurant-quality results with minimal effort. It’s ideal for busy home cooks who want to impress guests without spending hours in the kitchen.
Why You’ll Love It
- No oven required—just mix, layer, and refrigerate for an impressive dessert.
- The combination of creamy cheesecake and tart blueberries creates a perfectly balanced flavor profile.
- Make it up to two days ahead, making it perfect for stress-free entertaining.
Ingredients
- 2 cups graham cracker crumbs
- 6 tablespoons melted butter
- 16 ounces cream cheese, softened
- 1/2 cup powdered sugar
- 1 teaspoon vanilla extract
- 2 cups heavy whipping cream
- 2 cups fresh blueberries
- 1/4 cup blueberry jam or preserves
- 2 tablespoons lemon juice
How To Make It
- Combine graham cracker crumbs with melted butter and press firmly into the bottom of a 9-inch springform pan. Refrigerate while preparing the filling.
- Beat softened cream cheese, powdered sugar, and vanilla extract together until smooth and fluffy, about 2 minutes.
- In a separate bowl, whip heavy cream to stiff peaks, then gently fold into the cream cheese mixture in two batches until no streaks remain.
- Spread half of the cream cheese mixture evenly over the crust, then layer with half of the fresh blueberries.
- Top with the remaining cream cheese mixture, smoothing the surface with a spatula.
- Warm the blueberry jam with lemon juice and drizzle over the top, then scatter remaining fresh blueberries on the surface.
- Cover with plastic wrap and refrigerate for at least 6 hours, preferably overnight, until the cake is set and chilled through.
Variations And Substitutions
Swap fresh blueberries for blackberries, raspberries, or a mixed berry combination for different flavor profiles. Replace the blueberry jam with raspberry or strawberry jam if preferred. For a lighter version, use Greek yogurt for half the cream cheese. Add a tablespoon of lemon zest to the cream cheese mixture for extra brightness, or drizzle with a simple blueberry compote instead of jam.
Make-Ahead, Storage, And Serving Tips
Prepare this dessert up to 2 days in advance and keep it covered in the refrigerator. The crust can be made and pressed into the pan the morning of serving. Store leftovers in an airtight container for up to 3 days. Remove from the refrigerator 10 minutes before serving for the best texture and flavor. For easy slicing, dip your knife in hot water and wipe between cuts. This dessert does not freeze well due to the whipped cream texture, so enjoy it fresh.
Final Thoughts
Icebox cakes are the perfect solution when you want something impressive but don’t have hours to spend in the kitchen. Whether you’re drawn to the classic chocolate and vanilla combination, the fruity freshness of a berry version, or something more adventurous like the coffee-flavored option, there’s a recipe here that will become your new favorite. The beauty of these desserts is that they do most of the work for you while chilling in the refrigerator, leaving you free to focus on other things.
We encourage you to pick one recipe that speaks to you and give it a try this week. You might be surprised at how simple it is to create a dessert that tastes like it came straight from a bakery. Your family and friends will be impressed, and you’ll have discovered an easy go-to dessert that you can make again and again for any occasion.
Peanut Butter Icebox Cake
Ingredients
Method
- In a large mixing bowl, whip heavy cream until soft peaks form.
- In another bowl, whisk together peanut butter, powdered sugar, vanilla extract, and salt until smooth.
- Gently fold the peanut butter mixture into the whipped cream until fully combined.
- Arrange a single layer of vanilla wafers on the bottom of an 8x8-inch baking dish.
- Spread half of the peanut butter cream mixture over the wafers.
- Add another layer of vanilla wafers, then top with remaining peanut butter cream.
- Finish with a final layer of vanilla wafers on top.
- Refrigerate for at least 6 hours or overnight, then drizzle with melted chocolate syrup before serving.