Easy Icebox Cake Recipes | No-Bake Desserts
Easy Icebox Cake Recipes | No-Bake Desserts
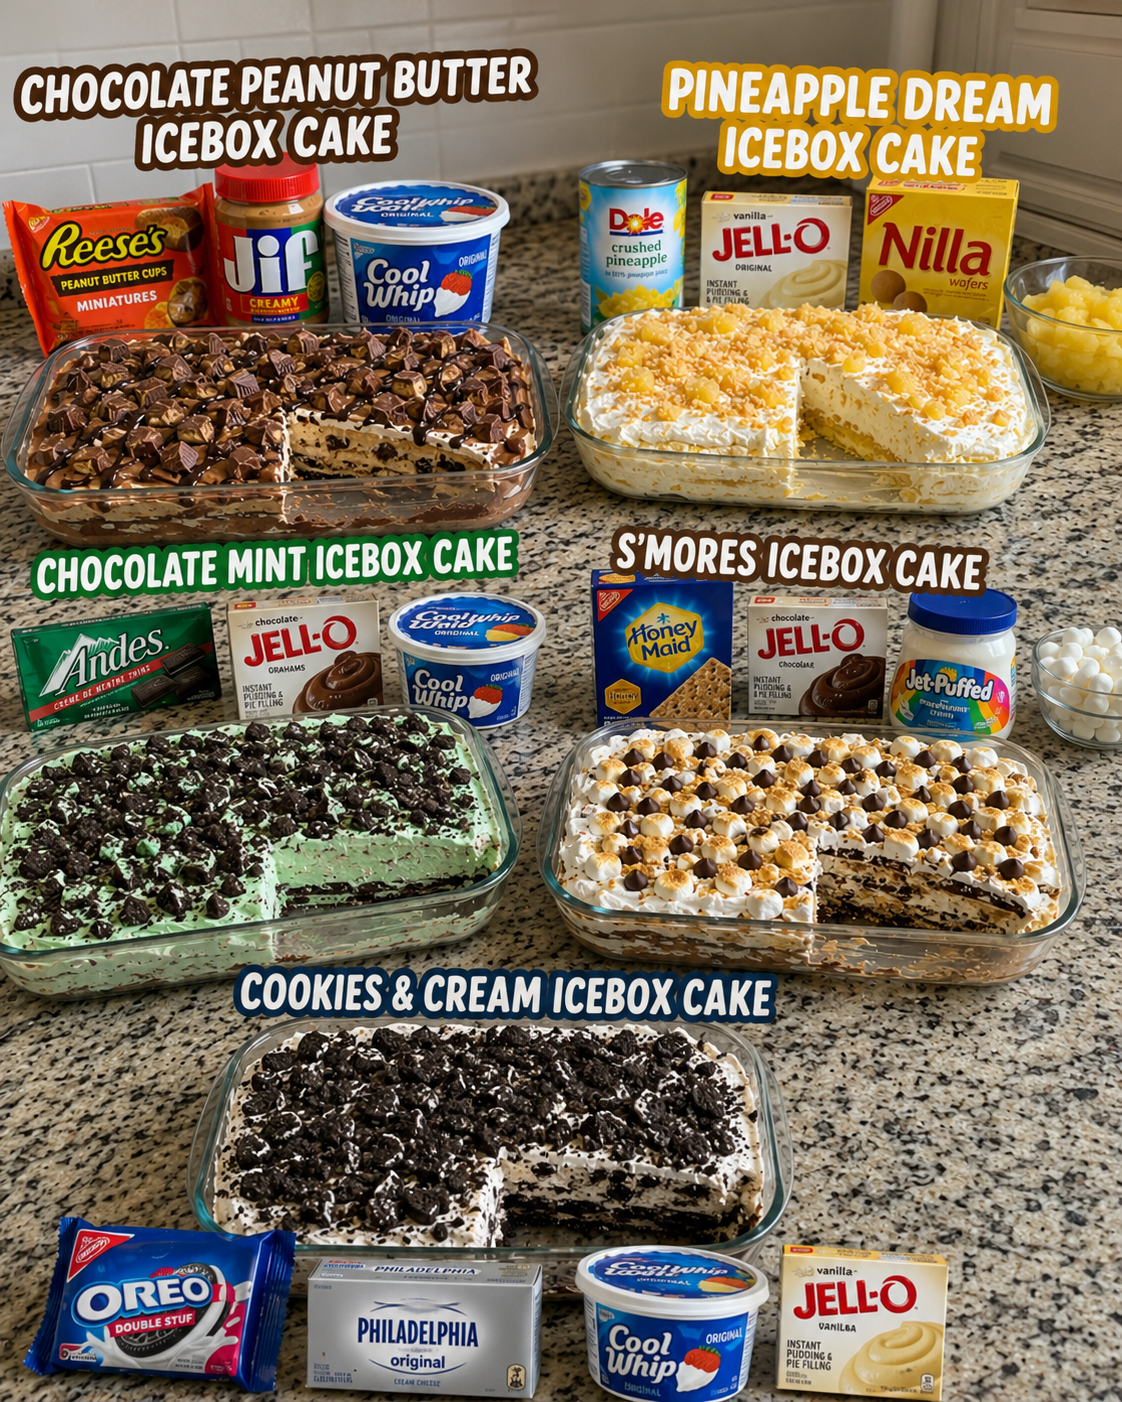
I’m so excited to share my collection of easy icebox cake recipes with you because, honestly, these are the desserts that have saved me time and time again. There’s something magical about icebox cakes—they require minimal baking skills, come together in under 30 minutes of hands-on time, and taste like you spent hours in the kitchen. Whether you’re planning a summer dinner party or just craving something sweet and cold, these five recipes are absolute game-changers.
What I love most about these icebox cakes is that they do all the heavy lifting for you while they chill overnight. You layer, you refrigerate, and you wake up to a perfectly set, restaurant-quality dessert. I’ve included flavors for every craving—from the classic combination of chocolate and peanut butter to a tropical pineapple dream, a refreshing chocolate mint option, nostalgic s’mores vibes, and the crowd-pleasing cookies and cream. Each one is foolproof and absolutely delicious.
These recipes are definitely worth saving because they’re the kind of desserts you’ll make over and over again, especially when life gets busy. If you’re looking for more easy dessert inspiration, Follow me on HaileeRecipes on Pinterest where I’m constantly pinning new ideas and sharing my favorites. Now let’s dive into these five incredible icebox cake recipes that are about to become your new go-to desserts.
1. Chocolate Peanut Butter Icebox Cake
This Chocolate Peanut Butter Icebox Cake is a no-bake dream that combines rich chocolate layers with creamy peanut butter filling for an irresistible dessert. The combination of cool, smooth textures and bold flavors makes it perfect for warm weather entertaining or whenever you want something special without turning on the oven. The cake softens beautifully as it chills, allowing the graham crackers to absorb moisture and create a cake-like consistency that’s both indulgent and surprisingly light. It’s ideal for dinner parties, potlucks, or simply satisfying chocolate and peanut butter cravings.
Why You’ll Love It
- Requires no baking, making it perfect for hot days or busy schedules
- Comes together in under 20 minutes of hands-on time
- Can be prepared up to 24 hours ahead, reducing last-minute stress
Ingredients
- 2 cups heavy whipping cream
- 1 cup creamy peanut butter
- 1 cup powdered sugar
- 1 teaspoon vanilla extract
- 1 cup chocolate frosting or ganache
- 20 graham cracker rectangles
- 1/4 cup milk or coffee
- Chocolate chips or shavings for topping
How To Make It
- Whip the heavy cream until stiff peaks form, then gently fold in peanut butter, powdered sugar, and vanilla until fully combined and fluffy.
- Mix the milk or coffee with a splash of vanilla in a shallow dish for dipping.
- Quickly dip each graham cracker into the milk mixture for just one second per side to avoid sogginess.
- Layer four dipped crackers in the bottom of a 9×13-inch dish, then spread a thin layer of peanut butter cream over them.
- Repeat layering crackers and peanut butter cream, ending with a cracker layer on top.
- Spread chocolate frosting or ganache evenly over the top layer.
- Refrigerate for at least 8 hours, preferably overnight, until the cake is set and the crackers have softened.
- Top with chocolate chips or shavings just before serving, and slice into squares with a sharp knife dipped in hot water.
Variations And Substitutions
Replace the chocolate frosting with a peanut butter frosting for an extra-rich version, or use a thin layer of melted dark chocolate mixed with butter. Swap the graham crackers for vanilla wafers or digestive biscuits for different textures. For a lighter option, use whipped coconut cream instead of heavy cream, or add a tablespoon of cocoa powder to the peanut butter filling for deeper chocolate flavor without the frosting layer.
Make-Ahead, Storage, And Serving Tips
Prepare this cake up to 24 hours in advance and store it covered in the refrigerator. It actually tastes better the next day as flavors meld and the texture becomes more cake-like. Keep it chilled until serving, as the peanut butter cream softens at room temperature. Leftovers keep well for up to three days refrigerated. For cleaner slices, dip your knife in hot water and wipe it clean between cuts. If the cake becomes too firm, let it sit at room temperature for 10 minutes before slicing.
2. Pineapple Dream Icebox Cake
This tropical-inspired icebox cake combines layers of creamy vanilla pudding, crushed pineapple, and buttery graham crackers for a refreshing dessert that tastes like a vacation in every bite. The pineapple juice soaks into the crackers, creating a tender texture while the fluffy whipped cream keeps everything light and airy. With its bright, fruity flavor and no-bake convenience, this cake is perfect for summer gatherings, potlucks, or whenever you want an impressive dessert without turning on the oven. It’s an ideal make-ahead option since the flavors actually improve as it sits in the refrigerator.
Why You’ll Love It
- Completely no-bake and requires minimal active cooking time.
- The tropical pineapple flavor feels fancy but uses simple, pantry-friendly ingredients.
- Perfect for feeding a crowd since it serves 8-10 people and can be made a day ahead.
Ingredients
- 2 cups heavy whipping cream
- 1 package vanilla instant pudding mix
- 2 cups whole milk
- 1 can crushed pineapple with juice, about 20 ounces
- 3 tablespoons granulated sugar
- 24 full-size graham crackers
- 4 tablespoons unsalted butter, melted
- 1/4 teaspoon vanilla extract
How To Make It
- Prepare a 9×13-inch baking dish by lining the bottom with a layer of graham crackers, breaking them as needed to fit snugly.
- Whisk the vanilla pudding mix with the milk until smooth and slightly thickened, about 2 minutes, then gently fold in the crushed pineapple with its juice.
- In a separate bowl, whip the heavy cream with sugar and vanilla extract until stiff peaks form.
- Fold half of the whipped cream into the pudding mixture until just combined, then fold in the remaining whipped cream to create a light, fluffy filling.
- Spread half of the pudding mixture over the graham cracker layer in the baking dish.
- Add another layer of graham crackers on top of the pudding, pressing gently to help them absorb the moisture.
- Top with the remaining pudding mixture and finish with a final layer of graham crackers.
- Cover with plastic wrap and refrigerate for at least 8 hours, preferably overnight, until the graham crackers soften and the flavors meld together.
Variations And Substitutions
For a coconut twist, add one-half cup of shredded coconut to the whipped cream mixture. You can substitute the crushed pineapple with canned peaches, mandarin oranges, or even a combination of tropical fruits for different flavor profiles. If you prefer a less sweet cake, use sugar-free pudding mix and reduce the sugar in the whipped cream to two tablespoons. For added crunch, mix melted butter with crushed graham crackers and sprinkle it between layers or on top before serving.
Make-Ahead, Storage, And Serving Tips
This cake actually tastes better when made a full day ahead, making it ideal for meal planning. Store it covered in the refrigerator for up to three days. Do not freeze, as the texture will become watery when thawed. If the top layer of crackers becomes too soft before serving, you can add a fresh layer of graham crackers just before presenting. Serve cold directly from the refrigerator, and cut with a sharp knife dipped in hot water between each slice for clean cuts.
3. Chocolate Mint Icebox Cake
This Chocolate Mint Icebox Cake combines cool, creamy layers with the timeless pairing of dark chocolate and refreshing mint. The dessert features a simple no-bake construction with chocolate wafer cookies, whipped cream, and chocolate ganache creating a sophisticated treat that looks impressive but requires minimal effort. The texture becomes perfectly fudgy as it chills overnight, making it ideal for dinner parties, summer gatherings, or whenever you need an elegant dessert without oven time. It’s the perfect balance of indulgence and refreshment.
Why You’ll Love It
- No baking required, just simple layering and chilling for an elegant result.
- The mint-chocolate flavor combination feels restaurant-quality but tastes homemade.
- Makes ahead beautifully, reducing stress when entertaining guests.
Ingredients
- 1 box chocolate wafer cookies
- 2 cups heavy whipping cream
- 3 tablespoons powdered sugar
- 1 teaspoon peppermint extract
- 6 ounces semi-sweet chocolate, chopped
- 1 cup heavy cream for ganache
- 2 tablespoons butter
- Fresh mint leaves for garnish
How To Make It
- Prepare a 9-inch springform pan by lining the bottom with parchment paper and arranging chocolate wafer cookies in a single layer to cover the base.
- In a chilled bowl, whip 2 cups heavy cream with powdered sugar and peppermint extract until stiff peaks form, creating a mint-flavored whipped cream.
- Spread a thin layer of mint whipped cream over the cookie base, then arrange another layer of cookies on top, pressing gently.
- Continue alternating layers of mint whipped cream and cookies, ending with cookies on top, until the pan is full.
- Heat 1 cup heavy cream until steaming, then pour over chopped chocolate and butter in a bowl, letting it sit for 1 minute before stirring until smooth for the ganache.
- Pour the warm chocolate ganache over the top layer of cookies, spreading evenly to the edges.
- Refrigerate uncovered for 30 minutes until the ganache sets, then cover with plastic wrap.
- Chill for at least 8 hours or overnight before serving, garnishing with fresh mint leaves.
Variations And Substitutions
For a stronger mint flavor, increase the peppermint extract to 1.5 teaspoons or add a few drops of mint food coloring to the whipped cream for visual impact. Substitute the chocolate wafer cookies with crushed Oreos or chocolate graham crackers for different textures. If you prefer white chocolate, replace the semi-sweet chocolate with white chocolate in the ganache layer. For a dairy-free version, use coconut cream instead of heavy cream and a plant-based butter in the ganache.
Make-Ahead, Storage, And Serving Tips
This cake is best made 1 to 2 days ahead, allowing the cookies to soften slightly and flavors to meld together. Store covered in the refrigerator for up to 4 days. Do not freeze as the texture becomes too hard. For cleaner slices, dip your knife in hot water and wipe between cuts. Serve directly from the refrigerator while still cold for the best texture. If the ganache cracks when slicing, let the cake sit at room temperature for 5 to 10 minutes before cutting.
4. S'mores Icebox Cake
This S’mores Icebox Cake brings the beloved campfire dessert indoors with layers of chocolate graham crackers, fluffy marshmallow cream, and rich chocolate ganache. The no-bake construction makes it perfect for warm weather entertaining, while the combination of textures—crispy, creamy, and smooth—delivers that nostalgic s’mores experience in every bite. Serve this impressive dessert after dinner or at summer gatherings, and watch guests marvel at how simple yet elegant it tastes. It’s the ideal make-ahead option that actually improves as flavors meld overnight in the refrigerator.
Why You’ll Love It
- No baking required, just assembly and chilling time.
- Tastes like s’mores but without the mess of campfire cooking.
- Can be prepared up to two days ahead for stress-free entertaining.
Ingredients
- 2 cups heavy cream
- 1 cup marshmallow fluff
- 2 tablespoons powdered sugar
- 1 teaspoon vanilla extract
- 8 ounces semi-sweet chocolate, chopped
- 1 cup heavy cream (for ganache)
- 16 chocolate graham crackers
- 2 tablespoons butter
- Crushed graham crackers for topping
- Mini marshmallows for garnish
How To Make It
- Whip 2 cups heavy cream with powdered sugar and vanilla extract until stiff peaks form, then gently fold in marshmallow fluff until combined.
- Heat 1 cup heavy cream until steaming, then pour over chopped chocolate and let sit 1 minute before stirring until smooth ganache forms.
- Line an 8×8-inch pan with parchment paper and spread a thin layer of marshmallow cream on the bottom.
- Arrange 4 chocolate graham crackers in a single layer over the cream.
- Spread another layer of marshmallow cream over the crackers, then drizzle with chocolate ganache.
- Repeat layering with remaining crackers, marshmallow cream, and ganache, ending with ganache on top.
- Sprinkle crushed graham crackers and mini marshmallows over the top.
- Cover and refrigerate for at least 6 hours or overnight until the layers set completely.
Variations And Substitutions
Swap semi-sweet chocolate for dark chocolate or milk chocolate depending on your preference. Replace regular marshmallow fluff with homemade marshmallow cream for extra flavor depth. Add a tablespoon of Kahlua or coffee liqueur to the ganache for a mocha twist. Use honey graham crackers instead of chocolate ones for a slightly different flavor profile, or try cinnamon graham crackers for added warmth.
Make-Ahead, Storage, And Serving Tips
This cake actually benefits from being made 1 to 2 days ahead, as the layers meld and flavors deepen. Store covered in the refrigerator for up to 3 days. Cut into squares with a sharp knife dipped in hot water and wiped clean between cuts for neat portions. Serve chilled directly from the refrigerator. If you prefer softer layers, let the cake sit at room temperature for 10 minutes before serving.
5. Cookies & Cream Icebox Cake
This Cookies & Cream Icebox Cake is a showstopper dessert that combines creamy vanilla layers with crushed Oreo cookies for the ultimate no-bake treat. The contrast between smooth, cold frosting and crunchy cookie pieces creates an irresistible texture that improves as it chills overnight. Perfect for summer gatherings, potlucks, or whenever you need an elegant dessert without turning on the oven, this cake delivers classic cookies-and-cream flavor in an impressive presentation that looks far more complicated than it actually is.
Why You’ll Love It
- Requires no baking, making it ideal for hot weather and busy schedules.
- Gets better as it sits overnight, allowing flavors to meld and wafers to soften perfectly.
- Impresses guests with restaurant-quality results using just a handful of simple ingredients.
Ingredients
- 2 cups heavy whipping cream
- 1 cup whole milk
- 1 package (3.9 ounces) instant vanilla pudding mix
- 8 ounces cream cheese, softened
- 1/4 cup powdered sugar
- 30 Oreo cookies, divided
- 1 teaspoon vanilla extract
- Pinch of salt
How To Make It
- Crush 24 Oreo cookies into various sizes, ranging from fine crumbs to small chunks. Set aside and reserve the remaining 6 cookies for topping.
- In a large mixing bowl, beat the softened cream cheese, powdered sugar, vanilla extract, and salt together until smooth and fluffy, about 2 minutes.
- In a separate bowl, whisk together the heavy cream, whole milk, and instant vanilla pudding mix until thickened, about 1-2 minutes.
- Gently fold the pudding mixture into the cream cheese mixture until fully combined and no streaks remain.
- Fold the crushed Oreo cookies into the frosting mixture, reserving about 1/4 cup of the finest crumbs for garnish.
- Spread half of the mixture into a 9-by-13-inch baking dish, creating an even layer.
- Crumble the reserved 6 whole Oreos and sprinkle over the first layer, then top with the remaining frosting mixture, smoothing the surface.
- Sprinkle the reserved fine cookie crumbs over the top and refrigerate for at least 8 hours or overnight before serving.
Variations And Substitutions
Swap regular Oreos for Double Stuf or Golden Oreos for different flavor profiles. Use Greek yogurt in place of some heavy cream for a tangier version. For a chocolate twist, substitute chocolate pudding mix or add 2 tablespoons of cocoa powder to the frosting. Try crushing other cookies like digestive biscuits or vanilla wafers mixed with the Oreos for variety. For a lighter version, replace some cream cheese with mascarpone or ricotta cheese.
Make-Ahead, Storage, And Serving Tips
This cake is best made the day before serving, as the wafers soften and flavors develop overnight. Store covered in the refrigerator for up to 4 days. Cut into squares and serve chilled directly from the dish. If the cake becomes too soft, freeze it for 1-2 hours before serving for better slicing. You can also freeze the entire assembled cake for up to 2 weeks; simply thaw in the refrigerator for 4 hours before serving.
Final Thoughts
Icebox cakes are the perfect dessert for anyone looking to impress without spending hours in the kitchen. Whether you choose a classic chocolate version, a fruity twist, or a creative flavor combination, you’ll find that these no-bake treats deliver impressive results with minimal effort. The beauty of icebox cakes lies in their flexibility—feel free to mix and match cookies, fillings, and toppings to match your taste and what you have on hand.
We encourage you to pick one of these recipes and give it a try this week. Start with whichever combination sounds most appealing to you, and don’t worry about achieving perfection on your first attempt. Once you’ve made one, you’ll discover how simple the process really is, and you’ll likely find yourself reaching for these recipes again and again whenever you need a dessert that tastes homemade but feels effortless.
Chocolate Peanut Butter Icebox Cake
Ingredients
Method
- Whip heavy cream with powdered sugar and vanilla extract until stiff peaks form.
- In a separate bowl, whisk peanut butter with cocoa powder until well combined.
- Fold the peanut butter mixture into the whipped cream until no streaks remain.
- Combine milk and melted butter in a shallow dish.
- Quickly dip each chocolate wafer cookie into the milk mixture and layer in a 9x5-inch loaf pan, alternating with peanut butter mousse.
- Finish with a layer of mousse on top.
- Cover and refrigerate for at least 4 hours or overnight until the cookies soften and flavors meld.
- Slice and serve chilled.