S’mores Campfire Shake Recipe | Cozy Treats
S'mores Campfire Shake Recipe | Cozy Treats
S’mores Campfire Shake: A Cozy Dessert Drink That Tastes Like Nostalgia
I grew up in a house where my parents treated summer nights like an art form. Every Friday, we’d pile into the backyard with a cooler, a fire pit, and the kind of low-key energy that made everything feel special. My dad would roast marshmallows until they were perfectly golden (mine always caught fire), and my mom would break chocolate squares into neat little piles. But here’s the thing—I was never the biggest s’mores person. I’d eat them because it was tradition, but I always felt like something was missing.
Then one random Tuesday, I was craving that specific s’mores feeling—the toasty, chocolatey, marshmallow-soft nostalgia—but it was pouring rain and the idea of standing outside in the cold sounded absolutely terrible. So I did what I always do when I’m feeling creatively stuck: I opened my fridge and started experimenting. I grabbed some vanilla ice cream, melted chocolate, toasted marshmallows in my oven (yes, really), and blended it all together with some milk and a tiny pinch of graham cracker crumbs.
The result? A S’mores Campfire Shake that tastes like summer memories, requires zero campfire, and honestly tastes even better than the original version. It’s thick, creamy, genuinely indulgent, and takes about ten minutes from start to finish. This is the kind of drink that works for lazy Sunday afternoons, when you want to impress friends without actually trying, or when you’re craving that cozy campfire feeling without leaving your kitchen.
I’ve tested this recipe probably fifty times now (my family thinks I’m slightly unhinged, but they keep asking for it), and I’m sharing my exact method, my honest mistakes, and all the ways you can make it your own. If you love this kind of comfort-food approach to cooking, follow me on HaileeRecipes on Pinterest for more recipes that feel like home.
Why You’ll Love This Recipe
Let me be really honest with you: this shake is pure comfort in a glass. You’re getting all the flavors you love about s’mores—the chocolate, the marshmallow, the slight graham cracker crunch—but in a format that’s actually easy to enjoy. No burnt fingers, no sticky hands, no marshmallow stuck to the roof of your mouth.
- It’s genuinely fast. Seriously, this takes about ten minutes total, including the time it takes to toast the marshmallows. Most of that is just blending and assembly.
- The flavor is spot-on. When you toast marshmallows fresh (even in the oven), they bring this caramelized, almost nutty depth that makes the whole shake taste elevated. It’s not overly sweet or artificial-tasting.
- You can make it for one person or a crowd. The recipe scales easily, and you can prep components ahead of time, which is huge if you’re thinking about entertaining.
- It feels fancy but tastes fun. This is the kind of drink that looks impressive when you hand it to someone, but it’s really just melted chocolate and ice cream. Nobody needs to know how simple it is.
- There’s flexibility built in. Want it less thick? Add more milk. Want it more chocolatey? Drizzle more chocolate on top. This recipe is a starting point, not a rulebook.
Ingredients
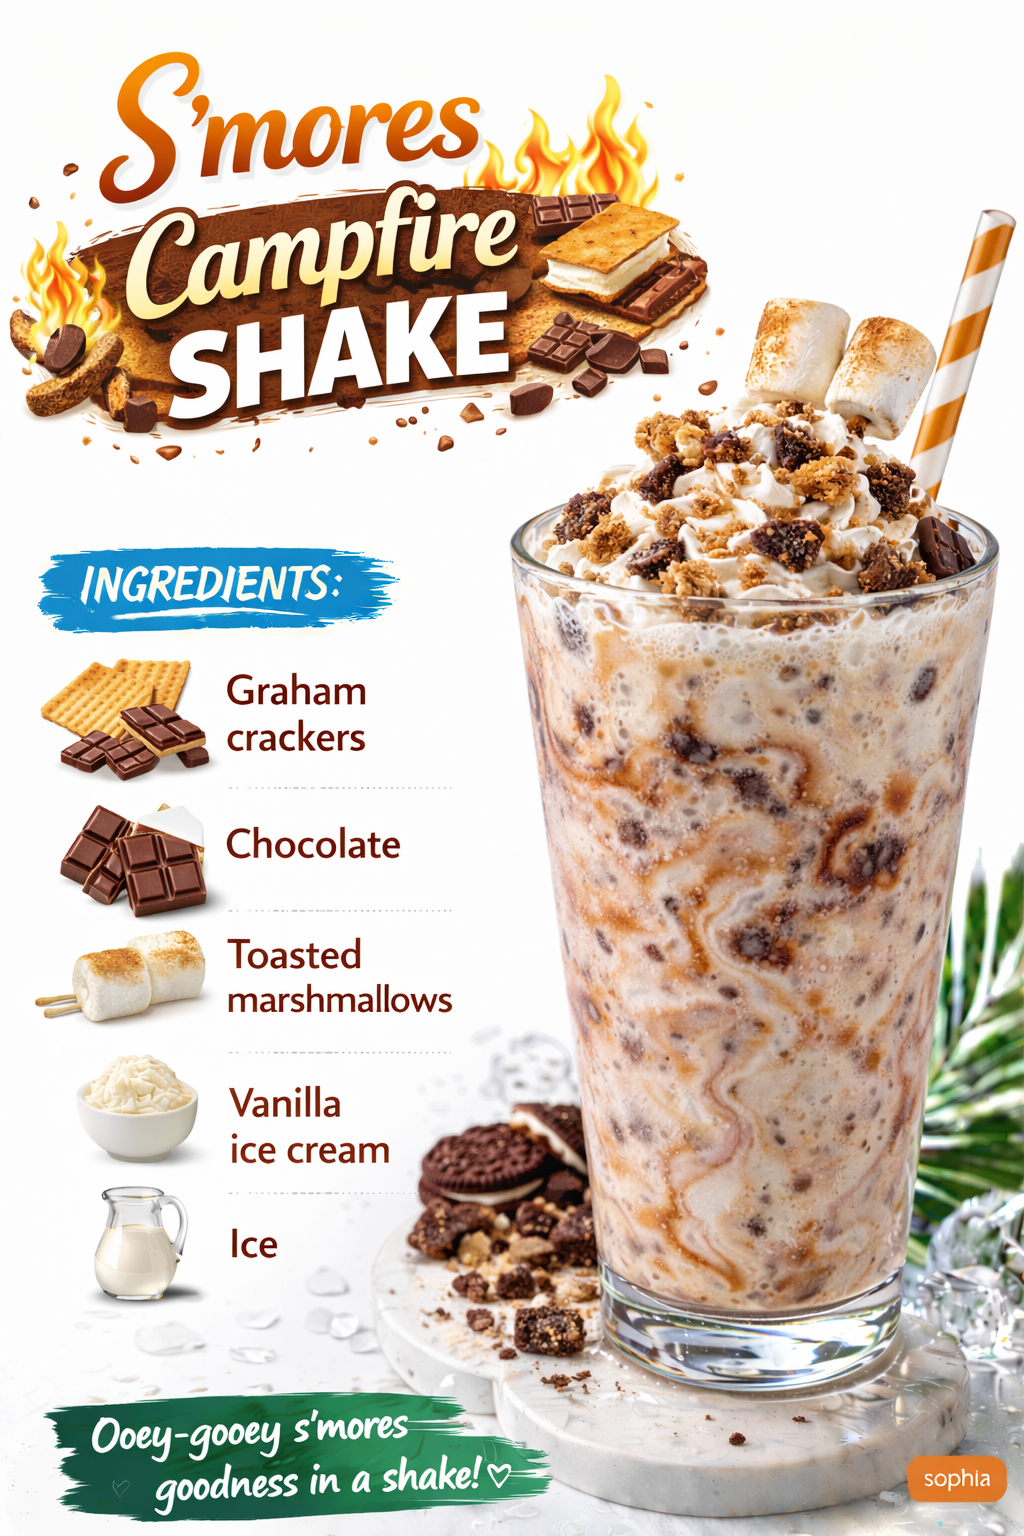
- 2 cups vanilla ice cream (I use good-quality vanilla, not the super-cheap stuff)
- 1/2 cup whole milk (or any milk you prefer—oat milk works beautifully here)
- 3 tablespoons unsweetened cocoa powder
- 2 ounces semi-sweet chocolate, chopped (or about 1/3 cup chocolate chips)
- 4 large marshmallows, fresh and fluffy (this matters)
- 2 tablespoons graham cracker crumbs (from about 2-3 full crackers)
- 1/2 teaspoon vanilla extract
- 1 tablespoon honey or maple syrup (optional, but I use it)
- Pinch of sea salt
- Extra chocolate and marshmallow for topping
Hailee’s Tip: Don’t skip toasting the marshmallows. I know it sounds like an extra step, but those caramelized edges are literally the difference between “nice shake” and “why does this taste like a campfire memory?” Toast them in a 375-degree oven for about 3-4 minutes until they’re just starting to turn golden. Watch them closely—they go from perfect to burnt in about thirty seconds.
Hailee’s Tip: Use actual good chocolate here. I’m not talking about fancy artisanal stuff, but don’t reach for the chocolate chips meant for baking. I use Ghirardelli or Lindt because they melt smoothly and taste genuinely good. It makes a noticeable difference.
Hailee’s Tip: Fresh marshmallows are key. If your marshmallows have been sitting in the pantry for six months, they’ll be stale and won’t toast properly. I buy mine from the regular grocery store, and I use them within a few weeks of opening the bag.
Optional Add-Ins and Variations
This is where you can get creative. The base recipe is solid, but here’s what I like to play around with:
- Coffee boost: Add 1 tablespoon of cold brew coffee or espresso powder for a mocha-s’mores situation. It’s honestly incredible.
- Peanut butter version: Swap 1 tablespoon of the cocoa powder for peanut butter powder. You’ll get this nutty, rich depth that plays really well with chocolate and marshmallow.
- Salted caramel: Drizzle a tiny bit of salted caramel sauce into the shake before blending, and add a sprinkle on top. The salt against the sweet is *chef’s kiss*.
- Bourbon or rum: If you’re making this for adults, a splash of bourbon or rum adds a sophisticated warmth. I usually do about 1 ounce per shake.
- Cinnamon kick: Add 1/4 teaspoon ground cinnamon and a tiny pinch of cayenne pepper. Sounds weird, tastes amazing.
- Vegan version: Use coconut ice cream or cashew-based ice cream, and swap the milk for oat or almond milk. The shake will be slightly less creamy but still delicious.
Step-by-Step Method
Step 1: Toast your marshmallows
Preheat your oven to 375 degrees. Place your marshmallows on a small baking sheet (line it with parchment paper if you want to make cleanup easier, though honestly I never do). Bake for 3-4 minutes until the tops are just starting to turn golden brown. They’ll look slightly puffed and caramelized. Remove them and let them cool for about a minute. This is important because you don’t want to blend molten lava into your shake.
What I messed up: The first time I made this, I toasted the marshmallows for way too long and they basically turned into charcoal briquettes. I was so frustrated. Then I toasted them again, watched them like a hawk, and got it right. Now I set a timer for exactly 3 minutes and check at 2.5 minutes. Oven temperatures vary, so yours might be slightly faster or slower.
Step 2: Prepare your blender
Add your vanilla ice cream to the blender. Break it up a little bit with a spoon so it blends more easily. Add your milk, cocoa powder, chopped chocolate, vanilla extract, honey (if using), and salt.
Step 3: Add the marshmallows
Once your toasted marshmallows are cool enough to handle, tear them into chunks and add them to the blender. Don’t worry about being neat—they’re going to blend anyway.
Step 4: Blend until smooth
Blend on high for about 45 seconds to 1 minute, until everything is completely smooth and creamy. You shouldn’t see any chunks of chocolate or marshmallow. If your blender is struggling, stop and use a spoon to push things down, then blend again. Don’t just keep blending on high—that’s how blender motors die, and I learned that the hard way.
What I messed up: I once blended this for way too long because I was distracted, and it got oddly thin and separated-looking. The ice cream basically melted into soup. Now I blend just until smooth and stop immediately.
Step 5: Prepare your glass
While your shake is blending, prepare a tall glass. This is optional, but I like to drizzle a little melted chocolate around the inside of the glass and then sprinkle graham cracker crumbs onto the chocolate so they stick. It looks fancy and tastes amazing when you get those crumbs in each sip.
Step 6: Pour and top
Pour your shake into the prepared glass. Top with a dollop of whipped cream if you want to be extra (and honestly, why wouldn’t you be?). Add a sprinkle of graham cracker crumbs, a few chocolate chips, and maybe a toasted marshmallow on top. Serve immediately with a thick straw.
Common Mistakes to Avoid
Using stale marshmallows. I cannot stress this enough. Stale marshmallows don’t toast properly, they don’t blend smoothly, and they taste like disappointment. Buy fresh ones and use them within a reasonable timeframe.
Not toasting the marshmallows. I know this adds a step, but it’s literally what makes this shake taste like a campfire instead of just tasting like chocolate milk. Don’t skip it.
Using low-quality chocolate. Cheap chocolate tastes waxy and artificial. Spend the extra dollar or two on something that actually tastes good. Your taste buds will thank you.
Over-blending. Once everything is smooth, stop. Over-blending makes the shake thin and separates the ingredients. Blend just until combined and smooth.
Using milk that’s too cold straight from the fridge. This isn’t a huge deal, but if your milk is ice-cold, it can make the shake slightly less creamy. I usually let mine sit out for a minute or two, or I use milk that’s been in the fridge for a while rather than milk I just opened.
Forgetting the salt. A tiny pinch of salt brings out all the chocolate and caramel flavors. It sounds counterintuitive, but trust me. Don’t skip it.
My Tested Substitutions
Ice cream: I’ve tested this with chocolate ice cream, cookies and cream, and even salted caramel, and they all work beautifully. Vanilla is my go-to because it lets the s’mores flavors shine, but feel free to experiment.
Milk: Whole milk gives you the creamiest shake, but I’ve made this with 2% milk, oat milk, almond milk, and even coconut milk. They all work. Almond milk will be slightly less creamy, and coconut milk will add a subtle coconut flavor that’s actually really nice.
Cocoa powder: Use unsweetened cocoa powder. Dutch-process cocoa has a slightly deeper flavor, but regular cocoa powder works just fine. I’ve tested both and honestly prefer the regular stuff here because it’s less intense.
Chocolate: Semi-sweet chocolate is my favorite, but dark chocolate works too and will make the shake less sweet. Milk chocolate is too sweet and makes the whole thing cloying. Don’t use white chocolate—it won’t give you that chocolate depth you’re looking for.
Honey or maple syrup: I use honey because it’s what I have on hand, but maple syrup is equally good. You could also use agave nectar or skip it entirely if you want a less sweet shake. The shake is still plenty sweet without it, so this is really just a personal preference.
How to Customize
This recipe is genuinely flexible, and I love that about it. Here’s how to make it exactly what you want:
If you want it thicker: Use less milk. Start with 1/4 cup instead of 1/2 cup and add more as needed until you get the consistency you like.
If you want it thinner: Add more milk, 1 tablespoon at a time, until it reaches your preferred consistency.
If you want it less sweet: Skip the honey and use dark chocolate instead of semi-sweet. You could also reduce the amount of chocolate slightly.
If you want it more chocolatey: Add another tablespoon of cocoa powder or use more chopped chocolate.
If you want more marshmallow flavor: Use 5 or 6 marshmallows instead of 4, and make sure they’re really well toasted.
If you want more graham cracker flavor: Increase the graham cracker crumbs to 3 tablespoons, or add a tiny pinch of honey to bring out that honey-graham flavor.
Serving Ideas
This shake is perfect on its own, but here are some fun ways to serve it:
- With dessert: Pair it with brownies or chocolate chip cookies for a full s’mores experience.
- As a party drink: Make a big batch (the recipe doubles easily) and serve it in a pitcher with a ladle. Set out toppings like whipped cream, graham cracker crumbs, and extra marshmallows so people can customize.
- For a date night: Make two, add a splash of bourbon to each, and enjoy together while watching something cozy.
- For kids: Skip the alcohol, obviously, and let them help toast the marshmallows (with supervision). They’ll love it.
- As a midnight snack: Make it when you’re craving something sweet and want to feel fancy about it.
- For brunch: Serve it as a dessert drink alongside pastries and coffee. It’s unexpected and delicious.
Meal Prep and Storage
Here’s the thing about shakes: they’re best served immediately. That said, I’ve figured out some workarounds if you want to prep ahead.
Make-ahead option: Toast your marshmallows and store them in an airtight container for up to 2 days. Chop your chocolate and measure out your cocoa powder and other dry ingredients. When you’re ready to make the shake, just blend everything together. This cuts your prep time down to about 5 minutes.
Freezing: You can freeze the blended shake in a container for up to 1 week. When you want to drink it, let it thaw slightly and give it a good stir. It won’t be quite as smooth as a freshly made shake, but it’s still delicious and tastes kind of like a frozen s’mores pop.
Storage of components: Store your marshmallows in an airtight container away from heat and humidity. Store your chocolate in a cool, dry place. Store your graham cracker crumbs in an airtight container for up to 2 weeks.
Leftover shake: If you somehow have leftover shake (which would be a tragedy), cover it and refrigerate for up to 4 hours. It will separate slightly, so give it a good stir before drinking. It won’t be as good as fresh, but it’s still edible.
Nutritional Breakdown
This recipe makes 2 generous servings. Here’s the approximate nutrition per serving:
- Calories: 385
- Protein: 6g
- Carbohydrates: 52g
- Fat: 17g
- Fiber: 2g
- Sugar: 42g
Please note that these are estimates based on standard ingredient brands. Actual nutrition will vary depending on the specific products you use. If you need exact nutrition information for dietary reasons, I’d recommend plugging your specific ingredients into a nutrition calculator.
Final Thoughts
Making this S’mores Campfire Shake has genuinely become one of my favorite things to do when I want to feel cozy without leaving my kitchen. There’s something really satisfying about taking a childhood memory and transforming it into something new and delicious. Every time I make this, I’m reminded that the best recipes are the ones that make you feel something—whether that’s nostalgia, comfort, joy, or just pure indulgence.