Reese’s Peanut Butter Oreo Dirt Cake Recipe
Reese's Peanut Butter Oreo Dirt Cake Recipe
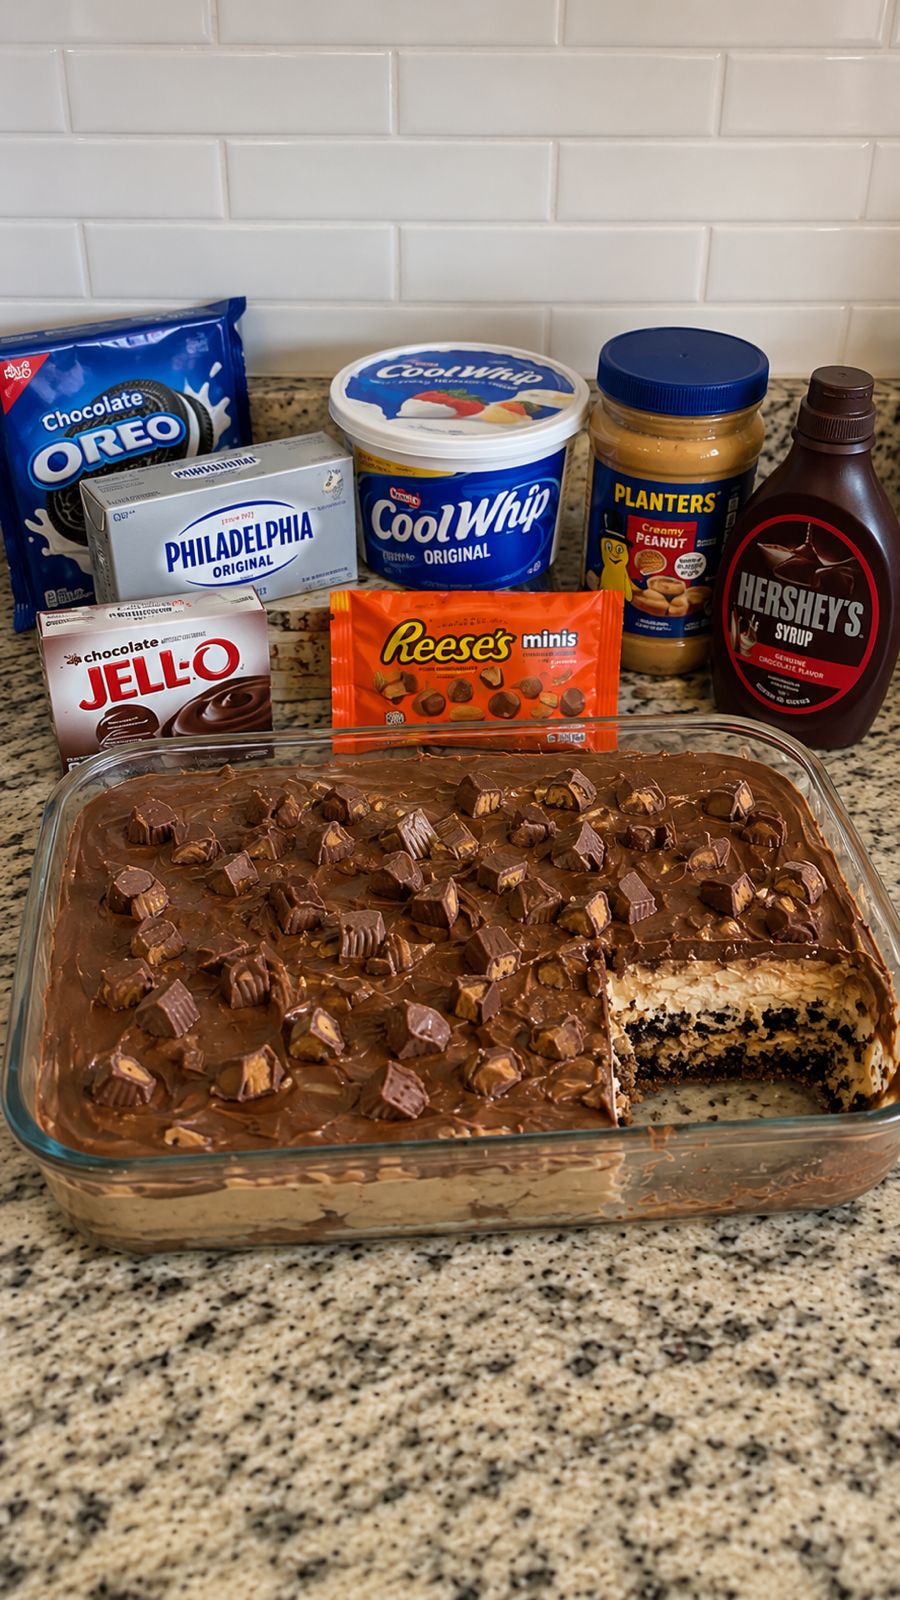
Reese’s Peanut Butter Oreo Dirt Cake: A Decadent Dessert That Tastes Like Candy
I created this recipe on a Tuesday night when I was standing in my pantry staring at three half-eaten boxes of Oreos, a jar of peanut butter, and a bag of Reese’s cups. You know that feeling when you want something so badly that you’re willing to just throw it all together and hope for the best? Yeah, that was me. I had just finished a long day of content creation, my kids were finally asleep, and I needed something that tasted like pure indulgence without the guilt of ordering takeout dessert for the millionth time that month.
What I ended up with completely surprised me. This Reese’s Peanut Butter Oreo Dirt Cake isn’t just a random mashup of candy and cake. It’s actually a thoughtfully layered dessert that brings together three beloved flavors in a way that somehow feels sophisticated and comforting at the same time. The “dirt” comes from crushed Oreos mixed into a rich chocolate cake base, then we’re talking peanut butter frosting, more Oreos, and Reese’s cups scattered throughout like edible treasure. It’s the kind of cake that looks way more impressive than it actually is to make, which is honestly my favorite type of recipe.
This cake is for anyone who’s ever had a peanut butter and chocolate craving that wouldn’t quit. It’s perfect for potlucks, birthday celebrations, or those nights when you just need to treat yourself without any apologies. Fair warning: people will ask for this recipe, and they’ll probably make it multiple times. I’ve had friends text me photos of their versions, and it never gets old. If you want to save this for later, feel free to follow me on HaileeRecipes on Pinterest where I’m always pinning new dessert ideas and kitchen tricks.
Why You’ll Love This Recipe
Let me be real with you: this cake tastes like the love child of a candy store and a bakery. If you’re someone who gets excited about peanut butter and chocolate combinations, this is your moment. I’m talking layers of flavor that work together instead of competing.
- It’s genuinely impressive. The presentation looks like you spent hours in the kitchen, but honestly, most of the work is just assembly and waiting for things to bake or chill.
- The texture is incredible. You get that soft, fudgy chocolate cake, the crunch of crushed Oreos, the creaminess of peanut butter frosting, and the bite of actual Reese’s cups all in one forkful.
- It’s not overly complicated. I’m not asking you to make cake from scratch using some fancy French technique. This uses a box mix as the base, which I’m never ashamed of because it works and it’s reliable.
- You can make it ahead. This cake actually tastes better after it’s been in the fridge overnight, which means you can prep it the day before your event and actually enjoy your guests instead of stressing in the kitchen.
- It feeds a crowd. One cake easily serves 12 to 16 people, making it perfect for gatherings without breaking the bank.
Ingredients
For the Chocolate Cake:
- 1 box chocolate cake mix (plus ingredients listed on box: usually eggs, oil, water)
- 20 Oreo cookies, crushed into small pieces (not powder, just broken up)
- 2 tablespoons cocoa powder, extra
For the Peanut Butter Frosting:
- 1 cup creamy peanut butter (not natural, the regular kind works better here)
- 4 tablespoons unsalted butter, softened
- 2 cups powdered sugar
- 2 tablespoons heavy cream or milk
- 1 teaspoon vanilla extract
- Pinch of salt
For Assembly and Topping:
- 15 to 20 Oreo cookies, crushed (for the “dirt” layer)
- 8 to 10 Reese’s Peanut Butter Cups, chopped into chunks
- 2 tablespoons powdered sugar, for dusting
- Optional: 1/2 cup chocolate chips for extra richness
Hailee’s Tip: Don’t use natural peanut butter for the frosting. The oil separates and makes everything greasy. Stick with Jif or Skippy, and yes, I’m saying that out loud.
Hailee’s Tip: Crush your Oreos by hand or pulse them in a food processor. I like hand-crushing because you get a nice mix of sizes, which creates better texture than fine crumbs.
Hailee’s Tip: Buy your Reese’s cups when they’re on sale. I usually grab a few extra boxes because they’re expensive and this recipe uses quite a few.
Optional Add-Ins and Variations
One of my favorite things about this recipe is how flexible it is. You’re not locked into one version forever.
- Chocolate Lovers Version: Add 1/2 cup chocolate chips to the peanut butter frosting, or make a chocolate ganache layer between the cake and frosting.
- Extra Crunch: Mix crushed pretzels into the “dirt” layer. The salty-sweet thing is unreal.
- Caramel Drizzle: Drizzle salted caramel over the top before serving. It sounds extra, but trust me.
- Peanut Butter Cup Filling: Make a peanut butter cup mousse and pipe it between the cake layers for an extra decadent version.
- Mini Version: Use a 9-inch round cake pan instead of a 9×13 rectangular pan, and halve the frosting recipe. Perfect for smaller gatherings.
Step-by-Step Method
Step 1: Bake Your Cake
Preheat your oven to 350 degrees Fahrenheit. Prepare a 9×13-inch baking pan with cooking spray or parchment paper. Follow the box mix instructions, but here’s where I make my adjustment: after mixing everything together, fold in those 20 crushed Oreos and the extra 2 tablespoons of cocoa powder. This gives you that “dirt” texture right in the cake itself, not just on top. Pour into your prepared pan and bake according to package directions, usually around 30 to 35 minutes. You’re looking for a toothpick to come out with just a few moist crumbs, not completely clean.
What I Messed Up: The first time I made this, I crushed the Oreos into a fine powder and they basically disappeared into the cake batter. Now I leave them chunky so you actually get that satisfying cookie texture in every bite.
Step 2: Cool Everything Down
Let the cake cool in the pan for about 15 minutes, then turn it out onto a wire rack to cool completely. This takes around an hour, but don’t skip this step. A warm cake will melt your frosting into a sad puddle. I usually bake my cake in the morning and frost it in the afternoon just to make sure it’s completely cool.
Step 3: Make the Peanut Butter Frosting
While your cake is cooling, make the frosting. In a large bowl, beat together the softened butter and peanut butter until it’s smooth and creamy, about 2 minutes. Gradually add the powdered sugar, one cup at a time, mixing well after each addition. The frosting will look dry at first, which is normal. Add the heavy cream, vanilla extract, and salt, then beat for another 2 to 3 minutes until it’s light and fluffy. If it’s too thick, add a splash more cream. If it’s too thin, add a bit more powdered sugar.
What I Messed Up: I once forgot to soften my butter and ended up with lumpy frosting that I had to basically start over. Room temperature ingredients are your friend here.
Step 4: Level Your Cake
If your cake domed up in the middle (and let’s be honest, most box mixes do), use a serrated knife to carefully slice off the top so you have a flat surface. Don’t stress about this being perfect. You’re going to cover it with frosting anyway.
Step 5: First Frosting Layer
Place your cooled cake on a serving plate or cake board. Spread about one-third of your peanut butter frosting evenly over the top of the cake. This should be a nice, generous layer, about 1/4 inch thick.
Step 6: Add the “Dirt”
Here’s where it gets fun. Take those 15 to 20 crushed Oreos and sprinkle them all over the frosting layer. Press them down gently so they stick. This is your signature “dirt” layer, and it’s what makes this cake look so cool.
Step 7: Add Reese’s Cups
Scatter your chopped Reese’s cups over the Oreo layer. I like to use chunks rather than whole cups because it distributes the peanut butter cup flavor more evenly. Reserve a few nice pieces for the top decoration.
Step 8: Second Frosting Layer
Spread the remaining peanut butter frosting over the Reese’s cups and Oreos. This layer doesn’t need to be perfectly smooth because you’re going to top it with more texture anyway. Just make sure everything is covered and sealed.
Step 9: Final Topping
Top with another layer of crushed Oreos and those reserved Reese’s cup pieces. Dust lightly with powdered sugar for a finished look. If you want to be extra, you can arrange whole Reese’s cups around the edges.
Step 10: Chill and Set
Refrigerate the cake for at least 2 hours, but ideally overnight. This allows all the layers to set and the flavors to meld together. The cake actually tastes better cold, and the frosting holds up better when you’re slicing it.
Common Mistakes to Avoid
I’ve made most of these mistakes so you don’t have to.
- Using warm cake: Warm cake will cause your frosting to slide right off. Patience is key here. Make your cake ahead if possible.
- Overmixing the frosting: Once everything is combined, stop mixing. Overmixing can make it grainy and separate.
- Skipping the chill time: I know you’re excited, but this cake needs time to set. At least 2 hours, preferably overnight.
- Using powdered peanut butter: I tried this once thinking it would be lighter. It was a disaster. Use regular creamy peanut butter.
- Not crushing the Oreos properly: Too fine and they disappear. Too chunky and they’re hard to eat. Aim for bite-sized pieces.
- Forgetting to level the cake: A domed cake will slide around. Take 30 seconds to make it flat.
My Tested Substitutions
I’ve experimented with this recipe quite a bit, and here’s what actually works.
- Box Mix Alternative: You can absolutely use a homemade chocolate cake recipe if you prefer. Just make sure it’s a dense, fudgy cake, not a light and airy one. The structure matters here.
- Frosting Base: If you want to use cream cheese frosting instead of peanut butter, use 8 ounces cream cheese, 4 tablespoons butter, 1/2 cup peanut butter, and 2 cups powdered sugar. It’s tangier but still delicious.
- Peanut Butter Cups: You can substitute with any chocolate-peanut butter candy. Butterfinger pieces work in a pinch, though they’re less cohesive.
- Oreos: Golden Oreos work if you want something slightly less intense. Double Stuf Oreos are overkill and make the cake too cookie-heavy.
- Frosting Consistency: If you need a firmer frosting, reduce the cream to 1 tablespoon. If you want it more spreadable, add up to 3 tablespoons.
How to Customize
This is your cake, so make it your own.
- For Chocolate Lovers: Make a chocolate frosting instead of peanut butter by using 1 cup butter, 3/4 cup cocoa powder, 3 cups powdered sugar, and 1/4 cup milk. Layer it the same way.
- For Peanut Butter Fanatics: Use peanut butter chips mixed into the frosting, or swirl in a layer of peanut butter sauce between the cake and frosting.
- For Salted Sweet Lovers: Add a sprinkle of fleur de sel or pretzel pieces to the top layer.
- For Individual Servings: Use cupcake liners in a muffin tin, divide the batter, and bake for 18 to 22 minutes. Frost and top each one individually for adorable single-serve cakes.
- For a Smaller Crowd: Halve all the ingredients and use an 8-inch round cake pan. Everything else stays the same, just reduce baking time to 25 to 28 minutes.
Serving Ideas
This cake is rich, so a little goes a long way, which I actually love because one cake feeds so many people.
- Classic Presentation: Serve slices straight from the fridge with a glass of cold milk. It’s nostalgic and perfect.
- Fancy Plating: Serve a slice on a white plate with a scoop of vanilla ice cream on the side. The ice cream melts into the warm cake and creates this amazing texture contrast.
- Dessert Buffet: Cut into small squares and arrange on a platter with forks for a casual gathering.
- With Coffee: This cake is incredible with strong black coffee. The bitterness of the coffee balances the sweetness of the cake perfectly.
- Crumbled Parfait: If your cake breaks or you have leftover pieces, crumble it up and layer it in a glass with whipped cream and crushed Oreos for a parfait.
Meal Prep and Storage
One of the best things about this cake is how well it keeps.
- Room Temperature: Covered loosely, this cake lasts about 2 days at room temperature. After that, the frosting gets a bit soft and the texture changes. It’s still edible, just not ideal.
- Refrigerated: In an airtight container, this cake lasts 5 to 7 days in the fridge. It actually tastes better cold, and the frosting holds its shape better.
- Frozen: Wrap individual slices tightly in plastic wrap and then foil, or place the whole cake in an airtight container. It freezes beautifully for up to 3 months. Thaw in the fridge overnight before serving.
- Make-Ahead Strategy: Bake the cake 1 day ahead, frost it the next day, and chill it for at least 2 hours before serving. This is my go-to for events.
- Transporting: If you need to move this cake, keep it in the fridge until the last possible moment, then transport it in a sturdy cake container. The cold frosting is much less likely to shift.
Nutritional Breakdown
Let’s be real: this is a dessert cake, not a health food. But here’s what you’re looking at per serving (based on 12 servings):
- Calories: approximately 480
- Protein: 8g
- Carbohydrates: 58g
- Fat: 24g
- Fiber: 1g
- Sugar: 45g
This is a rich, indulgent dessert meant to be enjoyed in moderation. A small slice goes a long way because of all