Sheet Pan Dessert Bars – Simple Homemade Treats
Sheet Pan Dessert Bars – Simple Homemade Treats
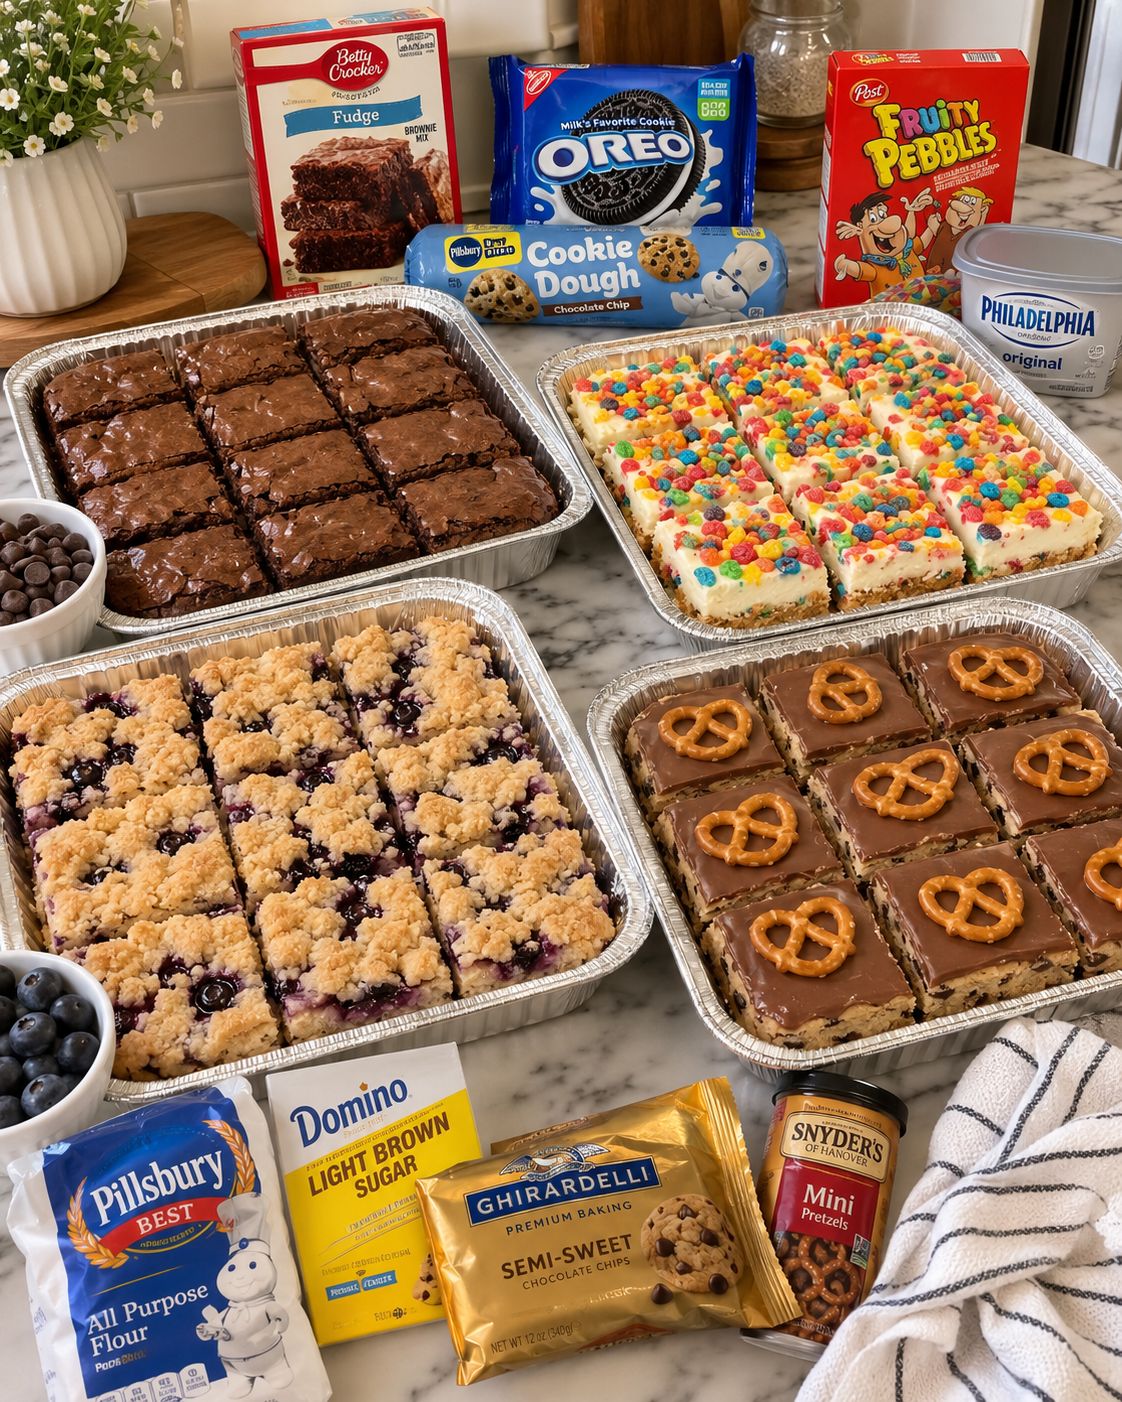
Sheet pan dessert bars are my absolute favorite way to satisfy a crowd without spending hours in the kitchen. Whether you’re baking for a potluck, stocking your freezer, or just craving something sweet that doesn’t require individual plating, these recipes are total game-changers. I’ve rounded up four of my go-to sheet pan creations that deliver maximum flavor with minimal fuss, and I’m so excited to share them with you.
What I love most about baking this way is that you get restaurant-quality desserts with a fraction of the effort. From fudgy brownies that rival any bakery to a no-bake fruity pebbles cheesecake situation that’ll blow your mind, each of these bars brings something special to the table. The blueberry crumb bars and chocolate pretzel cookie bars round out the collection with flavors that feel both comforting and a little bit fancy, which honestly is the dream combination.
These recipes are absolutely worth saving because they’re the kind of desserts you’ll find yourself making again and again. They’re perfect for meal prep, they transport beautifully, and they taste even better the next day. If you love easy, delicious baking ideas, follow me on HaileeRecipes on Pinterest where I’m always sharing new ways to simplify your time in the kitchen.
1. Fudge Brownies
These fudge brownies are the ultimate indulgence for chocolate lovers, delivering rich, decadent flavor with a perfectly fudgy center and slightly crispy edges. Baked in a sheet pan, they’re incredibly convenient for feeding a crowd or stocking your dessert supply throughout the week. The combination of cocoa powder and melted chocolate creates an intensely satisfying treat that’s neither too cake-like nor too dense. Serve these warm with vanilla ice cream for an elegant dessert, or enjoy them plain as an afternoon pick-me-up. They’re ideal for potlucks, bake sales, or whenever you need an easy crowd-pleaser.
Why You’ll Love It
- One-pan recipe means minimal cleanup and maximum convenience.
- Rich chocolate flavor that satisfies even the most serious cravings.
- Ready in under an hour from start to finish.
Ingredients
- 1 cup unsalted butter
- 8 ounces semi-sweet chocolate, chopped
- 1 1/2 cups granulated sugar
- 4 large eggs
- 1 teaspoon vanilla extract
- 3/4 cup all-purpose flour
- 1/2 cup unsweetened cocoa powder
- 1/2 teaspoon salt
- 1/2 cup chocolate chips (optional)
How To Make It
- Preheat your oven to 350 degrees Fahrenheit and line a 9×13-inch sheet pan with parchment paper.
- Combine butter and chopped chocolate in a microwave-safe bowl, heating in 30-second intervals while stirring until completely melted and smooth.
- Whisk together sugar, eggs, and vanilla in a separate bowl until well combined, then pour in the melted chocolate mixture and stir until fully incorporated.
- In another bowl, sift together flour, cocoa powder, and salt, then gently fold into the chocolate mixture until just combined, being careful not to overmix.
- Pour the batter evenly into the prepared sheet pan and smooth the top with a spatula, then sprinkle chocolate chips over the surface if desired.
- Bake for 25 to 30 minutes, until a toothpick inserted in the center comes out with just a few moist crumbs attached.
- Allow the brownies to cool in the pan for at least 15 minutes before cutting into squares and serving.
Variations And Substitutions
Customize these brownies by adding espresso powder to deepen the chocolate flavor, or mix in chopped nuts like walnuts or pecans for added texture. For a salted version, sprinkle fleur de sel over the top before baking. You can substitute dark chocolate for semi-sweet if you prefer a more intense flavor, or use a combination of both. For extra fudginess, reduce baking time by a minute or two, but watch carefully to avoid underbaking.
Make-Ahead, Storage, And Serving Tips
These brownies keep well in an airtight container at room temperature for up to five days, making them perfect for preparing ahead. For longer storage, wrap individually and freeze for up to three months. Thaw at room temperature before serving. If your brownies turn out slightly dry, brush the tops lightly with simple syrup or serve with whipped cream or ice cream. For the fudgiest texture, underbake slightly and allow them to set as they cool.
2. Fruity Pebbles Cheesecake Bars
These vibrant Fruity Pebbles Cheesecake Bars combine the nostalgic crunch of colorful cereal with creamy cheesecake for a fun, indulgent dessert. The crispy cereal crust provides textural contrast to the smooth filling, while fruity notes from the cereal infuse each bite with subtle flavor. These bars are perfect for potlucks, celebrations, or whenever you want a playful treat that feels both familiar and special. They’re easier to execute than traditional cheesecake, making them ideal for home bakers seeking impressive results without the fuss.
Why You’ll Love It
- The combination of crunchy cereal and creamy cheesecake creates an irresistible texture contrast.
- No water bath or complicated techniques required—just mix, press, and bake for foolproof success.
- Visually striking with vibrant colors that appeal to both kids and adults at any gathering.
Ingredients
- 2 cups Fruity Pebbles cereal
- 4 tablespoons butter, melted
- 2 tablespoons sugar
- 16 ounces cream cheese, softened
- 1/2 cup sugar
- 2 large eggs
- 1/2 teaspoon vanilla extract
- 1/4 teaspoon salt
- 1/2 cup sour cream
How To Make It
- Preheat your oven to 325 degrees Fahrenheit and line an 8×8-inch baking pan with parchment paper, leaving an overhang on two sides for easy removal.
- Crush the Fruity Pebbles cereal into small pieces, then mix with melted butter and 2 tablespoons sugar until the texture resembles wet sand.
- Press the cereal mixture firmly into the bottom of the prepared pan, creating an even layer.
- In a large bowl, beat softened cream cheese and 1/2 cup sugar together until smooth and fluffy, about 2 minutes.
- Add eggs one at a time, beating well after each addition, then mix in vanilla extract and salt until just combined.
- Fold in the sour cream gently until no streaks remain, being careful not to overmix.
- Pour the cheesecake filling over the cereal crust and smooth the top with a spatula.
- Bake for 25 to 30 minutes, until the filling is set but still slightly jiggly in the very center when gently shaken.
Variations And Substitutions
Swap Fruity Pebbles for Froot Loops, Lucky Charms, or Cinnamon Toast Crunch to change the flavor profile. Use graham crackers mixed with cereal for added structure, or substitute Greek yogurt for half the sour cream for tangier results. For a chocolate version, add 2 tablespoons cocoa powder to the filling and top with chocolate chips before baking.
Make-Ahead, Storage, And Serving Tips
These bars are best served chilled, so refrigerate for at least 4 hours or overnight before cutting. Store covered in the refrigerator for up to 5 days, or freeze for up to 2 months wrapped tightly in plastic wrap. For clean cuts, dip your knife in hot water and wipe between each slice. You can prepare the crust the day before and keep it covered at room temperature, then add the filling and bake when ready.
3. Blueberry Crumb Bars
These blueberry crumb bars deliver a perfect balance of juicy fruit filling and buttery crumb topping that’s impossible to resist. The tender shortbread base provides a sturdy foundation, while fresh blueberries create a bright, slightly tart layer that contrasts beautifully with the sweet, cinnamon-spiced streusel topping. These bars are ideal for summer picnics, potlucks, or afternoon snacking, and they’re simple enough for beginner bakers to master. The beauty of this recipe is that it requires minimal prep work and comes together on a single sheet pan, making cleanup effortless while delivering impressive, bakery-quality results.
Why You’ll Love It
- No mixer required—everything comes together with simple stirring and mixing by hand.
- Fresh blueberries provide natural sweetness and a pop of color without overpowering the dessert.
- The crumb topping adds wonderful texture contrast and bakes to golden, crispy perfection.
Ingredients
- 2 cups all-purpose flour
- 1 cup cold butter, cubed
- 3/4 cup granulated sugar
- 1/4 cup brown sugar
- 1 teaspoon vanilla extract
- 1/2 teaspoon salt
- 3 cups fresh blueberries
- 2 tablespoons lemon juice
- 1 teaspoon ground cinnamon
- 1/4 cup cornstarch
How To Make It
- Preheat your oven to 350 degrees Fahrenheit and line a 9-by-13-inch baking pan with parchment paper for easy removal.
- In a large bowl, combine 1 1/2 cups flour, 1/2 cup cold butter cubed, 1/4 cup granulated sugar, and 1/4 teaspoon salt. Mix with your fingertips until the mixture resembles coarse breadcrumbs, then press firmly into the bottom of your prepared pan.
- In another bowl, toss together the blueberries, 1/2 cup granulated sugar, lemon juice, cornstarch, and cinnamon until the berries are evenly coated. Spread this mixture over the base layer.
- In a third bowl, combine the remaining 1/2 cup flour, 1/2 cup cold butter cubed, 1/4 cup brown sugar, cinnamon, and 1/4 teaspoon salt. Mix with your fingertips until crumbly, then sprinkle this topping evenly over the blueberries.
- Bake for 35 to 40 minutes, until the crumb topping is golden brown and the blueberry filling is bubbling around the edges.
- Remove from the oven and let cool completely on a wire rack for at least 2 hours before cutting into bars.
- Use a sharp knife dipped in hot water and wiped clean between cuts for neat, clean edges.
Variations And Substitutions
Swap blueberries for blackberries, raspberries, or a mixed berry combination for different flavor profiles. If fresh berries are unavailable, frozen blueberries work well—no need to thaw them first. Replace lemon juice with lime juice for a brighter citrus note, or add a tablespoon of lemon zest to the filling for extra flavor. For a nuttier crumb topping, mix in 1/2 cup chopped almonds or pecans to the streusel layer. You can also substitute brown butter for regular butter in the topping for a deeper, more complex flavor.
Make-Ahead, Storage, And Serving Tips
These bars keep well in an airtight container at room temperature for up to three days or in the refrigerator for up to five days. You can assemble the bars up to eight hours ahead and refrigerate before baking—simply add five extra minutes to the baking time. For longer storage, wrap individual bars in plastic wrap and freeze for up to one month. These bars are best served at room temperature or slightly chilled, and they pair wonderfully with a glass of cold milk, iced tea, or vanilla ice cream. If the crumb topping browns too quickly, tent the pan loosely with foil during the final ten minutes of baking.
4. Chocolate Pretzel Cookie Bars
These Chocolate Pretzel Cookie Bars combine sweet and salty in the most irresistible way, featuring a buttery shortbread base, a layer of creamy chocolate, and crunchy pretzel pieces throughout. The contrast between the salty pretzels and rich chocolate creates an addictive texture that keeps people reaching for more. These bars are perfect for potlucks, bake sales, or satisfying a sweet craving with a sophisticated twist. They’re easy enough for beginners but impressive enough to serve at gatherings, and they require no special baking skills.
Why You’ll Love It
- The sweet and salty combination appeals to everyone and creates an unexpectedly crave-worthy flavor profile.
- No mixer or complex techniques required—this recipe comes together quickly with simple mixing and pressing.
- One pan means minimal cleanup while delivering restaurant-quality results that look far more complicated than they are.
Ingredients
- 1 cup all-purpose flour
- 1/2 cup softened butter
- 1/4 cup granulated sugar
- 1/4 teaspoon salt
- 1 1/2 cups semi-sweet chocolate chips
- 2 tablespoons coconut oil or butter
- 1 1/2 cups pretzel pieces, roughly chopped
- 1/4 cup chopped roasted peanuts or almonds (optional)
How To Make It
- Preheat your oven to 350 degrees Fahrenheit and line an 8×8 inch baking pan with parchment paper for easy removal.
- In a bowl, combine the flour, softened butter, sugar, and salt, mixing until the mixture resembles coarse crumbs and comes together slightly.
- Press this mixture firmly and evenly into the bottom of your prepared pan, creating a compact base layer.
- Bake the shortbread base for 12-15 minutes until lightly golden, then remove from the oven and let cool slightly.
- In a microwave-safe bowl, combine chocolate chips and coconut oil, heating in 30-second intervals while stirring until completely melted and smooth.
- Pour the melted chocolate over the cooled shortbread base and spread evenly with an offset spatula or the back of a spoon.
- Immediately sprinkle the chopped pretzel pieces and nuts over the warm chocolate, pressing gently so they adhere.
- Refrigerate for at least 2 hours until the chocolate is completely set, then cut into squares and serve.
Variations And Substitutions
Swap semi-sweet chocolate for dark chocolate or white chocolate depending on your preference. Replace pretzels with crushed potato chips for a different salty crunch, or use a combination of both. Add a sprinkle of sea salt on top before the chocolate sets for extra saltiness. You can also layer in caramel or peanut butter between the shortbread and chocolate for additional richness and flavor complexity.
Make-Ahead, Storage, And Serving Tips
These bars keep well in an airtight container at room temperature for up to 5 days, or refrigerated for up to 2 weeks. You can prepare the shortbread base up to a day ahead and store it covered, then add the chocolate layer just before serving. If your kitchen is warm, keep the bars refrigerated so the chocolate doesn’t soften. For gift-giving, wrap individual bars in parchment paper and place in a box. If the chocolate layer cracks when cutting, use a sharp knife dipped in hot water and wiped clean between cuts.
Final Thoughts
Sheet pan dessert bars are the perfect solution for anyone who wants to bake something delicious without spending hours in the kitchen. Whether you’re craving something chocolatey, fruity, or nutty, there’s a recipe here that will satisfy your sweet tooth and impress everyone who tries it. The beauty of these bars is that they require minimal cleanup and maximum flavor, making them ideal for busy weeknights or weekend gatherings.
Pick one recipe that speaks to you and give it a try this week. Start with whichever flavor combination sounds most appealing, and don’t be afraid to make it your own by swapping in your favorite ingredients. Once you master one recipe, you’ll find yourself reaching for the sheet pan again and again, creating new favorites and becoming known as the person who always has delicious homemade treats on hand.
Fudge Brownies
Ingredients
Method
- Preheat oven to 350°F and grease an 8x8 inch baking pan.
- Melt butter and chopped chocolate together in a medium saucepan over low heat, stirring frequently.
- Remove from heat and stir in sugar, then let cool for 2 minutes.
- Beat in eggs one at a time, then add vanilla extract and mix until combined.
- In a separate bowl, whisk together flour, cocoa powder, and salt.
- Fold the dry ingredients into the chocolate mixture until just combined, then fold in chocolate chips.
- Pour batter into prepared pan and bake for 25 minutes until a toothpick inserted in the center comes out with a few moist crumbs.
- Cool completely in the pan before cutting into 12 squares.