Creative Walking Taco Bag Recipes and Sweet Treats
Creative Walking Taco Bag Recipes and Sweet Treats
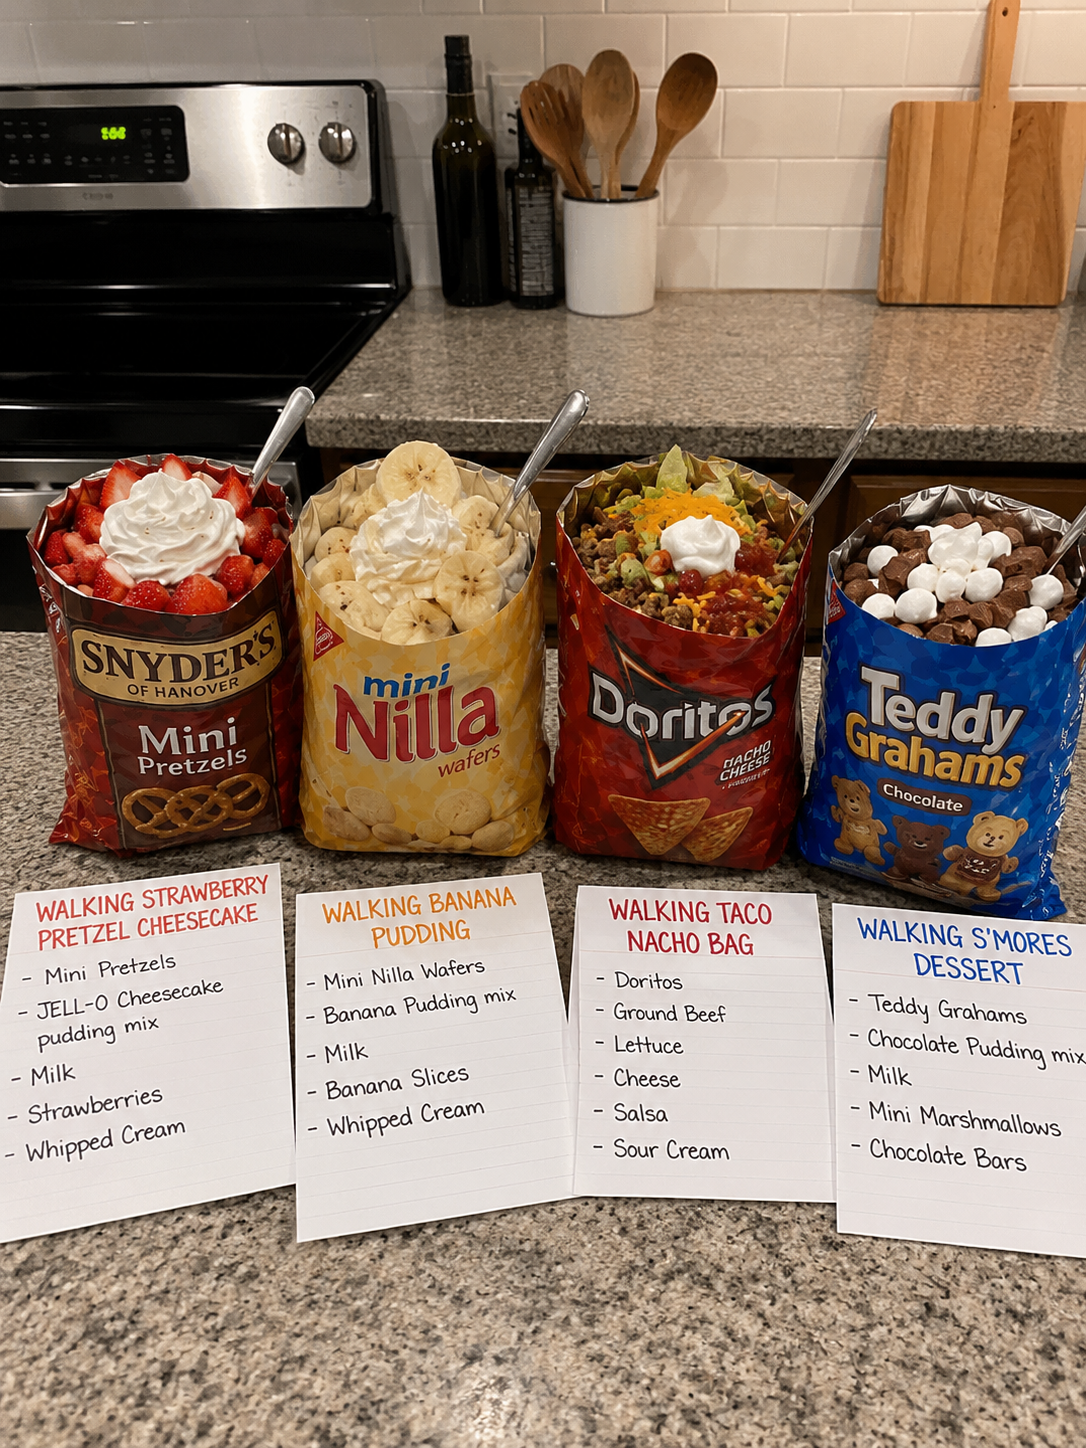
I’m so excited to share these creative walking taco bag recipes and sweet treats with you today! There’s something magical about serving up a complete meal or dessert right in the bag it came in, and I’ve rounded up some of my absolute favorite versions that go way beyond the classic. These recipes are total game-changers for potlucks, parties, and those nights when you want something fun that doesn’t require a ton of cleanup.
What I love most about these recipes is how they let you get creative in the kitchen while still keeping things simple enough that you’ll actually want to make them again and again. Whether you’re craving something savory like my walking taco nacho bag or something sweet like the strawberry pretzel cheesecake version, each one is designed to be portable, impressive, and absolutely delicious. These are definitely worth saving to your collection because they’re the kind of recipes people ask you to bring to every gathering.
I’ve tested and tweaked each of these until they’re just right, and I can’t wait for you to try them. If you love easy entertaining ideas and creative recipe twists, Follow me on HaileeRecipes on Pinterest where I’m constantly sharing new ways to make cooking fun and stress-free.
1. WALKING STRAWBERRY PRETZEL CHEESECAKE
This Walking Strawberry Pretzel Cheesecake transforms the classic dessert into a portable bag treat that combines sweet, salty, and creamy textures in every bite. Layers of crushed pretzels, smooth cheesecake filling, and fresh strawberries create a delightful contrast that works perfectly for outdoor adventures, picnics, or casual snacking. The individual bag format lets everyone customize their ratios of crunchy, creamy, and fruity elements, making it an interactive dessert experience. It’s ideal for warm-weather gatherings where you want something indulgent yet easy to eat on the go.
Why You’ll Love It
- No baking required—everything comes together with simple mixing and layering.
- Individually portioned in bags, making it mess-free and perfect for walking or standing.
- The salty-sweet combination of pretzels and cheesecake appeals to multiple flavor preferences.
Ingredients
- 2 cups crushed pretzel pieces
- 8 ounces cream cheese, softened
- 1/2 cup powdered sugar
- 1/2 cup heavy whipping cream
- 1 teaspoon vanilla extract
- 2 cups fresh strawberries, diced
- 2 tablespoons strawberry jam
- 8 small resealable bags
How To Make It
- In a large bowl, beat softened cream cheese and powdered sugar together until smooth and fluffy, about 2 minutes.
- In a separate bowl, whip the heavy cream and vanilla extract until stiff peaks form, then fold gently into the cream cheese mixture.
- In a small bowl, combine diced strawberries with strawberry jam and let sit for 5 minutes to release juices.
- Divide the crushed pretzels evenly among the 8 resealable bags, using about 1/4 cup per bag.
- Spoon the cheesecake mixture over the pretzels in each bag, dividing equally.
- Top each bag with the strawberry mixture, reserving some of the juices to drizzle on top.
- Seal the bags gently, leaving a small opening to allow for easy mixing and eating.
- Chill in the refrigerator for at least 1 hour before serving.
Variations And Substitutions
Replace strawberries with raspberries, blueberries, or a mixed berry combination for different flavor profiles. Substitute the cream cheese layer with Greek yogurt mixed with honey for a lighter version. Use chocolate-covered pretzels instead of plain for added richness, or swap in graham cracker crumbles for a different texture. For a no-dairy option, use dairy-free cream cheese and coconut whipped cream.
Make-Ahead, Storage, And Serving Tips
Prepare the cheesecake mixture and strawberry topping up to 2 days ahead, storing separately in the refrigerator. Assemble the bags no more than 4 hours before serving to prevent the pretzels from becoming too soft. Keep sealed bags refrigerated until ready to eat. For best texture, let guests gently shake and mix the bag before opening to combine all layers. These bags stay fresh for up to 8 hours when kept cool, making them ideal for day trips or outdoor events.
2. WALKING BANANA PUDDING
This delightful walking banana pudding transforms the classic dessert into a portable, hand-held treat perfect for picnics, road trips, and outdoor adventures. Creamy vanilla pudding layers with crushed vanilla wafers and fresh banana slices create a nostalgic flavor combination with satisfying texture contrasts. The individual bag format keeps everything contained and mess-free while delivering that comforting banana pudding experience you crave. It’s an ideal dessert for warm weather when you want something sweet but not too heavy, and it works wonderfully for potlucks where traditional plated desserts aren’t practical.
Why You’ll Love It
- Completely mess-free eating straight from the bag with no utensils required
- Combines creamy, crunchy, and fruity textures in every bite
- Requires no baking and comes together in under 15 minutes
- Appeals to both kids and adults with its familiar, comforting flavors
Ingredients
- 1 cup instant vanilla pudding mix
- 2 cups cold milk
- 3 ripe but firm bananas, sliced into coins
- 2 cups crushed vanilla wafer cookies
- 1/4 cup powdered sugar
- 1 teaspoon vanilla extract
- Pinch of cinnamon
- Individual snack-sized bags or small resealable containers
How To Make It
- Prepare the pudding by whisking the instant vanilla pudding mix with cold milk until thickened, about 2 minutes. Stir in vanilla extract.
- Slice bananas into thin coins and toss gently with a pinch of powdered sugar to prevent browning and add sweetness.
- Crush vanilla wafers into bite-sized pieces, keeping some texture rather than making fine crumbs.
- Layer ingredients in individual bags starting with a spoonful of crushed wafers on the bottom.
- Add a layer of vanilla pudding, then banana slices, then more wafers.
- Repeat layering until the bag is three-quarters full, ending with a wafer layer on top.
- Sprinkle a light dusting of cinnamon over the top for extra flavor.
- Seal bags and refrigerate until ready to serve or eat immediately.
Variations And Substitutions
Substitute regular vanilla pudding made from scratch if you prefer avoiding instant mixes. Try chocolate pudding for a twist, or swap vanilla wafers for graham crackers or shortbread cookies. Add a tablespoon of caramel sauce between layers for extra richness, or include a small handful of chopped pecans or walnuts for crunch. For a lighter version, use Greek yogurt mixed with a bit of honey instead of pudding. Fresh strawberries or blueberries can replace or complement the bananas.
Make-Ahead, Storage, And Serving Tips
Prepare these bags up to 4 hours ahead and refrigerate to keep pudding cool and prevent bananas from oxidizing. The wafers will gradually soften as they absorb moisture, which some prefer for a cake-like texture, while others prefer eating within 2 hours for maximum crunch. Pack in an insulated cooler with an ice pack for outdoor serving. If bananas brown slightly, it won’t affect taste. You can assemble the dry ingredients ahead and add pudding and bananas just before eating for optimal texture preservation.
3. WALKING TACO NACHO BAG
Transform the classic walking taco into a loaded nacho experience by layering crushed tortilla chips with all your favorite nacho toppings directly in the bag. This handheld version combines crispy, salty chips with warm cheese, seasoned beef, jalapeños, sour cream, and fresh toppings for a satisfying crunch and flavor explosion. Perfect for tailgates, picnics, or casual weeknight dinners, this recipe delivers restaurant-quality nachos without the mess of a plate. The beauty of this walking taco variation is that everything stays contained in the bag, making it ideal for eating on the go while keeping your hands relatively clean.
Why You’ll Love It
- All the nacho indulgence in an easy-to-eat, portable format that requires no utensils or plates.
- Customizable with your preferred toppings, allowing everyone to build their own flavor combination.
- The warm cheese and meat heat the chips just enough to soften them slightly while maintaining satisfying crunch.
Ingredients
- 2 cups crushed tortilla chips
- 1 cup seasoned ground beef or shredded chicken
- 1 cup shredded cheddar or Mexican cheese blend
- 1/2 cup diced jalapeños
- 1/2 cup diced tomatoes
- 1/4 cup sliced black olives
- 1/2 cup sour cream or Mexican crema
- 2 tablespoons fresh cilantro, chopped
- 1/4 cup diced red onion
How To Make It
- Cook and season ground beef with taco seasoning according to package directions, or warm pre-cooked shredded chicken with seasoning until heated through.
- Pour crushed tortilla chips into a sturdy snack-sized bag, filling it about halfway.
- Spoon the warm seasoned meat evenly over the chips inside the bag.
- Sprinkle shredded cheese directly over the meat while it’s still warm so the cheese begins to melt.
- Add jalapeños, diced tomatoes, black olives, and red onion on top of the cheese layer.
- Drizzle sour cream over all the toppings, distributing it evenly throughout the bag.
- Gently shake and toss the bag to combine all ingredients, ensuring flavors distribute evenly.
- Top with fresh cilantro and serve immediately while the cheese is still warm and melty.
Variations And Substitutions
Swap ground beef for seasoned ground turkey or crumbled chorizo for different protein options. Replace cheddar with pepper jack cheese for extra heat, or use a queso dip instead of shredded cheese for easier melting. Add corn, black beans, or pico de gallo for additional texture and flavor. For a lighter version, use baked tortilla chips and Greek yogurt instead of sour cream. Experiment with different hot sauces drizzled throughout, or top with guacamole for creaminess.
Make-Ahead, Storage, And Serving Tips
Prepare seasoned meat up to two days ahead and reheat before assembling bags. Chop all vegetables and store separately in containers for quick assembly. Assemble bags just before serving to keep chips crispy and cheese warm. If preparing slightly ahead, wait to add sour cream until just before eating to prevent sogginess. These bags are best enjoyed immediately while warm and crunchy. For large gatherings, set up a nacho bar where guests can customize their own bags with their preferred toppings and cheese levels.
4. WALKING S'MORES DESSERT
This handheld s’mores dessert transforms the classic campfire treat into a portable walking taco bag experience. Crushed graham crackers form the base, layered with melted chocolate chips and toasted marshmallows for that authentic s’mores flavor in every bite. The combination of sweet, crunchy, and gooey textures makes it perfect for outdoor adventures, picnics, or casual snacking. It’s an ideal dessert when you want the nostalgia of s’mores without needing a campfire, and the individual bag format means everyone gets their own customizable portion.
Why You’ll Love It
- No campfire required—enjoy s’mores flavor anytime and anywhere with minimal prep.
- Individual servings in bags make it perfect for parties, potlucks, or family outings.
- Customizable sweetness and chocolate-to-marshmallow ratios to suit every preference.
Ingredients
- 2 cups crushed graham crackers
- 1 cup semi-sweet chocolate chips
- 1 cup mini marshmallows
- 3 tablespoons butter, melted
- 2 tablespoons brown sugar
- 1 teaspoon vanilla extract
- Pinch of sea salt
- 6 small paper or foil bags
How To Make It
- Crush graham crackers into bite-sized pieces and place in a large bowl.
- Drizzle melted butter over the crushed graham crackers and toss until evenly coated.
- Add brown sugar, vanilla extract, and sea salt to the mixture, stirring well to combine.
- Divide the graham cracker mixture evenly among the six bags, filling each about one-third full.
- Layer chocolate chips on top of the graham crackers in each bag.
- Top with mini marshmallows, pressing them gently into the chocolate.
- Fold the bags closed and let sit for 5-10 minutes so the heat from the chocolate softens the marshmallows slightly.
- Shake each bag gently before eating to combine all the layers into a cohesive dessert.
Variations And Substitutions
Swap semi-sweet chocolate for dark chocolate or white chocolate chips depending on preference. Add crushed cookies like Oreos or digestive biscuits for extra flavor complexity. Toast the marshmallows lightly in a dry skillet before bagging for a more authentic campfire taste. Include a drizzle of caramel or chocolate sauce for added richness. For a nutty twist, sprinkle crushed pecans or almonds into each bag.
Make-Ahead, Storage, And Serving Tips
Assemble bags up to 2 days ahead and store in an airtight container at room temperature. Keep chocolate and marshmallows separate until just before serving if making far in advance, then layer them together when ready to eat. These bags are best enjoyed within a few hours of assembly while the marshmallows maintain their texture. Serve them as an interactive dessert where guests shake and mix their own bags, or pre-mix everything for convenience. Store in a cool location to prevent chocolate from melting excessively.
Final Thoughts
Walking tacos and sweet treats in edible bags are more than just fun novelties—they’re practical solutions for meals on the go while adding an interactive, memorable element to any gathering. Whether you’re hosting a casual weeknight dinner, planning a picnic, or looking for creative party food, these recipes offer something for everyone. The beauty of this concept lies in its flexibility; you can customize each bag to individual tastes and dietary preferences without any fuss.
We encourage you to pick just one recipe to try first—perhaps start with the classic seasoned beef walking taco if you’re new to the concept, or jump straight to the churro bag if you’re craving something sweet. Once you’ve mastered your first creation, you’ll find yourself experimenting with new flavor combinations and impressing friends and family with your creativity. The joy is in the journey, so grab your favorite bag of chips and get started today!
Creative Walking Taco Bag Recipes and Sweet Treats
Ingredients
Method
- Walking Strawberry Pretzel Cheesecake: Layer crushed pretzels in individual snack bags, then add cream cheese mixed with jam and top with whipped topping.
- Walking Strawberry Pretzel Cheesecake: Shake bag gently to combine layers just before eating for optimal texture.
- Walking Banana Pudding: Combine crushed vanilla wafers with prepared pudding in portable bags, then add sliced banana and whipped cream.
- Walking Banana Pudding: Mix contents of bag thoroughly before serving to distribute all ingredients evenly.
- Walking Taco Nacho Bag: Layer crushed tortilla chips with seasoned ground beef, cheese, and sour cream in individual bags.
- Walking Taco Nacho Bag: Add salsa to taste and shake well to combine all components before eating.
- Walking S'mores Dessert: Combine crushed graham crackers, chocolate chips, and mini marshmallows in individual snack bags.
- Walking S'mores Dessert: Optional: briefly microwave bag for 15 seconds to slightly melt chocolate before eating.
Notes
Walking Banana Pudding Tips: Slice banana immediately before packing to prevent browning. Best consumed within 1 hour of preparation.
Walking Taco Nacho Bag Tips: Keep meat warm in insulated container. Prepare toppings separately and add to bag at serving time.
Walking S'mores Dessert Tips: Store in cool location. For warm s'mores, microwave sealed bag carefully or add warm marshmallows at serving time.