Mac & Cheese Quesadilla
Mac & Cheese Quesadilla
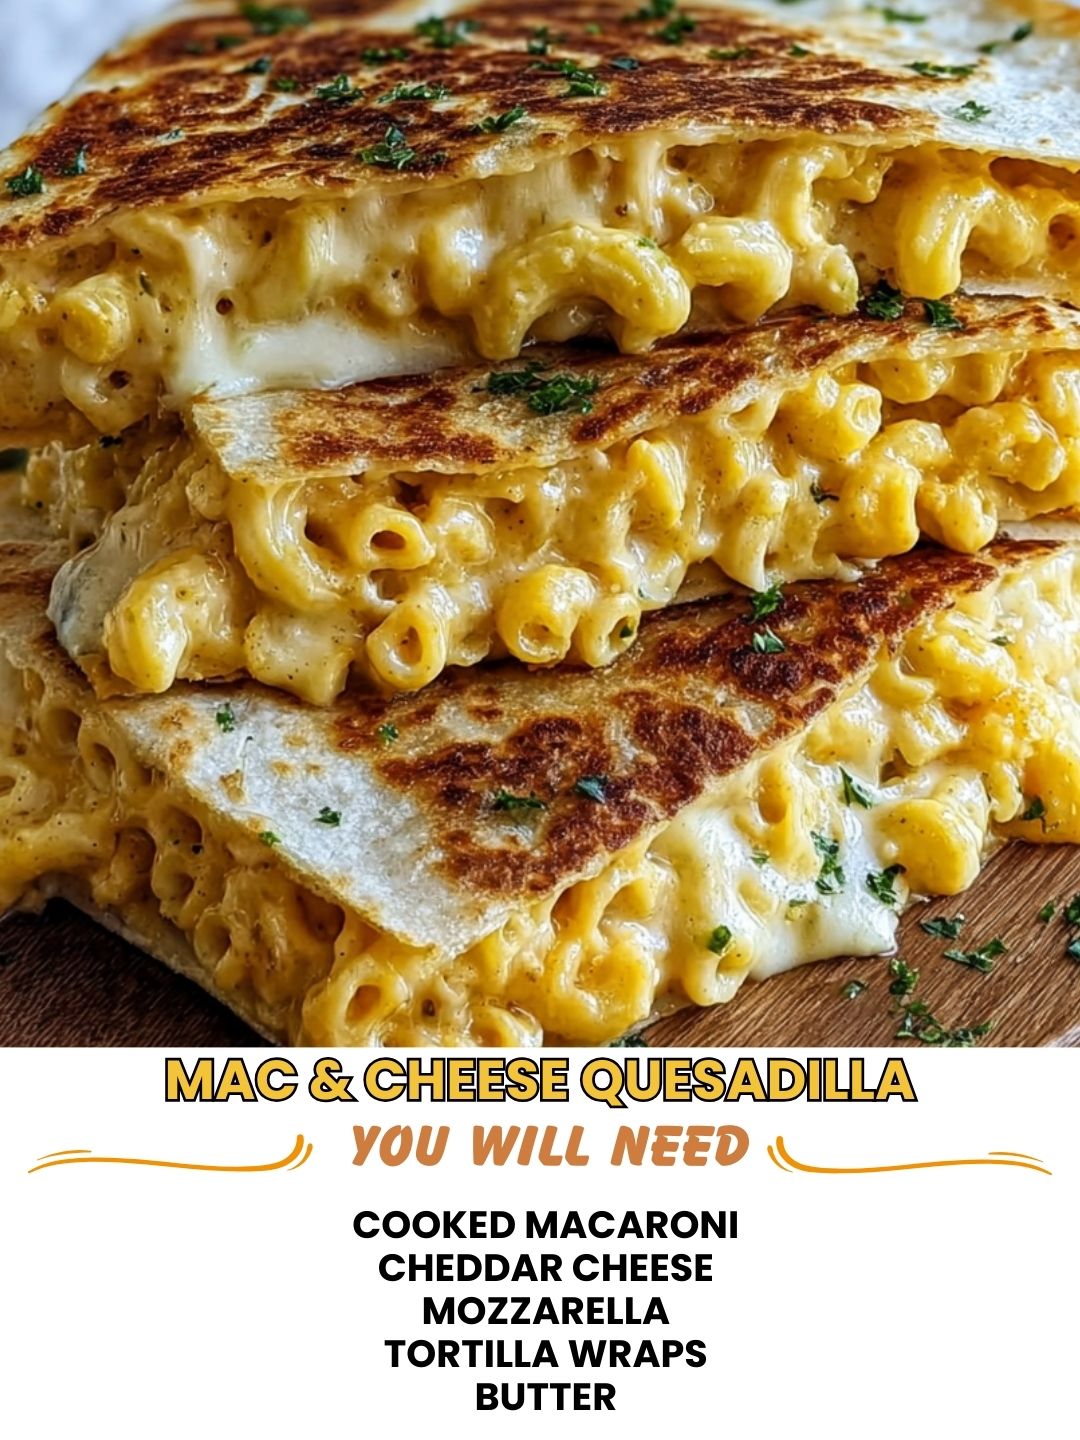
Mac & Cheese Quesadilla: A Comfort Food Mashup That Actually Works
I was standing in my kitchen on a Tuesday night, staring at a pot of leftover mac and cheese and a stack of flour tortillas, when my brain just kind of… broke in the best way. What if I took two of my favorite comfort foods and smashed them together? I know, I know—it sounds like something a sleep-deprived person would dream up at 2 a.m. But hear me out.
That first Mac & Cheese Quesadilla came together almost by accident. I buttered a tortilla, loaded it with creamy pasta, pressed it in a skillet, and watched the edges turn golden and crispy while the inside got all warm and gooey. When I bit into it, I felt like I’d discovered something magical. It had the crispy exterior of a perfect quesadilla, the creamy nostalgia of homemade mac and cheese, and honestly? It tasted like a warm hug wrapped in melted cheese.
Since that night, I’ve made this recipe probably fifty times. My friends think I’m slightly unhinged for loving it this much, but they always ask for seconds. My partner now requests it on stressful days. And my nephew—who is notoriously picky—will actually eat vegetables if they’re hidden in the mac and cheese filling. This recipe has become my go-to when I want something that feels indulgent but doesn’t require a ton of effort or fancy ingredients.
The beauty of a Mac & Cheese Quesadilla is that it works for so many situations. Late-night dinner? Yes. Lunch for the next day? Absolutely. Feeding a crowd of people with wildly different tastes? It’s your secret weapon. And if you’ve got leftover pasta hanging around, you’re basically already halfway there.
If you love cozy, cheesy comfort food and you’re open to a little culinary adventure, I think you’re going to really enjoy this one. Follow me on HaileeRecipes on Pinterest for more recipes that blur the lines between categories and make your kitchen smell absolutely incredible.
Why You’ll Love This Recipe
Let me break down what makes this so special, because it’s not just about throwing things together.
- It’s genuinely quick. Seriously, from start to finish, you’re looking at about 15 minutes. Most of that is just cooking time while you scroll your phone.
- You probably have everything already. Pasta, cheese, tortillas, butter. These aren’t fancy ingredients. This is real-life cooking.
- It’s endlessly customizable. Vegetarian? Add broccoli. Want protein? Throw in bacon or rotisserie chicken. Spice lover? Hot sauce is your friend.
- It tastes indulgent but isn’t pretentious. There’s no complicated technique here. Just good flavors, good texture, and honest food.
- Leftovers are actually better the next day. The flavors meld together, and you can reheat it in a skillet for that crispy exterior all over again.
- It works for any meal. Breakfast, lunch, dinner, late-night snack—this quesadilla doesn’t judge.
Ingredients
This is where I keep things simple and real. Here’s what you’ll need to make four generous quesadillas (or two massive ones if you’re feeling it):
- 2 cups cooked mac and cheese (homemade or boxed—I won’t tell)
- 4 large flour tortillas (I use burrito-size, but regular is fine too)
- 1 cup shredded cheddar cheese (sharp cheddar is my preference, but use what you love)
- 4 tablespoons butter, divided
- Salt and pepper to taste
- Optional: 1/2 teaspoon garlic powder, 1/4 teaspoon smoked paprika
Hailee’s Tip: Don’t use your fancy, fresh mac and cheese for this. Slightly cooled leftovers are actually perfect because they hold together better when you fold the tortilla. If you’re making it fresh, let it cool for a few minutes before assembling.
Hailee’s Tip: The type of tortilla matters more than you’d think. Flour tortillas are your best friend here—they get crispy on the outside and stay pliable enough to fold without cracking. Corn tortillas are great, but they’re more fragile. Whole wheat works too, though the flavor will be a bit earthier.
Hailee’s Tip: Use real butter, not margarine. I know it sounds fussy, but the flavor difference is honestly noticeable, and butter crisps up the tortilla in a way that other fats just don’t quite achieve.
Optional Add-Ins and Variations
This is where you make it yours. Here are some of my favorite additions:
- Proteins: Crumbled bacon, diced rotisserie chicken, ground beef, or even pulled pork. About 1/4 cup per quesadilla works great.
- Vegetables: Sautéed broccoli, roasted jalapeños, caramelized onions, or fresh spinach. I usually add about 2 tablespoons per quesadilla.
- Extra cheese: Gruyere, smoked gouda, or pepper jack for a little heat.
- Seasonings: Hot sauce mixed into the mac and cheese, sriracha mayo for dipping, or fresh cilantro sprinkled on top.
- Crispy elements: Crushed tortilla chips mixed into the filling for extra texture.
Step-by-Step Method
Alright, let’s make this happen. I’m going to walk you through exactly how I do it, including the moments where I’ve definitely messed up so you don’t have to.
Step 1: Gather and prep your mac and cheese
Pull your cooked mac and cheese out of the fridge or pot. If it’s piping hot, let it cool for a couple of minutes—this makes it way easier to work with and less likely to tear through your tortilla. Give it a quick stir to make sure it’s evenly distributed. If it looks a little dry, add a splash of milk to loosen it up.
What I messed up: I once tried to use mac and cheese that was still steaming hot, and it just slid right out of the tortilla when I tried to fold it. Not my finest moment.
Step 2: Heat your skillet
Place a large skillet or griddle over medium heat. Let it warm up for about a minute. You want it hot enough that butter sizzles immediately when it hits the pan, but not so hot that it smokes.
Step 3: Butter one side of your tortilla
Take one tortilla and spread about 1/2 tablespoon of butter on one side. This is going to be the outside of your quesadilla—the side that gets crispy and golden.
Step 4: Place tortilla butter-side down in the skillet
Lay that tortilla butter-side down into your hot skillet. You should hear a little sizzle. That’s the sound of deliciousness happening.
Step 5: Add your filling
Now, here’s the key: don’t overfill. I know it’s tempting, but too much filling makes it hard to fold and causes leakage. I use about 1/2 cup of mac and cheese per quesadilla, plus any add-ins I’m using. Spread it on one half of the tortilla, leaving about a half-inch border around the edges.
Step 6: Sprinkle with extra cheese
Add a small handful of shredded cheddar (about 1/4 cup) right on top of the mac and cheese. This creates a cheese barrier that helps hold everything together and adds extra deliciousness.
Step 7: Fold and butter the top
Carefully fold the tortilla in half. Use a spatula to press it down gently. Now butter the top side of the folded tortilla with another 1/2 tablespoon of butter.
Step 8: Cook until golden
Let it cook for about 2-3 minutes without moving it. You want that bottom to turn golden brown and crispy. Then, using your spatula, carefully flip it and cook the other side for another 2-3 minutes until it’s equally golden.
What I messed up: I’ve definitely flipped too early and had the whole thing fall apart. Patience is your friend here. Give it time to set before flipping.
Step 9: Transfer to a plate and let cool for 30 seconds
Slide your finished quesadilla onto a plate. I know you want to dive in immediately, but give it just half a minute to set slightly. This prevents the filling from sliding out when you cut into it.
Step 10: Repeat for remaining quesadillas
Make the rest of your quesadillas using the same method. You might need to adjust your heat slightly as you go—if the skillet seems too hot, turn it down a notch.
Common Mistakes to Avoid
I’ve made all of these, so you don’t have to:
- Using cold mac and cheese straight from the fridge. It doesn’t melt as well and can be lumpy. Let it come to room temperature or warm it gently first.
- Overfilling the quesadilla. More filling does not equal better. It just means more mess. Stick with about 1/2 cup.
- Flipping too early. The tortilla needs time to crisp up. Wait at least 2-3 minutes before flipping.
- Forgetting to butter both sides. The butter is what creates that crispy, golden exterior. Don’t skip it.
- Using a skillet that’s too hot. This burns the outside before the inside gets warm. Medium heat is your sweet spot.
- Not seasoning the mac and cheese. Taste it before you use it as filling. If it needs salt or pepper, add it now.
My Tested Substitutions
Real life doesn’t always match the recipe card, and that’s okay. Here’s what I’ve actually swapped out and how it worked:
Tortillas: I’ve used corn tortillas successfully, though they’re more delicate. I’ve also used whole wheat tortillas, which add a nuttier flavor. Homemade tortillas are absolutely incredible if you have the time.
Mac and cheese: Homemade, boxed, Annie’s, Kraft—I’ve used them all. The boxed stuff is totally fine. I’ve also used leftover baked mac and cheese, which works beautifully.
Cheese: Any melting cheese works. I’ve used gruyere, smoked gouda, pepper jack, and even a mix of cheeses. The flavor changes, but it’s always good.
Butter: Olive oil works in a pinch, but the flavor and crispiness aren’t quite the same. I’d stick with butter if you can.
Cooking method: You can also make these on a panini press or in a waffle iron if you’re feeling adventurous. They come out with fun textures and cook a bit faster.
How to Customize
The beauty of this recipe is that it’s a blank canvas. Here are some of my favorite combinations:
The Fancy Version: Use homemade mac and cheese with gruyere, add crispy bacon and caramelized onions, serve with a simple arugula salad on the side.
The Spicy Version: Mix hot sauce into the mac and cheese, add jalapeños, use pepper jack cheese, and serve with a dollop of sour cream for cooling.
The Loaded Version: Add rotisserie chicken, broccoli, and a bit of garlic powder to the mac and cheese. It becomes almost like a complete meal in one quesadilla.
The Breakfast Version: Use your leftover mac and cheese, add a fried egg in the middle, and serve it with hot sauce and avocado. Yes, really.
The Veggie Version: Load it up with sautéed mushrooms, spinach, roasted red peppers, and maybe some sun-dried tomatoes. It’s surprisingly satisfying.
Serving Ideas
A Mac & Cheese Quesadilla is honestly great on its own, but here’s what I like to serve alongside it:
- A simple green salad with lemon vinaigrette. The acidity cuts through the richness beautifully.
- Roasted vegetables like broccoli or Brussels sprouts. It balances out the meal.
- A fruit side like sliced apple or grapes. I know it sounds random, but the sweetness is nice.
- Dipping sauces: Sour cream, ranch, hot sauce, or even a simple marinara.
- A cold drink: Iced tea, lemonade, or honestly just water. This is rich, so something refreshing is nice.
If you’re serving this to a group, I usually make a big batch and let people customize their own dipping sauces and sides.
Meal Prep and Storage
Here’s the thing about this recipe that makes it even better: it stores beautifully.
Refrigerator: Store leftover quesadillas in an airtight container for up to 3 days. They’re actually great cold, but I prefer to reheat them.
Reheating: Pop them back in a skillet over medium heat for 2-3 minutes per side. They’ll crisp right back up. You can also use a toaster oven at 350 degrees for about 5 minutes.
Freezing: You can freeze uncooked quesadillas. Assemble them, wrap them individually in plastic wrap, and freeze for up to a month. Cook from frozen—just add an extra minute or two to the cooking time.
Make-ahead tip: I often prepare the mac and cheese filling the day before, which cuts down on cooking time when I actually want to eat.
Nutritional Breakdown
Here’s what you’re looking at per quesadilla (approximate, since this varies based on your specific ingredients):
- Calories: 520
- Protein: 18g
- Carbohydrates: 42g
- Fat: 28g
- Fiber: 2g
This will change if you add proteins or vegetables, but this gives you a baseline. It’s a rich, satisfying meal, so one quesadilla is usually enough.
Final Thoughts
I genuinely love this recipe because it represents everything I believe cooking should be: simple, delicious, and totally forgiving. You don’t need fancy equipment or hard-to-find ingredients. You just need butter, cheese, pasta, and a willingness to try something a little different.
The Mac & Cheese Quesadilla has become my comfort food of choice because it tastes like someone made it with love, even when I’m just making it for myself on a Tuesday night. It’s the kind of food that makes you feel taken care of, which honestly, we all need sometimes.
I hope you make this soon, and I really hope you enjoy it as much as I do. If you do, I’d love to hear about it. Tell me what add-ins you used, or if you made it exactly as written. That’s what makes this whole thing worthwhile—knowing that something I created in my kitchen is bringing joy to yours.
Now go get yourself some butter and tortillas. You’ve got a quesadilla to make.
Recipe Card
Mac & Cheese Quesadilla
Ingredients
Method
- 1