Crispy Baked Zucchini Chips
Crispy Baked Zucchini Chips
Crispy Baked Zucchini Chips: A Game-Changing Snack That Actually Tastes Good
I remember the exact moment I decided to make crispy baked zucchini chips. It was late summer, my garden was absolutely bursting with zucchini—I’m talking the kind of abundance where you start leaving them on your neighbor’s porch—and I was tired of the same old zucchini bread. My kids were asking for snacks that weren’t chips or candy, and I was craving something crunchy and satisfying without feeling guilty about it.
So I started experimenting. I tried frying them. Too greasy. I tried baking them plain. Too soggy. Then one afternoon, while I was stress-eating regular potato chips and feeling annoyed about it, I had this thought: what if I treated zucchini like I was making the crispiest baked chicken wing? What if I brined it, dried it really well, coated it properly, and baked it at a high temperature?
That’s when the magic happened.
These crispy baked zucchini chips are now a permanent fixture in my kitchen. They’re crunchy, they’re flavorful, they’re genuinely delicious—not in that “healthy food tastes like cardboard” way, but in the “I actually want to eat these” way. My kids fight over them. My husband sneaks them when he thinks I’m not looking. And honestly? They’re so easy to make that I don’t know why I didn’t figure this out sooner.
This recipe is for anyone who wants a real snack that happens to be good for you. It’s for busy parents, for people meal prepping, for anyone who’s tired of feeling deprived when they’re trying to eat better. It’s also just genuinely delicious, which is the most important part.
Follow me on HaileeRecipes on Pinterest for more recipes like this one that actually work in real life.
Why You’ll Love This Recipe
Let me be real with you: crispy baked zucchini chips work because they solve actual problems. First, they’re genuinely crispy. I’m not talking about that chewy, slightly soggy texture you get from most baked veggie recipes. These are actually crunchy. That crunch is what makes them satisfying, what makes them feel like a real snack instead of a punishment for wanting to eat something good.
Second, they’re versatile. You can season them however you want. I’ve made them with Italian herbs, with ranch seasoning, with everything bagel seasoning, with just salt and pepper. They work with whatever flavor profile you’re craving. That flexibility means you’re not going to get bored with them.
Third, they’re genuinely quick. From start to finish, you’re looking at about 30 minutes. Most of that is passive baking time while you do something else. The actual hands-on time is maybe five minutes. That’s not a lot of effort for something this satisfying.
And finally, they’re perfect for so many situations. They’re great as a snack straight from the oven. They’re good in lunchboxes. They work as an appetizer when people come over. They’re perfect for meal prep. They’re the kind of recipe that just fits into real life without being complicated.
Ingredients
- 2 medium zucchini (about 1 pound total), sliced into 1/4-inch rounds
- 1 teaspoon salt (for brining)
- 2 tablespoons cornstarch
- 1/4 cup grated Parmesan cheese
- 1 teaspoon garlic powder
- 1 teaspoon onion powder
- 1/2 teaspoon paprika
- 1/2 teaspoon black pepper
- 1/4 teaspoon cayenne pepper (optional, if you like heat)
- 2 tablespoons olive oil (or cooking spray)
Hailee’s Tip: The cornstarch is the secret weapon here. It’s what gives these chips that crispy, almost fried texture without any oil. Don’t skip it.
Hailee’s Tip: Buy medium zucchini, not the giant ones. The smaller ones have fewer seeds and less water, which means crispier chips.
Hailee’s Tip: I use freshly grated Parmesan when I can, but pre-grated works fine too. Just don’t use the stuff in the green can—it has too many additives and won’t coat as nicely.
Optional Add-Ins and Variations
Here’s where you get to play. The base recipe is solid, but it’s also a blank canvas. Some of my favorite variations:
- Italian seasoning version: Replace the garlic and onion powder with 1 teaspoon of Italian seasoning. Add a pinch of dried oregano. This is what I make when I’m feeling Mediterranean.
- Ranch version: Use 1 teaspoon ranch powder mix instead of the individual spices. It’s lazy, but it works beautifully.
- Everything bagel version: Use everything bagel seasoning in place of the spice blend. Honestly, this might be my favorite.
- Spicy version: Increase the cayenne to 1/2 teaspoon and add 1/4 teaspoon of smoked paprika. Add a tiny pinch of chili powder if you want it even spicier.
- Lemon herb version: Add 1/2 teaspoon of lemon zest to the coating and use dried thyme instead of the garlic powder.
Step-by-Step Method
Step 1: Slice and Salt Your Zucchini
Slice your zucchini into 1/4-inch rounds. This is important—too thin and they’ll burn, too thick and they won’t get crispy. I use a mandoline for this because it’s faster and more consistent, but a sharp knife works too. Just be careful with your fingers.
Lay the slices out on a cutting board or clean kitchen towel. Sprinkle them with 1 teaspoon of salt and let them sit for 10 minutes. This draws out the excess moisture, which is crucial for crispiness. Trust me on this step.
Hailee’s Moment of Honesty: The first time I made these, I skipped the salting step because I was impatient. They came out chewy and disappointing. Never again. The salt step is non-negotiable.
Step 2: Dry Your Zucchini Thoroughly
After 10 minutes, pat the zucchini slices completely dry with paper towels. Don’t just give them a quick dab—really dry them. The drier they are, the crispier they’ll get. I usually press gently with the paper towels, then let them air dry for another minute or two while I prep my seasoning mixture.
Step 3: Make Your Seasoning Mixture
In a small bowl, combine the cornstarch, Parmesan, garlic powder, onion powder, paprika, black pepper, and cayenne (if using). Mix it together really well. The cornstarch has a tendency to clump, so break it up with your fingers as you mix. You want an even, consistent coating mixture.
Step 4: Coat Your Zucchini
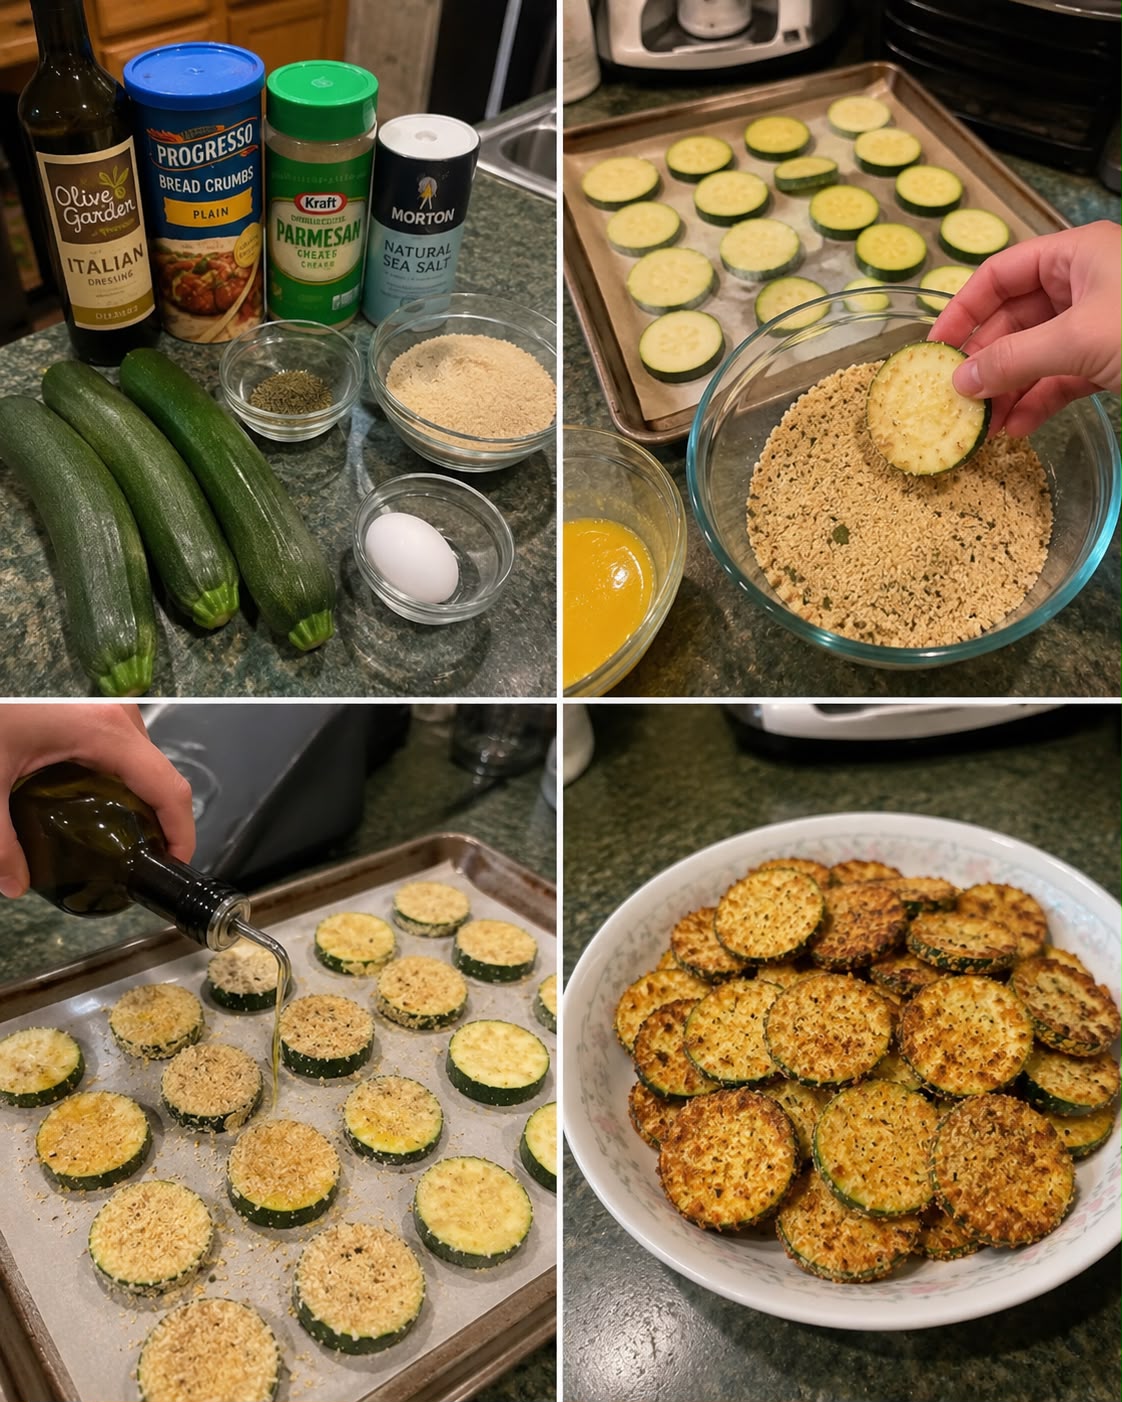
This is where most people go wrong. You need to coat each slice evenly, but you don’t want to oversaturate. Here’s what I do: I put the seasoning mixture in a shallow bowl or on a plate. I drizzle the olive oil over the bottom of a baking sheet and use my fingers to spread it around lightly. Then I dip each zucchini slice into the seasoning mixture, coating both sides, and place it on the oiled baking sheet.
Make sure the slices aren’t overlapping. They need space to get crispy. If you crowd them, they’ll steam instead of bake, and you’ll end up with chewy chips instead of crispy ones.
Step 5: Bake at High Heat
Preheat your oven to 425°F. Bake the zucchini chips for 20 to 25 minutes, depending on your oven. They’re done when the edges are golden and crispy and the centers are tender but still have a little firmness to them. They’ll crisp up even more as they cool, so don’t overbake them.
Step 6: Cool Before Serving
Let them cool on the baking sheet for about 5 minutes. This is when they really firm up and get that satisfying crunch. If you try to eat them straight out of the oven, they’ll be hot and a little floppy. Wait those five minutes. It’s worth it.
Common Mistakes to Avoid
Skipping the salt step: I mentioned this already, but it bears repeating. The salt draws out moisture. No moisture means crispy chips. Skip this and you’ll have disappointment on your hands.
Not drying the zucchini thoroughly: Moisture is the enemy of crispiness. Dry them well. Then dry them some more.
Crowding the baking sheet: Give those chips space. They need air circulation to crisp up properly. If they’re touching, they’ll steam. Soggy chips are sad chips.
Using too much oil: You only need a light coating. Too much oil and they’ll be greasy instead of crispy. A light drizzle is all you need.
Not slicing evenly: If some slices are 1/8-inch and others are 1/2-inch, they’ll bake unevenly. The thin ones will burn while the thick ones are still soft. Use a mandoline if you have one, or take your time with a knife.
Underbaking them: They should be golden and have crispy edges. If they’re still pale, they need more time. A few extra minutes makes a huge difference.
My Tested Substitutions
For the cornstarch: Potato starch works just as well. Arrowroot powder also works, though it’s slightly less crispy. I haven’t had success with flour—it doesn’t give you that same texture.
For the Parmesan: You can use pecorino Romano for a sharper flavor, or skip it entirely if you’re dairy-free. The chips will still be good, just slightly less savory. If you go dairy-free, add an extra 1/2 teaspoon of garlic powder to compensate for the lost umami.
For the olive oil: Any neutral oil works. Avocado oil, vegetable oil, canola oil—they all work fine. You can also use cooking spray if you want to cut the fat even more. It works, but the texture is slightly less crispy.
For fresh zucchini: I’ve never tried frozen zucchini for this, and I don’t recommend it. Frozen zucchini releases too much water when it thaws, and you’d lose that crispiness that makes these special.
How to Customize
The beauty of this recipe is that it’s endlessly customizable. Think about what flavors you love and build from there.
Love Mexican food? Add cumin, chili powder, and a pinch of smoked paprika. Skip the Parmesan and add lime zest.
Love Indian flavors? Use garam masala, a pinch of turmeric, and some curry powder. Add a little ground ginger if you want.
Love Mediterranean flavors? Use dried oregano, thyme, and a little lemon zest. Add some sun-dried tomato powder if you have it.
The key is to start with the base recipe and then add your own flavor profile. Don’t be afraid to experiment. The worst that happens is you learn what doesn’t work, and then you try again.
Serving Ideas
Straight from the oven is my favorite way to eat these, but they’re also great for:
- Lunchbox snack: Pack them in a container with a dip like ranch or hummus.
- Appetizer: Arrange them on a platter with a few different dipping sauces. People always think they’re more complicated than they are.
- Side dish: Serve them alongside grilled chicken or fish instead of fries.
- Snack board: Mix them with other snacks like cheese, nuts, and olives for a casual grazing situation.
- Salad topper: Crumble them up and use them as a crunchy topping on salads.
- Dipping situation: Pair them with ranch dip, garlic aioli, marinara sauce, or even a simple tzatziki.
Meal Prep & Storage
These chips are best eaten the day they’re made, when they’re at peak crispiness. But I get it—sometimes you want to make them ahead.
Storing them: Keep cooled chips in an airtight container at room temperature for up to 2 days. After that, they start to soften. They’ll still taste fine, but they lose that satisfying crunch. If you want to refresh them, pop them in a 350°F oven for 5 minutes.
Making ahead: You can slice and salt your zucchini up to 4 hours ahead. Keep them covered with a paper towel in the fridge. When you’re ready to cook, just dry them again and proceed with the recipe.
Freezing: I don’t recommend freezing the cooked chips. They get weird when they thaw. But you can freeze the raw, coated zucchini on a baking sheet, then transfer to a freezer bag. Bake directly from frozen, adding about 5 extra minutes to the baking time.
Nutritional Breakdown
Per serving (makes about 24 chips, so roughly 6 chips per serving):
- Calories: 45
- Protein: 1.5g
- Carbs: 3g
- Fat: 3g
- Fiber: 0.5g
These are genuinely light snacking. You can eat a whole serving and not feel like you’ve derailed anything. They’re perfect for when you want something satisfying without the guilt.
Final Thoughts
I love this recipe because it’s proof that healthy eating doesn’t have to be boring or complicated. These crispy baked zucchini chips are delicious because they’re actually good, not because I’m trying to trick you into eating vegetables. They’re crunchy and flavorful and satisfying, and they happen to be made from zucchini.
That’s the whole philosophy of my cooking, really. I want to make food that tastes good first, and if it happens to be healthy, that’s a bonus. These chips nail that balance.
Make them this week. Experiment with your favorite seasonings. Let me know what variations you come up with. And most importantly, enjoy them while they’re still warm and crispy, maybe with a cold drink and a moment to yourself. You deserve it.
—
Recipe Card
**Crispy Baked Zucchini Chips**
Crispy Baked Zucchini Chips
Ingredients
Method
- Slice zucchini into 1/4-inch rounds and lay on a cutting board. Sprinkle with 1 teaspoon salt and let sit for 10 minutes to draw out moisture.
- Pat zucchini slices completely dry with paper towels.
- In a small bowl, combine cornstarch, Parmesan, garlic powder, onion powder, paprika, black pepper, and cayenne. Mix well, breaking up any clumps.
- Preheat oven to 425°F. Lightly oil a baking sheet with olive oil, spreading it aroun