Easy Raspberry Cheesecake Bites
Easy Raspberry Cheesecake Bites
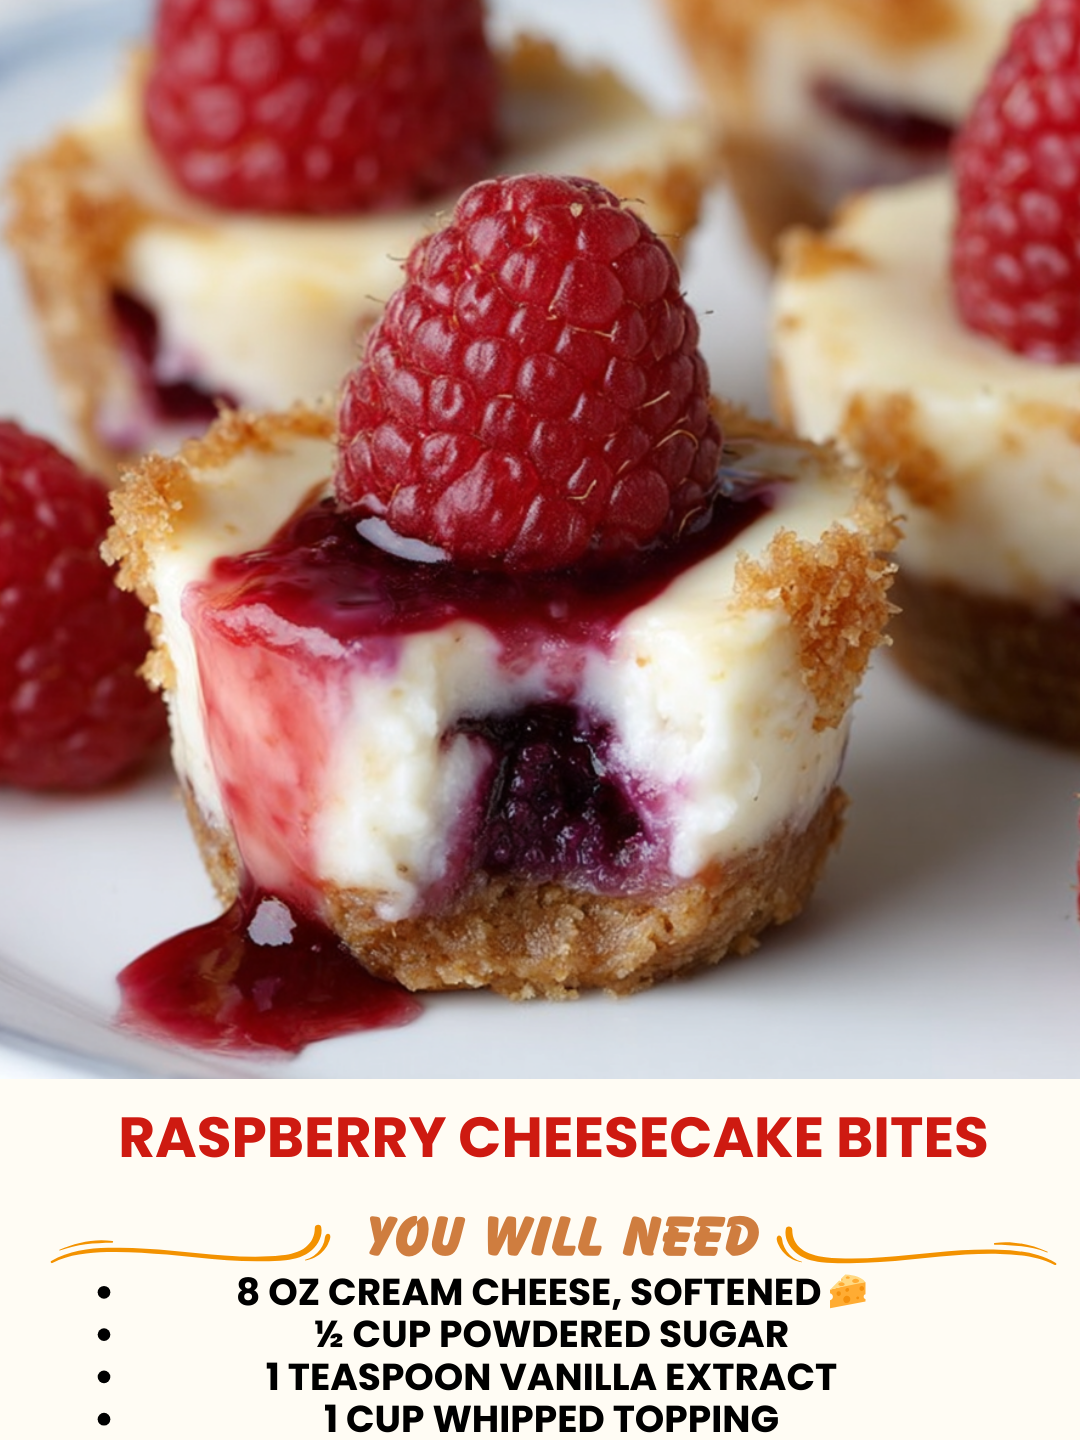
Easy Raspberry Cheesecake Bites: The Recipe I Make When I Want Fancy Without the Fuss
Last summer, I was hosting my book club at my place, and I wanted to make something that looked like I’d spent all day in the kitchen. You know that feeling, right? When you want to impress people but also want to actually enjoy their company instead of stress-baking for three hours? That’s when I came up with these Easy Raspberry Cheesecake Bites, and honestly, they’ve become my go-to move.
I remember standing in my kitchen on a Tuesday night, craving cheesecake but absolutely not wanting to deal with a water bath, a springform pan, and the anxiety of whether it would crack. I had some cream cheese softening on the counter, fresh raspberries from the farmer’s market, and about twenty minutes before my friends showed up. So I grabbed my muffin tin, threw together what would become my favorite no-bake formula, and these little bites were born. My friend Sarah literally closed her eyes when she bit into one. That’s when I knew I was onto something.
Here’s why I love this recipe so much: it tastes like you spent hours on it, but it takes maybe thirty minutes from start to finish. No oven required. No complicated techniques. No wondering if your cheesecake is “done” because there’s nothing to bake. It’s just buttery graham cracker crust, silky cheesecake filling, and bright, tart raspberries on top. These bites are perfect for dinner parties, potlucks, meal prep, or just when you want to feel a little fancy on a random Thursday night.
If you’re the type of person who loves cheesecake but gets intimidated by the traditional route, or if you just appreciate recipes that actually fit into real life, this one’s for you. I’ve made these with my mom, with my nieces, and solo at midnight when I couldn’t sleep. They never disappoint. Follow me on HaileeRecipes on Pinterest for more recipes that taste way fancier than they actually are.
Why You’ll Love This Recipe
Let me be real with you: these aren’t just good because they taste amazing (though they absolutely do). They’re good because they fit into actual human life.
- No baking required. Seriously. Your oven stays off. This matters when you’re already hot, when you’re making multiple recipes, or when you just don’t feel like heating up your kitchen.
- They look impressive but taste approachable. These aren’t fussy or pretentious. They’re just delicious little pockets of creamy, fruity joy.
- Make-ahead friendly. You can prepare these the morning of your event, or even the day before. They actually get better as they chill.
- Naturally portion-controlled. One bite is satisfying. You don’t end up eating half a cheesecake in one sitting because you couldn’t stop (though honestly, I wouldn’t blame you).
- Customizable to your taste. Want to use blackberries instead? Go for it. Want to add lemon zest? Perfect. This recipe is flexible and forgiving.
- Genuinely easy to execute. Even if you’re a beginner baker, you can make these. I promise.
Ingredients
Here’s what you’ll need. I’ve added my little tips throughout because I’ve learned a lot from making these over and over.
- 1 1/2 cups graham cracker crumbs (about 10-12 crackers) — Hailee’s Tip: Don’t pulverize these into dust. You want some texture. I pulse mine in a food processor just until they’re broken into pea-sized pieces.
- 5 tablespoons unsalted butter, melted — Hailee’s Tip: Melted butter makes the crust come together without any mixing fuss. Cold butter is your enemy here.
- 2 tablespoons sugar — Hailee’s Tip: This adds a touch of sweetness to the crust. Don’t skip it; it makes a difference.
- 8 oz cream cheese, softened to room temperature — Hailee’s Tip: This is non-negotiable. Cold cream cheese won’t blend smoothly, and you’ll end up with lumps. Take it out of the fridge thirty minutes before you start.
- 1/4 cup powdered sugar — Hailee’s Tip: Powdered sugar dissolves better than granulated when you’re not cooking the filling, so use it here.
- 1/2 teaspoon vanilla extract — Hailee’s Tip: Real vanilla tastes better, but imitation works fine if that’s what you have. I use what I have on hand.
- 1/4 cup heavy cream — Hailee’s Tip: This keeps the filling light and fluffy. Don’t use milk as a substitute; the texture will be off.
- 1 cup fresh raspberries — Hailee’s Tip: Use the freshest berries you can find. They’re the star here, so they deserve to be good.
- 2 tablespoons raspberry jam or preserves — Hailee’s Tip: This adds a glossy finish and extra flavor. Seedless is prettier, but use whatever you have.
- Pinch of salt — Hailee’s Tip: Salt makes everything taste better. Don’t skip it.
Optional Add-Ins and Variations
This is where you get to make the recipe yours. I love the classic version, but here are some tweaks I’ve played with:
- Lemon or lime zest: Add a teaspoon to the filling for brightness. It pairs beautifully with raspberries.
- A splash of liqueur: A teaspoon of raspberry liqueur or chambord in the filling is absolutely lovely for adult gatherings.
- White chocolate drizzle: Melt a bit of white chocolate and drizzle it over the top before the jam sets. Fancy and delicious.
- Almond extract: Use half a teaspoon instead of vanilla for a subtle almond note.
- Different berries: Blackberries, blueberries, or even strawberries work beautifully. Mix and match if you want.
- Honey instead of jam: A tiny drizzle of honey on top is elegant and adds a floral note.
Step-by-Step Method
Let’s make these. I’m going to walk you through exactly how I do it, including the moments where I’ve messed up so you don’t have to.
Step 1: Prepare Your Pan
Line a muffin tin with paper liners or silicone muffin cups. This step saves you so much cleanup and makes it easy to pop these out. If you don’t have liners, you can skip this, but they’ll stick a little. I always use liners.
Step 2: Make the Crust
In a small bowl, combine your graham cracker crumbs, melted butter, sugar, and salt. Mix it with a fork until it looks like wet sand. This takes about one minute. Press about a tablespoon of this mixture into the bottom of each muffin cup. I use the bottom of a shot glass to pack it down evenly. Here’s what I messed up the first time: I over-packed the crust and it became hard instead of crispy. Pack it gently but firmly, and you’ll be fine.
Step 3: Chill the Crusts
Pop the muffin tin in the freezer for about ten minutes while you make the filling. This helps the crust set and stay in place. I know ten minutes feels like forever when you’re excited, but it’s worth it.
Step 4: Make the Filling
In a medium bowl, beat the softened cream cheese with a hand mixer (or a whisk if you’re feeling strong) until it’s smooth and creamy. This takes about two minutes. Add the powdered sugar, vanilla, and salt, and mix until combined. Now add the heavy cream a little at a time, mixing gently until you have a light, fluffy filling. Don’t overmix once you add the cream, or you’ll end up with something closer to whipped cream than cheesecake filling.
Step 5: Fill the Cups
Take your muffin tin out of the freezer. Spoon or pipe the filling into each cup on top of the crust. I use a small cookie scoop or a spoon, but if you have a piping bag, that looks even prettier. Fill them almost to the top, leaving just a tiny bit of room for the raspberry and jam.
Step 6: Top with Raspberries
Press one fresh raspberry into the top of each bite, pointy side up. They’re so pretty this way.
Step 7: Add the Jam Glaze
Warm your raspberry jam slightly (I microwave it for about ten seconds) so it’s loose enough to brush or spoon onto the raspberries. This gives them a gorgeous glossy finish and locks in the flavor. Let a tiny bit drip down the sides if you want. It looks intentional and delicious.
Step 8: Chill and Serve
Refrigerate for at least two hours before serving. These can sit in the fridge for up to four days, which is perfect for make-ahead situations.
Common Mistakes to Avoid
I’ve made these so many times, and I’ve learned what works and what doesn’t. Here’s what to watch out for:
- Using cold cream cheese: This is the biggest one. Cold cream cheese won’t blend smoothly, and you’ll end up with lumps in your filling. Let it sit out for thirty minutes. Seriously.
- Overmixing the filling: Once you add the heavy cream, mix gently. Overmixing can make it grainy or turn it into whipped cream texture.
- Packing the crust too hard: A gentle pack is all you need. Too much pressure and it becomes dense and hard instead of crispy.
- Skipping the chill time: I know it’s tempting to eat these right away, but two hours makes a huge difference in texture and flavor. The flavors meld, and everything sets properly.
- Using old raspberries: If your raspberries are starting to get soft or moldy, they won’t taste good. Use the freshest ones you can find.
- Not warming the jam: Cold jam won’t spread smoothly and looks clumpy. A quick warm-up makes it glossy and professional-looking.
My Tested Substitutions
Life happens, and you might not have exactly what the recipe calls for. Here’s what I’ve swapped out and what actually works:
- Honey instead of powdered sugar: Use a little less (about three tablespoons) because honey is sweeter. The filling will be slightly thinner, but still delicious.
- Greek yogurt for half the cream cheese: This makes a lighter filling and adds protein. Use four ounces cream cheese and four ounces Greek yogurt. It’s tangier but really good.
- Coconut oil instead of butter: Works great for the crust. Use the same amount, melted.
- Almond flour mixed with graham cracker crumbs: Half and half gives you a gluten-free option and a nuttier flavor.
- Frozen raspberries: Thaw them completely and pat them dry. They work, but fresh is definitely better.
- Any jam flavor: Strawberry, blackberry, apricot—they all work. Use what you love.
How to Customize
One of the best things about this recipe is how adaptable it is. Here are some ways to make it your own:
- Flavor the crust: Add a teaspoon of cinnamon or a pinch of nutmeg to the graham cracker mixture.
- Make it chocolate: Replace half the graham crackers with crushed chocolate cookies. Use chocolate jam on top.
- Add citrus: Zest a lemon or lime into the filling, and use lemon or lime curd instead of jam.
- Go nutty: Mix crushed pistachios or almonds into the crust.
- Make it boozy: Add a teaspoon of liqueur to the filling for grown-up gatherings.
- Swap the fruit: Use blackberries, blueberries, or even fresh figs on top.
Serving Ideas
These little bites are versatile. Here’s how I serve them:
- At dinner parties: Make them the day before and arrange on a pretty platter. They’re elegant and impressive.
- For brunch: Serve with coffee or champagne. They’re light enough to enjoy after a meal.
- As a dessert course: One or two per person is the perfect ending to dinner.
- For meal prep: Make a batch on Sunday and enjoy one or two throughout the week as a treat.
- At potlucks: They travel well and always get compliments.
- As a gift: Arrange them in a box with parchment between each layer. People love homemade treats.
Meal Prep and Storage
This is one of my favorite things about this recipe: it’s actually better when you make it ahead.
Make-Ahead: You can prepare these up to two days in advance. Keep them in an airtight container in the fridge. The flavors actually meld and get better as they sit.
Storage: Keep them refrigerated in an airtight container for up to four days. Don’t leave them at room temperature for more than two hours, especially if your kitchen is warm.
Freezing: You can freeze these for up to one month. Place them on a baking sheet to freeze individually first, then transfer to a freezer bag. Thaw in the fridge for a few hours before serving. The texture stays pretty good, though the raspberries get a bit softer.
Transporting: If you’re taking these somewhere, pack them carefully in a container with parchment between layers. They’re sturdy enough to handle a little jostling, but they’re not indestructible.
Nutritional Breakdown
Here’s what you’re getting in each bite (these are approximate, based on twelve servings):
- Calories: 145
- Protein: 2g
- Carbohydrates: 14g
- Fat: 9g
- Fiber: 1g
- Sugar: 10g
These are reasonably balanced for a dessert. The cream cheese and butter provide healthy fats, the raspberries add fiber and antioxidants, and the portion size is naturally controlled. I don’t stress about nutrition too much with treats like these—I just enjoy them and move on.
Final Thoughts
Making Easy Raspberry Cheesecake Bites has become one of my favorite kitchen rituals. There’s something so satisfying about creating something that looks fancy and tastes incredible without spending hours on it. These bites have shown up at my book club, my niece’s birthday party, my friend’s bridal shower, and honestly, just random Tuesday nights when I wanted to feel a little fancy.
I love recipes that work in real life. Recipes that don’t require a culinary degree, special equipment, or ingredients you can’t find at your regular grocery store. This is one of those recipes. It’s approachable, it’s flexible, and it genuinely tastes like you put in way more effort than you actually did.
So go ahead and make these. Make them for people you love. Make them for yourself on a night when you deserve something special. Make them ahead and feel like you have your life together. Make them with your kids or your friends or your partner. Make them and let me know how it goes. I’d love to hear about your version.
You’ve got this, and these bites are going to be delicious.
Warmly,
Hailee
Recipe Card
**Easy Raspberry Cheesecake Bites**
**Ingredients**
- 1 1/2 cups graham cracker crumbs
- 5 tablespoons unsal