5 No-Bake Truffles: Easy, Delicious, No Oven Needed
5 No-Bake Truffles: Easy, Delicious, No Oven Needed
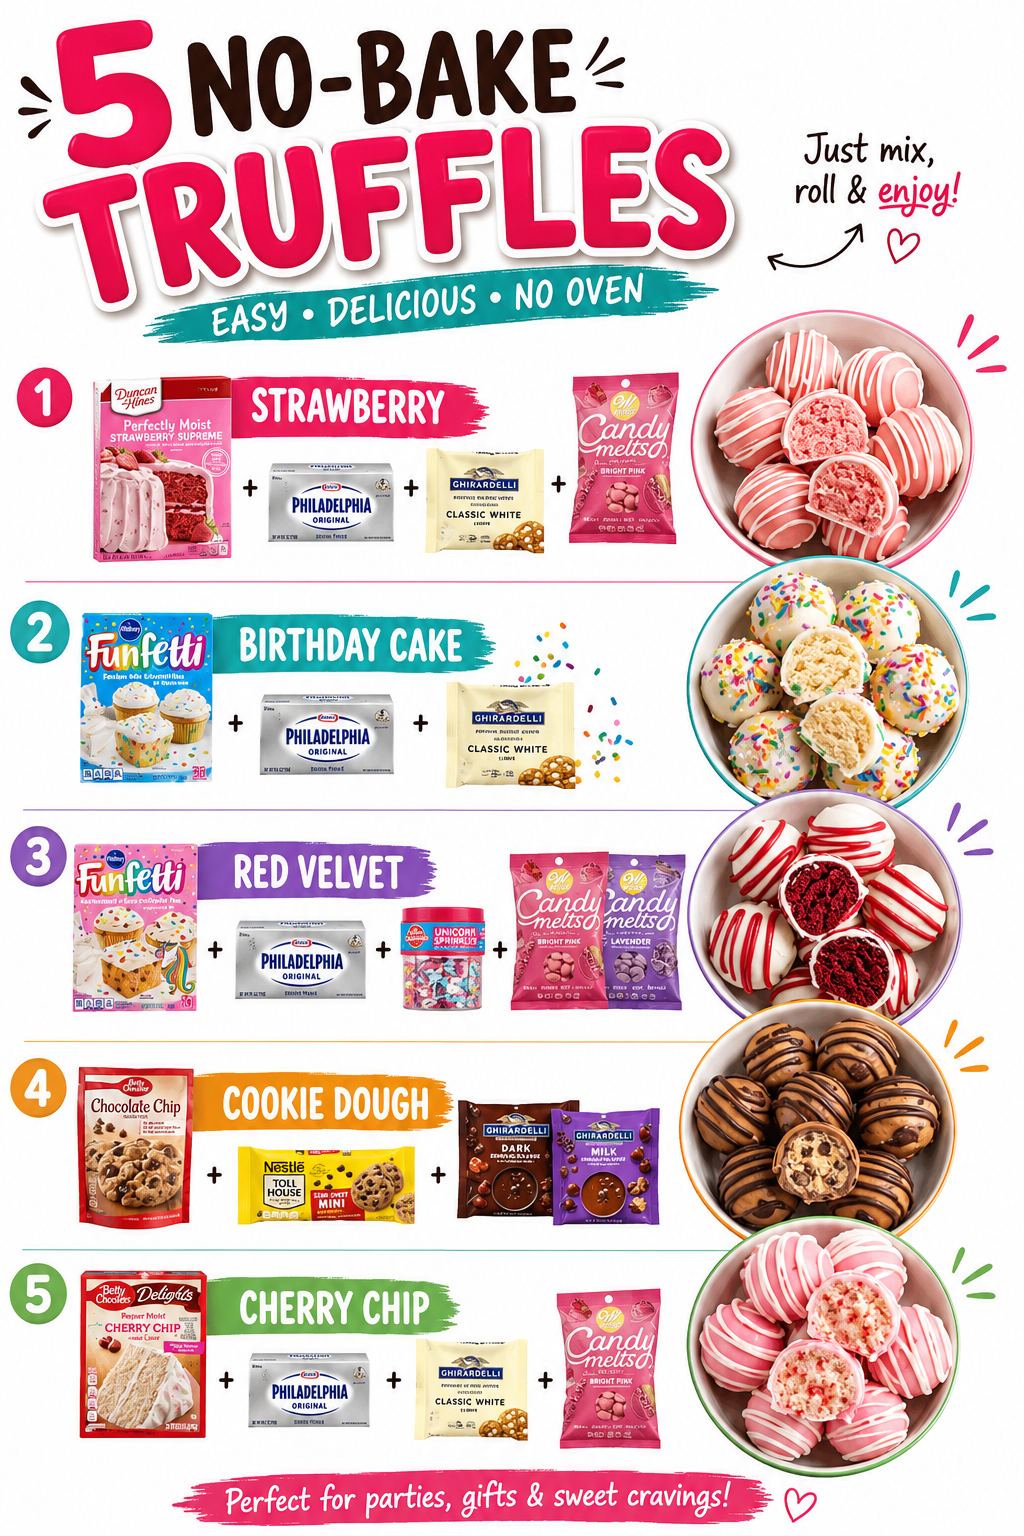
I’m obsessed with no-bake truffles because they’re the perfect solution when you want homemade candy without heating up your kitchen. Whether it’s the middle of summer or you just don’t feel like turning on the oven, these five recipes prove that some of the best treats require nothing but a mixing bowl and your refrigerator. I’ve tested each one multiple times, and they’re all foolproof enough that even if you’ve never made truffles before, you’ll end up with something absolutely delicious.
What makes this roundup so helpful is that you can whip up any of these in about 30 minutes of active time, then let the fridge do the rest of the work while you relax. From the bright freshness of strawberry truffles to the nostalgic fun of birthday cake and cookie dough flavors, there’s something here for every craving and every occasion. These are the kinds of recipes worth bookmarking because you’ll find yourself making them over and over again.
I’ve included my favorite flavor combinations—strawberry, birthday cake, red velvet, cookie dough, and cherry chip—and each one is simple enough to customize with your own twist. If you love easy recipes like these, Follow me on HaileeRecipes on Pinterest for more no-stress dessert ideas that actually taste homemade.
1. Strawberry
These luscious strawberry truffles combine fresh berry flavor with rich chocolate and creamy sweetness in every bite. With a vibrant pink center and dark chocolate coating, they offer a delightful balance of tart and sweet that feels indulgent yet surprisingly simple to make. Perfect for Valentine’s Day, bridal showers, or whenever you want an elegant dessert without heating the oven, these no-bake treats impress guests and satisfy cravings in minutes.
Why You’ll Love It
- Ready in under 30 minutes with minimal hands-on time and no baking required.
- Naturally flavored with real strawberries for authentic fruit taste and beautiful color.
- Impressive enough for entertaining yet easy enough for beginners to master.
Ingredients
- 1 cup fresh strawberries, hulled and finely chopped
- 8 ounces cream cheese, softened to room temperature
- 1 cup powdered sugar
- 1 teaspoon vanilla extract
- 8 ounces dark chocolate, chopped
- 2 tablespoons coconut oil or butter
- Freeze-dried strawberries for topping, optional
- Pinch of sea salt for finishing
How To Make It
- Pat the chopped fresh strawberries dry with paper towels to remove excess moisture, which prevents the filling from becoming too wet.
- Beat softened cream cheese with powdered sugar and vanilla extract until smooth and fluffy, about 2 minutes with an electric mixer.
- Fold the dried strawberries gently into the cream cheese mixture until evenly distributed throughout.
- Scoop the mixture into teaspoon-sized portions and roll between your palms into smooth balls, then place on a parchment-lined tray and refrigerate for at least 1 hour until firm.
- Melt the chopped dark chocolate with coconut oil in a microwave-safe bowl in 30-second intervals, stirring between each, until completely smooth.
- Working with one truffle at a time, dip each cold ball into the melted chocolate using a fork, tap off excess, and return to the parchment-lined tray.
- If desired, immediately top each truffle with a piece of freeze-dried strawberry or a pinch of sea salt before the chocolate sets.
- Allow the chocolate coating to set at room temperature for 15 minutes, or refrigerate for faster setting.
Variations And Substitutions
Swap fresh strawberries for freeze-dried ones blended into a powder for more concentrated flavor and less moisture. Substitute white chocolate or milk chocolate for the dark chocolate coating. Add a teaspoon of strawberry jam to the filling for extra fruity depth. For a boozy version, mix in a splash of strawberry liqueur or champagne. Replace cream cheese with mascarpone for a lighter, airier texture.
Make-Ahead, Storage, And Serving Tips
Prepare the filling up to 2 days ahead and refrigerate in an airtight container. Store finished truffles in the refrigerator for up to 1 week in an airtight container, separating layers with parchment paper to prevent sticking. For longer storage, freeze uncoated balls for up to 3 months, then dip in chocolate as needed. Serve chilled straight from the refrigerator for the best texture, as they soften quickly at room temperature. If truffles become too soft while dipping, return them to the freezer for 15 minutes.
2. Birthday Cake
These birthday cake truffles capture all the joy of a classic celebration in bite-sized form. Featuring a moist vanilla cake crumb base mixed with cream cheese frosting, then dipped in white chocolate and sprinkled with colorful nonpareils, they deliver that nostalgic birthday party flavor everyone loves. The combination of tender cake pieces and creamy frosting creates a perfect texture contrast, while the white chocolate coating adds elegance. These are ideal for celebrations, gift-giving, or simply treating yourself to a festive no-bake dessert that tastes like homemade indulgence.
Why You’ll Love It
- Uses pantry staples and store-bought vanilla cake, making them incredibly quick to assemble.
- The cream cheese frosting adds tanginess that balances the sweetness perfectly.
- Customizable with different sprinkles, jimmies, or edible glitter to match any occasion.
Ingredients
- 1 store-bought vanilla cake, crumbled into fine crumbs
- 4 ounces cream cheese, softened
- 2 tablespoons butter, softened
- 1 teaspoon vanilla extract
- 1 cup powdered sugar
- 8 ounces white chocolate, chopped
- 1 tablespoon coconut oil or shortening
- Colorful nonpareils or sprinkles for topping
How To Make It
- Crumble the store-bought vanilla cake into a large bowl until you have fine, uniform crumbs. You should have about 2 to 2.5 cups of crumbs.
- In another bowl, beat together the softened cream cheese, butter, and vanilla extract until smooth and fluffy, about 2 minutes.
- Gradually mix in the powdered sugar until fully incorporated, then fold this frosting mixture into the cake crumbs until the texture resembles wet sand and holds together when squeezed.
- Roll the mixture into 1-inch balls and place them on a parchment-lined baking sheet. Refrigerate for at least 30 minutes until firm.
- Combine the chopped white chocolate and coconut oil in a microwave-safe bowl, then heat in 30-second intervals, stirring between each, until completely melted and smooth.
- Using a fork or dipping tool, dip each truffle into the melted white chocolate, tap off excess, and return it to the parchment paper.
- Immediately sprinkle colorful nonpareils on top of each truffle while the chocolate is still wet.
- Allow the chocolate coating to set at room temperature for 1 to 2 hours, or refrigerate for faster setting.
Variations And Substitutions
Swap the vanilla cake for chocolate or funfetti cake to change the flavor profile entirely. Replace cream cheese frosting with buttercream if preferred, or add a tablespoon of sprinkles into the cake mixture for extra color throughout. For a different coating, use milk chocolate, dark chocolate, or even candy melts in pastel colors. You can also press a birthday candle-shaped sprinkle or small edible pearl into the top before the chocolate sets for extra festive flair.
Make-Ahead, Storage, And Serving Tips
These truffles can be made up to 5 days ahead and stored in an airtight container in the refrigerator. You can also freeze the rolled cake balls before dipping for up to 2 weeks, then dip them straight from the freezer for easier handling. Serve them chilled or at room temperature. If the white chocolate coating cracks during dipping, add a bit more coconut oil to thin it slightly. These truffles are perfect for birthday parties, bake sales, or as an edible gift packaged in a festive box.
3. Red Velvet
Red velvet truffles deliver the sophisticated flavor of the classic cake in an elegant, bite-sized form. These no-bake gems feature a tangy cream cheese center with subtle cocoa notes and a striking red exterior, all finished with a smooth chocolate coating. The velvety texture melts on your tongue, making them perfect for holiday parties, Valentine’s Day, or any occasion calling for an impressive homemade treat. They’re impressive enough to gift yet simple enough for beginners to master.
Why You’ll Love It
- Captures the beloved red velvet cake flavor without any baking required.
- Elegant presentation makes them look professionally made despite minimal effort.
- Cream cheese filling provides tangy richness that balances the chocolate coating perfectly.
Ingredients
- 8 ounces cream cheese, softened
- 1 cup powdered sugar
- 2 tablespoons unsweetened cocoa powder
- 1 teaspoon vanilla extract
- 1 teaspoon red gel food coloring
- 8 ounces dark chocolate, chopped
- 1 tablespoon coconut oil or shortening
- Red sprinkles or white chocolate shavings for garnish (optional)
How To Make It
- Beat softened cream cheese with powdered sugar until smooth and fluffy, about 2 minutes.
- Sift cocoa powder into the mixture and stir until fully combined and evenly colored.
- Add vanilla extract and red gel food coloring, mixing until you achieve a deep red-brown hue.
- Refrigerate the mixture for 30 minutes, then scoop into 1-inch balls using a melon baller or spoon. Place on a parchment-lined baking sheet and freeze for at least 1 hour.
- Combine chopped chocolate and coconut oil in a microwave-safe bowl. Heat in 30-second intervals, stirring between each, until melted and smooth.
- Using a fork or dipping tool, submerge each frozen truffle into the melted chocolate, coating completely, then return to the parchment sheet.
- Sprinkle with garnish immediately if desired, before chocolate sets.
- Allow chocolate coating to set at room temperature for 20 minutes, or refrigerate for faster setting.
Variations And Substitutions
For a white chocolate version, substitute white chocolate for the dark chocolate coating. If you prefer less cocoa flavor, reduce it to 1 tablespoon. Swap gel coloring for liquid food coloring, though you may need slightly less to avoid affecting the texture. For a cream cheese lover’s version, increase cream cheese to 10 ounces and reduce powdered sugar to 3/4 cup. Add a pinch of cinnamon or a dash of almond extract for subtle depth.
Make-Ahead, Storage, And Serving Tips
These truffles keep refrigerated in an airtight container for up to 10 days or frozen for up to 3 weeks. Prepare the cream cheese filling up to 2 days ahead and refrigerate before rolling. For the best texture, serve directly from the refrigerator so the cream cheese center stays firm. If truffles become too soft while dipping, return them to the freezer for 15 minutes. These are best enjoyed within a few hours of chocolate coating for optimal contrast between the creamy center and crisp shell.
4. Cookie Dough
This indulgent no-bake cookie dough truffle captures all the nostalgic joy of eating raw cookie dough without any food safety concerns. Creamy, buttery, and studded with chocolate chips, these bites deliver rich vanilla flavor and a tender, melt-in-your-mouth texture that satisfies sweet cravings instantly. The combination of heat-treated flour and pasteurized eggs ensures complete safety, making these perfect for snacking straight from the fridge, serving at parties, or gifting to fellow cookie dough enthusiasts. They’re ideal for busy bakers who want homemade treats without turning on the oven.
Why You’ll Love It
- Tastes exactly like edible cookie dough with none of the food safety worries.
- Ready in under 15 minutes with minimal ingredients and zero baking required.
- Makes an impressive homemade gift that looks far more complicated than it actually is.
Ingredients
- 1 cup unsalted butter, softened
- 3/4 cup granulated sugar
- 1/4 cup brown sugar
- 1 teaspoon vanilla extract
- 1 1/2 cups heat-treated all-purpose flour
- 1/4 teaspoon sea salt
- 3/4 cup mini chocolate chips
- 2 tablespoons milk
How To Make It
- Heat your flour in a dry skillet over medium heat for 3 to 5 minutes, stirring constantly, until it reaches 160 degrees Fahrenheit on a thermometer. This kills any potential bacteria. Spread on a plate to cool completely before using.
- In a large bowl, cream together the softened butter, granulated sugar, and brown sugar until light and fluffy, about 2 to 3 minutes of beating.
- Add the vanilla extract to the butter mixture and beat until fully incorporated.
- Gently fold in the cooled heat-treated flour and sea salt until just combined, then fold in the chocolate chips and milk until the dough comes together into a thick, cohesive mixture.
- Using a small cookie scoop or spoon, form the dough into 1-inch balls and place them on a parchment-lined baking sheet.
- Refrigerate the truffles for at least 30 minutes until firm enough to handle and serve.
- If desired, roll each truffle in cocoa powder, crushed cookies, or sprinkles for added texture and visual appeal.
Variations And Substitutions
Swap mini chocolate chips for chopped white chocolate, crushed pretzels, or candy-coated chocolate pieces for different flavor profiles. Add 1 tablespoon of peanut butter or almond butter to the dough for a nutty twist. For brown butter lovers, brown your butter before creaming it with the sugars to deepen the flavor. You can also dust finished truffles with powdered sugar, edible glitter, or dip them halfway in melted chocolate for an elegant presentation.
Make-Ahead, Storage, And Serving Tips
Store these truffles in an airtight container in the refrigerator for up to one week or freeze for up to three months. They can be made up to two days ahead, making them perfect for advance party prep. Serve them chilled directly from the fridge for the best texture, or let them sit at room temperature for 5 minutes if you prefer a slightly softer bite. If the dough becomes too warm while rolling, refrigerate it for 10 minutes to firm up again. These are best enjoyed within a few hours of removing from the fridge for optimal texture.
5. Cherry Chip
Cherry Chip truffles combine tart dried cherries with rich dark chocolate and white chocolate chips for a sophisticated flavor profile that feels indulgent yet refreshingly fruity. These no-bake gems feature a fudgy center with delightful pops of sweetness and texture from the chips. They’re perfect for holiday gift-giving, dinner party desserts, or whenever you need an elegant treat without turning on the oven. The combination of cherry and chocolate is a classic pairing that works beautifully in truffle form, making these a standout addition to any dessert spread.
Why You’ll Love It
- The tart cherry flavor cuts through the richness of chocolate, creating a perfectly balanced bite.
- White and dark chocolate chips add textural interest and visual appeal to each truffle.
- Ready in under 30 minutes with minimal ingredients and no special equipment required.
Ingredients
- 1 cup dried cherries, finely chopped
- 8 ounces dark chocolate, chopped
- 1/2 cup heavy cream
- 2 tablespoons butter
- 1/2 cup white chocolate chips
- 1/4 cup dark chocolate chips
- 2 tablespoons cocoa powder for coating
- 1 teaspoon vanilla extract
How To Make It
- Heat the heavy cream and butter together in a small saucepan over medium heat until steaming, then pour over the chopped dark chocolate in a bowl and let sit for 2 minutes.
- Stir the chocolate mixture until completely smooth and glossy, then add vanilla extract and mix well.
- Fold in the finely chopped dried cherries, white chocolate chips, and dark chocolate chips until evenly distributed throughout the ganache.
- Refrigerate the mixture for 1 hour until firm enough to scoop.
- Using a small cookie scoop or spoon, form the mixture into 1-inch balls and place on a parchment-lined baking sheet.
- Refrigerate the formed truffles for 30 minutes until set.
- Roll each truffle in cocoa powder, tapping off excess, and return to the refrigerator for 15 minutes before serving.
Variations And Substitutions
Substitute dried cranberries or tart cherries for a more pronounced tang. Use milk chocolate instead of dark chocolate for a sweeter version, or replace white chocolate chips with dried cherry pieces for extra fruity texture. For a festive twist, dust truffles with crushed freeze-dried strawberries or sprinkles instead of cocoa powder. You can also add a pinch of almond extract or a small amount of cherry liqueur to the ganache for added depth.
Make-Ahead, Storage, And Serving Tips
These truffles can be made up to 5 days ahead and stored in an airtight container in the refrigerator. For longer storage, freeze them for up to 3 months in a freezer-safe container with parchment between layers. Serve directly from the refrigerator or at room temperature, depending on your preference for texture. If the ganache becomes too soft while rolling, return it to the refrigerator for 10 minutes. These truffles make excellent gifts when packaged in small boxes lined with tissue paper.
Final Thoughts
Making no-bake truffles is one of the easiest ways to impress yourself and others in the kitchen. Whether you’re drawn to the richness of dark chocolate, the fun of colorful sprinkles, or the elegance of a simple cocoa dusting, there’s a truffle here that matches your mood and skill level. Best of all, you can have homemade candy ready to enjoy or gift within minutes, with zero oven time required.
Pick one recipe that speaks to you today and give it a try. You might be surprised at how quickly you become a truffle-making pro, and even more surprised at how hard it is to stop at just one. Happy making!
5 No-Bake Truffles: Easy, Delicious, No Oven Needed
Ingredients
Method
- Strawberry Truffles: Pulse freeze-dried strawberries into fine powder, then mix with softened cream cheese, powdered sugar, and vanilla until combined.
- Strawberry Truffles: Roll into 1-inch balls and chill for 30 minutes, then dip in melted chocolate and set on parchment paper.
- Birthday Cake Truffles: Combine cake crumbles with cream cheese, powdered sugar, and sprinkles until the mixture holds together.
- Birthday Cake Truffles: Roll into balls, chill 30 minutes, dip in chocolate, and allow to set completely.
- Red Velvet Truffles: Mix red velvet cake crumbles with cream cheese, powdered sugar, and vanilla extract until smooth.
- Red Velvet Truffles: Form into balls, refrigerate 30 minutes, coat with white chocolate, and let set.
- Cookie Dough Truffles: Blend edible cookie dough with cream cheese, powdered sugar, and mini chocolate chips.
- Cookie Dough Truffles: Roll into balls, chill 30 minutes, dip in chocolate coating, and refrigerate until firm.
- Cherry Chip Truffles: Finely chop dried cherries and mix with cream cheese, powdered sugar, and chocolate chips.
- Cherry Chip Truffles: Shape into balls, chill 30 minutes, dip in melted chocolate, and allow to harden.
Notes
Birthday Cake Truffles Tips: These truffles are perfect for celebrations. Make ahead and freeze for up to 1 month.
Red Velvet Truffles Tips: The white chocolate coating creates an elegant contrast. Keep refrigerated and serve within 10 days.
Cookie Dough Truffles Tips: Use only food-safe, heat-treated edible cookie dough. Store in an airtight container in the fridge.
Cherry Chip Truffles Tips: Soak dried cherries in warm water for 10 minutes before chopping for softer texture. Refrigerate between servings.