Baked Meat and Cheese Stuffed Pastry
Baked Meat and Cheese Stuffed Pastry
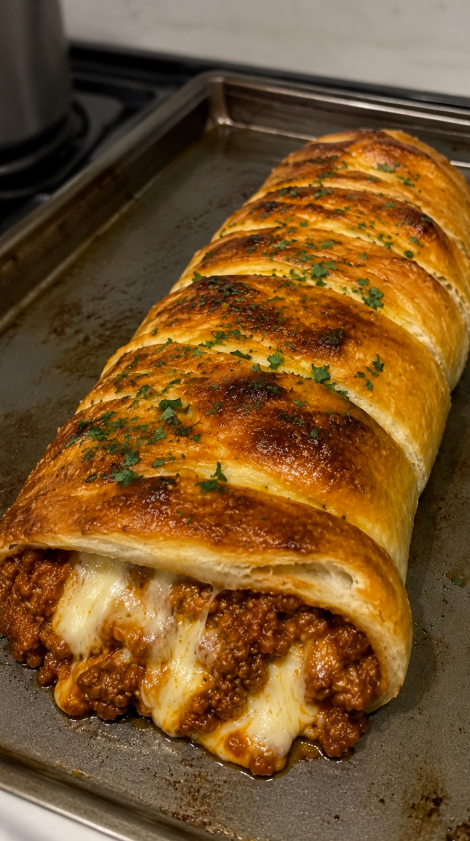
Baked Meat and Cheese Stuffed Pastry: A Cozy Kitchen Classic
You know that feeling when you’re standing in your kitchen on a chilly evening, and you just want something that feels like a warm hug? That’s exactly what I was craving last November when I decided to dust off my pastry skills and create what would become one of my go-to comfort meals: a baked meat and cheese stuffed pastry that’s crispy on the outside, savory and melty on the inside, and honestly? Way easier to make than it sounds.
I grew up watching my grandmother fold pastry dough with the kind of precision that made it look like an art form. She’d never tell me her exact measurements, which drove me absolutely crazy. But over the years, I reverse-engineered her technique and made it my own, and now I’m sharing it with you because I genuinely believe this recipe deserves to be in your regular rotation. Whether you’re planning a weeknight dinner that feels special, prepping something for meal prep containers, or looking for an impressive dish to bring to a potluck, this is the answer.
A baked meat and cheese stuffed pastry is basically layers of buttery, flaky pastry wrapped around a savory filling of seasoned ground meat, melted cheese, and aromatics. It’s part hand pie, part savory pastry, and entirely delicious. The beauty of it is that it works for almost anyone—meat lovers, cheese devotees, people who want leftovers that actually taste good the next day. I make it for my family, I make it for myself on nights when I need comfort food, and I make it when I’m genuinely trying to impress someone without spending all day in the kitchen.
If you’re new to working with pastry dough, don’t stress. I’ll walk you through every single step, including the mistakes I’ve made so you don’t have to. And if you’re already comfortable in the kitchen? You’ll appreciate how forgiving this recipe is and how many ways you can customize it. Follow me on HaileeRecipes on Pinterest for more cozy recipes like this one.
Why You’ll Love This Recipe
Let me be real with you: this recipe hits different. Here’s why it’s become a permanent fixture in my kitchen.
- It’s actually manageable. You’re not doing anything complicated here. Brown some meat, mix it with cheese and seasonings, wrap it in pastry, and bake. That’s genuinely it.
- It looks way more impressive than it is. Your family or guests will think you spent hours on this. You didn’t. You spent maybe 20 minutes of active time, and the oven did the rest.
- It’s naturally portable. Cut it into portions, wrap them individually, and you’ve got grab-and-go meals for the week. Cold, room temperature, or reheated—it works.
- You can make it your own. Prefer Italian flavors? Add fennel and fresh basil. Want it spicy? Jalapeños and hot sauce are your friends. The base is flexible enough to handle whatever you throw at it.
- It’s genuinely satisfying. There’s something about the combination of crispy pastry, savory meat, and melted cheese that just works. It’s comfort food in its purest form.
Ingredients
For the pastry:
- 2 cups all-purpose flour
- 1 teaspoon salt
- 8 ounces cold butter, cubed
- 6 to 8 tablespoons ice water
- 1 egg, beaten (for egg wash)
For the filling:
- 1 pound ground beef or ground lamb (or a mix)
- 1 medium onion, finely diced
- 3 cloves garlic, minced
- 1 cup sharp cheddar cheese, shredded
- ½ cup gruyère cheese, shredded
- 2 tablespoons fresh parsley, chopped
- 1 teaspoon dried thyme
- ½ teaspoon black pepper
- ¾ teaspoon salt
- 2 tablespoons olive oil
- ¼ cup beef broth or water
Hailee’s Tip: Don’t skip the ice water. I know it seems fussy, but cold water keeps your pastry flaky. Warm water makes it tough. Also, buy good butter—it genuinely makes a difference in how your pastry tastes.
Hailee’s Tip: I use a mix of cheddar and gruyère because cheddar gives you that sharp, familiar flavor while gruyère adds a subtle nuttiness that makes people ask “what is that amazing flavor?” It’s the cheese equivalent of a secret weapon.
Optional Add-Ins and Variations
This is where you get to play. Here are some of my favorite ways to shake things up:
- Mushrooms: Add ½ cup finely chopped mushrooms (cremini or shiitake) sautéed with the onions. They add earthiness and moisture.
- Spinach: Wilt ½ cup fresh spinach and squeeze out the excess moisture before mixing it into the filling. It adds nutrition and a subtle flavor.
- Caramelized onions: If you have time, caramelize your onions instead of just sautéing them. The sweetness is incredible.
- Fresh herbs: Swap parsley for basil, dill, or oregano depending on what direction you want to take the flavor.
- Spicy version: Add ¼ teaspoon cayenne pepper, a diced jalapeño, or a splash of hot sauce to the filling.
- Mediterranean twist: Mix in sun-dried tomatoes, pine nuts, and fresh mint.
Step-by-Step Method
Making the Pastry
Step 1: Combine your dry ingredients. In a large bowl, whisk together your flour and salt. This distributes the salt evenly, which is important for flavor.
Step 2: Cut in the cold butter. Add your cubed cold butter to the flour. Using a pastry cutter, two forks, or your fingertips (my preference), work the butter into the flour until the mixture looks like coarse breadcrumbs. Some pea-sized pieces of butter should still be visible—that’s what creates the flakiness. This usually takes me about 5 minutes.
Hailee’s Tip: If your kitchen is warm, pop your flour and butter in the freezer for 10 minutes before mixing. Seriously, it helps.
Step 3: Add ice water. Sprinkle the ice water over the mixture, one tablespoon at a time, mixing gently with a fork until the dough just comes together. You want it slightly shaggy—not a smooth ball yet. This is the moment I usually mess up by adding too much water, which makes the pastry tough. Start with 6 tablespoons and only add more if absolutely necessary.
Step 4: Chill the dough. Form the dough into a disk, wrap it in plastic wrap, and refrigerate for at least 30 minutes. I usually do this while I’m making the filling, which works perfectly.
Making the Filling
Step 5: Sauté your aromatics. Heat olive oil in a large skillet over medium heat. Add your diced onion and cook for about 4 minutes until it starts to soften. Add your garlic and cook for another minute until it smells absolutely incredible.
Step 6: Brown the meat. Increase the heat to medium-high and add your ground beef. Break it up with a wooden spoon and cook until it’s completely browned, about 5 to 7 minutes. This is important—you want all the pink gone, and you want some of the meat to have a slight crust on it for texture.
Step 7: Deglaze and season. Pour in your beef broth and let it simmer for about 2 minutes, scraping up any browned bits stuck to the bottom of the pan. These bits are pure flavor. Remove from heat and stir in the cheese, parsley, thyme, pepper, and salt. Taste it. Seriously, taste it. Adjust seasoning as needed. The filling should taste slightly overseasoned because the pastry is neutral.
Step 8: Cool the filling. Spread the filling on a plate or baking sheet and let it cool to room temperature. This is crucial because warm filling will make your pastry soggy. I usually do this while my pastry is chilling.
What I Messed Up: The first time I made this, I didn’t cool the filling. The pastry came out soggy and sad. Now I’m militant about letting it cool.
Assembling and Baking
Step 9: Roll out your pastry. Preheat your oven to 400°F. Flour a clean work surface lightly. Remove your pastry from the fridge and let it sit for 2 to 3 minutes—this makes it easier to roll without cracking. Roll it out to about ⅛-inch thickness. You’re aiming for a rectangle roughly 12 by 16 inches, but don’t stress if it’s not perfect.
Step 10: Spread the filling. Transfer your pastry to a parchment-lined baking sheet. Spread your cooled filling down the center, leaving about 2 inches on all sides. Don’t overfill—this is the moment I always want to stuff it like a burrito, but restraint is your friend here.
Step 11: Fold and seal. Fold the long sides of the pastry over the filling, overlapping them slightly at the top. Fold the short ends up and over. You’re creating a neat package. If the pastry tears, just patch it with a scrap of dough and a tiny bit of water—it will seal as it bakes.
Step 12: Brush with egg wash. Beat your egg and brush it all over the pastry. This creates that gorgeous golden-brown finish. Sprinkle with a tiny pinch of salt if you want.
Step 13: Bake. Bake for 30 to 35 minutes until the pastry is deep golden brown. The bottom should be crispy too—if you’re worried, slide a spatula under it halfway through to check.
Step 14: Rest and serve. Let it cool for 5 minutes before slicing. This allows the filling to set slightly so it doesn’t fall apart when you cut into it.
Common Mistakes to Avoid
Warm pastry ingredients: I cannot stress this enough. Warm butter makes tough pastry. Keep everything cold.
Overworking the dough: Mix it just until it comes together. Overworking develops gluten, which makes it tough instead of flaky.
Skipping the filling cool-down: Warm filling melts the pastry from the inside out. Not what we want.
Overfilling: I know it’s tempting, but too much filling will burst through the pastry and create a mess.
Not using an egg wash: It’s the difference between a pale, sad pastry and a gorgeous, restaurant-quality one. Takes 30 seconds and makes a huge difference.
Opening the oven door constantly: Every time you open it, heat escapes and your pastry bakes unevenly. Resist the urge to peek until the last 5 minutes.
My Tested Substitutions
Different meats: Ground lamb is my second choice—it has a richer flavor that pairs beautifully with cheese. Ground turkey works too, though it’s leaner, so add an extra tablespoon of olive oil to the filling. You can also do a mix of beef and pork.
Dairy-free option: Use dairy-free butter for the pastry and nutritional yeast mixed with cashew cream for the filling. It won’t be identical, but it’s genuinely good.
Phyllo instead of pastry: If you want something lighter, use phyllo dough brushed with melted butter between layers. You’ll get a crispier, less rich result.
Puff pastry shortcut: Honestly? Store-bought puff pastry works beautifully here. It’s not cheating—it’s being smart with your time. Just thaw it according to package directions.
How to Customize
The beauty of this recipe is that it’s genuinely flexible. Want it Italian? Add fennel seeds, sun-dried tomatoes, and fresh basil. Going Greek? Use lamb, add oregano, and mix in some crumbled feta. Feeling French? Caramelize your onions, add Dijon mustard to the filling, and use gruyère exclusively. The meat and cheese base is your canvas.
You can also make this in individual portions. Divide the pastry into four pieces, roll each one out, fill, fold, and bake. They’ll cook faster—about 20 to 25 minutes—and they’re perfect for meal prep or taking to work.
Serving Ideas
Serve this warm with a simple green salad dressed in a tangy vinaigrette. The acidity cuts through the richness perfectly. A dollop of sour cream or Greek yogurt on the side is also lovely—it adds creaminess and a slight tang.
For a more casual meal, serve it with roasted vegetables or a crusty bread and butter. For something fancier, plate it with sautéed greens and a drizzle of herb oil.
Honestly though? It’s equally good cold the next day straight from the fridge, which is why I love making this for meal prep.
Meal Prep and Storage
Refrigerator: Store leftovers in an airtight container for up to 4 days. Reheat gently in a 325°F oven for about 10 minutes until warmed through. The microwave works too, but the oven keeps the pastry crispier.
Freezer: You can freeze this unbaked. Assemble it, wrap it tightly in plastic wrap and foil, and freeze for up to 3 months. Bake from frozen, adding about 10 minutes to the baking time. No need to thaw first.
Make-ahead tip: You can make the filling up to 2 days ahead and store it in the fridge. You can also make the pastry dough up to 1 day ahead. Just keep both covered and chilled.
Individual portions: Divide into portions, wrap individually in parchment and foil, and freeze. Perfect for grabbing when you want something homemade but quick.
Nutritional Breakdown
This recipe makes about 4 generous servings. Here’s what you’re looking at per serving (approximate):
- Calories: 720
- Protein: 32g
- Carbs: 42g
- Fat: 48g
- Fiber: 1g
Keep in mind these are estimates and will vary based on your specific ingredients and how you portion it. If you make individual smaller portions, you’ll adjust accordingly.
Final Thoughts
Here’s what I want you to know: this recipe is a gift you’re giving yourself. It’s the kind of thing that makes your kitchen smell incredible, that makes people ask for the recipe, that tastes even better as leftovers. It’s forgiving enough for a beginner but interesting enough to keep an experienced cook happy.
The first time you make it, follow the recipe exactly. The second time, make it yours. Add the herbs you love, the cheese you’re craving, the meat that speaks to you. That’s when cooking stops being about following instructions and starts being about creating something that’s uniquely yours.
I genuinely hope you make this soon. And when you do, I hope it becomes as much of a regular in your kitchen as it is in mine. Come back and let me know how it goes—I love hearing about your kitchen adventures.
Happy baking, friend.
—
Recipe Card
**Ingredients**
* 2 cups all-purpose flour
* 1 teaspoon salt
* 8 ounces cold butter, cubed
* 6 to 8 tablespoons ice water
* 1 egg, beaten (for egg wash)
* 1 pound ground beef or ground lamb
* 1 medium onion, finely diced
* 3 cloves garlic, minced
* 1 cup sharp cheddar cheese, shredded
* 1/2 cup gruyère cheese, shredde