Cheesy Pepperoni Pizza Roll
Cheesy Pepperoni Pizza Roll
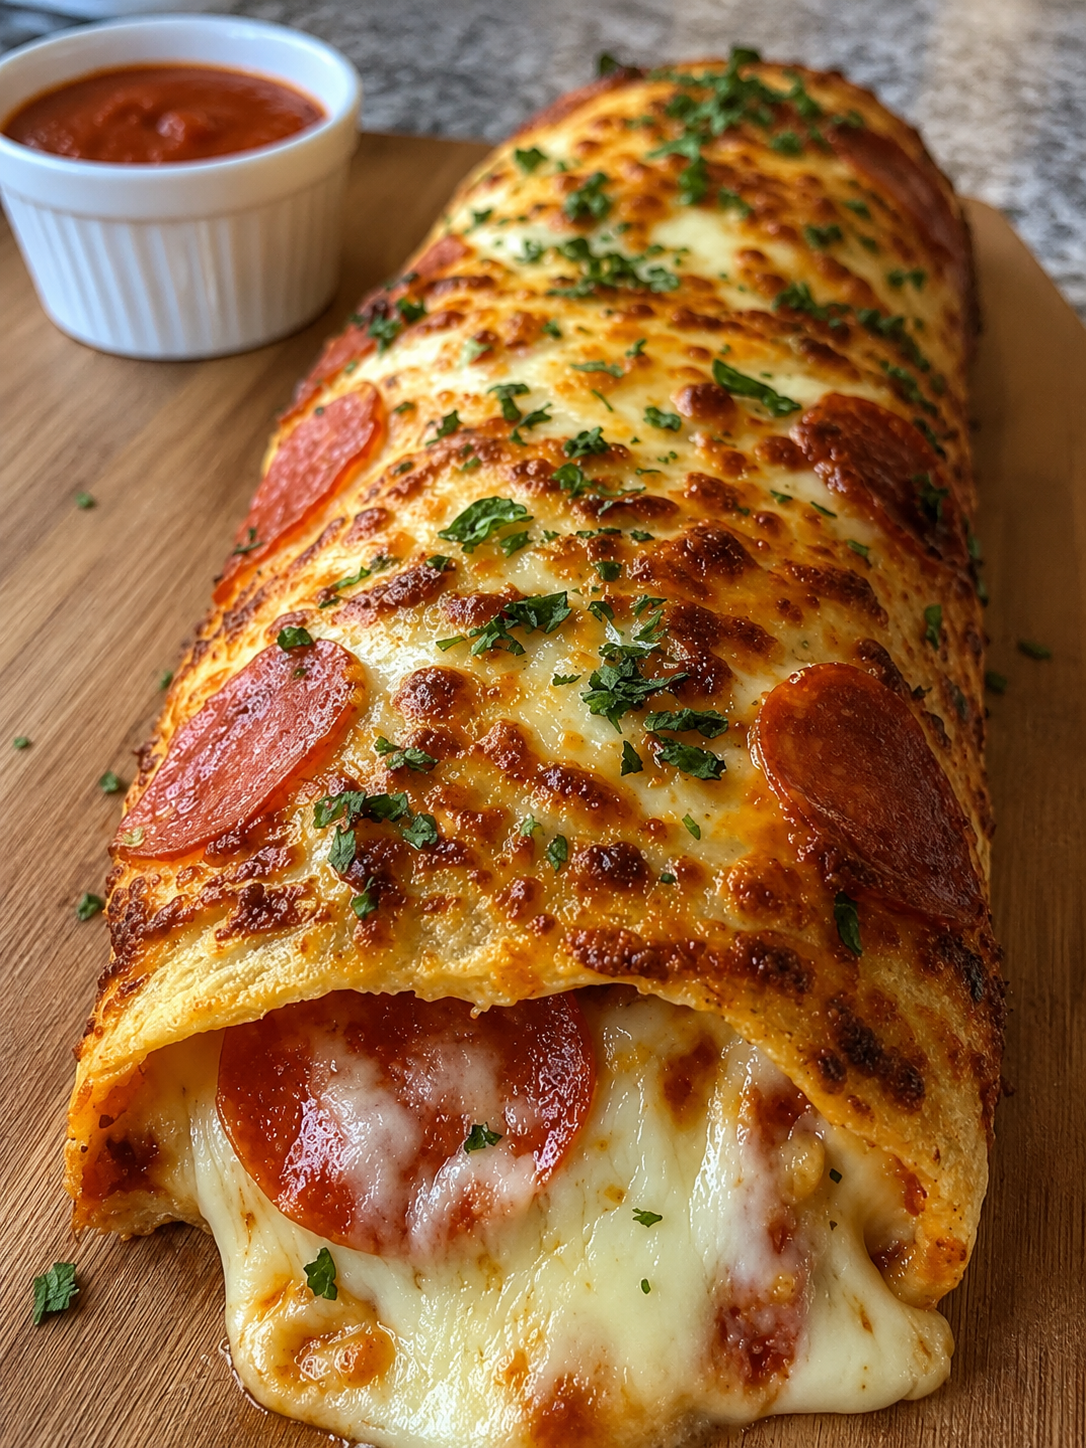
Cheesy Pepperoni Pizza Roll: My Cozy Kitchen Favorite
You know that feeling when you’re standing in front of the fridge at 9 PM, absolutely starving, and nothing feels quite right? That’s exactly where this recipe came from. I was craving pizza—the comfort, the cheese, the salty pepperoni—but I also wanted something I could eat with my hands while binge-watching my latest obsession. So I started playing around with pizza dough, and honestly, it was messy and imperfect at first. But then something clicked.
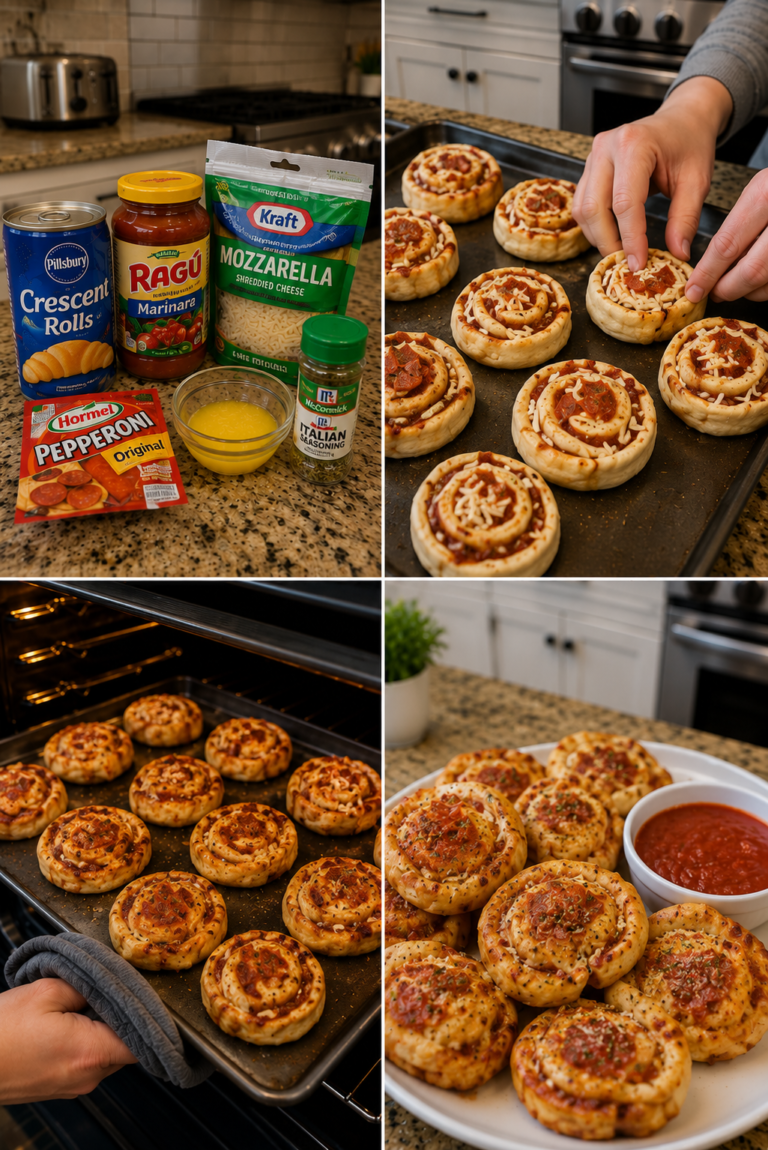
The Cheesy Pepperoni Pizza Roll is basically everything you love about pizza, but rolled up into this beautiful spiral that’s crispy on the outside and molten on the inside. Think of it as the love child between a pizza and a cinnamon roll, except it’s savory and absolutely addictive. I’ve made this for lazy weeknight dinners, brought it to potlucks where it mysteriously disappeared, and even prepped the rolls ahead for mornings when I needed something substantial that wasn’t cereal.
What I love most is how forgiving this recipe is. You don’t need fancy equipment, you don’t need to be a bread expert, and you genuinely can’t mess it up too badly. It’s the kind of recipe that works whether you’re cooking solo or feeding a crowd, and it tastes just as good the next day (if there’s any left). I’ve tested this dozens of times, tweaked the ratios, and even accidentally discovered some brilliant variations along the way.
If you’re someone who loves pizza, appreciates carbs that actually satisfy, or just wants to impress people without breaking a sweat, this one’s for you. And if you want more ideas like this, follow me on HaileeRecipes on Pinterest where I share all my cozy kitchen experiments.
Why You’ll Love This Recipe
Honestly, there are so many reasons I keep coming back to this one. First, it’s genuinely delicious. The combination of melted cheese, crispy pepperoni, and soft dough is basically comfort in spiral form. But beyond taste, there’s the practicality of it all.
You can make the dough from scratch in about 10 minutes if you’re comfortable working with yeast, or you can use store-bought pizza dough and skip that step entirely. No judgment here—I do both depending on my mood and how much time I have. The whole process from start to finish takes maybe 35 minutes, which means you can go from hungry to eating in less than an hour.
The rolls also freeze beautifully, which means you can prep a batch on Sunday and have ready-to-bake pizza rolls waiting for you all week. That’s the kind of meal prep I actually stick to. And because you’re rolling everything up, there’s less mess than traditional pizza, and somehow it feels fancier even though it’s not.
Ingredients
- 2 cups all-purpose flour — I use unbleached, but honestly any all-purpose flour works fine here
- 1 teaspoon instant yeast — the kind that doesn’t need activating separately
- 3/4 teaspoon salt
- 1 tablespoon sugar — helps the yeast do its thing
- 3/4 cup warm water — should feel like a warm bath, not hot
- 1 tablespoon olive oil — plus a little more for your hands
- 1.5 cups mozzarella cheese, shredded — low-moisture works best so it doesn’t make things soggy
- 8 ounces pepperoni slices — I prefer the thicker deli kind, but regular works too
- 1/2 cup marinara sauce or pizza sauce — your favorite brand is perfect
- 1/4 cup grated Parmesan cheese — for that extra savory punch
- 1 teaspoon Italian seasoning — dried is totally fine
- 1/2 teaspoon garlic powder
- Pinch of red pepper flakes (optional) — if you like a little heat
- Cornmeal for dusting (optional) — helps prevent sticking
Hailee’s Tip: Don’t skip the low-moisture mozzarella. Regular mozzarella releases too much water while baking, and your rolls end up a bit soggy. Trust me on this one—I learned the hard way.
Hailee’s Tip: Room temperature really matters with yeast. If your water is too cold, the dough won’t rise. If it’s too hot, you’ll kill the yeast. Aim for around 110 degrees—it should feel warm but not uncomfortable on your wrist.
Optional Add-Ins and Variations
One of my favorite things about this recipe is how customizable it is. Here’s what I’ve tested and loved:
- Caramelized onions — adds sweetness and depth. I usually add about 1/2 cup mixed in with the filling
- Fresh basil — sounds fancy but just tear it up and sprinkle it before rolling. Use about 2 tablespoons
- Ricotta cheese mixed in — makes the filling creamier. Use 1/4 cup mixed with the mozzarella
- Roasted red peppers — I chop these finely and use about 1/3 cup. They add a nice sweetness
- Spinach — blanch it first to remove excess moisture, then chop finely. About 1/2 cup works
- Sausage crumbles — brown them first, then mix in. Use 1/2 cup for a meatier roll
- Olives — sliced and scattered throughout. About 1/3 cup if you love them as much as I do
Step-by-Step Method
Making the Dough
Step 1: Mix your dry ingredients. In a large bowl, whisk together your flour, yeast, salt, and sugar. I do this by hand because I don’t always have my stand mixer out, and honestly it takes 30 seconds.
Step 2: Add the wet stuff. Pour in your warm water and olive oil. Mix with a wooden spoon or your hands until everything comes together into a shaggy dough. It’ll look rough and a bit sticky—that’s exactly what you want.
Step 3: Knead it out. This is where I usually switch to my hands. Knead for about 5 minutes until the dough becomes smooth and elastic. If it’s sticking to your hands too much, rub a tiny bit of olive oil on your palms. The dough should feel slightly tacky but not wet. What I Messed Up: I used to knead for way too long, thinking more effort meant better bread. Nope. Five minutes is genuinely enough.
Step 4: First rise. Form the dough into a ball, place it in a lightly oiled bowl, and cover with a damp kitchen towel. Let it sit for 20 minutes. You don’t need a full hour here—just enough time for it to puff up a bit.
Building Your Rolls
Step 5: Roll it out. Turn your dough onto a lightly floured surface and gently roll it into a rectangle about 12 by 10 inches. It doesn’t have to be perfect. If it springs back, let it rest for 2 minutes and try again.
Step 6: Sauce the base. Spread your marinara sauce evenly across the dough, leaving about a half-inch border on all sides. Use about 1/2 cup total. Don’t go crazy here—too much sauce makes everything wet.
Step 7: Layer your fillings. Sprinkle half your mozzarella over the sauce. Then arrange your pepperoni slices in a single layer. Top with the remaining mozzarella, then sprinkle with Parmesan, Italian seasoning, and garlic powder. If you’re adding any other mix-ins, scatter them now.
Step 8: Roll it up. Starting from the long side closest to you, roll the dough tightly toward the opposite end, like you’re making a cinnamon roll. Try to keep it even so it bakes consistently. What I Messed Up: I used to roll too loosely, and everything would come apart. Roll firmly but not aggressively—you’re not mad at the dough.
Step 9: Slice your rolls. Using a sharp knife or dental floss (seriously, floss works amazing for this), cut your log into 8 equal pieces. If you’re using a knife, a gentle sawing motion works better than pressing down hard.
Step 10: Arrange on a pan. Place your rolls cut-side up on a parchment-lined baking sheet. They should be close but not touching. If you want them to bake together into one big pull-apart thing, squish them closer. If you want individual rolls, give them space.
Step 11: Optional second rise. You can bake them right away, or let them sit for 10 minutes while your oven preheats. Either way works—the second rise just makes them slightly puffier.
Baking
Step 12: Bake. Preheat your oven to 400 degrees Fahrenheit. Bake your rolls for 18 to 22 minutes, until the tops are golden brown and the cheese is melted and bubbly. The exact time depends on your oven—mine runs a bit hot, so I check at 18 minutes.
Step 13: Cool slightly. Let them rest for 2 to 3 minutes before eating. I know this is hard, but the cheese needs a moment to set, and your mouth will thank you for not burning it on molten mozzarella.
Common Mistakes to Avoid
I’ve made every mistake here so you don’t have to. Here’s what I’ve learned:
- Overloading with sauce: Too much marinara makes everything soggy and the rolls fall apart. Stick to about 1/2 cup total.
- Using regular mozzarella: It releases moisture and creates a watery filling. Low-moisture mozzarella is your friend.
- Skipping the border when spreading sauce: That half-inch edge helps the dough seal when you roll it. Skip it and you might have filling leaking out.
- Rolling too loosely: The filling will separate from the dough and you’ll end up with weird pockets. Roll firmly and evenly.
- Baking at too high a temperature: If your oven is too hot, the outside browns before the inside cooks through. 400 degrees is the sweet spot for me.
- Overcrowding the pan: If you want separate rolls, give them space. They expand as they bake.
My Tested Substitutions
Not everyone has the exact ingredients on hand, and that’s totally okay. Here’s what I’ve swapped successfully:
- Store-bought pizza dough: Use 1 pound of your favorite brand and skip steps 1 through 4. This cuts your total time in half and honestly tastes just as good.
- Whole wheat flour: Replace up to half the all-purpose flour with whole wheat. The rolls will be denser but still delicious. You might need an extra tablespoon of water.
- Different cheeses: I’ve used a mix of mozzarella and provolone, or mozzarella and fontina. Each brings its own flavor. Just keep the total amount the same.
- Turkey pepperoni: Works great if you’re looking for something lighter. Use the same amount.
- Pesto instead of marinara: This is wild but so good. Use about 1/3 cup pesto spread instead of sauce.
- Garlic powder for fresh garlic: If you have fresh garlic, mince 2 cloves finely and scatter throughout. It’s more flavorful than powder.
How to Customize
The beauty of this recipe is that it’s basically a template. Here are some directions I’ve taken it:
Veggie-loaded version: Add roasted zucchini, mushrooms, and spinach. Reduce the pepperoni to 4 ounces and add 1 cup of mixed veggies. It’s still cheesy and satisfying.
Spicy version: Use hot pepperoni, add 1/2 teaspoon red pepper flakes to the filling, and sprinkle more on top before baking. Pair with a cooling dip like ranch.
Meat lovers version: Add 1/2 cup cooked sausage crumbles and 1/4 cup cooked bacon pieces to the filling along with the pepperoni. It’s rich and amazing.
Lighter version: Use part-skim mozzarella, reduce the cheese to 1 cup total, and load up on vegetables instead. It’s less heavy but still satisfying.
Serving Ideas
These rolls are honestly good on their own, but here’s how I usually serve them:
- With marinara for dipping: Warm up some extra sauce and let people dip. It feels fancier than it is.
- With a simple green salad: The freshness balances the richness of the cheese and pepperoni.
- With garlic butter: Brush a little melted butter mixed with garlic powder and fresh parsley on top right out of the oven. Game changer.
- As a main course: I usually make 8 rolls and that’s a full dinner for 2 people, or a hearty lunch for 4.
- For a party: Make two batches, slice them smaller, and serve on a platter. People go wild for them.
- Cold the next day: Honestly, these are great at room temperature or slightly reheated. I’ve packed them for lunch and they’re still delicious.
Meal Prep and Storage
This is where the recipe really shines for me because it’s so practical for busy weeks.
Refrigerator: Store baked rolls in an airtight container for up to 3 days. Reheat in a 350-degree oven for about 5 minutes until warmed through.
Freezer: Here’s my favorite hack. You can freeze the rolls either before or after baking. If freezing unbaked, arrange them on a parchment-lined baking sheet, freeze until solid (about 2 hours), then transfer to a freezer bag. They’ll keep for up to 3 months. Bake from frozen, adding about 5 extra minutes to the baking time. If freezing baked rolls, let them cool completely, then store in a freezer bag for up to 2 months. Reheat in a 350-degree oven for about 8 minutes.
Make-ahead tip: I usually make a double batch on Sunday, bake half, and freeze half unbaked. That way I can have fresh pizza rolls anytime without the full effort.
Nutritional Breakdown
Per roll (out of 8 total):
- Calories: 285
- Protein: 12g
- Carbohydrates: 28g
- Fat: 14g
- Fiber: 1g
These numbers are approximate and can vary based on your specific ingredients and brands. If you’re using store-bought dough or making significant substitutions, the nutrition will shift a bit.
Final Thoughts
I genuinely love this recipe because it’s exactly what I want it to be—delicious, practical, and not pretentious. It doesn’t require fancy skills or equipment, and it genuinely tastes like you spent way more effort than you actually did. That’s my favorite kind of cooking.
The Cheesy Pepperoni Pizza Roll has become a staple in my kitchen because it works for so many situations. Lazy weeknight? Got it. Impressing people without trying? Absolutely. Meal prep? Yes. This is the kind of recipe I come back to again and again, and I hope you will too.
If you make this, I’d genuinely love to hear how it goes for you. Did you add something unexpected? Did you mess up and figure out a fix? That’s the stuff I’m