No bake eclair cake
No bake eclair cake
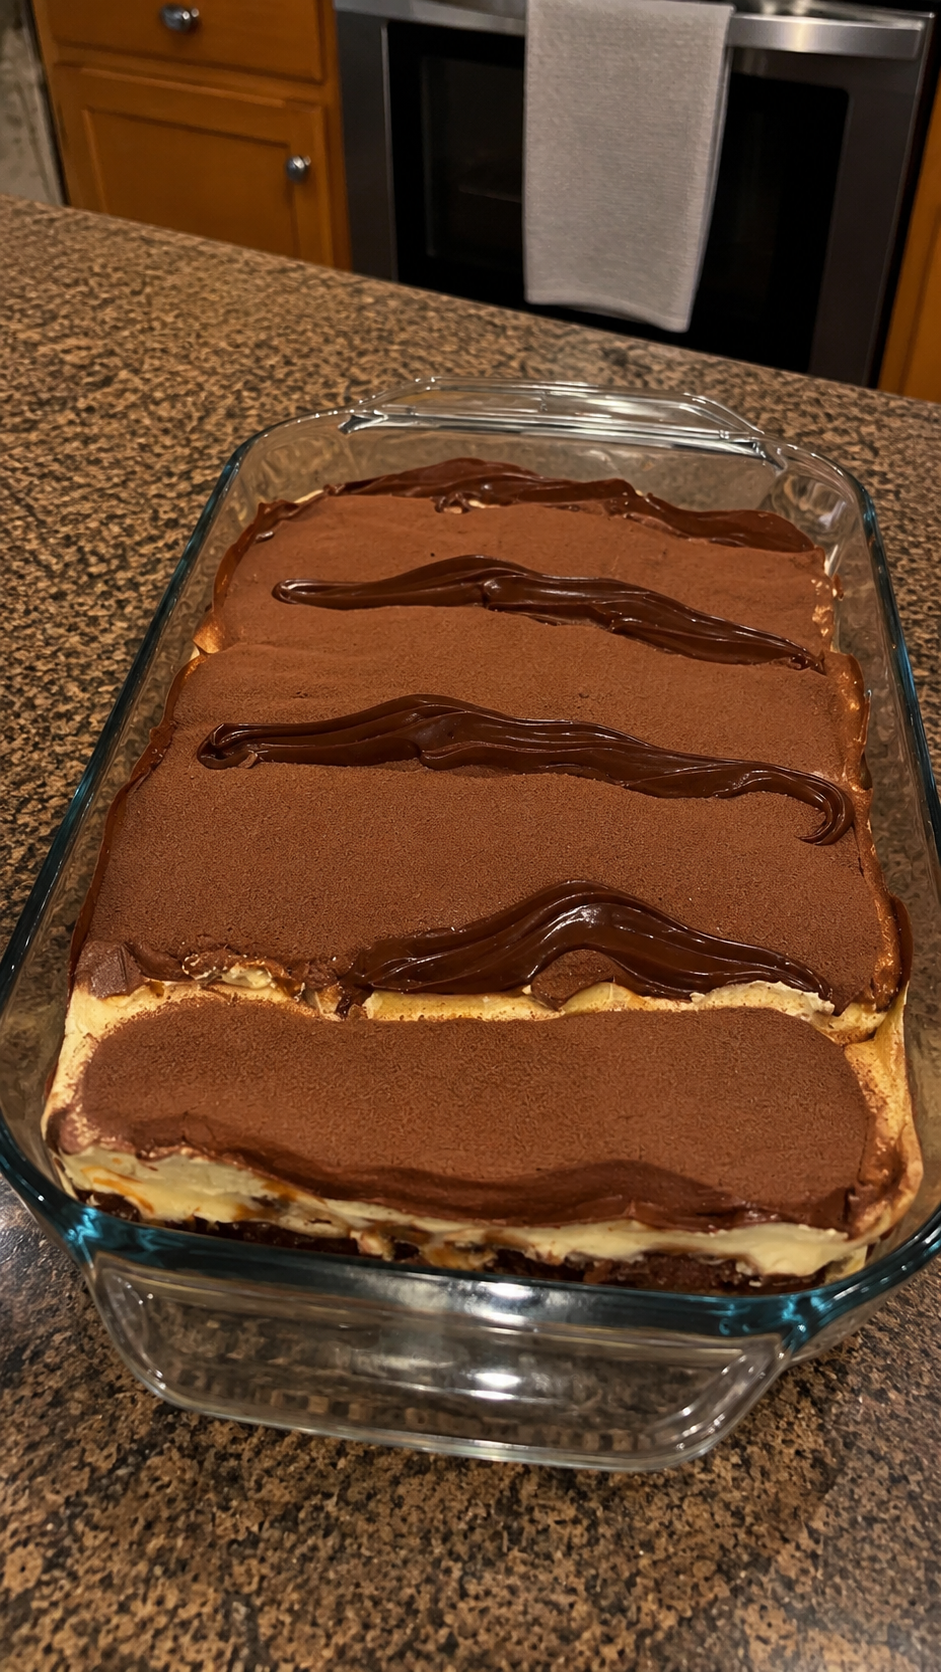
If you are looking for a dessert that delivers rich, creamy layers without the need for an oven, this no bake eclair cake is the ideal solution. It mimics the classic French pastry by combining crisp vanilla wafers with a luscious filling made from instant pudding and whipped cream, all topped with a glossy chocolate glaze. The texture is a delightful contrast: the cookies soften just enough to offer a tender bite while retaining a slight structural integrity, creating a mouthfeel similar to a traditional éclair but with far less effort. This dish is particularly useful during hot summer days when you want something cold and indulgent, or for last-minute gatherings where time is scarce. It requires no baking, no complex piping techniques, and no special equipment beyond a few basic kitchen tools. You can prepare the components in the morning and have a stunning centerpiece ready by dinner time.
The appeal of this treat lies in its simplicity and reliability. Unlike baked goods that require precise temperature control and timing, this recipe relies on the natural softening process of the cookies as they absorb moisture from the filling. The result is a cohesive sliceable cake that feels luxurious on the palate. For those who enjoy the flavors of chocolate and vanilla but find the labor-intensive nature of making actual éclairs daunting, this version offers the same satisfaction with a fraction of the work. It is a crowd-pleaser that appeals to children and adults alike, offering a familiar taste profile that feels both comforting and celebratory.
For more delicious ideas and visual inspiration, Follow Hailee Recipes on Pinterest.
Why This Recipe Works
This approach succeeds because it leverages the chemical properties of instant pudding mix and the structure of vanilla wafers. Instant pudding contains starches and stabilizers designed to thicken milk quickly and hold their shape, creating a stable base that supports the weight of the cookies without becoming soggy too early. When folded with whipped cream, the mixture gains airiness and volume, ensuring each layer is light rather than dense. The vanilla wafers act as the structural skeleton; as they sit in the refrigerator, they slowly absorb the liquid from the cream and pudding mixture. This hydration process transforms the hard cookie into a soft, cake-like layer that holds together when sliced. The chocolate topping provides a necessary seal that locks in moisture, preventing the top layer of cookies from drying out while adding a rich flavor contrast to the sweet vanilla interior.
Ingredients
To make this dessert, you will need a specific set of ingredients that work together to create the right balance of sweetness and texture. Using high-quality items ensures the final product tastes fresh and not overly processed.
- Vanilla Wafers: 1 package (approx. 30 cookies), standard size. These form the layers of the cake.
- Milk: 2 cups of whole milk. Whole milk provides the best fat content for a creamy texture and helps the pudding set properly.
- Instant Vanilla Pudding Mix: 2 packages (3.4 ounces each). Do not use cook-and-serve pudding; instant mix is required for this method.
- Whipped Topping: 1 container (8 ounces) of frozen whipped topping, thawed. This adds volume and a light texture to the filling.
- Chocolate Frosting: 1 jar (16 ounces) of ready-to-spread chocolate frosting. A smooth, creamy variety works best for spreading.
How To Make No Bake Eclair Cake
- Prepare the Pan and First Layer: Begin by selecting a 9×13 inch baking dish. You do not need to grease the pan, as the moisture from the filling will prevent sticking. Arrange a single layer of vanilla wafers across the bottom of the dish. Break any cookies that are too large to fit neatly, aiming for a tight, even layer with minimal gaps. If there are small holes, place tiny pieces of cookie over them so the filling does not leak through later.
- Make the Cream Filling: In a large mixing bowl, pour the 2 cups of cold milk. Add both packages of instant vanilla pudding mix to the milk. Using a hand mixer or a whisk, beat the mixture on medium speed for about 2 minutes until it thickens significantly and begins to hold soft peaks. Be sure to scrape down the sides of the bowl to ensure the powder is fully incorporated. Gently fold in the thawed whipped topping using a spatula. Fold carefully to maintain the air bubbles created during whipping, which gives the filling its light texture. Continue folding until the mixture is uniform in color and consistency.
- Assemble the Middle Layers: Spread half of the pudding and whipped cream mixture evenly over the first layer of cookies in the baking dish. Use an offset spatula or the back of a spoon to smooth the surface. Place a second layer of vanilla wafers directly on top of the cream, pressing down gently to ensure they adhere to the filling. Repeat the process by spreading the remaining cream mixture over this second layer of cookies, followed by a third and final layer of vanilla wafers on top. Ensure the top layer of cookies is completely covered by the cream before proceeding.
- Add the Chocolate Topping: Once the final layer of cookies is in place, spread the entire jar of chocolate frosting over the top. Start at the center and work your way outward toward the edges, creating a smooth, even coat. The frosting should cover every visible part of the vanilla wafers to seal in moisture. If the frosting is too stiff to spread easily, you can microwave it for 10 to 15 seconds to soften it slightly, but be careful not to melt it into a liquid.
- Chill Before Serving: Cover the baking dish tightly with plastic wrap or aluminum foil. Place the dish in the refrigerator for at least 4 hours, though overnight chilling is highly recommended. This resting period is critical as it allows the vanilla wafers to absorb the moisture from the filling, transforming them from crunchy cookies into soft, cake-like layers. The dessert needs this time to set firmly so it can be sliced cleanly without crumbling.
Doneness And Troubleshooting
Determining if your cake is ready to serve relies on observing the texture of the cookies rather than a specific internal temperature. After the minimum 4-hour chill, test a cookie near the edge of the dish. It should yield easily to the pressure of a fork and feel soft throughout, not crunchy or dry. If the cookies still feel hard or separate from the filling, the cake needs more time. Allow it to chill for another hour or two. A common issue is a runny filling; this usually happens if the pudding was not beaten long enough or if the milk was too warm. Always use cold milk and ensure the pudding reaches a thick consistency before folding in the whipped topping. Another potential problem is a soggy bottom layer. This can occur if the cookies are left in contact with the filling for too long before the next layer is added, or if the dish is not chilled immediately after assembly. To prevent this, assemble the layers efficiently and refrigerate promptly.
Substitutions And Variations
While the traditional version uses vanilla wafers and chocolate frosting, there are ways to adapt this recipe to suit different tastes or dietary needs. If you prefer a darker flavor profile, you can substitute the vanilla wafers with chocolate wafer cookies. Note that this will change the visual contrast and make the cake appear darker overall. For a lighter option, you might swap the chocolate frosting for a strawberry or caramel glaze, though the texture may vary slightly depending on the thickness of the alternative topping. Regarding the dairy, some bakers use a combination of heavy cream and instant pudding instead of whipped topping, but this requires more effort as you must whip the cream yourself. If you choose to do this, ensure the cream is stabilized with a bit of sugar to match the sweetness of the original recipe. Avoid using homemade pudding mixes unless you are experienced with cornstarch ratios, as they may not set as firmly as the instant varieties designed for no-bake desserts.
Serving Suggestions
This cake is versatile enough to stand alone as a dessert or be paired with complementary treats. Because the flavors are rich and sweet, it pairs well with a cup of black coffee or a glass of cold milk. For a festive presentation, garnish individual slices with fresh berries like strawberries or raspberries, which add a tart contrast to the sweet cream. Crushed nuts, such as pecans or walnuts, can be sprinkled over the chocolate frosting just before serving to add a textural crunch that contrasts with the soft interior. If you are serving this at a party, cut the cake into smaller squares, as the richness means people often take smaller portions. A dusting of cocoa powder over the chocolate frosting can also enhance the visual appeal and deepen the chocolate flavor.
Storage And Reheating
Proper storage is essential to maintain the quality of this no-bake dessert. Keep the cake covered tightly in the refrigerator at all times. It will remain fresh and safe to eat for up to 3 days. After this period, the cookies may become overly soft, and the texture of the filling could begin to degrade. Do not attempt to reheat this cake, as warming it will cause the whipped topping to collapse and the cookies to turn mushy. If you need to store leftovers for longer, you can freeze the cake, though the texture of the whipped topping may change slightly upon thawing. Wrap the entire dish or individual slices tightly in plastic wrap and then in aluminum foil. Freeze for up to 1 month. Thaw in the refrigerator overnight before serving. Always check for any signs of spoilage, such as an off smell or discoloration, before consuming.
Remember that patience is key to this recipe. While the assembly takes only minutes, the magic happens in the refrigerator. Taking the time to let the layers meld together ensures that every bite offers the perfect balance of softness and flavor.
No bake eclair cake
Ingredients
Method
- Line a 9x13 inch baking dish with a single layer of vanilla wafers.
- Beat milk and instant pudding mix for 2 minutes until thick, then fold in whipped topping.
- Spread half the filling over cookies, add a second layer of wafers, spread remaining filling, and top with a third layer of wafers.
- Spread chocolate frosting evenly over the top layer.
- Cover and refrigerate for at least 4 hours or overnight before slicing.