Witch’s Cauldron Cheesecake: Okay, So My Oven Just Got Spooky
Witch’s Cauldron Cheesecake: Okay, So My Oven Just Got Spooky
Okay So This Just Happened
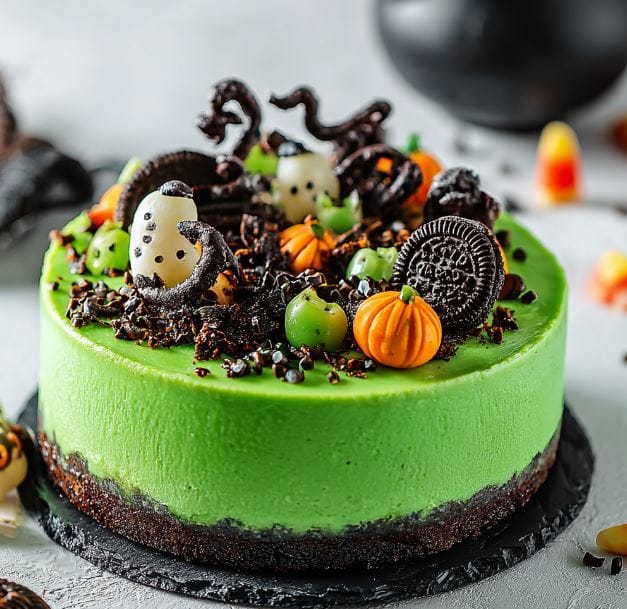
Okay, so remember when I said my Spiderweb Cheesecake was peak Halloween baking energy? I was wrong. Like, completely, dramatically, broomstick-flying wrong. Because last weekend, I made something that looks like it was brewed in a spellbook and tastes like pure magic — the Witch’s Cauldron Cheesecake.
I’m talking deep, dark chocolate cheesecake with a bubbling green glaze that looks like a potion gone slightly too well. It’s spooky, it’s creamy, and it made Sarah say, “This belongs on the cover of a Halloween cookbook.” (She also said, “You’re not storing that next to my salad,” but that’s fair.)
Here’s the deal: I didn’t plan to make a Witch’s Cauldron Cheesecake. It just kind of… happened. I was supposed to make brownies, realized I had cream cheese that was about a day away from turning, and figured, why not make something dramatic? One quick Pinterest scroll later (you know, over at Hailee Recipes on Pinterest), and this idea was born.
The Accidental Spell That Became Dessert
So, the idea behind this Witch’s Cauldron Cheesecake was “what if a potion exploded, but make it edible?” I wanted something that looked like a witch’s brew bubbling over, with swirls of color and a dark, mysterious base.
The first version looked… horrifying. The green glaze turned army-drab, and Sarah asked if I’d accidentally made “pond cheesecake.” I fixed it by switching to neon gel food coloring and adding a glossy chocolate crust that could survive the apocalypse.
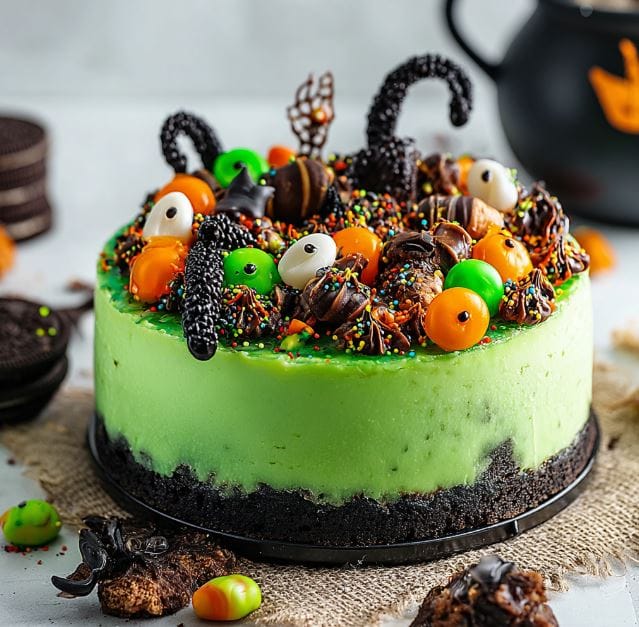
This final version? Dark chocolate base, black cookie crust, vibrant green glaze with candy “bubbles,” and a hint of vanilla smoke from the topping. It looks like something you’d serve at a Halloween party right next to a fog machine — but it tastes like a rich, creamy, indulgent dream.
What You Actually Need (And What You Don’t)
No spells, just solid ingredients. The Witch’s Cauldron Cheesecake is surprisingly simple once you know the potion ratios.
Stuff You Probably Already Have:
- 2 cups chocolate cookie crumbs (Oreos, obviously)
- 5 tablespoons butter, melted
- 3 blocks (8 oz each) cream cheese, softened
- 1 cup sugar
- 1 cup sour cream
- 3 large eggs
- 2 teaspoons vanilla extract
The Magic Ingredients:
- 6 ounces dark chocolate, melted and cooled slightly
- Neon green gel food coloring (the witchy kind, not pastel)
- 1/3 cup white chocolate chips (for the potion glaze)
- 2 tablespoons heavy cream
- Green candy pearls or Sixlets (for “bubbles”)
Optional Add-ons:
- Dry ice for serving (dramatic, but optional)
- A sprinkle of edible glitter — yes, it exists, and yes, it makes the Witch’s Cauldron Cheesecake sparkle like a curse gone right.
The Actual Time This Takes
Let’s be honest. Cheesecake is not a “whip it up and eat in an hour” situation.
- Prep: 30 minutes (plus some stirring magic)
- Bake: 60 minutes
- Cool: 1 hour in the oven, 4 hours in the fridge (yes, the waiting hurts)
- Decorate: 15 minutes
- Total time: About 6 hours of effort, mostly patience
While it chills, go check out my savory side — like my Homemade Pizza Dough. It’s what I make when I’m pretending to be balanced.
Step 1: The Base Spell (Don’t Skip This Part)
Preheat your oven to 325°F. Mix your cookie crumbs with melted butter until it looks like damp soil. Press it into a springform pan and bake for 8 minutes.
Real talk: the crust makes or breaks your Witch’s Cauldron Cheesecake. The first time I got lazy and skipped pre-baking, my crust floated up through the batter like a swamp monster. Bake it. Trust me.
Step 2: The Dark Filling
Beat cream cheese until smooth, then add sugar and mix again. Add eggs one at a time, followed by sour cream and vanilla. Melt the dark chocolate, cool slightly, then fold it into the batter.
When you pour this mixture into your pan, it should look like smooth chocolate silk. It smells like every Halloween party dessert table dreams about.
Bake for about an hour, or until the edges are set and the center has a little wobble. Leave it in the turned-off oven with the door cracked for another hour. Cheesecake doesn’t like sudden temperature changes — it’s dramatic like that.
Step 3: The Witch’s Glaze
Once your cheesecake is cooled, it’s time for the fun part. Melt the white chocolate and heavy cream together in a small bowl. Add neon green gel coloring a little at a time until it looks like radioactive goo — in the best way.
Pour the glaze over your chilled cheesecake and gently tilt the pan to spread it. Let some drip down the sides for that “boiling cauldron” effect. Add green candy pearls as bubbles while it’s still tacky.
When I first poured the glaze, I thought I ruined it. But once the bubbles set, it looked so convincingly magical that Sarah took ten pictures before we even cut it.
Step 4: The Chill
Chill your Witch’s Cauldron Cheesecake for at least four hours. Overnight is best — the glaze sets perfectly and the flavors settle. Slice with a hot knife for those clean, perfect edges.
The result? Deep chocolate flavor, creamy texture, and a top so shiny you’ll catch reflections of your Halloween decor.
The Health Stuff (But Make It Real)
Let’s be honest, there’s nothing “light” about this. But it’s worth it.
Per serving:
- Calories: about 420
- Protein: 7g
- Carbs: 35g
- Fat: 29g
This Witch’s Cauldron Cheesecake is pure comfort disguised as chaos. It’s decadent without being cloying and rich enough that one slice feels like a celebration.
Real Talk: How to Not Mess It Up
- Don’t skip the water bath if you can manage it — it keeps your cheesecake from cracking.
- Use gel food coloring, not liquid, for the glaze. Liquid ruins the texture.
- Chill it properly — patience equals texture.
- If your glaze looks dull, brush with a thin layer of corn syrup before adding candy bubbles for shine.
Making It Your Own
Once you master the base, go wild. The Witch’s Cauldron Cheesecake is perfect for variations.
- Purple Potion Version: Use violet food coloring and black sugar pearls.
- Matcha Brew: Replace the food coloring with matcha powder for a subtle green tea flavor.
- Mini Cauldrons: Make individual cheesecakes in ramekins — ideal for parties.
You can even top with edible “smoke” using dry ice in a bowl of water beside it for that theatrical reveal moment. Just don’t actually eat the dry ice.
Storing the Magic
Refrigerate your Witch’s Cauldron Cheesecake in an airtight container for up to 5 days. Freeze slices individually for up to 2 months. When thawing, let it sit overnight in the fridge to avoid condensation ruining your glaze.
If you make it ahead for a party, hold off on adding the glaze until the day of — it keeps the texture perfect and the color bright.
Final Thoughts
The Witch’s Cauldron Cheesecake feels like a little kitchen witchcraft — the kind that turns chaos into dessert. It’s visually wild, ridiculously indulgent, and surprisingly easy once you’ve done it once.
Sarah said it looks like something out of a Halloween movie. I said it tastes like “chocolate meets potion.” And honestly, both are true.
If you’re planning your spooky baking lineup this year, start with this one. It’ll steal the show — and your guests’ sanity when they realize it’s homemade.
And if you try it, tag me on Pinterest. I want to see your bubbling cauldrons, drips, and kitchen chaos. Because if my apartment can smell like a haunted bakery, yours can too.
Table of Contents
Witch’s Cauldron Cheesecake Recipe
Ingredients
Equipment
Method
- Instructions
- Preheat oven to 325°F. Mix crumbs and butter; press into springform pan. Bake 8 minutes.
- Beat cream cheese and sugar until smooth. Add eggs, sour cream, and vanilla.
- Mix in melted chocolate, pour into crust.
- Bake 60 minutes. Turn off oven, crack door, and cool 1 hour.
- Melt white chocolate and cream, stir in green coloring.
- Pour glaze over cooled cheesecake. Add candy pearls.
- Chill 4 hours minimum, slice and serve.