Burnt Basque Cheesecake in a Loaf Pan – Creamy, Easy & Foolproof
Burnt Basque Cheesecake in a Loaf Pan – Creamy, Easy & Foolproof
Burnt Basque Cheesecake in a Loaf Pan: Okay, So This Just Happened
Okay So This Just Happened
Okay, so… I didn’t think Burnt Basque Cheesecake could get easier — until I tried baking it in a loaf pan.
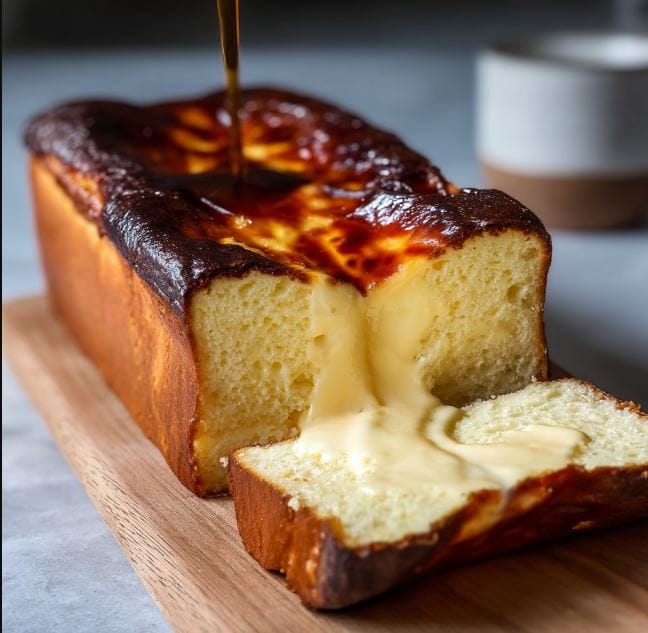
Turns out, you don’t need a springform, you don’t need a crust, and you definitely don’t need to stress over cracks. This cheesecake is meant to look perfectly imperfect — dark, caramelized edges, soft custardy center, and a wobbly top that screams effortless drama.
Sarah took one look at it cooling on the counter and said, “It looks like a dessert that knows it’s better than me.”
And she’s not wrong.
The “It’s Supposed to Look Like That” Moment
Traditional cheesecakes require water baths, parchment precision, and emotional support. Not this one.
Burnt Basque Cheesecake in a Loaf Pan wants to be chaotic. The high heat caramelizes the sugar, giving you that gorgeous burnt look — no cracks, no worries, just rustic perfection.
It’s the kind of recipe that feels fancy but is secretly just dump, mix, and bake.
Sarah said, “This is the low-maintenance cheesecake I’ve been waiting for.”
What You Actually Need (And What You Don’t)
You’ll need seven simple ingredients — nothing you can’t find at the grocery store, nothing intimidating.
Ingredients:
- 16 oz cream cheese (2 blocks), softened
- ¾ cup granulated sugar
- 3 large eggs
- 1 cup heavy cream
- 1 tablespoon flour (optional — helps structure)
- 1 teaspoon vanilla extract
- ½ teaspoon salt
Optional extras: a dash of lemon zest or a drizzle of honey when serving.
Sarah said, “If dessert had a personality, this one’s flirty and mysterious.”
Timing Breakdown
- Prep Time: 10 minutes
- Bake Time: 40–45 minutes
- Cool Time: 2 hours (I know, it’s torture)
- Total Time: 2 hours 55 minutes
- Servings: 6–8
Step 1: Prep the Pan
Line your loaf pan with parchment paper. Don’t try to make it neat — the wrinkles create those rustic edges we love.
Pro tip: Let the parchment hang over the sides for easy lifting later.
Sarah said, “This feels like the baking equivalent of messy hair that still looks good.”
Step 2: Beat It (The Batter, Obviously)
Beat the softened cream cheese and sugar together until smooth and fluffy.
Add the eggs one at a time, mixing after each one. Pour in the heavy cream, vanilla, salt, and flour (if using).
Mix until the batter is glossy and velvety.
Sarah dipped a spoon in, took a taste, and said, “This could be the final course in heaven.”
Step 3: Bake It Beautifully Burnt
Pour the batter into your lined loaf pan and give it a little tap to release air bubbles.
Bake at 400°F (200°C) for 40–45 minutes, or until the top is deeply golden brown — nearly burnt but not dry.
The center should still jiggle slightly when you move the pan.
Sarah said, “It’s giving ‘French café that doesn’t take reservations.’”
Step 4: Cool & Chill
Let the cheesecake cool in the pan for at least 2 hours. It’ll sink a little in the center, forming that signature Basque look.
If you like a firmer texture, refrigerate for another hour before slicing.
Pro tip: this cheesecake tastes even better the next day, once the flavors settle.
Step 5: Slice & Serve
Lift it out using the parchment overhang, slice thick pieces, and serve plain or with toppings:
- Whipped cream
- Fresh berries
- Sea salt & caramel drizzle
- Espresso powder dusting
Sarah topped hers with raspberry jam and said, “This tastes like vacation in Spain.”
The Health Stuff (But Make It Real)
Per slice:
- Calories: ~310
- Fat: 27g
- Carbs: 9g
- Protein: 6g
It’s cheesecake. We don’t do calorie guilt here — only joy.
Flavor Upgrades
Once you’ve nailed Burnt Basque Cheesecake in a Loaf Pan, you can remix it like this:
- Chocolate Swirl: Add 2 tbsp cocoa powder or Nutella.
- Maple Dream: Replace half the sugar with maple syrup.
- Espresso Buzz: Add 1 tbsp instant espresso powder.
- Citrus Glow: Stir in orange or lemon zest.
- Holiday Spice: Add cinnamon, nutmeg, and a touch of clove.
Sarah’s favorite? Espresso. She said, “It’s like cheesecake and coffee went on a date.”
Storage
- Fridge: Up to 5 days, covered tightly.
- Freezer: Up to 2 months (slice before freezing).
- Reheat Tip: Microwave 10 seconds for that just-baked warmth.
Pro tip: serve slightly chilled for creaminess, room temp for richness.
Real Talk
This Burnt Basque Cheesecake in a Loaf Pan is the lazy baker’s dream. No crust, no cracks, no panic — just pure, rich, caramelized cheesecake heaven.
It’s rustic, dramatic, and low-effort fancy — the kind of dessert that makes you feel like you own a tiny bakery in San Sebastián.
Sarah said, “If my personality were a dessert, I’d want to be this.”
If you make it, tag me on Pinterest — it’s already trending on my “Desserts That Accidentally Look Professional” board.
And if you need a savory balance, my Homemade Pizza Dough Recipe is the perfect cozy pre-dessert project.
Table of Contents
Burnt Basque Cheesecake in a Loaf Pan
Ingredients
Equipment
Method
- Instructions
- Preheat oven to 400°F (200°C). Line loaf pan with parchment paper.
- Beat cream cheese and sugar until smooth.
- Add eggs one at a time; mix in cream, vanilla, salt, and flour.
- Pour into loaf pan and tap gently.
- Bake 40–45 minutes until top is dark brown and center jiggles slightly.
- Cool completely, then chill at least 1 hour before slicing.
- Notes
- Add lemon zest, espresso, or maple syrup for flavor twists.
- Cracked top = perfect. It’s supposed to look rustic.
- Serve with whipped cream, berries, or caramel drizzle.