4 Budget Dessert Fruit Salad To-Go Recipes
4 Budget Dessert Fruit Salad To-Go Recipes
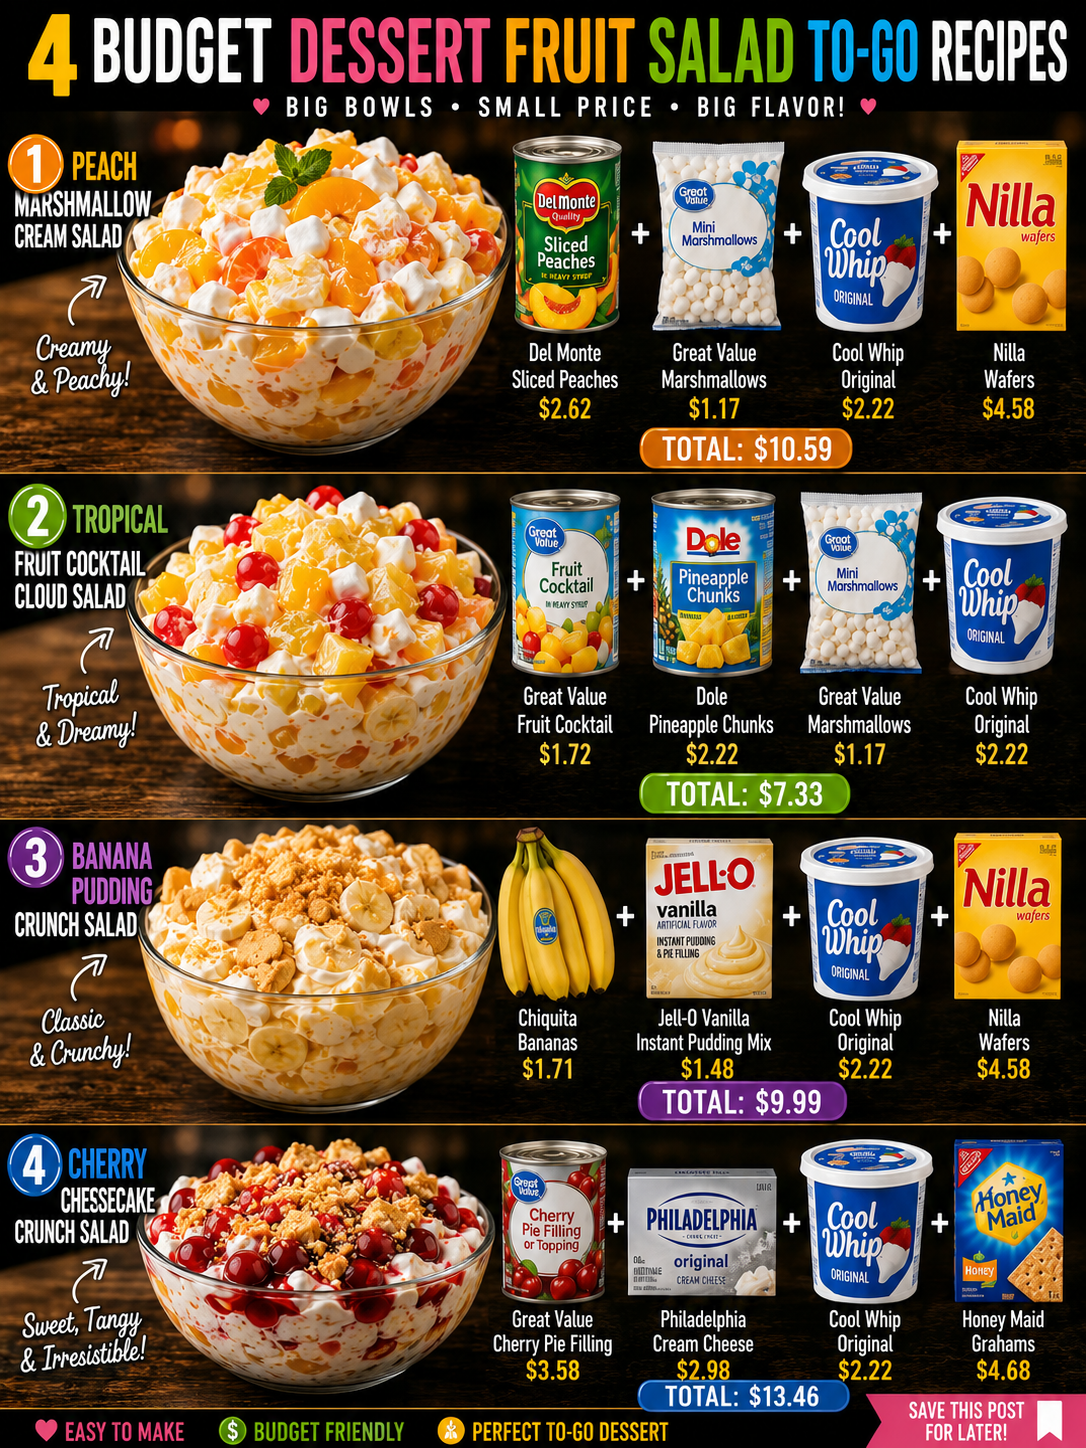
I’m so excited to share these 4 budget dessert fruit salad to-go recipes with you because let’s be honest, sometimes you need something sweet, portable, and actually affordable. These aren’t your basic fruit bowls either—they’ve got that extra something special that makes them feel like real desserts. Whether you’re packing them for lunch, bringing them to a potluck, or just wanting something refreshing in your fridge, these recipes deliver on flavor without breaking the bank.
What I love most about these particular salads is how they transform simple, budget-friendly ingredients into something that feels genuinely indulgent. From the Peach Marshmallow Cream Salad to the Cherry Cheesecake Crunch Salad, each one has its own personality and charm. They’re the kind of recipes you’ll find yourself making over and over because they’re so easy, so good, and so perfect for meal prep.
I’m constantly sharing recipes and food inspiration over at Follow me on HaileeRecipes on Pinterest, and these salads are definitely ones worth saving for your collection. Trust me, your taste buds and your wallet will thank you.
1. Peach Marshmallow Cream Salad
This creamy, fruity dessert combines juicy peaches with fluffy marshmallows and a cloud-like whipped cream base that feels indulgent without breaking the budget. The cool, refreshing texture makes it perfect for warm weather gatherings, potlucks, or packed lunches. The natural sweetness of peaches paired with mini marshmallows creates delightful pockets of flavor and texture, while the cream keeps everything cohesive and luscious. It’s the kind of simple fruit salad that tastes homemade and special, yet requires minimal effort and inexpensive ingredients you likely already have on hand.
Why You’ll Love It
- Made with budget-friendly ingredients that cost just a few dollars for a large batch.
- No baking required—simply mix and chill for an easy no-fuss dessert.
- Travels well in containers, making it ideal for picnics, lunches, and meal prep.
Ingredients
- 2 pounds fresh peaches, peeled, pitted, and chopped
- 1 cup mini marshmallows
- 1 cup heavy whipping cream
- 3 tablespoons powdered sugar
- 1 teaspoon vanilla extract
- 1/4 teaspoon almond extract (optional)
- Pinch of salt
How To Make It
- Whip the heavy cream with powdered sugar, vanilla extract, and salt using an electric mixer or whisk until stiff peaks form, about 2-3 minutes.
- Gently fold the whipped cream into a large mixing bowl to create a fluffy base.
- Add the chopped peaches to the whipped cream and fold gently until combined, being careful not to deflate the cream.
- Fold in the mini marshmallows, reserving a small handful for topping if desired.
- Transfer the mixture to an airtight container or individual serving cups.
- Refrigerate for at least 30 minutes before serving to allow flavors to meld and texture to set.
- Stir gently before serving and add reserved marshmallows on top for extra appeal.
Variations And Substitutions
Swap fresh peaches for canned peaches in juice (drained well) to save money and time. Replace heavy cream with whipped topping or Cool Whip for an even more budget-friendly option. Add a tablespoon of lemon juice to brighten the flavor, or stir in a teaspoon of cinnamon for warmth. Include diced fresh strawberries or raspberries alongside the peaches for extra color and flavor complexity.
Make-Ahead, Storage, And Serving Tips
Prepare this salad up to 2 days in advance and store in an airtight container in the refrigerator. The marshmallows may soften slightly over time, which some prefer. For the best texture, add marshmallows just a few hours before serving if making ahead. Serve chilled directly from the refrigerator. If the cream separates slightly during storage, gently stir to recombine. Divide into individual containers for easy grab-and-go lunch options.
2. Tropical Fruit Cocktail Cloud Salad
This light and fluffy tropical fruit salad combines fresh pineapple, mango, and coconut with a cloud-like whipped topping for an elegant yet budget-friendly dessert. The refreshing citrus flavors and creamy texture make it perfect for potlucks, picnics, or meal prep containers. The whipped topping keeps the fruit tasting fresh while adding a luxurious feel without expensive ingredients. It’s an ideal warm-weather treat that feels indulgent but costs just a few dollars to prepare.
Why You’ll Love It
- Costs under five dollars to make an entire batch that serves six to eight people.
- Requires no baking, cooking, or special equipment beyond a mixing bowl.
- Travels well in sealed containers and stays fresh for up to two days.
Ingredients
- 1 can pineapple chunks in juice, drained
- 2 cups fresh or frozen mango chunks
- 1 cup shredded coconut, unsweetened or sweetened
- 1 container whipped topping, thawed
- 2 tablespoons honey or agave syrup
- 1 teaspoon vanilla extract
- Juice of one lime
- Pinch of salt
How To Make It
- Drain the canned pineapple thoroughly, pressing gently to remove excess juice.
- Combine the pineapple chunks and mango pieces in a large mixing bowl.
- In a separate bowl, fold together the whipped topping, honey, vanilla extract, and lime juice until well combined.
- Gently fold the whipped topping mixture into the fruit, being careful not to crush the delicate pieces.
- Stir in three-quarters of the shredded coconut, reserving the rest for topping.
- Add a pinch of salt to enhance the tropical flavors.
- Divide into individual serving containers or transfer to a large bowl.
- Top with remaining coconut just before serving for best texture.
Variations And Substitutions
Swap mango for papaya, kiwi, or passion fruit for different tropical variations. Use Greek yogurt mixed with a bit of powdered sugar instead of whipped topping for a tangier option. Add a handful of macadamia nuts or almonds for crunch. If you prefer less sweetness, reduce the honey to one tablespoon. Coconut cream can replace whipped topping for a richer flavor.
Make-Ahead, Storage, And Serving Tips
Prepare the fruit and whipped topping mixture separately up to one day ahead, then combine just before serving to prevent sogginess. Store in airtight containers in the refrigerator for up to two days. Pack in individual mason jars or disposable containers for easy grab-and-go portions. If the salad becomes watery, drain excess liquid before serving. For outdoor events, keep in a cooler with ice packs until ready to eat.
3. Banana Pudding Crunch Salad
This Banana Pudding Crunch Salad brings together the beloved flavors of classic banana pudding in an easy, portable format. Layers of ripe bananas, creamy pudding, and crispy vanilla wafer crumbles create a delightful contrast of textures that keeps this dessert interesting with every spoonful. The cool, custard-like pudding complements the soft bananas perfectly, while the wafer crumbles add satisfying crunch. This recipe works wonderfully for picnics, potlucks, or quick weeknight treats because it requires no baking and comes together in minutes. It’s budget-friendly since it relies on affordable pantry staples, making it ideal for feeding a crowd without breaking the bank.
Why You’ll Love It
- No-bake convenience means you can assemble it in under ten minutes.
- Costs just a few dollars to make an entire batch that serves six to eight people.
- Tastes like indulgent banana pudding but travels well in individual containers for grab-and-go eating.
Ingredients
- 4 ripe bananas, sliced into quarter-inch rounds
- 1 box instant vanilla pudding mix
- 2 cups cold milk
- 1 cup vanilla wafer cookies, crushed into bite-sized pieces
- 2 tablespoons granulated sugar
- 1 teaspoon vanilla extract
- Pinch of salt
How To Make It
- Pour the instant vanilla pudding mix into a large bowl and add the cold milk. Whisk vigorously for two minutes until the pudding thickens to a creamy consistency.
- Stir in the vanilla extract and salt to enhance the pudding flavor.
- Slice the bananas into quarter-inch rounds and gently fold them into the pudding mixture, being careful not to break the banana pieces.
- Crush the vanilla wafer cookies into bite-sized crumbles and mix most of them into the pudding, reserving about two tablespoons for topping.
- Divide the mixture evenly among six to eight individual serving containers or mason jars.
- Sprinkle the reserved wafer crumbles on top of each serving just before closing the containers.
Variations And Substitutions
Swap vanilla pudding for butterscotch or chocolate for different flavor profiles. Use graham crackers, gingersnaps, or even crushed cornflakes instead of vanilla wafers for varied textures and tastes. Add a tablespoon of peanut butter to the pudding mixture for extra richness, or layer the ingredients in clear cups for a more elegant presentation. For a tropical twist, substitute half the bananas with diced pineapple or mandarin oranges.
Make-Ahead, Storage, And Serving Tips
Prepare this salad up to six hours ahead and store in the refrigerator in sealed containers. To prevent the bananas from browning, slice them just before mixing or toss them lightly with a little lemon juice. Add the wafer crumble topping just before serving to maintain maximum crunch, as the cookies will soften if added too early. This dessert is best enjoyed cold straight from the refrigerator. It keeps well for two days when stored properly, making it perfect for meal prep or advance party planning.
4. Cherry Cheesecake Crunch Salad
This Cherry Cheesecake Crunch Salad combines fresh cherries and creamy cheesecake flavors in a portable, no-bake dessert that tastes like an indulgent treat without the price tag. The combination of juicy cherries, tangy Greek yogurt, and crunchy granola creates layers of texture and flavor that work beautifully in mason jars or portable containers. Perfect for picnics, lunch boxes, or grab-and-go breakfasts, this salad delivers the satisfaction of cheesecake with the freshness of fruit, making it an ideal budget-friendly option for warm weather entertaining or meal prep.
Why You’ll Love It
- Tastes like dessert but works as breakfast or a light snack, maximizing value.
- No baking required means lower energy costs and faster preparation time.
- Layers beautifully in mason jars for grab-and-go convenience and minimal cleanup.
Ingredients
- 2 cups fresh or frozen cherries, pitted and halved
- 1.5 cups plain Greek yogurt
- 3 tablespoons honey or maple syrup
- 1 teaspoon vanilla extract
- 1 cup granola or crushed graham crackers
- 1/4 cup mini chocolate chips
- 2 tablespoons cream cheese, softened (optional but recommended)
- Pinch of salt
How To Make It
- In a small bowl, whisk together Greek yogurt, softened cream cheese, honey, vanilla extract, and a pinch of salt until smooth and creamy.
- Pat the cherries dry with paper towels to remove excess moisture, then gently fold them into the yogurt mixture, reserving a few for topping.
- In a separate bowl, combine granola and mini chocolate chips, mixing well.
- Layer the mixture into mason jars or containers, starting with a spoonful of yogurt mixture on the bottom.
- Add a layer of granola mixture on top of the yogurt.
- Repeat layers until jars are full, ending with a sprinkle of granola and a reserved cherry on top.
- Seal containers and refrigerate until ready to serve, up to 24 hours.
- Give jars a gentle shake before eating to combine layers if desired.
Variations And Substitutions
Swap fresh cherries for canned cherries in light syrup, drained and rinsed, for year-round affordability. Replace Greek yogurt with ricotta cheese or cottage cheese blended smooth for a different texture. Use store-brand granola or make your own by mixing oats, honey, and oil for maximum savings. Substitute chocolate chips with crushed cookies, nuts, or coconut flakes. Add a tablespoon of cherry jam to the yogurt layer for deeper flavor without extra fruit cost.
Make-Ahead, Storage, And Serving Tips
Assemble jars up to 24 hours ahead and store in the refrigerator to save time during busy mornings. Keep granola separate and add just before eating if you prefer extra crunch, or mix in immediately for softer texture. These salads travel well in coolers for picnics and outdoor events. If the yogurt mixture becomes too thin from cherry juices, drain extra liquid before layering. Frozen cherries work equally well and are often cheaper than fresh; thaw and drain them thoroughly before using.
Final Thoughts
Budget-friendly fruit salads are the perfect way to satisfy your sweet cravings without breaking the bank or spending hours in the kitchen. Whether you’re packing lunch for work, prepping snacks for the week, or looking for a light dessert option, these four recipes prove that delicious doesn’t have to be expensive. Each one comes together in minutes and uses affordable, seasonal ingredients that you likely already have on hand.
Pick whichever recipe speaks to you first and give it a try this week. You might be surprised at how a simple combination of fresh fruit and a few pantry staples can become your new go-to dessert. Once you master one, the others will feel just as easy, and you’ll have a whole rotation of portable, budget-conscious treats ready whenever you need them.
4 Budget Dessert Fruit Salad To-Go Recipes
Ingredients
Method
- Peach Marshmallow Cream Salad: Drain peaches and combine with mini marshmallows in a large bowl.
- Peach Marshmallow Cream Salad: Fold in whipped cream and powdered sugar until fully combined, then chill until serving.
- Tropical Fruit Cocktail Cloud Salad: Drain tropical fruit cocktail and combine with whipped topping and mini marshmallows in a bowl.
- Tropical Fruit Cocktail Cloud Salad: Stir in shredded coconut and refrigerate for at least 1 hour before serving.
- Banana Pudding Crunch Salad: Prepare instant vanilla pudding according to package directions using 1 1/2 cups milk.
- Banana Pudding Crunch Salad: Layer sliced bananas, pudding mixture, crushed vanilla wafers, and whipped cream in a serving bowl or individual cups.
- Cherry Cheesecake Crunch Salad: Beat softened cream cheese with powdered sugar until smooth and fluffy.
- Cherry Cheesecake Crunch Salad: Fold in cherry pie filling, top with graham cracker crumbs and whipped cream, then refrigerate until ready to serve.
Notes
Tropical Fruit Cocktail Cloud Salad Tips: Best served chilled. Pack in sealed containers and transport in a cooler for on-the-go enjoyment.
Banana Pudding Crunch Salad Tips: Slice bananas just before serving to prevent browning. Assemble in individual cups for portable portions.
Cherry Cheesecake Crunch Salad Tips: Make the cream cheese mixture up to 2 days ahead. Add cherry filling and toppings within 2 hours of serving to keep graham crackers crispy.