Wafer Sticks: 9 Delicious Flavors to Savor
Wafer Sticks: 9 Delicious Flavors to Savor
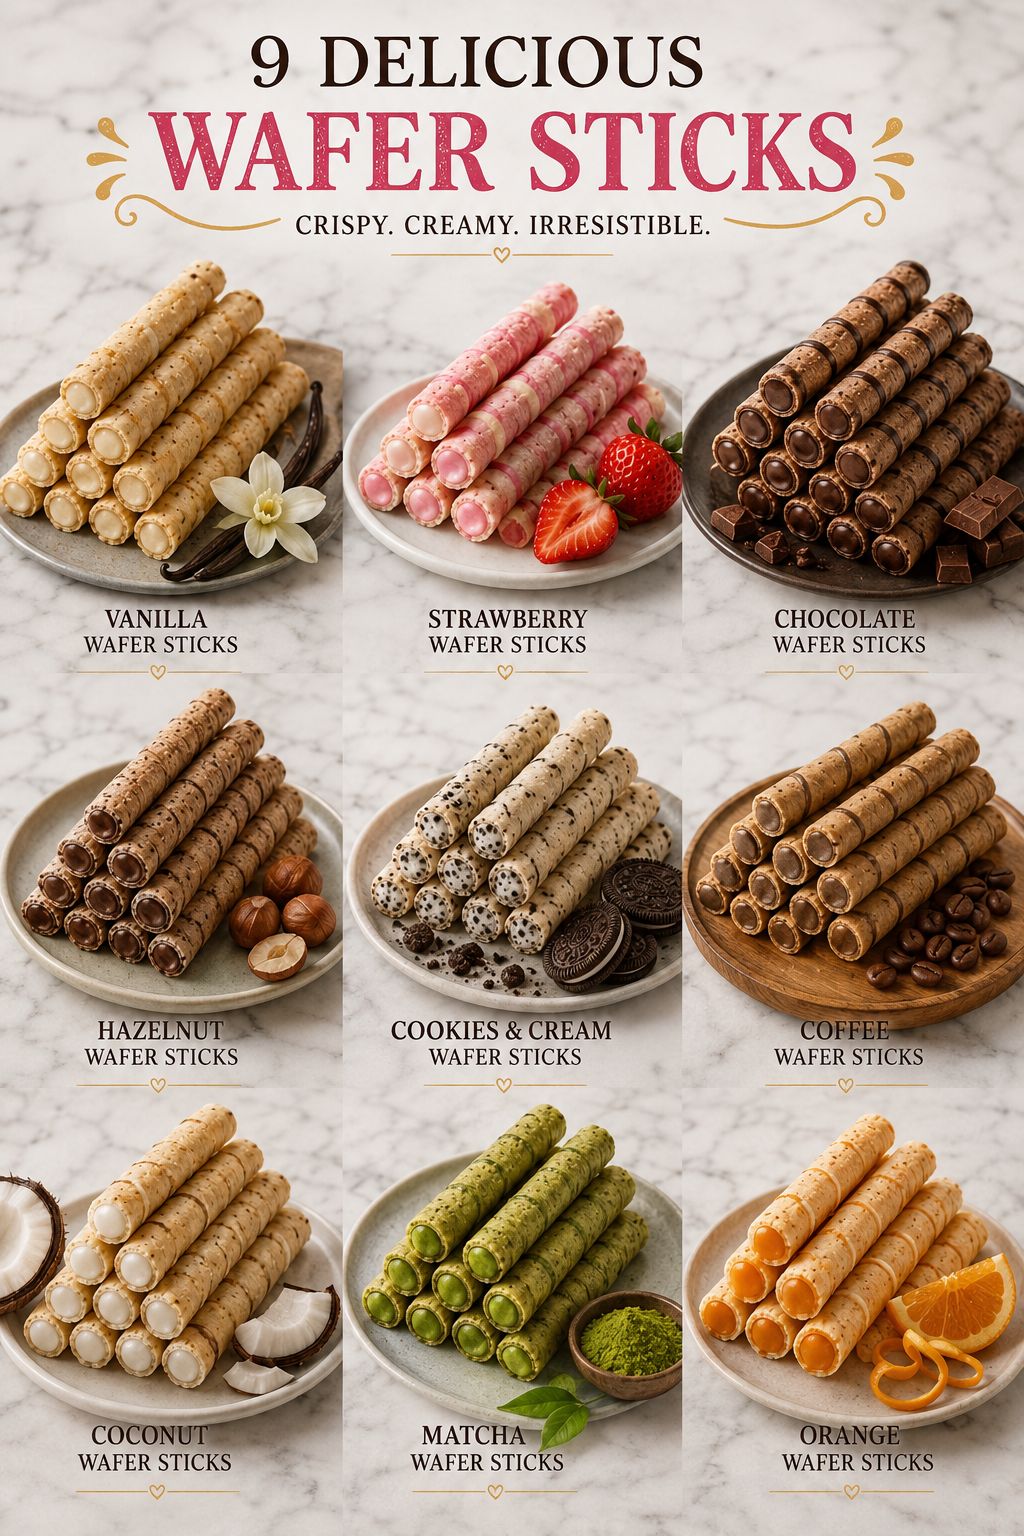
I’ve been absolutely obsessed with wafer sticks lately, and I had to share my nine favorite flavors with you. Whether you’re looking for a delicate treat to pair with coffee, a homemade gift that actually impresses people, or just something fun to bake on a lazy afternoon, these 9 delicious wafer sticks deliver on every front. From classic vanilla to unexpected flavors like matcha and orange, there’s something here for every craving.
What I love most about wafer sticks is how elegant they feel despite being surprisingly straightforward to make. They’re crispy, they’re sophisticated, and they make your kitchen smell incredible while they bake. I’ve tested each of these recipes multiple times to make sure they’re foolproof, so you can feel confident diving into any of them. I’m also constantly sharing new recipe ideas and food inspiration, so follow me on HaileeRecipes on Pinterest if you want more ideas like these.
These recipes are absolutely worth saving because they’re the kind of treats you’ll find yourself making again and again. Whether it’s the comforting chocolate version, the floral notes of the orange wafers, or the cozy hazelnut option, each one has its moment to shine. Bookmark this roundup and come back whenever you need to impress someone or just treat yourself.
1. Vanilla Wafer Sticks
Vanilla wafer sticks are delicate, crispy cookies with a subtle sweetness and buttery flavor that melts on your tongue. These thin, elongated treats offer the perfect balance of crunch and tender crumb, making them ideal for dunking in coffee or serving alongside desserts. Their elegant appearance and simple vanilla profile make them a timeless choice for afternoon tea, gift boxes, or whenever you want a sophisticated snack.
Why You’ll Love It
- Simple ingredient list requires no special equipment or advanced baking skills.
- Bakes quickly and produces impressive, bakery-quality results in under 20 minutes.
- Naturally pairs well with coffee, tea, or desserts without overwhelming other flavors.
Ingredients
- 1 cup all-purpose flour
- 6 tablespoons butter, softened
- 1/4 cup granulated sugar
- 1 egg yolk
- 1 teaspoon vanilla extract
- 1/4 teaspoon salt
- 2 tablespoons powdered sugar for dusting
How To Make It
- Preheat your oven to 350°F and line two baking sheets with parchment paper.
- Cream together softened butter and granulated sugar until light and fluffy, about 2 minutes, then beat in the egg yolk and vanilla extract.
- Gently fold in the flour and salt until just combined, creating a smooth dough.
- Transfer dough to a piping bag fitted with a long, thin tip and pipe 4-inch sticks onto prepared baking sheets, spacing them about 1 inch apart.
- Bake for 10-12 minutes until the edges are golden and the centers are set, then cool on the baking sheet for 2 minutes before transferring to a wire rack and dusting with powdered sugar.
Variations And Substitutions
Add almond extract or a pinch of cardamom for deeper flavor complexity. Dip cooled wafer sticks halfway into melted white or dark chocolate for an elegant twist. Substitute half the flour with ground almonds for a nuttier texture, or brush sticks with egg white and sprinkle with sanding sugar before baking for extra sparkle.
Make-Ahead, Storage, And Serving Tips
Store cooled wafer sticks in an airtight container at room temperature for up to one week. Prepare the dough up to 2 days ahead and refrigerate before piping. For best crispness, avoid storing with humid foods. Serve at room temperature alongside coffee, tea, or as an accompaniment to mousse or ice cream desserts.
2. Strawberry Wafer Sticks
These delicate strawberry wafer sticks combine crispy, golden wafer layers with sweet strawberry flavor for an elegant treat. The light, airy texture pairs perfectly with coffee or tea, making them ideal for afternoon snacking or entertaining guests. Fresh strawberry essence shines through without overwhelming, while the wafer’s subtle crunch provides satisfying textural contrast.
Why You’ll Love It
- Quick to prepare with minimal ingredients and no baking required.
- Impressive presentation that looks homemade yet refined.
- Naturally fruity flavor appeals to both kids and adults.
Ingredients
- 12 wafer stick cookies
- 1 cup fresh strawberries, finely chopped
- 3 tablespoons powdered sugar
- 2 tablespoons heavy cream
- 1 tablespoon strawberry jam
- 1 teaspoon vanilla extract
- Pinch of salt
How To Make It
- Combine chopped strawberries, powdered sugar, and salt in a bowl, stirring gently to release juices. Let sit for 5 minutes.
- Whip heavy cream to soft peaks, then fold in vanilla extract.
- Gently fold the strawberry mixture and jam into the whipped cream until just combined, keeping some texture.
- Transfer filling to a piping bag fitted with a small round tip.
- Pipe filling onto one wafer stick, then press another stick on top to create a sandwich. Repeat with remaining wafers.
Variations And Substitutions
Replace fresh strawberries with freeze-dried strawberries for concentrated flavor and longer shelf life. Use mascarpone instead of whipped cream for a richer, tangier filling. Substitute strawberry jam with raspberry or cherry preserves for different fruit profiles. Dip the finished sticks halfway into melted white chocolate for extra indulgence.
Make-Ahead, Storage, And Serving Tips
Assemble these sticks up to 4 hours ahead and refrigerate in an airtight container to keep wafers crisp. The filling may soften slightly over time, so serve within a few hours for optimal texture. Store leftover components separately and assemble fresh as needed. Serve chilled or at room temperature alongside fresh berries for a charming presentation.
3. Chocolate Wafer Sticks
These crispy chocolate wafer sticks deliver rich cocoa flavor with a delicate, snappy texture that shatters on the tongue. Perfect for dunking in coffee or serving alongside ice cream, they’re an elegant treat that looks impressive but requires minimal effort. The thin, uniform shape makes them ideal for gift-giving or afternoon tea service.
Why You’ll Love It
- Ready in under 30 minutes from start to finish.
- Requires only basic pantry ingredients with no special equipment needed.
- Naturally gluten-free option when using certified flour alternatives.
Ingredients
- 1 cup all-purpose flour
- 1/4 cup unsweetened cocoa powder
- 1/2 cup butter, softened
- 1/2 cup granulated sugar
- 1 large egg yolk
- 1 teaspoon vanilla extract
- 1/4 teaspoon sea salt
How To Make It
- Cream together softened butter and sugar until light and fluffy, about 2 minutes.
- Beat in egg yolk and vanilla extract until fully combined.
- Whisk together flour, cocoa powder, and salt in a separate bowl, then fold into wet ingredients until a smooth dough forms.
- Transfer dough to a piping bag fitted with a thin round tip and pipe 4-inch sticks onto parchment-lined baking sheets, spacing them 1 inch apart.
- Bake at 350°F for 12-15 minutes until firm but still slightly tender, then cool on the baking sheet for 5 minutes before transferring to a wire rack.
Variations And Substitutions
Dip finished sticks in melted dark chocolate for extra indulgence. Add 1/2 teaspoon espresso powder to intensify chocolate flavor. Swap cocoa powder for matcha powder for a green tea version, or roll unbaked sticks in colored sugar before baking for festive appeal.
Make-Ahead, Storage, And Serving Tips
Store cooled wafer sticks in an airtight container at room temperature for up to 5 days. Dough can be piped onto trays and refrigerated for up to 2 days before baking. Serve at room temperature alongside coffee, tea, or as a dessert accompaniment. If sticks soften during storage, recrisp in a 300°F oven for 3-5 minutes.
4. Hazelnut Wafer Sticks
Hazelnut wafer sticks deliver a delicate crunch with rich, nutty flavor in every bite. These elegant treats feature a crispy wafer exterior with a smooth hazelnut cream filling that melts on the tongue. Perfect for serving alongside coffee or tea, they’re ideal for impressing guests or enjoying as a sophisticated snack. The combination of buttery wafer and creamy hazelnut makes them irresistible.
Why You’ll Love It
- Nutty hazelnut flavor pairs beautifully with crispy wafer texture.
- Elegant presentation makes them perfect for entertaining or gifting.
- Surprisingly simple to make with basic pantry ingredients.
Ingredients
- 1 cup all-purpose flour
- 1/4 cup granulated sugar
- 1/2 cup unsalted butter, softened
- 1/2 cup hazelnut spread or paste
- 1 egg yolk
- 1/2 teaspoon vanilla extract
- Pinch of sea salt
How To Make It
- Cream together softened butter and sugar until light and fluffy, then mix in egg yolk and vanilla extract.
- Fold in flour and salt until a smooth dough forms, then refrigerate for 30 minutes.
- Roll dough between parchment paper to 1/8-inch thickness, then cut into long, thin rectangles.
- Place rectangles on baking sheets and bake at 350°F for 10-12 minutes until golden and crispy.
- Once cooled completely, sandwich hazelnut spread between two wafer sticks and serve.
Variations And Substitutions
Replace hazelnut spread with chocolate-hazelnut spread for extra richness, or use almond butter for a different nutty profile. Dust finished sticks with powdered sugar or dip ends in melted chocolate for added elegance.
Make-Ahead, Storage, And Serving Tips
Store unfilled wafer sticks in an airtight container for up to one week. Assemble with filling just before serving to maintain crispness. For longer storage, freeze unfilled sticks for up to three months and fill after thawing.
5. Cookies & Cream Wafer Sticks
These Cookies & Cream Wafer Sticks combine the beloved cookie flavor with crispy, delicate wafer texture. The contrast between crunchy wafers and creamy filling creates an irresistible treat that’s perfect for snacking, lunch boxes, or pairing with coffee. This recipe works because the cookie crumbles add bursts of flavor throughout, making each bite interesting and satisfying.
Why You’ll Love It
- Combines two favorite textures in one convenient stick form.
- Simple enough for beginners but impressive enough to share.
- Uses pantry staples and requires no special equipment.
Ingredients
- 2 cups all-purpose flour
- 1/2 cup unsalted butter, softened
- 1/4 cup granulated sugar
- 1/4 cup crushed cookies and cream cookies
- 1 egg yolk
- 1 teaspoon vanilla extract
- 1/4 teaspoon salt
How To Make It
- Cream together softened butter and sugar until light and fluffy, about 2 minutes.
- Mix in egg yolk and vanilla extract until fully combined.
- In a separate bowl, whisk together flour and salt, then fold into wet ingredients until a dough forms.
- Fold crushed cookies throughout the dough, reserving some larger pieces for texture.
- Pipe dough into thin stick shapes on parchment paper and bake at 325°F for 12-15 minutes until golden and crisp.
Variations And Substitutions
Swap crushed cookies and cream cookies for other sandwich cookies like chocolate wafers or graham crackers. Add a thin chocolate coating by dipping the cooled sticks in melted white or dark chocolate. For extra creaminess, sandwich two wafers with frosting between them.
Make-Ahead, Storage, And Serving Tips
Store in an airtight container at room temperature for up to one week. Dough can be made ahead and refrigerated for two days before piping and baking. Serve at room temperature for best crispness, and keep away from humidity to maintain texture.
6. Coffee Wafer Sticks
These elegant coffee wafer sticks combine the delicate crispness of classic wafers with rich espresso flavor, creating a sophisticated treat perfect for coffee lovers. The thin, crispy texture contrasts beautifully with a smooth coffee-infused filling, making them ideal for pairing with afternoon coffee or serving as an elegant dessert accompaniment. Their refined taste and impressive appearance make them feel indulgent despite being relatively simple to prepare.
Why You’ll Love It
- Perfect for coffee enthusiasts who enjoy bold, authentic espresso flavor in a delicate form.
- Impressive enough to serve to guests yet simple enough for home bakers of any skill level.
- Light and crispy texture satisfies without feeling heavy or overly sweet.
Ingredients
- 1 cup all-purpose flour
- 1/4 cup unsalted butter, softened
- 1/4 cup sugar
- 2 tablespoons instant espresso powder mixed with 1 tablespoon hot water
- 1 egg white
- 1/2 teaspoon vanilla extract
- Pinch of salt
How To Make It
- Cream together softened butter and sugar until light and fluffy, then stir in the espresso mixture and vanilla extract until fully combined.
- Whisk the egg white until frothy and fold it gently into the coffee mixture along with salt.
- Fold in flour until just combined, being careful not to overmix, then transfer batter to a piping bag fitted with a large round tip.
- Pipe 3-inch-long sticks onto parchment-lined baking sheets, spacing them about 2 inches apart, then bake at 375°F for 8-10 minutes until golden and crispy.
- Cool on the baking sheet for 2 minutes, then transfer to a wire rack to cool completely before serving.
Variations And Substitutions
Create mocha wafer sticks by adding 1 tablespoon of cocoa powder to the dry ingredients. For a less intense coffee flavor, reduce espresso powder to 1 tablespoon. Dip cooled wafers halfway into melted dark chocolate for an elegant finish, or dust with cocoa powder while still warm.
Make-Ahead, Storage, And Serving Tips
Store cooled wafer sticks in an airtight container for up to 5 days to maintain crispness. Prepare the batter up to 2 hours ahead and refrigerate before piping. Serve at room temperature alongside espresso, cappuccino, or hot chocolate for an elegant pairing.
7. Coconut Wafer Sticks
Coconut wafer sticks deliver tropical sweetness with a delicate, crispy texture that melts on your tongue. These light and airy treats feature toasted coconut throughout, offering rich coconut flavor without being overly dense. Perfect for afternoon tea, dessert platters, or gift-giving, they’re an elegant option that looks impressive yet remains surprisingly simple to make.
Why You’ll Love It
- Naturally tropical flavor that feels indulgent but uses simple pantry staples.
- Crispy-wafer texture contrasts beautifully with chewy coconut pieces.
- Quick baking time means fresh treats ready in under 30 minutes.
Ingredients
- 1 cup all-purpose flour
- 3/4 cup shredded unsweetened coconut
- 1/2 cup butter, softened
- 1/2 cup granulated sugar
- 1 egg white
- 1 teaspoon vanilla extract
- 1/4 teaspoon salt
How To Make It
- Preheat oven to 350°F and line baking sheets with parchment paper. Toast coconut in a dry skillet for 3-4 minutes until lightly golden, then set aside.
- Cream together softened butter and sugar until light and fluffy, about 2 minutes. Beat in egg white and vanilla extract until well combined.
- Gently fold in flour, toasted coconut, and salt until just combined, being careful not to overmix.
- Transfer batter to a piping bag fitted with a long tip and pipe 3-inch sticks onto prepared baking sheets, spacing them 1 inch apart.
- Bake for 10-12 minutes until edges are light golden but centers remain pale, then cool on baking sheets for 5 minutes before transferring to a wire rack.
Variations And Substitutions
Add toasted coconut flakes on top before baking for extra crunch and visual appeal. Substitute half the flour with cornstarch for an even crisper, more delicate texture. For chocolate-dipped versions, dip cooled sticks halfway into melted dark or white chocolate and let set on parchment paper.
Make-Ahead, Storage, And Serving Tips
Store cooled wafer sticks in an airtight container at room temperature for up to one week. They can be frozen unbaked for up to three months; bake directly from frozen, adding 2-3 extra minutes to baking time. Serve with tea, coffee, or as part of a dessert board. If sticks soften during storage, crisp them in a 300°F oven for 3-5 minutes.
8. Matcha Wafer Sticks
Matcha wafer sticks deliver a delicate, earthy green tea flavor with a light, crispy texture that melts on the tongue. These elegant treats offer a sophisticated twist on classic wafers, perfect for serving with tea or as an impressive homemade gift. The vibrant color and subtle umami notes make them ideal for Japanese-inspired gatherings or when you want something refined yet simple.
Why You’ll Love It
- Stunning green color impresses guests and looks beautiful on any plate.
- Quick to make with minimal ingredients and straightforward technique.
- Naturally pairs perfectly with tea, coffee, or light desserts.
Ingredients
- 3 tablespoons matcha powder
- 1/2 cup all-purpose flour
- 1/4 cup granulated sugar
- 1/4 cup melted butter
- 2 large egg whites
- 1/4 teaspoon vanilla extract
- Pinch of sea salt
How To Make It
- Sift matcha powder with flour and sugar to remove lumps and ensure even color distribution throughout the batter.
- Whisk egg whites until foamy, then gently fold in melted butter and vanilla extract until combined.
- Fold the dry matcha mixture into the wet ingredients until just combined, being careful not to overmix.
- Pipe thin lines of batter onto parchment-lined baking sheets, then bake at 350°F for 8-10 minutes until edges are lightly golden.
- Remove from oven and immediately roll each warm wafer around a wooden dowel or chopstick, then cool on a wire rack.
Variations And Substitutions
Add a teaspoon of white chocolate shavings to the batter for subtle sweetness, or dip finished wafers in white chocolate for elegance. Substitute 1 tablespoon matcha with 1 tablespoon finely ground pistachios for a different flavor profile while maintaining the technique.
Make-Ahead, Storage, And Serving Tips
Store cooled wafers in an airtight container for up to five days. Work quickly when rolling warm wafers, as they harden fast; if they cool too quickly, briefly return them to the oven. For make-ahead convenience, prepare the batter up to two hours in advance and refrigerate before piping and baking.
9. Orange Wafer Sticks
These delicate orange wafer sticks combine bright citrus flavor with a crispy, delicate texture that melts on your tongue. Perfect for afternoon tea, dessert platters, or gift-giving, they offer an elegant treat that tastes sophisticated but requires minimal effort. The subtle orange essence pairs beautifully with coffee or hot chocolate, making these wafers ideal for any occasion when you want to impress without fuss.
Why You’ll Love It
- Bright citrus flavor that feels refreshing and sophisticated without being overpowering.
- Quick to prepare with simple pantry ingredients most bakers already have on hand.
- Elegant presentation makes these perfect for entertaining or homemade gifts.
Ingredients
- 1 cup all-purpose flour
- 6 tablespoons butter, softened
- 1/3 cup granulated sugar
- 1 egg white
- 2 tablespoons fresh orange juice
- 1 tablespoon orange zest
- 1/4 teaspoon vanilla extract
How To Make It
- Preheat your oven to 350°F and line baking sheets with parchment paper.
- Cream together softened butter and sugar until light and fluffy, then beat in the egg white, orange juice, orange zest, and vanilla extract until well combined.
- Gently fold in the flour until just combined, being careful not to overmix the batter.
- Transfer the batter to a piping bag fitted with a long thin tip and pipe 3-inch sticks onto prepared baking sheets, spacing them about 1 inch apart.
- Bake for 8-10 minutes until the edges are golden but the centers remain pale and delicate, then cool on the baking sheet for 2 minutes before transferring to a wire rack.
Variations And Substitutions
Substitute lemon zest and juice for a tangy twist, or add a pinch of cardamom for warmth. Dip the cooled wafer sticks halfway into melted white chocolate for an elegant finish, or dust them with powdered sugar while still warm for a delicate coating.
Make-Ahead, Storage, And Serving Tips
Store cooled wafers in an airtight container at room temperature for up to 5 days. The unbaked batter can be refrigerated for up to 24 hours before piping. Serve at room temperature with tea, coffee, or alongside fruit-based desserts for a light, refreshing finish to any meal.
Final Thoughts
Wafer sticks are the perfect treat when you want something crispy, elegant, and surprisingly simple to make at home. Whether you prefer classic vanilla, adventurous matcha, or indulgent chocolate varieties, there’s a recipe here to match every mood and occasion. The best part? Most of these recipes come together in under an hour, making them ideal for impressing guests or satisfying your own cravings without spending all day in the kitchen.
If you’re new to making wafer sticks, we recommend starting with the Classic Vanilla or Chocolate varieties to get comfortable with the technique. Once you’ve mastered the basics, you’ll feel confident experimenting with the more creative flavors. Pick whichever one calls to you first, grab your ingredients, and get rolling. Your friends and family will be amazed at what you’ve created.
Vanilla Wafer Sticks
Ingredients
Method
- Preheat oven to 375°F and line baking sheets with parchment paper.
- In a small bowl, whisk together flour, baking powder, and salt.
- In a large bowl, cream together butter and sugar until light and fluffy.
- Beat in egg and vanilla extract until well combined.
- Gradually mix in the flour mixture alternating with milk until a thick dough forms.
- Transfer dough to a piping bag fitted with a large round tip and pipe 3-inch sticks onto prepared baking sheets.
- Bake for 10-12 minutes until golden brown and firm.
- Cool on baking sheets for 5 minutes, then transfer to a wire rack to cool completely.