Fudge Recipes: 9 Decadent Homemade Treats
Fudge Recipes: 9 Decadent Homemade Treats
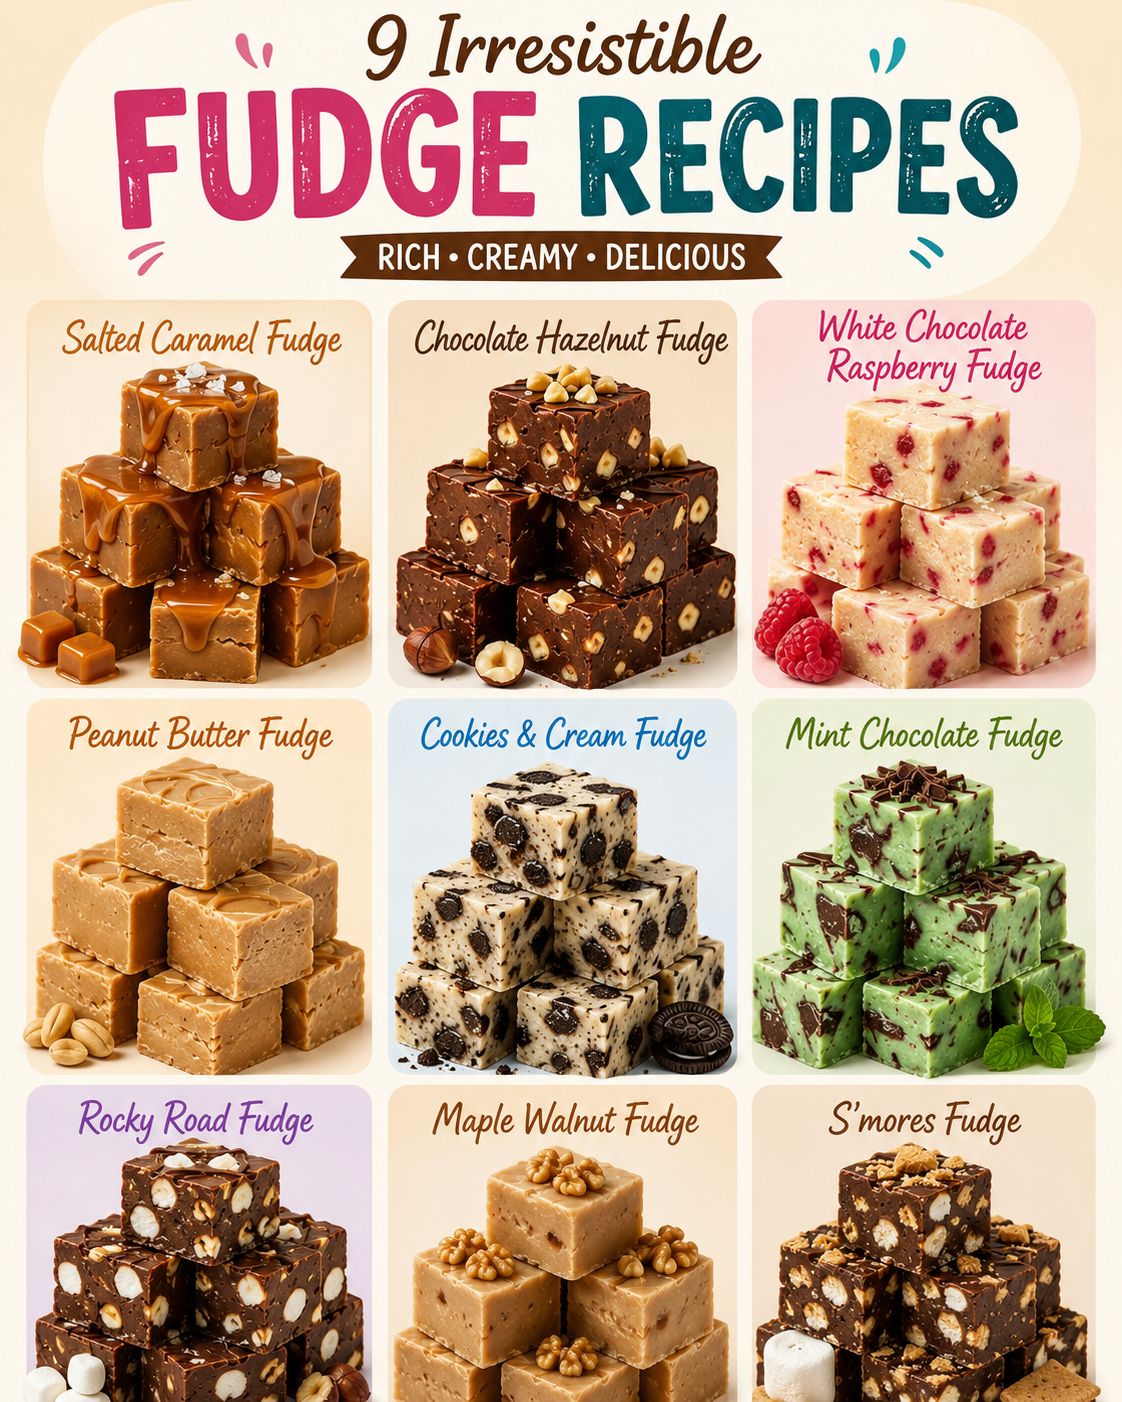
If you’re anything like me, fudge is basically edible gold. There’s something magical about that rich, velvety texture that just melts on your tongue, and I’ve spent years perfecting my favorite fudge recipes to share with you. Today, I’m rounding up 9 irresistible fudge recipes that cover everything from classic salted caramel to adventurous s’mores, because honestly, life’s too short for boring chocolate.
These recipes are absolutely worth saving because they work. I’ve tested each one multiple times, tweaked them until they’re perfect, and they all deliver that fudgy, melt-in-your-mouth result that makes people think you spent hours in the kitchen when really, most of these come together in under 30 minutes. Whether you’re making gifts for the holidays or just treating yourself on a Tuesday, you’ll find something here that speaks to you.
From white chocolate raspberry to mint chocolate, peanut butter to cookies and cream, there’s a fudge for every craving and every occasion. I’d love to see you make these, so follow me on HaileeRecipes on Pinterest where I’m constantly sharing new recipes and saving all my favorites. Now let’s dive into these nine beauties and find your next kitchen obsession.
1. Salted Caramel Fudge
This elegant salted caramel fudge combines rich chocolate with buttery caramel and a sophisticated salt finish. The smooth, melt-in-your-mouth texture makes it perfect for gifting or indulging after dinner. The balance of sweet and salty flavors creates an irresistible treat that feels more gourmet than homemade.
Why You’ll Love It
- The salted caramel layer adds complexity and prevents the fudge from tasting overly sweet.
- Ready in under 30 minutes with just a few pantry staples.
- Impressive enough to give as a gift but simple enough for beginners to master.
Ingredients
- 1 cup heavy cream
- 1 cup granulated sugar
- 6 tablespoons butter
- 8 ounces dark chocolate, chopped
- 1 teaspoon vanilla extract
- 1 teaspoon sea salt, divided
- 2 tablespoons coconut oil
How To Make It
- Combine heavy cream, sugar, and 6 tablespoons butter in a saucepan over medium heat, stirring until sugar dissolves. Continue cooking until the mixture reaches 238°F on a candy thermometer, about 8 minutes.
- Remove from heat and stir in vanilla extract and half a teaspoon of sea salt. Let cool for 2 minutes.
- Place chopped dark chocolate in a bowl and pour the hot caramel mixture over it. Let sit for 1 minute, then stir until smooth. Stir in coconut oil.
- Pour the mixture into a parchment-lined 8×8-inch pan, smoothing the top evenly.
- Sprinkle remaining half teaspoon of sea salt over the surface while still warm. Refrigerate for at least 4 hours until firm, then cut into 1-inch squares.
Variations And Substitutions
Try using milk chocolate or semi-sweet chocolate instead of dark for a sweeter version. Substitute almond butter or peanut butter for coconut oil for a nutty twist. For extra indulgence, drizzle white chocolate over the cooled fudge before cutting.
Make-Ahead, Storage, And Serving Tips
Store in an airtight container at room temperature for up to 2 weeks or refrigerate for up to 3 weeks. Fudge can be made up to 5 days ahead. If your mixture seizes or becomes grainy, rewarm gently and add a splash of cream. For cleaner cuts, dip your knife in hot water and wipe between each slice.
2. Chocolate Hazelnut Fudge
This luxurious fudge combines rich chocolate with creamy hazelnut, delivering a sophisticated flavor that feels indulgent yet approachable. The smooth, melt-in-your-mouth texture comes from a perfect balance of butter, condensed milk, and cocoa, while toasted hazelnuts add delightful crunch and depth. Serve these elegant squares at holiday gatherings, gift them to friends, or enjoy as a special treat with coffee.
Why You’ll Love It
- No-fail recipe that requires no candy thermometer or special equipment.
- Ready in under 30 minutes with minimal active cooking time.
- Impressive enough for gift-giving but simple enough for beginners.
Ingredients
- 1 cup unsalted butter
- 2 cups powdered sugar
- 3/4 cup unsweetened cocoa powder
- 1/4 cup sweetened condensed milk
- 1 teaspoon vanilla extract
- 3/4 cup roasted hazelnuts, roughly chopped
- Pinch of sea salt
How To Make It
- Line an 8×8-inch baking pan with parchment paper. Melt butter in a saucepan over medium heat, then remove from heat.
- Whisk together powdered sugar and cocoa powder in a bowl to remove lumps, then add to melted butter.
- Stir in condensed milk, vanilla extract, and sea salt until smooth and well combined.
- Fold in chopped hazelnuts, reserving a few for topping, then pour mixture into prepared pan and smooth the surface.
- Refrigerate for 2 hours until firm, then cut into squares and top with reserved hazelnuts.
Variations And Substitutions
Swap hazelnuts for almonds, pecans, or walnuts based on preference. Add a tablespoon of hazelnut liqueur for extra depth, or stir in espresso powder for mocha-flavored fudge. For a nuttier taste, use hazelnut butter in place of half the condensed milk.
Make-Ahead, Storage, And Serving Tips
Store fudge in an airtight container in the refrigerator for up to two weeks or freeze for up to three months. Make it up to five days ahead for stress-free entertaining. If fudge becomes too soft, refrigerate briefly before cutting. For gifting, wrap individual squares in parchment paper and place in decorative boxes.
3. White Chocolate Raspberry Fudge
This elegant white chocolate raspberry fudge combines creamy white chocolate with tart raspberry flavor for a sophisticated treat. The smooth, melt-in-your-mouth texture contrasts beautifully with bursts of fresh berry taste. Perfect for gifting or serving at dinner parties, this fudge proves that not all fudge needs to be dark chocolate.
Why You’ll Love It
- Stunning pink color makes it visually impressive for holiday platters and gift boxes.
- Requires just basic ingredients and no special equipment beyond a thermometer.
- The tart raspberry cuts through rich white chocolate for balanced, not-too-sweet flavor.
Ingredients
- 14 ounces white chocolate, chopped
- 1 cup heavy cream
- 3 tablespoons butter
- 1 teaspoon vanilla extract
- 1 cup freeze-dried raspberries, crushed
- 1/4 teaspoon salt
- 2 tablespoons raspberry liqueur or juice (optional)
How To Make It
- Line an 8-inch square pan with parchment paper. Combine heavy cream and butter in a saucepan, heating until the mixture reaches 238 degrees Fahrenheit on a candy thermometer.
- Pour the hot cream mixture over chopped white chocolate in a bowl. Let sit for 2 minutes, then stir until completely smooth and melted.
- Stir in vanilla extract, salt, and raspberry liqueur if using. Fold in crushed freeze-dried raspberries gently to distribute evenly.
- Pour the mixture into the prepared pan, smoothing the top with a spatula. Allow to cool completely at room temperature for at least 4 hours.
- Cut into 1-inch squares using a sharp knife dipped in hot water between cuts for clean edges.
Variations And Substitutions
Use fresh raspberry puree instead of freeze-dried raspberries for a softer texture, though the fudge may be slightly less firm. Substitute white chocolate chips for chopped chocolate if needed. Add a tablespoon of powdered freeze-dried raspberries to the surface before setting for extra berry flavor and decoration.
Make-Ahead, Storage, And Serving Tips
Store fudge in an airtight container at room temperature for up to two weeks, or refrigerate for up to one month. Freeze for up to three months. Separate layers with parchment paper to prevent sticking. Serve chilled or at room temperature. If the fudge seems too soft, refrigerate before cutting for cleaner pieces.
4. Peanut Butter Fudge
This classic peanut butter fudge delivers a creamy, rich texture with a perfect balance of sweet and salty flavors. The combination of peanut butter and chocolate creates an irresistible treat that melts on your tongue. Serve this at holiday gatherings, gift it to friends, or enjoy it as an indulgent afternoon snack.
Why You’ll Love It
- Only five simple ingredients and no special equipment required.
- Ready in under 30 minutes with minimal active cooking time.
- Naturally gluten-free and easily customizable for dietary preferences.
Ingredients
- 1 cup natural peanut butter
- 1 cup unsalted butter
- 2 cups powdered sugar
- 1 cup semi-sweet chocolate chips
- 1 teaspoon vanilla extract
How To Make It
- Line an 8×8-inch baking pan with parchment paper and set aside.
- Combine peanut butter and butter in a saucepan over low heat, stirring until melted and smooth.
- Remove from heat and stir in powdered sugar and vanilla extract until fully incorporated.
- Pour the mixture into the prepared pan and spread evenly with a spatula.
- Melt chocolate chips in a double boiler or microwave in 30-second intervals, then spread over the peanut butter layer and refrigerate for 2 hours until set.
Variations And Substitutions
Swap natural peanut butter for creamy or chunky varieties. Use dark chocolate or white chocolate for the topping instead of semi-sweet. Add a pinch of sea salt on top before the chocolate sets for a sweet and salty contrast. Substitute almond butter or sunflower seed butter for a nut-free option.
Make-Ahead, Storage, And Serving Tips
Store fudge in an airtight container in the refrigerator for up to two weeks or freeze for up to three months. Cut into squares with a warm knife for clean edges. Bring to room temperature for 5 minutes before serving for the best texture. Make this up to one week ahead for stress-free entertaining.
5. Cookies & Cream Fudge
This indulgent fudge combines rich chocolate with crushed Oreo cookies for a dessert that tastes like your favorite cookie in every bite. The smooth, creamy texture melts on your tongue while cookie pieces add delightful crunch and flavor. Perfect for holiday gift-giving or satisfying chocolate cravings, this no-bake treat impresses both kids and adults with minimal effort.
Why You’ll Love It
- No-bake recipe ready in under 30 minutes with no oven required.
- Combines two classic flavors that everyone recognizes and enjoys.
- Makes an impressive homemade gift that looks professionally made.
Ingredients
- 1 cup butter
- 2/3 cup unsweetened cocoa powder
- 3 cups powdered sugar
- 1/2 cup heavy cream
- 1 teaspoon vanilla extract
- 15 Oreo cookies, crushed into chunks
- Pinch of sea salt
How To Make It
- Line an 8×8-inch pan with parchment paper and set aside.
- Melt butter in a saucepan over low heat, then whisk in cocoa powder and remove from heat.
- Stir in powdered sugar, heavy cream, vanilla extract, and sea salt until smooth and well combined.
- Fold in crushed Oreo cookies, reserving some larger chunks for texture.
- Pour mixture into prepared pan, smooth the top, and refrigerate for at least 2 hours until firm before cutting into squares.
Variations And Substitutions
Use white chocolate fudge as a base instead of dark chocolate for a sweeter version. Replace Oreos with crushed vanilla wafers or chocolate chip cookies. Add a tablespoon of peanut butter to the mixture for cookies and cream peanut butter fudge, or drizzle white chocolate on top for visual appeal.
Make-Ahead, Storage, And Serving Tips
Store fudge in an airtight container in the refrigerator for up to two weeks or freeze for up to two months. Make the fudge up to three days ahead for convenient entertaining. Serve chilled straight from the refrigerator for best texture, or let sit at room temperature for five minutes for easier eating.
6. Mint Chocolate Fudge
This refreshing mint chocolate fudge combines cool peppermint with rich dark chocolate for a sophisticated treat. The smooth, creamy texture melts on your tongue, making it perfect for after-dinner indulgence or holiday gift-giving. The mint flavor brightens the deep chocolate, creating a balanced sweetness that appeals to anyone who loves classic mint-chocolate pairings.
Why You’ll Love It
- Refreshing mint flavor cuts through rich chocolate without being overpowering
- No-bake recipe ready in under 30 minutes with minimal equipment
- Elegant enough to impress guests yet simple enough for beginners
Ingredients
- 1 cup dark chocolate chips
- 1/2 cup unsalted butter
- 1 can (14 ounces) sweetened condensed milk
- 1/2 teaspoon peppermint extract
- 1/4 teaspoon salt
- Crushed candy canes for topping, about 1/4 cup
How To Make It
- Line an 8×8-inch baking pan with parchment paper and set aside.
- Combine chocolate chips and butter in a microwave-safe bowl, heating in 30-second intervals until melted and smooth, stirring between each interval.
- Stir in condensed milk, peppermint extract, and salt until fully combined and glossy.
- Pour mixture into prepared pan, smooth the top with a spatula, and sprinkle crushed candy canes evenly over the surface.
- Refrigerate for at least 2 hours until firm, then cut into 1-inch squares with a sharp knife.
Variations And Substitutions
Swap dark chocolate for milk or white chocolate. Replace peppermint extract with 1/2 teaspoon mint flavoring or add 1 tablespoon crushed fresh mint leaves. Use crushed peppermint bark, chocolate shavings, or sprinkles instead of candy canes. For a boozy version, add 1/2 teaspoon crème de menthe liqueur.
Make-Ahead, Storage, And Serving Tips
Make fudge up to one week ahead and store in an airtight container in the refrigerator. Keep layers separated with parchment paper to prevent sticking. For gift-giving, wrap individual pieces in wax paper. Fudge hardens at room temperature, so keep it cool. If it becomes too soft, refrigerate for 15 minutes before serving.
7. Rocky Road Fudge
Rocky Road Fudge combines rich chocolate with marshmallows, nuts, and crispy rice cereal for a delightfully textured treat. This no-bake recipe delivers that perfect balance of chewy, crunchy, and smooth in every bite. It’s ideal for holiday gift-giving or satisfying sudden chocolate cravings, and it comes together in minutes without requiring any special baking skills.
Why You’ll Love It
- No-bake recipe that’s ready in under 30 minutes from start to finish.
- Customizable mix-ins mean you can adjust the texture and flavor to your preferences.
- Creates impressive homemade gifts that taste far better than store-bought fudge.
Ingredients
- 1 cup unsalted butter
- 2 cups granulated sugar
- 3/4 cup unsweetened cocoa powder
- 1/2 cup whole milk
- 1 teaspoon vanilla extract
- 1 1/2 cups mini marshmallows
- 1 cup roasted peanuts or almonds, chopped
- 1/2 cup crispy rice cereal
How To Make It
- Line an 8×8-inch baking pan with parchment paper and set aside.
- Combine butter, sugar, cocoa powder, and milk in a saucepan over medium heat, stirring constantly for 5-7 minutes until the mixture reaches a soft-ball stage (235°F on a candy thermometer).
- Remove from heat and stir in vanilla extract, then let cool for 2 minutes.
- Fold in marshmallows, nuts, and cereal until evenly distributed throughout the fudge.
- Pour into the prepared pan, smooth the top, and refrigerate for 2 hours until firm, then cut into squares.
Variations And Substitutions
Swap peanuts for pecans or walnuts, use regular marshmallows cut into pieces instead of mini ones, or add a handful of chocolate chips for extra richness. For a twist, substitute crispy rice cereal with pretzels for a salty-sweet version, or incorporate dried cranberries for tartness.
Make-Ahead, Storage, And Serving Tips
Store fudge in an airtight container at room temperature for up to one week, or refrigerate for up to two weeks. You can prepare it up to three days ahead and keep it chilled. For gift-giving, wrap individual pieces in parchment paper and place in a decorative box. If fudge becomes too soft, refrigerate briefly before serving.
8. Maple Walnut Fudge
Maple walnut fudge combines the warm, earthy sweetness of pure maple syrup with crunchy toasted walnuts for a sophisticated treat. This creamy fudge has a buttery texture that melts on the tongue, making it perfect for holiday gift-giving or autumn gatherings. The maple flavor deepens as it sets, creating a complex sweetness that elevates this classic fudge beyond ordinary chocolate versions.
Why You’ll Love It
- Requires no thermometer—just simple visual cues for perfect consistency.
- Naturally flavored with real maple syrup instead of artificial extracts.
- Toasted walnuts add satisfying crunch and nutritional value to every bite.
Ingredients
- 1 cup pure maple syrup
- 1 cup heavy cream
- 4 tablespoons unsalted butter
- 1 teaspoon vanilla extract
- 1 cup toasted walnuts, chopped
- Pinch of sea salt
How To Make It
- Line an 8×8-inch baking pan with parchment paper. Combine maple syrup, heavy cream, and butter in a heavy-bottomed saucepan over medium heat, stirring until the butter melts.
- Bring the mixture to a gentle boil and let it bubble undisturbed for 8 to 10 minutes, until it darkens slightly and reaches the soft-ball stage (a small spoonful dropped in cold water forms a soft ball).
- Remove from heat and stir in vanilla extract and sea salt. Let cool for 5 minutes, then fold in the chopped walnuts.
- Pour the fudge into the prepared pan and smooth the top with a spatula. Allow to cool completely at room temperature for at least 4 hours or overnight.
- Cut into 1-inch squares using a sharp knife dipped in hot water between cuts for clean edges.
Variations And Substitutions
Substitute pecans or toasted almonds for walnuts if preferred. Add a quarter teaspoon of cinnamon or nutmeg for warm spice notes. For a darker maple flavor, use grade B maple syrup instead of grade A.
Make-Ahead, Storage, And Serving Tips
Store maple walnut fudge in an airtight container at room temperature for up to two weeks, or refrigerate for up to one month. Make it up to five days ahead for gift-giving. Serve at room temperature for the best flavor and texture. If the fudge becomes too soft, briefly refrigerate before serving.
9. S'mores Fudge
This nostalgic fudge captures the essence of campfire s’mores with layers of rich chocolate, gooey marshmallow, and crunchy graham cracker pieces. The combination delivers that perfect balance of creamy, sweet, and textured bites that taste like summer in every piece. Ideal for dessert tables, gift-giving, or satisfying late-night cravings, this fudge proves that s’mores belong in candy form year-round.
Why You’ll Love It
- Combines three classic s’mores ingredients in one indulgent treat.
- No campfire required—enjoy s’mores flavor anytime, anywhere.
- Simple enough for beginners yet impressive enough to gift.
Ingredients
- 1 cup semi-sweet chocolate chips
- 1 cup milk chocolate chips
- 1/2 cup butter
- 1 can (14 ounces) sweetened condensed milk
- 1 cup marshmallow fluff
- 1/2 cup crushed graham crackers
- 1/4 teaspoon sea salt
How To Make It
- Line an 8×8-inch baking pan with parchment paper. Combine semi-sweet chocolate chips, milk chocolate chips, and butter in a microwave-safe bowl, heating in 30-second intervals and stirring until melted and smooth.
- Stir in the sweetened condensed milk and sea salt until well combined, then pour half the mixture into the prepared pan.
- Spread marshmallow fluff evenly over the chocolate layer, then sprinkle crushed graham crackers on top.
- Pour the remaining chocolate mixture over the marshmallow and graham cracker layers, spreading gently to cover.
- Refrigerate for at least 4 hours or until completely firm, then cut into squares and serve.
Variations And Substitutions
Use dark chocolate chips for deeper flavor, or swap milk chocolate for white chocolate for a lighter version. Toast the graham crackers before crushing for added crunch and depth. Replace marshmallow fluff with mini marshmallows mixed into a marshmallow cream if preferred, or add a drizzle of caramel sauce between layers for extra sweetness.
Make-Ahead, Storage, And Serving Tips
Make this fudge up to one week ahead and store in an airtight container in the refrigerator or up to two weeks in the freezer. Keep squares separated with parchment paper to prevent sticking. Serve chilled straight from the fridge for the best texture, or let sit at room temperature for 5 minutes for a slightly softer bite. If the fudge becomes too soft, simply refrigerate again before serving.
Final Thoughts
Whether you’re a fudge novice or a seasoned candy maker, these nine recipes offer something for everyone. From classic chocolate to creative flavor combinations, you’ll find the perfect fudge to match your taste and skill level. The beauty of homemade fudge is that it requires just a few quality ingredients and a little patience to create something truly special.
We encourage you to pick one recipe that speaks to you and give it a try this week. Start with whichever flavor combination excites you most, and don’t worry if your first batch isn’t perfect—fudge making is forgiving, and each attempt will teach you something new. Soon you’ll have a go-to recipe that you’ll make again and again, and maybe even share with friends and family.
Salted Caramel Fudge
Ingredients
Method
- Line an 8x8 inch baking pan with parchment paper
- Melt butter in a saucepan over medium heat
- Stir in cocoa powder and mix until smooth
- Remove from heat and add powdered sugar, heavy cream, and vanilla extract, stirring until combined
- Fold in caramel sauce and sea salt until swirled throughout
- Pour mixture into prepared pan and smooth the top
- Sprinkle fleur de sel evenly across the surface
- Refrigerate for at least 2 hours until firm, then cut into 16 squares