christopher plummer birthday cake Birthday Cake Black and Gold | Elegant Design
Photo Birthday Cake Black and Gold | Elegant Design
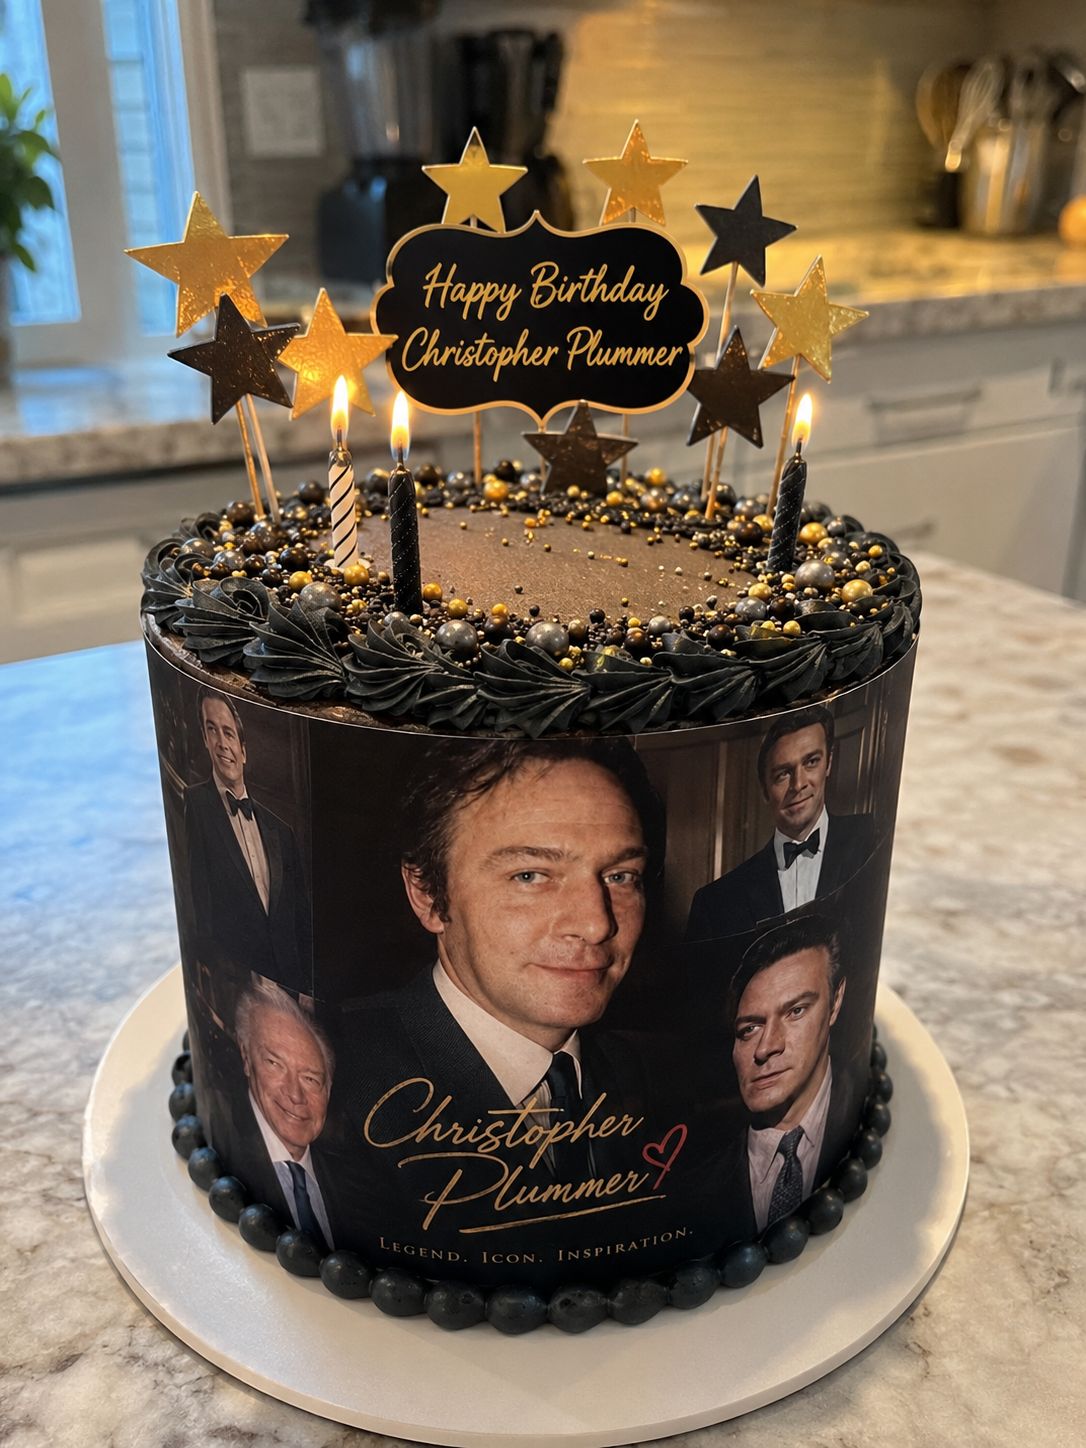
Photo Birthday Cake Black and Gold: A Showstopper That’s Actually Doable
I still remember the exact moment I decided to make a Photo Birthday Cake Black and Gold for my best friend’s thirtieth. She’d mentioned—just casually, over coffee—that she loved the elegance of black and gold together. Something about it felt sophisticated and fun at the same time. I went home that afternoon and started sketching ideas on the back of a grocery list, the way I do when I’m excited about a project.
Here’s the thing about birthday cakes: they don’t have to be complicated to feel special. This one looks like it belongs in a fancy bakery window, but I’m going to walk you through every single step so you can make it in your own kitchen without any stress. The black and gold color scheme is timeless, the cake itself is moist and forgiving, and the decorating part? It’s actually more fun than intimidating once you know what you’re doing.
I’ve made this cake three times now—once for that birthday, once for a client’s event, and once just because I craved chocolate and wanted an excuse to play with edible gold. Every time, people have asked me where I ordered it from. That’s when I know I’ve nailed it.
This Photo Birthday Cake Black and Gold is perfect for anyone who wants to celebrate someone special without spending hours in the kitchen or dropping a fortune at a bakery. It works whether you’re a confident baker or someone who’s only made box mixes before. I’m going to give you all my real-life tips, the mistakes I’ve made so you don’t have to, and exactly how to customize this to match whoever you’re celebrating.
If you’re looking for more cake inspiration and want to stay in the loop with my recipes, follow me on HaileeRecipes on Pinterest. I’m always pinning new ideas and sharing what I’m working on in the kitchen.
Why You’ll Love This Recipe
Let me be honest: this cake is a confidence booster. You’ll feel like a professional baker, but the recipe is actually straightforward. The chocolate cake is rich but not heavy, and it stays moist for days. The frosting is smooth, pipeable, and holds its shape beautifully.
Beyond the technique, there’s something genuinely special about serving a cake that looks this polished. It makes the birthday person feel celebrated. It makes you feel proud. And when people take photos of it before cutting into it? That’s when you know you’ve created something memorable.
The black and gold combination works year-round too. It’s elegant enough for a milestone birthday, sophisticated for an anniversary, and fun enough for a “just because” celebration. I’ve also made versions with different color combinations using the exact same method, so once you learn this, you’ve got a formula you can use over and over.
Ingredients
For the Cake
- 1 3/4 cups all-purpose flour
- 2 cups granulated sugar
- 3/4 cup unsweetened cocoa powder
- 2 teaspoons baking soda
- 1 teaspoon baking powder
- 1 teaspoon salt
- 2 large eggs
- 1 cup strong brewed coffee (or hot water), cooled slightly
- 1 cup buttermilk
- 1/2 cup vegetable oil
- 1 teaspoon vanilla extract
Hailee’s Tip: The coffee isn’t optional here. It deepens the chocolate flavor without making the cake taste like coffee. If you don’t have brewed coffee, use hot water—it still works, but the chocolate flavor won’t be quite as rich.
For the Black Frosting
- 1 cup unsalted butter, softened to room temperature
- 3/4 cup unsweetened cocoa powder
- 3 cups powdered sugar
- 1/2 cup heavy cream
- 1 teaspoon vanilla extract
- 1/4 teaspoon salt
- Black gel food coloring (about 1/2 teaspoon, or more to taste)
Hailee’s Tip: Use gel coloring, not liquid. Liquid coloring will thin out your frosting too much, and you’ll end up with a grainy mess. Gel is concentrated and won’t mess with your frosting’s consistency.
For Decorating
- Edible gold dust or gold leaf
- Black fondant or modeling chocolate (optional, for details)
- Clear piping gel or edible glue
- Piping bags and tips (I use a round tip for dots and a grass tip for texture)
Hailee’s Tip: You can find edible gold dust at any baking supply store or online. It’s inexpensive and lasts forever. A little goes a long way—you only need a tiny amount per cake.
Optional Add-Ins and Variations
Want to make this cake even more personal? Here are some directions I’ve taken it:
- Espresso powder: Add 1 tablespoon to the cake batter for a deeper, more sophisticated chocolate flavor.
- Almond extract: Use 1/2 teaspoon almond extract alongside the vanilla in the frosting for a subtle, luxurious twist.
- White chocolate ganache layer: Spread a thin layer of white chocolate ganache between the cake layers for richness and visual contrast.
- Raspberry filling: If you want to add fruit, a thin layer of seedless raspberry jam between the layers is gorgeous and tastes amazing with chocolate.
- Different color scheme: Skip the black food coloring and use navy, deep purple, or even burgundy. The gold works with all of them.
Step-by-Step Method
Baking the Cake
1. Preheat and prep. Get your oven to 350°F. Grease two 8-inch round cake pans and line the bottoms with parchment paper. This extra step ensures your cakes come out cleanly every single time.
2. Mix dry ingredients. In a large bowl, whisk together the flour, sugar, cocoa powder, baking soda, baking powder, and salt. I always sift the cocoa powder first because it clumps, and nobody wants little cocoa chunks in their cake.
3. Combine wet ingredients. In another bowl, whisk the eggs, then add the cooled coffee, buttermilk, oil, and vanilla. Whisk until smooth. This is where I usually pause and taste-test the coffee to make sure it’s not too hot—you don’t want scrambled eggs.
What I Messed Up: The first time I made this, I poured hot coffee directly into the wet ingredients and ended up with partially cooked eggs. Lesson learned: always let your coffee cool slightly.
4. Combine wet and dry. Pour the wet ingredients into the dry ingredients and stir with a spatula until just combined. Don’t overmix—a few lumps are fine. Overmixing develops too much gluten and makes the cake tough.
5. Divide and bake. Divide the batter evenly between your prepared pans. Bake for 30 to 35 minutes, until a toothpick inserted in the center comes out with just a few moist crumbs. The cakes should spring back when you gently touch the top.
6. Cool. Let the cakes cool in the pans for 15 minutes, then turn them out onto wire racks to cool completely. This usually takes about an hour. Don’t skip this step—trying to frost a warm cake is a nightmare.
Making the Black Frosting
7. Cream the butter. In a stand mixer (or with a hand mixer), beat the softened butter for about 2 minutes until it’s pale and fluffy. This incorporates air and makes the frosting lighter.
8. Add cocoa and sugar. Sift the cocoa powder into the butter, then add the powdered sugar gradually. Mix on low speed to avoid a cocoa dust explosion in your kitchen. Trust me, it’s not fun to clean up.
9. Add cream and flavorings. Pour in the heavy cream, vanilla, and salt. Beat on medium speed for about 2 minutes until the frosting is smooth and creamy. If it’s too thick, add a little more cream. If it’s too thin, add more powdered sugar.
10. Color it black. Add the black gel coloring a tiny bit at a time, mixing thoroughly after each addition. You want a deep, rich black, not gray. This might take more coloring than you’d expect.
What I Messed Up: I once added too much coloring at once and ended up with frosting that tasted slightly bitter. Now I add it gradually, and it’s perfect every time.
Assembling the Cake
11. Level the cakes. If your cakes have domed tops, use a serrated knife to level them. This ensures they stack evenly. Save those scraps—you can snack on them while you work.
12. Crumb coat. Place one cake layer on your cake board or serving plate. Spread a thin layer of frosting on top. This is your crumb coat, and it seals in any loose crumbs so your final frosting looks pristine. Add the second cake layer and another thin layer of frosting.
13. Final frosting. Apply the remaining frosting in a thicker layer, smoothing it with an offset spatula or the back of a spoon. Don’t stress about making it perfect—the gold dust and decorative elements will add character.
Decorating with Black and Gold
14. Add the gold. Using a clean, dry brush, dust the edible gold dust over the frosting. I like to apply it in sections—maybe gold around the top edge, then down one side. You can also mix the gold dust with a tiny bit of clear piping gel to create a paint-like consistency and brush it on for more control.
15. Pipe details (optional). If you want to add piped details, use your frosting in a piping bag fitted with a small round tip to create dots, lines, or patterns. A grass tip creates a fun textured effect. This is where you can really make it personal.
16. Final touches. If you’re adding fondant details, black numbers for the age or geometric shapes look stunning against the gold. Use edible glue or a dab of frosting to attach them.
Common Mistakes to Avoid
Frosting too thin: If your frosting is grainy or separates, your butter wasn’t at room temperature or you added too much liquid. Start over with room-temperature butter and add cream gradually.
Cake layers sliding: Use a cake leveler or serrated knife to create flat surfaces. If they still slide, insert a few cake dowels through the layers to stabilize them.
Gold dust looking dull: Make sure your frosting is completely smooth and set before applying gold. Dust it on dry hands or with a dry brush for the best shine.
Frosting cracks when piping: Your frosting might be too cold. Let it sit at room temperature for a few minutes and try again.
My Tested Substitutions
Buttermilk: If you don’t have buttermilk, mix 1 cup milk with 1 tablespoon lemon juice or vinegar and let it sit for 5 minutes. It works just as well.
Cocoa powder: Use natural cocoa powder, not Dutch-process, for the best flavor in this cake. Dutch-process is darker but slightly less flavorful.
Butter: I don’t recommend substituting butter in the frosting. It’s the backbone of the recipe. However, you can use salted butter if you reduce the added salt to 1/8 teaspoon.
Vegetable oil: Canola oil, coconut oil, or any neutral oil works in the cake. I stick with vegetable oil because it’s reliable and affordable.
How to Customize
The beauty of this cake is that it’s a template. Once you’ve made it once, you can play with it endlessly.
Different colors: Keep the black frosting but swap the gold for silver dust, copper, or even rose gold for a different vibe.
Different designs: Add stripes, ombre effects, or geometric patterns. You could also cover the whole cake in a textured frosting and just add gold accents.
Photo printing: Many bakeries will print edible photos. If you want to add a photo to the cake, print it on edible paper and adhere it with a dab of frosting or edible glue.
Personalization: Use fondant to create initials, numbers for the age, or even small shapes that represent the birthday person’s hobbies.
Serving Ideas
This cake serves about 12 people comfortably, depending on how generous your slices are. I like to serve it with a simple vanilla ice cream or whipped cream on the side—the richness of the chocolate cake pairs beautifully with something cold and creamy.
For a more elegant presentation, dust the plate with a tiny bit of edible gold dust before plating the slice. It sounds fancy, but it takes two seconds and makes a huge impression.
If you’re serving this at an event, cut it just before serving so the slices look clean and the frosting doesn’t smudge.
Meal Prep and Storage
Make-ahead: You can bake the cake layers up to 2 days in advance. Wrap them tightly in plastic wrap and store at room temperature. Make the frosting the day you plan to assemble.
Assembled cake: Once assembled and decorated, the cake keeps beautifully at room temperature for up to 3 days, covered loosely with plastic wrap or under a cake dome. The frosting will stay stable, and the cake will actually get more moist as it sits.
Refrigeration: If your kitchen is warm or you’re in a humid climate, keep the assembled cake in the refrigerator. Just pull it out about 30 minutes before serving so the frosting softens slightly and tastes its best.
Freezing: Unfrosted cake layers freeze beautifully for up to 3 months. Thaw them at room temperature for about an hour before frosting.
Nutritional Breakdown
This cake is decadent, so it’s not light on calories, but here’s what you’re looking at per slice (based on 12 servings):
- Calories: approximately 420
- Protein: 5g
- Carbohydrates: 58g
- Fat: 19g
- Fiber: 2g
These are estimates and can vary based on your specific ingredients and how generously you frost. The edible gold adds negligible calories.
Final Thoughts
Making a Photo Birthday Cake Black and Gold is one of those projects that feels more complicated than it actually is. I promise you, if you follow these steps and take your time, you’re going to create something beautiful that tastes even better than it looks.
The best part? You’ll have made someone feel genuinely celebrated. There’s something about a homemade cake that store-bought can never replicate. It says “I care enough to spend time on this,” and that matters.
I’d love to hear how yours turns out. If you make this cake, I hope it becomes a tradition in your kitchen the way it’s becoming one in mine. And remember, even if something doesn’t go exactly as planned, a little extra frosting and a sprinkle of gold dust can fix almost anything.
Happy baking, and here’s to celebrating the people you love with something made by your own hands.
—
Recipe Card
**Ingredients**
* 1 3/4 cups all-purpose flour
* 2 cups granulated sugar
* 3/4 cup unsweetened cocoa powder
* 2 teaspoons baking soda
* 1 teaspoon baking powder
* 1 teaspoon salt
* 2 large eggs
* 1 cup strong brewed coffee, cooled slightly
* 1 cup buttermilk
* 1/2 cup vegetable oil
* 1 teaspoon vanilla extract
* 1 cup unsalted butter, softened to room temperature
* 3 cups powdered sugar
* 1/2 cup heavy cream
* Black gel food coloring
* Edible gol