Big Batch No-Churn Ice Cream Flavors You’ll Love
Big Batch No-Churn Ice Cream Flavors You'll Love
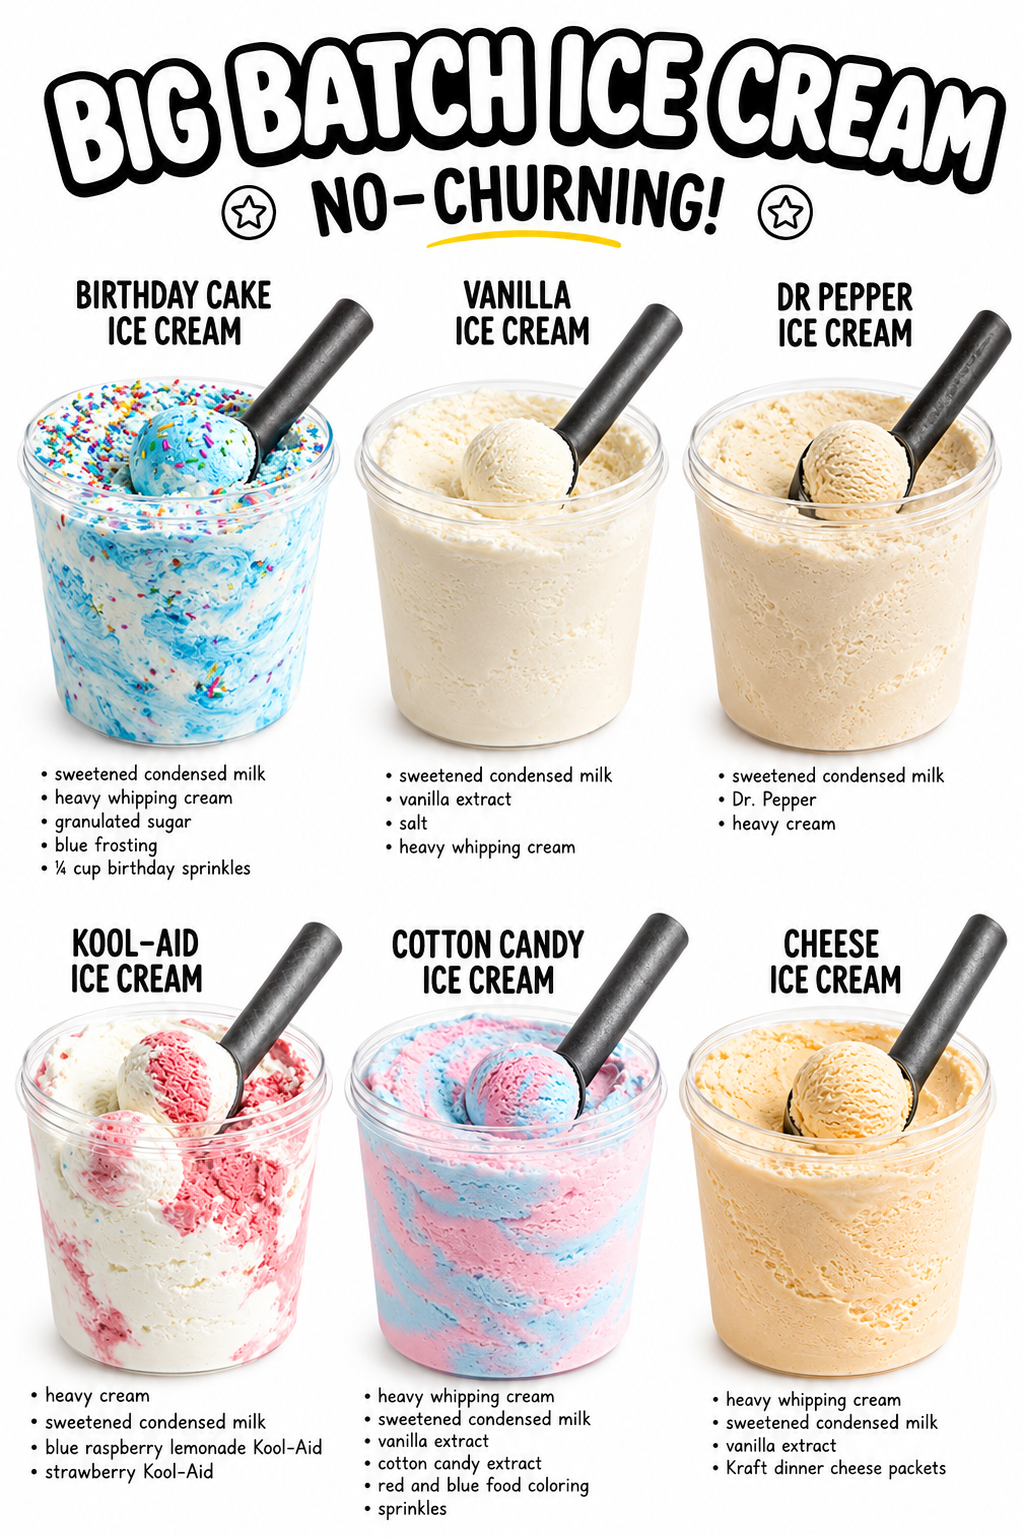
I’m so excited to share these big batch no-churn ice cream flavors with you because honestly, making ice cream at home doesn’t have to be complicated. Whether you’re planning a summer party, stocking your freezer for hot days, or just craving something sweet, these recipes are total game-changers. No ice cream maker required, just a few simple ingredients and a little patience, and you’ll have creamy, delicious ice cream that tastes like you spent hours in the kitchen.
What I love most about no-churn recipes is how forgiving they are, especially when you’re making big batches. You can whip these up whenever inspiration strikes, and they’re perfect for experimenting with fun flavors you won’t find at the store. From Birthday Cake and Cotton Candy to unexpected options like Dr Pepper and Cheese, these recipes prove that homemade ice cream can be as creative and fun as you want it to be.
I’ve tested and loved every single one of these flavors, and I think they’re totally worth saving and coming back to again and again. If you’re looking for more recipe inspiration, Follow me on HaileeRecipes on Pinterest where I’m constantly sharing new ideas. Now let’s dive into these flavors and find your new favorite!
1. Birthday Cake Ice Cream
This vibrant no-churn ice cream captures the festive spirit of birthday cake with a tender crumb swirl and vanilla bean base. The combination of sweetened condensed milk and whipped cream creates an impossibly creamy texture without an ice cream maker, while crushed vanilla wafers and rainbow sprinkles deliver nostalgic cake flavor in every spoonful. Perfect for celebrations, potlucks, or whenever you crave a playful, crowd-pleasing frozen treat.
Why You’ll Love It
- No ice cream maker required—just whip, fold, and freeze for restaurant-quality results.
- Naturally sweetened with condensed milk, so you skip the extra sugar and churning time.
- Customizable with different cake crumbles and sprinkles to match any party theme or preference.
Ingredients
- 1 can (14 ounces) sweetened condensed milk
- 2 cups heavy whipping cream
- 2 teaspoons vanilla extract
- 1 cup crushed vanilla wafer cookies
- 1/2 cup rainbow sprinkles
- 1/4 teaspoon salt
- 2 tablespoons milk
How To Make It
- Pour sweetened condensed milk into a large bowl and stir in vanilla extract and salt until combined.
- In a separate bowl, whip heavy cream to stiff peaks, then gently fold into the condensed milk mixture in two additions until no streaks remain.
- Fold in three-quarters of the crushed vanilla wafers and most of the sprinkles, reserving some for topping.
- Transfer the mixture to a parchment-lined 9-by-5-inch loaf pan or freezer-safe container, then sprinkle remaining wafer crumbles and sprinkles on top.
- Freeze for at least 6 hours or overnight until firm, then scoop and serve immediately for soft-serve texture.
Variations And Substitutions
Swap vanilla wafers for crushed sugar cookies, funfetti cake mix, or graham crackers for different flavor profiles. Use pink or pastel sprinkles for a themed party, or mix in edible glitter for extra shimmer. For a more indulgent version, drizzle in salted caramel or chocolate syrup before the final freeze.
Make-Ahead, Storage, And Serving Tips
This ice cream keeps frozen for up to two weeks in an airtight container. For easier scooping, let it sit at room temperature for 5 to 10 minutes before serving. You can prepare the whipped cream mixture up to 4 hours ahead and refrigerate before folding in the mix-ins, which helps prevent the sprinkles from bleeding color.
2. Vanilla Ice Cream
This classic vanilla ice cream delivers pure, creamy indulgence with a smooth texture that scoops beautifully straight from the freezer. Made with just sweetened condensed milk and whipped cream, it requires no churning and no eggs, making it foolproof for beginners. The subtle vanilla flavor shines through, making it the perfect canvas for toppings or a timeless dessert on its own. Serve it alongside pie, brownies, or enjoy it in a cone on warm summer days.
Why You’ll Love It
- Requires only two base ingredients, so it comes together in minutes with minimal effort.
- No ice cream maker needed, making it accessible to anyone with a freezer and mixing bowls.
- Naturally creamy texture rivals traditional churned ice cream without the hassle.
Ingredients
- 1 can (14 ounces) sweetened condensed milk
- 2 cups heavy whipping cream, cold
- 2 teaspoons vanilla extract
- 1 tablespoon granulated sugar
- Pinch of salt
How To Make It
- Pour sweetened condensed milk into a large mixing bowl and stir in vanilla extract and salt until combined.
- In a separate bowl, whip the cold heavy cream with sugar until stiff peaks form, about 2 to 3 minutes.
- Gently fold the whipped cream into the condensed milk mixture in two additions until no white streaks remain.
- Pour the mixture into a freezer-safe container and smooth the top with a spatula.
- Cover and freeze for at least 6 hours or overnight until firm enough to scoop.
Variations And Substitutions
Swap vanilla extract for almond extract or add a teaspoon of espresso powder for depth. Use half-and-half instead of heavy cream for a lighter texture, though it may be less creamy. Add 1 tablespoon of bourbon or rum for an adult version, or stir in melted chocolate for chocolate-swirled vanilla.
Make-Ahead, Storage, And Serving Tips
Prepare this up to one week ahead and store covered in the freezer to prevent ice crystals. If it freezes too hard, let it sit on the counter for 5 minutes before scooping. For best texture, serve within 4 to 5 days. This ice cream melts faster than traditional versions, so serve cold bowls or cones and enjoy promptly.
3. Dr Pepper Ice Cream
This retro-inspired Dr Pepper ice cream captures the unique spiced cola flavor in a creamy, no-churn format. The combination of sweetened condensed milk, heavy cream, and Dr Pepper syrup creates a smooth, scoopable texture with subtle vanilla undertones and a hint of cherry-almond complexity. Serve it as a nostalgic dessert or pair it with classic American cakes and pies for an unexpected flavor twist.
Why You’ll Love It
- No churning required, making it perfect for small freezers and busy schedules.
- Captures the distinctive taste of Dr Pepper without artificial flavoring.
- Creates a conversation-starting dessert that appeals to soda lovers and adventurous eaters alike.
Ingredients
- 1 can sweetened condensed milk
- 2 cups heavy cream
- 1 cup Dr Pepper soda
- 1/4 cup Dr Pepper syrup or concentrate
- 1 teaspoon vanilla extract
- 1/4 teaspoon almond extract
- Pinch of sea salt
How To Make It
- Pour the sweetened condensed milk into a large mixing bowl.
- In a separate bowl, whip the heavy cream to stiff peaks using an electric mixer.
- Combine the Dr Pepper syrup, vanilla extract, almond extract, and sea salt into the condensed milk, stirring until smooth.
- Gently fold the whipped cream into the Dr Pepper mixture in two additions, being careful not to deflate the cream.
- Pour into a freezer-safe container and freeze for at least 6 hours or overnight until scoopable.
Variations And Substitutions
Substitute the Dr Pepper syrup with regular Dr Pepper soda reduced on the stovetop until syrupy for a more budget-friendly option. For a lighter texture, use half-and-half instead of heavy cream. Add crushed vanilla wafers or caramel swirl for extra texture and flavor complexity.
Make-Ahead, Storage, And Serving Tips
This ice cream can be made up to two weeks ahead and stored in an airtight freezer container. If it becomes too hard, let it sit at room temperature for 5 to 10 minutes before scooping. Serve with root beer floats or alongside cherry pie for an enhanced Dr Pepper experience.
4. Kool-Aid Ice Cream
This nostalgic no-churn ice cream brings back childhood memories with vibrant Kool-Aid flavor and a smooth, creamy texture. The tangy-sweet taste makes it perfect for summer gatherings, potlucks, or simply satisfying a retro craving. It’s an easy way to create fun, colorful ice cream without special equipment or churning.
Why You’ll Love It
- Requires just five basic ingredients and no ice cream maker.
- Bright, bold flavor that appeals to kids and nostalgic adults alike.
- Freezes solid in four hours, making it quick and convenient.
Ingredients
- One 14-ounce can sweetened condensed milk
- Two cups heavy whipping cream
- One packet unsweetened Kool-Aid powder in your chosen flavor
- One-quarter cup granulated sugar
- One teaspoon vanilla extract
How To Make It
- Whip the heavy cream and sugar together in a large bowl until stiff peaks form, about three to four minutes.
- In a separate bowl, whisk together the sweetened condensed milk, Kool-Aid powder, and vanilla extract until the powder is fully dissolved.
- Gently fold the condensed milk mixture into the whipped cream until no streaks remain.
- Pour the mixture into a loaf pan or freezer-safe container and smooth the top.
- Cover with plastic wrap and freeze for at least four hours until firm.
Variations And Substitutions
Mix two different Kool-Aid flavors for a custom blend, or swirl in crushed candy, sprinkles, or graham cracker crumbs before freezing. For a less sweet version, reduce the sugar to two tablespoons and use unsweetened Kool-Aid with a tablespoon of extra sugar mixed into the powder.
Make-Ahead, Storage, And Serving Tips
Prepare this ice cream up to one week ahead and store covered in the freezer. Scoop directly from the freezer; no softening needed. If it becomes too hard, let it sit at room temperature for five minutes before scooping. Transfer to the refrigerator thirty minutes before serving for easier portioning.
5. Cotton Candy Ice Cream
This whimsical no-churn ice cream captures the nostalgic sweetness of cotton candy with a fluffy, creamy texture that melts on your tongue. The combination of sweetened condensed milk and whipped cream creates an impossibly smooth base, while cotton candy flavoring and a touch of pink coloring deliver that carnival magic. Perfect for summer gatherings, children’s parties, or anyone seeking a fun, indulgent treat that requires zero churning.
Why You’ll Love It
- No ice cream maker needed—just whip, fold, and freeze for effortless dessert success.
- Nostalgic cotton candy flavor appeals to both kids and adults seeking playful indulgence.
- Ready to scoop in just four hours, making it ideal for last-minute entertaining.
Ingredients
- 2 cups heavy whipping cream
- 1 can (14 ounces) sweetened condensed milk
- 2 teaspoons cotton candy flavoring extract
- 1/4 teaspoon pink gel food coloring
- 1/2 cup crushed cotton candy pieces, divided
- 1 tablespoon powdered sugar
How To Make It
- Pour heavy cream into a large bowl and beat with an electric mixer on medium-high speed until stiff peaks form, about 2-3 minutes.
- In a separate bowl, whisk together sweetened condensed milk, cotton candy flavoring, and pink food coloring until well combined and evenly colored.
- Gently fold the condensed milk mixture into the whipped cream in two additions until no streaks remain, then fold in 1/4 cup crushed cotton candy pieces.
- Transfer the mixture to a parchment-lined 9×5-inch loaf pan or freezer-safe container, smoothing the top and sprinkling remaining crushed cotton candy pieces over the surface.
- Cover with plastic wrap and freeze for at least 4 hours or until firm enough to scoop.
Variations And Substitutions
Swap cotton candy flavoring with vanilla extract and add a tablespoon of cotton candy syrup for deeper flavor. For a sugar-free version, use a cotton candy-flavored sugar-free syrup in place of some of the condensed milk. Layer with crushed pretzels or graham crackers for added texture, or swirl in a tablespoon of edible glitter for extra sparkle.
Make-Ahead, Storage, And Serving Tips
Prepare this ice cream up to two weeks ahead and store covered in the freezer. For easier scooping, let it sit at room temperature for 5 minutes before serving. If the mixture becomes too soft during folding, briefly chill it before transferring to the pan. The crushed cotton candy on top may soften slightly over time; add fresh pieces just before serving for maximum crunch and visual appeal.
6. Cheese Ice Cream
This sophisticated cheese ice cream delivers a subtle tangy richness with a smooth, creamy texture that’s perfect for dessert lovers seeking something unexpected. The cream cheese and mascarpone create depth and complexity, while sweetened condensed milk ensures easy freezing without ice crystals. Serve alongside fruit compote or berry desserts for an elegant finish.
Why You’ll Love It
- No-churn convenience with sophisticated, restaurant-quality flavor.
- Cream cheese adds subtle tang that prevents one-note sweetness.
- Pairs beautifully with fruit, desserts, and even savory applications.
Ingredients
- 14 ounces sweetened condensed milk
- 1 cup heavy cream
- 8 ounces cream cheese, softened
- 4 ounces mascarpone cheese
- 1 teaspoon vanilla extract
- 2 tablespoons lemon juice
- Pinch of salt
How To Make It
- Beat softened cream cheese and mascarpone together until completely smooth and combined.
- Whip heavy cream to stiff peaks in a separate bowl.
- Fold sweetened condensed milk, vanilla extract, lemon juice, and salt into the cheese mixture until well combined.
- Gently fold whipped cream into the cheese mixture in two additions until no streaks remain.
- Pour into a freezer-safe container and freeze for at least 6 hours or overnight until firm.
Variations And Substitutions
Add honey or jam swirls for sweetness, incorporate fresh lemon or lime zest for brightness, or blend in graham cracker crumbs for texture. Ricotta can replace mascarpone for a lighter version, or use all cream cheese for a tangier result.
Make-Ahead, Storage, And Serving Tips
Prepare up to one week ahead and store in an airtight container in the freezer. Soften at room temperature for 5-10 minutes before scooping. If the mixture becomes too soft during preparation, chill it briefly before folding in whipped cream. Drizzle with honey or serve with fresh berries.
Final Thoughts
No-churn ice cream is the perfect solution for anyone who wants homemade frozen treats without the hassle of an ice cream maker. These big batch recipes prove that you don’t need fancy equipment to create restaurant-quality flavors right in your own freezer. Whether you’re drawn to classic vanilla, adventurous salted caramel, or fruity options, there’s something here for every craving and every occasion.
Pick whichever flavor speaks to you first—there’s truly no wrong choice. Start with that one, perfect your technique, and then circle back to explore the others. You’ll be amazed at how simple it is to make creamy, delicious ice cream that your whole family will love. Happy freezing!
Birthday Cake Ice Cream
Ingredients
Method
- In a large bowl, whisk together heavy cream, whole milk, and granulated sugar until sugar dissolves completely.
- Stir in vanilla extract, almond extract, and salt.
- Pour mixture into an ice cream maker and churn according to manufacturer's instructions, about 20-25 minutes.
- During the last 5 minutes of churning, add crumbled vanilla cake and rainbow sprinkles.
- Transfer churned ice cream to a freezer-safe container.
- Freeze for at least 4 hours until firm.
- Scoop and serve with additional sprinkles if desired.