Banana Split with Caramel & Vanilla Pudding
Banana Split with Caramel & Vanilla Pudding
Banana Split with Caramel and Vanilla Pudding: A Cozy Dessert That Actually Feels Manageable
I grew up watching my dad make banana splits on lazy Sunday afternoons. He’d pull out this ancient ice cream scoop, line up the bananas with almost military precision, and then go completely freehand with the toppings. My mom would shake her head at the mess, but honestly? Those chaotic, overstuffed banana splits are some of my best food memories.
For years, I thought banana splits had to be some elaborate production. You know, the kind of thing you order at a retro diner and feel slightly guilty about because it’s basically a sugar avalanche on a plate. But then I started experimenting with homemade vanilla pudding and caramel sauce, and everything changed. Suddenly, this wasn’t just a throwback dessert—it became something I could actually make at home that tasted better than any diner version I’d ever had.
This banana split with caramel and vanilla pudding is my answer to those nights when you want something indulgent but don’t want to spend three hours in the kitchen. It’s the kind of dessert that feels fancy enough to serve guests, but approachable enough that even if you’ve never made pudding from scratch before, you’re going to nail it. The homemade vanilla pudding is silky and rich without being heavy, and that caramel sauce? It’s genuinely addictive.
I’m sharing this recipe because I genuinely believe that good food shouldn’t feel intimidating. If you follow along, you’ll have a beautiful, delicious banana split that tastes like someone who actually knows what they’re doing made it. And here’s the thing—you do now. If you love collecting easy, reliable recipes like this one, follow me on HaileeRecipes on Pinterest where I share all my go-to comfort food recipes.
Why You’ll Love This Recipe
Let me be real with you: homemade pudding tastes exponentially better than the box mix version. I’m not saying there’s anything wrong with box mix—sometimes convenience is the whole point—but when you taste actual vanilla pudding made with real vanilla and good milk, it’s like someone just turned up the flavor dial on your entire dessert.
The caramel sauce is where this recipe really shines for me. It’s buttery, glossy, and has that perfect balance of sweet and slightly salty. You make it in about five minutes, and it transforms everything it touches.
Here’s what makes this approach different from just throwing ice cream and toppings on a banana:
- The pudding creates a creamy base that holds everything together
- The caramel sauce is homemade, so you control the sweetness and quality
- You can prep the pudding and caramel ahead of time, making assembly super quick
- It feels special without requiring fancy equipment or skills you don’t have
- It’s genuinely delicious—not just nostalgia on a plate
This is the kind of dessert that works whether you’re feeding yourself on a Tuesday night or serving it to people you’re trying to impress. It’s flexible, forgiving, and honestly just makes you happy when you eat it.
Ingredients
For the Vanilla Pudding:
- 2 cups whole milk
- 1/2 cup heavy cream
- 1/4 cup granulated sugar
- 3 tablespoons cornstarch
- 1/4 teaspoon salt
- 1 tablespoon unsalted butter
- 2 teaspoons vanilla extract (use real vanilla, not imitation if you can)
Hailee’s Tip: The combination of milk and heavy cream makes the pudding feel luxurious without being overwhelming. If you only have whole milk, use 2.5 cups total—it’ll still be delicious, just slightly less rich.
For the Caramel Sauce:
- 1/2 cup unsalted butter
- 1 cup packed brown sugar
- 1/2 cup heavy cream
- 1/4 teaspoon sea salt
- 1/2 teaspoon vanilla extract
Hailee’s Tip: Don’t skip the sea salt. It’s not about making it taste salty—it’s about making the caramel taste more like caramel. Trust me on this one.
For Assembly:
- 3 ripe but firm bananas
- Vanilla ice cream (however much you want—I usually go with 1 to 1.5 cups per banana split)
- Whipped cream (homemade or store-bought, I won’t judge)
- Maraschino cherries (optional, but they make it look pretty)
- Chopped nuts like pecans or walnuts (optional)
- Chocolate sprinkles (optional)
Hailee’s Tip: Buy your bananas a day or two before you plan to make this. You want them ripe enough to be sweet but still firm enough to hold their shape. If they’re too soft, they’ll get mushy when you slice them.
Optional Add-Ins and Variations
The beauty of a banana split is that it’s basically a canvas for whatever you’re craving. Here are my favorite ways to customize it:
- Chocolate lovers: Drizzle some melted chocolate over the ice cream before adding the caramel. Or make a quick chocolate sauce to layer in.
- Nutty version: Toast some pecans or walnuts and sprinkle them over the pudding. The texture contrast is incredible.
- Tropical twist: Add a drizzle of coconut syrup or top with toasted coconut flakes.
- Boozy option: Add a splash of rum or bourbon to the caramel sauce (just whisk it in at the end). A little goes a long way.
- Fruity upgrade: Add a berry compote or fresh strawberries on top. Raspberries especially work beautifully with vanilla and caramel.
Step-by-Step Method
Making the Vanilla Pudding:
Step 1: Combine your dry ingredients
In a medium saucepan, whisk together the sugar, cornstarch, and salt. This is important—you want to break up any lumps in the cornstarch before you add liquid. I usually use a fork to press out any little clumps. Takes about 30 seconds and saves you from grainy pudding.
Step 2: Add your liquids gradually
Pour in about 1/4 cup of the milk and whisk it into the dry mixture until you have a smooth paste. This is called making a slurry, and it prevents lumps. Then slowly pour in the rest of the milk and the heavy cream while whisking constantly. You’re looking for a smooth, lump-free mixture.
Step 3: Cook it over medium heat
Put the saucepan over medium heat and stir constantly. This is not a step where you can walk away. After about 5 to 7 minutes, you’ll feel it start to thicken. You’ll see it go from pourable to almost gel-like. Keep stirring—the pudding should coat the back of a spoon when it’s done.
What I messed up: The first time I made this, I got impatient and turned the heat up to medium-high. The pudding scorched on the bottom, and I could taste it. Medium heat is your friend here. Patience is literally the secret ingredient.
Step 4: Finish it off
Remove from heat and stir in the butter and vanilla extract. The butter makes it glossy and adds richness. The vanilla is what makes it taste like real pudding and not just thickened milk.
Step 5: Chill it
Pour the pudding into a bowl and press plastic wrap directly onto the surface. This prevents a skin from forming on top (which I know some people like, but I find it weird). Refrigerate for at least 1 hour, though you can make it up to 2 days ahead.
Making the Caramel Sauce:
Step 1: Melt your butter
In a small saucepan over medium heat, melt the butter. Once it’s melted, add the brown sugar and stir constantly. This should take about 2 to 3 minutes. You’re looking for it to combine into a smooth, thick mixture.
Step 2: Add the cream slowly
This is the moment where caramel can get a little temperamental. Remove the pan from heat and slowly pour in the heavy cream while stirring. It’ll bubble up a bit—that’s normal and actually kind of fun to watch. Keep stirring until it’s smooth.
What I messed up: I once added the cream too quickly and ended up with a grainy, separated mess. Slow and steady wins the race here.
Step 3: Season it
Stir in the sea salt and vanilla extract. Taste it. Seriously, taste it. If you want it sweeter, you can add a touch more vanilla. If it needs more salt, add just a pinch more. This is your caramel—make it taste the way you want it to.
Step 4: Cool and store
Let the caramel cool to room temperature before using. It’ll thicken slightly as it cools, which is perfect. You can make this up to 1 week ahead and store it in the fridge. Just gently reheat it before serving if you want it pourable.
Assembling Your Banana Split:
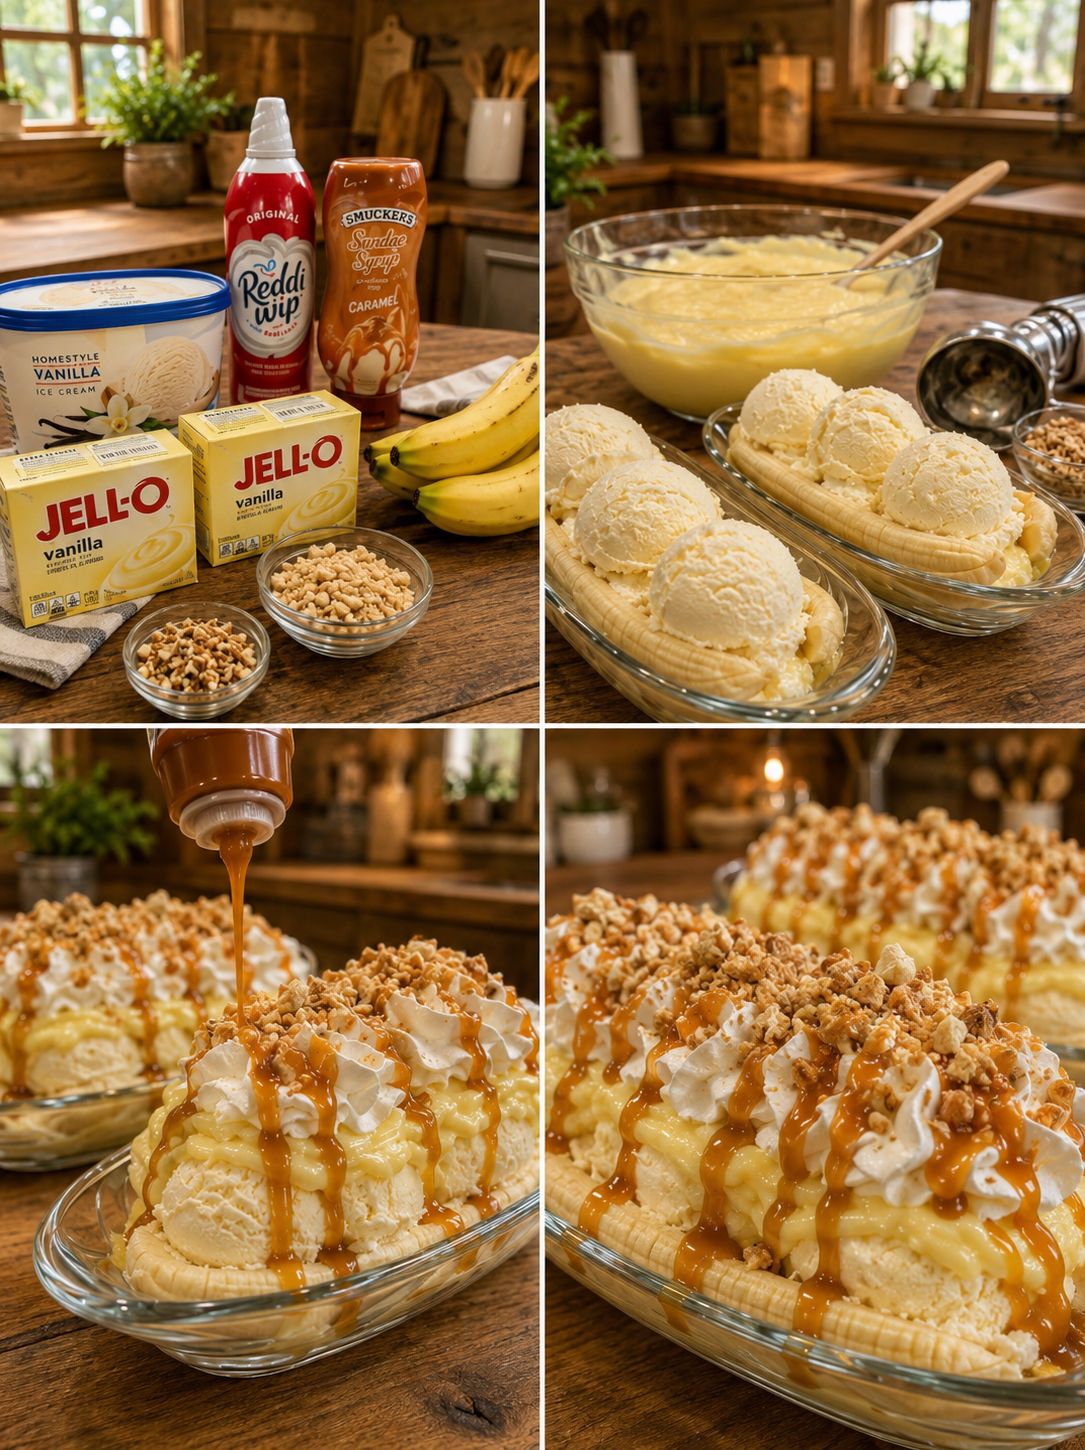
Step 1: Slice your bananas
Cut each banana in half lengthwise. Place two halves in a bowl or on a plate, cut side up, so they form a little boat.
Step 2: Add the pudding
Spoon a generous dollop of vanilla pudding down the center of each banana split.
Step 3: Add the ice cream
Scoop your vanilla ice cream on top of the pudding. I usually do 2 to 3 scoops per split, depending on how indulgent I’m feeling.
Step 4: Drizzle the caramel
Pour that beautiful caramel sauce over everything. Don’t be shy—this is where the magic happens.
Step 5: Top it off
Add a dollop of whipped cream, a cherry if you want to be fancy, and any other toppings you’re using. Serve immediately and enjoy.
Common Mistakes to Avoid
I’ve made all of these mistakes so you don’t have to:
- Lumpy pudding: Make sure you whisk the cornstarch with the dry ingredients first, then create a slurry before adding all the milk. This is the number one thing that prevents lumps.
- Scorched pudding: Keep the heat at medium, not higher. Patience is key.
- Caramel that breaks: Add the cream slowly and off the heat. This prevents the temperature shock that can cause separation.
- Mushy bananas: Don’t slice them more than 30 minutes before serving. They brown and soften quickly once cut.
- Melted ice cream: Have everything chilled and ready to go before you assemble. Speed is your friend here.
- Overly thick pudding: If your pudding sets up too firm, whisk in a splash of milk to loosen it up. It should be creamy, not gelatinous.
My Tested Substitutions
Not everyone has access to the same ingredients, and that’s totally okay. Here’s what I’ve successfully swapped:
For the milk: You can use 2% milk instead of whole milk—the pudding will be slightly less rich but still delicious. Oat milk also works surprisingly well if you’re dairy-free, though add an extra tablespoon of cornstarch to help it set properly.
For the heavy cream: Half-and-half works in a pinch, though the pudding won’t be quite as luxurious. For dairy-free, use full-fat coconut milk.
For the butter in the caramel: I’ve used coconut oil with decent results, though the flavor profile changes slightly. Stick with butter if you can—it’s really what makes the caramel taste like caramel.
For the vanilla extract: A vanilla bean paste makes the pudding look prettier with little vanilla specks, and it tastes amazing. Use about 1 teaspoon in place of the extract.
For the ice cream: Obviously you can use whatever flavor you like, but I’ve found that salted caramel ice cream is absolutely dangerous with this recipe—so good but so rich. Strawberry is a nice lighter option.
How to Customize
This is where your banana split becomes truly yours:
Flavor tweaks: Add a pinch of cinnamon or nutmeg to the pudding if you want warm spice notes. A tiny splash of almond extract (like 1/4 teaspoon) adds complexity without making it taste like almonds.
Texture variations: Toast your nuts before adding them. Crumble some graham crackers on top. Add crispy bacon bits if you’re feeling adventurous (sweet and salty is a real thing).
Make it lighter: Use Greek yogurt instead of some of the ice cream. Use whipped coconut cream instead of regular whipped cream. Use less caramel sauce.
Make it richer: Add chocolate chips. Use premium ice cream. Make a chocolate drizzle to layer with the caramel.
Serving Ideas
The obvious answer is to serve this as a dessert, but here are some other moments where it shines:
- After a light dinner when you want something indulgent but not too heavy
- As a special weekend breakfast or brunch item (yes, really)
- When you want to impress someone but don’t want to spend hours cooking
- On hot summer days when you want something cold and comforting
- As a nostalgic throwback dessert for a dinner party
- When you’re celebrating something small—a good day, a promotion, making it through Monday
I also love making individual banana splits for guests because it looks impressive but is actually super easy to execute. Everyone gets their own beautiful dessert, and you look like you know what you’re doing.
Meal Prep and Storage
Make-ahead timeline:
You can make both the pudding and caramel sauce up to 2 days in advance. Store them in separate airtight containers in the fridge. The pudding will keep its texture beautifully. The caramel might thicken slightly, but just gently reheat it over low heat or in the microwave in 15-second bursts until it’s pourable again.
On assembly day: Slice your bananas no more than 30 minutes before serving. Assemble each banana split just before eating so the ice cream doesn’t melt and the bananas stay firm.
Storage of leftovers: Honestly, this is best eaten fresh. But if you have leftover pudding or caramel, store them separately in the fridge for up to 3 days. The pudding is great eaten with a spoon as a standalone dessert. The caramel is perfect drizzled over ice cream, yogurt, or even toast.
Freezing: Don’t freeze the assembled banana split. The texture becomes weird. But you can freeze the caramel sauce in an ice cube tray for future use—pop out a cube whenever you want a little drizzle of caramel goodness.
Nutritional Breakdown
Here’s what you’re looking at per serving (based on 2 generous banana splits):
- Calories: approximately 520
- Protein: 6g
- Carbohydrates: 68g
- Fat: 24g
- Fiber: 2g
Keep in mind that this varies based on the type and amount of ice cream you use, whether you add toppings, and how generous you are with the