No-Bake Icebox Cakes & Frozen Desserts Recipes
No-Bake Icebox Cakes & Frozen Desserts Recipes
When the weather heats up, I’m all about easy no-bake icebox cakes and frozen desserts that practically make themselves. There’s something so satisfying about layering ingredients in a pan, popping it in the freezer, and coming back hours later to a showstopping dessert that tastes like you spent all day in the kitchen. I’ve rounded up my favorite make-ahead recipes that are perfect for summer gatherings, busy weeknights, or whenever you need something cold and comforting.
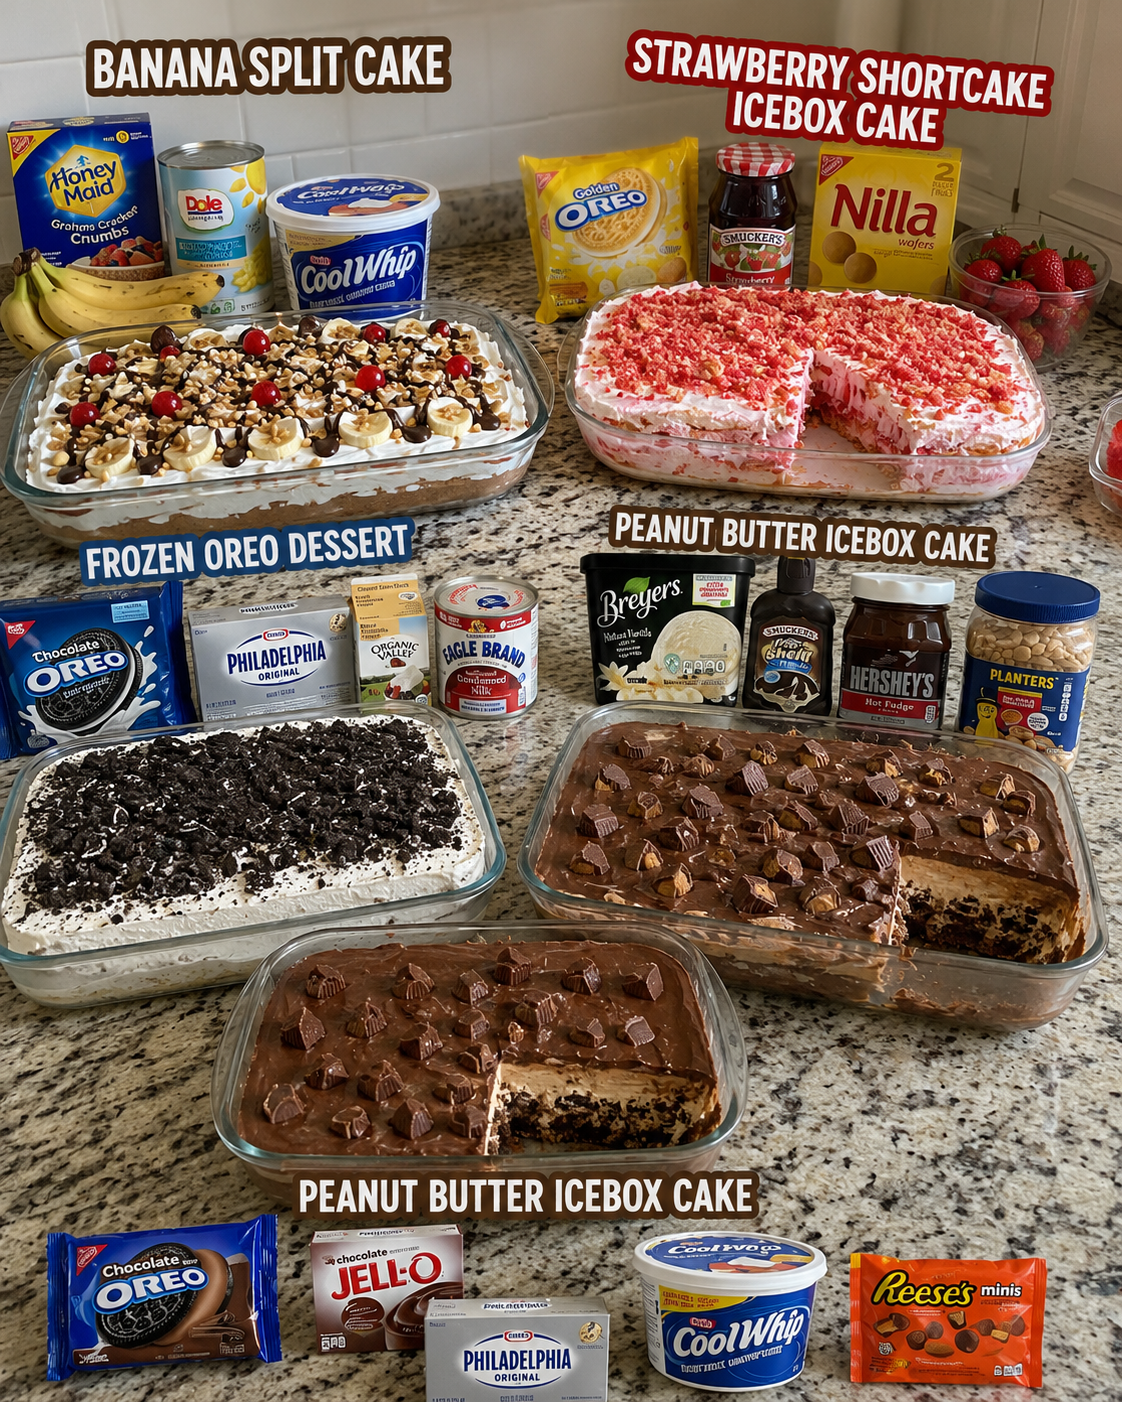
These four recipes—Banana Split Cake, Strawberry Shortcake Icebox Cake, Frozen Oreo Dessert, and Peanut Butter Icebox Cake—are worth saving because they’re genuinely foolproof and require zero baking skills. Most of them come together in under 20 minutes of actual hands-on time, and they all get better as they freeze. I love that you can make them days ahead, which takes so much stress out of entertaining or meal planning.
If you’re constantly hunting for new dessert ideas, follow me on HaileeRecipes on Pinterest where I’m always pinning my latest recipes and kitchen finds. But for now, let’s dive into these frozen treats that are about to become your go-to summer staples.
1. Banana Split Cake
This showstopping Banana Split Cake captures all the nostalgic flavors of a classic banana split in elegant layer form. With creamy vanilla wafer crust, whipped cream, fresh bananas, chocolate sauce, and maraschino cherries, it’s a dessert that tastes like pure indulgence but requires no oven time. The combination of cool, creamy, and fruity elements makes it perfect for summer gatherings, potlucks, or whenever you want an impressive dessert that comes together in minutes. It’s ideal for serving after a light meal and works beautifully as a make-ahead option that actually improves as flavors meld overnight.
Why You’ll Love It
- Completely no-bake and requires minimal kitchen skills or special equipment.
- Can be assembled up to 24 hours ahead, making entertaining stress-free.
- Delivers classic ice cream parlor flavors in an elegant, shareable dessert format.
Ingredients
- 2 cups vanilla wafer crumbs (about 40 wafers)
- 6 tablespoons melted butter
- 2 cups heavy whipping cream
- 3 tablespoons powdered sugar
- 1 teaspoon vanilla extract
- 4 ripe but firm bananas, sliced
- 1 cup chocolate syrup
- 1/2 cup chopped maraschino cherries, plus whole cherries for topping
- 1/4 cup chopped roasted peanuts (optional)
How To Make It
- Combine vanilla wafer crumbs with melted butter and press firmly into the bottom of a 9-by-13-inch dish to create an even crust layer. Refrigerate while preparing other components.
- Pour heavy whipping cream into a chilled bowl and whip with an electric mixer until soft peaks form, about 2 minutes.
- Add powdered sugar and vanilla extract to the whipped cream and continue beating until stiff peaks form, approximately 1 minute more.
- Spread half of the whipped cream evenly over the chilled crust layer, creating a smooth, even surface.
- Arrange banana slices in a single layer over the whipped cream, slightly overlapping them for visual appeal.
- Drizzle chocolate syrup over the bananas in a decorative crosshatch pattern, using about half the syrup.
- Spread the remaining whipped cream over the chocolate layer, then sprinkle chopped cherries and peanuts across the top.
- Drizzle remaining chocolate syrup decoratively over the surface and top with whole maraschino cherries for garnish.
Variations And Substitutions
Substitute graham cracker crumbs for vanilla wafers for a slightly different texture and flavor profile. Use store-bought whipped topping instead of homemade whipped cream for even easier assembly. Swap chocolate syrup for hot fudge sauce for deeper chocolate flavor, or use caramel sauce for a different twist. For a boozy version, add a tablespoon of rum or banana liqueur to the whipped cream. Substitute crushed pecans or walnuts for peanuts, or omit nuts entirely for a nut-free version.
Make-Ahead, Storage, And Serving Tips
Assemble this cake up to 24 hours ahead and refrigerate covered with plastic wrap. The flavors actually meld and improve overnight, making this an ideal make-ahead dessert. Store leftovers covered in the refrigerator for up to 2 days, though the crust may soften slightly. Slice with a sharp knife dipped in hot water and wiped clean between cuts for neat portions. Serve chilled directly from the refrigerator. If bananas begin to brown, add them no more than 4 hours before serving, or toss banana slices in lemon juice to prevent browning.
2. Strawberry Shortcake Icebox Cake
This elegant strawberry shortcake icebox cake delivers all the charm of the classic dessert without any baking required. Layers of crispy vanilla wafers, whipped cream, and fresh strawberries create a delightfully textured treat that’s both light and satisfying. The wafers soften slightly as they chill, absorbing the strawberry juices while maintaining a pleasant crunch. Perfect for summer gatherings, dinner parties, or whenever you want an impressive dessert that comes together in minutes. This no-bake version is ideal for hot days when turning on the oven is the last thing you want to do.
Why You’ll Love It
- Requires no baking, mixing, or special equipment—just assembly and chilling.
- Naturally lighter than traditional cake with fresh fruit and whipped cream layers.
- Can be made up to a day ahead, making it perfect for entertaining and stress-free meal planning.
Ingredients
- 2 pounds fresh strawberries, hulled and sliced
- 1/4 cup granulated sugar
- 2 tablespoons fresh lemon juice
- 2 cups heavy whipping cream
- 3 tablespoons powdered sugar
- 1 teaspoon vanilla extract
- 40 vanilla wafer cookies
- 2 tablespoons strawberry jam, optional
How To Make It
- Combine sliced strawberries with granulated sugar and lemon juice in a bowl. Stir gently and let sit for 15 minutes to release the juices.
- In a separate bowl, whip the heavy cream with powdered sugar and vanilla extract until stiff peaks form. Be careful not to overbeat.
- Spread a thin layer of whipped cream on the bottom of a 9-by-13-inch dish or similar-sized container.
- Arrange a single layer of vanilla wafers over the cream, breaking cookies as needed to fit.
- Spread a portion of whipped cream over the wafers, then add a layer of strawberries with some of their juices.
- Repeat the layers—wafers, whipped cream, and strawberries—until all ingredients are used, ending with whipped cream on top.
- Refrigerate for at least 4 hours or overnight, allowing the wafers to soften and flavors to meld.
- Garnish with fresh strawberries and a drizzle of strawberry jam just before serving if desired.
Variations And Substitutions
Swap strawberries for raspberries, blueberries, or a mixed berry combination for different flavor profiles. Use Greek yogurt mixed with whipped cream for a tangier taste and lighter texture. Replace vanilla wafers with ladyfinger cookies, digestive biscuits, or even crushed graham crackers for textural variety. Add a splash of balsamic vinegar or a hint of mint to the strawberry mixture for sophisticated depth. For a boozy version, drizzle a small amount of strawberry liqueur or champagne over the wafers before layering.
Make-Ahead, Storage, And Serving Tips
Prepare this dessert up to 24 hours in advance, making it excellent for entertaining. The wafers will continue to soften as it chills, so assemble it earlier rather than later if you prefer more texture. Cover with plastic wrap or a lid to prevent the whipped cream from absorbing refrigerator odors. Store in the coldest part of your refrigerator and serve chilled directly from the dish. Leftovers keep for up to 2 days, though the wafers will become increasingly soft. If the dessert seems too soft before serving, pop it in the freezer for 30 minutes to firm up the layers.
3. Frozen Oreo Dessert
This Frozen Oreo Dessert is a show-stopping no-bake creation that combines creamy layers with crunchy cookie goodness. With its rich chocolate flavor, smooth texture, and satisfying cookie crumble throughout, this dessert is perfect for summer gatherings, potlucks, or whenever you need an impressive treat without turning on the oven. It’s ideal for feeding a crowd since it serves 12 to 15 people, and the make-ahead nature means you can prepare it days in advance. The combination of whipped cream, cream cheese, and crushed Oreos creates an irresistible frozen cake that tastes far more complicated than it actually is.
Why You’ll Love It
- Requires no baking skills or oven time, making it accessible to any home cook.
- Can be assembled in under 20 minutes and frozen overnight, perfect for stress-free entertaining.
- Feeds a large crowd affordably while looking elegant and impressive on the dessert table.
Ingredients
- 2 cups Oreo cookie crumbs (about 20 cookies)
- 4 tablespoons melted butter
- 8 ounces cream cheese, softened
- 1 cup powdered sugar
- 2 cups heavy whipping cream
- 1 teaspoon vanilla extract
- 1 cup crushed Oreos (additional, for topping)
- Pinch of salt
How To Make It
- Mix 2 cups of Oreo crumbs with melted butter until the texture resembles wet sand, then press firmly into the bottom of a 9-by-13-inch baking dish to create an even crust.
- Beat softened cream cheese and powdered sugar together until smooth and fluffy, about 2 to 3 minutes, scraping down the bowl as needed.
- In a separate bowl, whip heavy cream with vanilla extract and a pinch of salt until stiff peaks form, taking care not to overbeat.
- Gently fold the whipped cream into the cream cheese mixture in two additions, being careful to maintain the airy texture.
- Spread half of the cream cheese mixture over the Oreo crust in an even layer.
- Sprinkle 1 cup of additional crushed Oreos over the cream layer, then top with the remaining cream cheese mixture, smoothing the top.
- Garnish with extra crushed Oreos if desired, then cover and freeze for at least 8 hours or overnight until completely firm.
Variations And Substitutions
For a lighter version, replace half the heavy cream with Greek yogurt. You can substitute the Oreos with other cookies like Thin Mints, chocolate wafers, or crushed brownies for different flavor profiles. Add a chocolate layer by spreading 1 cup of chocolate pudding between the cream layers. For a peanut butter twist, mix 1/2 cup of peanut butter into the cream cheese layer. You can also swap vanilla extract for almond extract or add 1 teaspoon of instant espresso powder to enhance the chocolate flavor.
Make-Ahead, Storage, And Serving Tips
This dessert is ideal for make-ahead preparation and can be frozen for up to one week when covered tightly with plastic wrap. Remove from the freezer 10 to 15 minutes before serving for easier slicing and better flavor. If the dessert becomes too hard, let it sit at room temperature briefly or dip your knife in hot water between cuts. Store leftover slices in an airtight container in the freezer for up to five days. For serving at parties, cut into squares while still frozen, then arrange on a platter and return to the freezer until guests arrive.
4. Peanut Butter Icebox Cake
This creamy peanut butter icebox cake delivers rich, indulgent flavor with minimal effort. Layers of buttery graham crackers alternate with a smooth peanut butter mousse filling, creating a dessert with satisfying texture contrasts. The longer it chills, the more the crackers soften into a cake-like consistency while the filling stays silky and substantial. Perfect for potlucks, summer gatherings, or whenever you want an impressive dessert without turning on the oven. It’s a nostalgic treat that tastes far more complicated than it actually is.
Why You’ll Love It
- No baking required, just mixing and chilling for a foolproof dessert.
- Naturally crowd-pleasing peanut butter flavor appeals to most palates.
- Can be assembled in under 15 minutes, then forgotten in the refrigerator.
Ingredients
- 1 cup creamy peanut butter
- 8 ounces cream cheese, softened
- 1 cup powdered sugar
- 1 teaspoon vanilla extract
- 2 cups heavy whipping cream
- 3 tablespoons granulated sugar
- 1 box graham crackers (about 16 ounces)
- 2 tablespoons milk or water
How To Make It
- Beat together the softened cream cheese, peanut butter, powdered sugar, and vanilla extract until smooth and well combined.
- In a separate bowl, whip the heavy cream with granulated sugar until stiff peaks form.
- Gently fold the whipped cream into the peanut butter mixture in two additions until no white streaks remain.
- Lightly brush or dip each graham cracker in milk to soften slightly, then arrange a single layer on the bottom of a 9-by-13-inch baking dish.
- Spread half of the peanut butter mousse evenly over the crackers.
- Layer another row of softened graham crackers, then top with the remaining mousse.
- Finish with a final layer of graham crackers on top.
- Cover with plastic wrap and refrigerate for at least 8 hours or overnight until the crackers have softened into a cake-like texture.
Variations And Substitutions
Swap the peanut butter for almond butter, sunflower seed butter, or cookie butter for different flavor profiles. Add a layer of chocolate ganache between the mousse and top crackers for extra richness. Drizzle melted chocolate or peanut butter over the top before serving. For a no-dairy version, use coconut cream in place of heavy cream and dairy-free cream cheese. Sprinkle crushed peanut butter cups or chocolate chips on top of the final layer for added texture and indulgence.
Make-Ahead, Storage, And Serving Tips
This dessert is ideal for make-ahead preparation. Assemble it up to 3 days in advance and keep it covered in the refrigerator. The longer it sits, the better the flavors meld and the softer the crackers become. Store leftovers covered for up to 5 days. For serving, cut into squares with a sharp knife dipped in hot water and wiped clean between cuts for neat portions. If the cake becomes too soft or difficult to cut, pop it back into the freezer for 30 minutes before slicing.
Final Thoughts
No-bake icebox cakes and frozen desserts are the ultimate answer to satisfying your sweet tooth without spending hours in the kitchen. Whether you’re planning a summer gathering, need a quick weeknight treat, or want to impress guests with minimal effort, these recipes deliver impressive results every single time. The beauty of these desserts lies in their simplicity and flexibility—you can customize flavors, adjust sweetness levels, and even prepare them days ahead of time.
Pick one recipe that speaks to you and give it a try this week. Start with whichever combination of flavors makes your mouth water, whether that’s a classic chocolate icebox cake, a refreshing fruit-forward frozen dessert, or something entirely unique to your taste. Once you master one, you’ll have the confidence to experiment with others and create your own signature frozen treats that your family will request again and again.
Banana Split Cake
Ingredients
Method
- Preheat oven to 350°F and grease a 9x13 inch baking pan.
- In a small bowl, whisk together flour, baking soda, and salt.
- In a large bowl, cream together butter and sugar until light and fluffy, about 2 minutes.
- Beat in eggs one at a time, then add mashed bananas and vanilla extract.
- Alternately add flour mixture and sour cream to the banana mixture, beginning and ending with flour mixture.
- Fold in chocolate chips and pour batter into prepared pan.
- Bake for 35-40 minutes until a toothpick inserted in the center comes out clean.
- Cool completely before serving or frosting as desired.