Easy Icebox Cake Recipes | No-Bake Desserts
Easy Icebox Cake Recipes | No-Bake Desserts
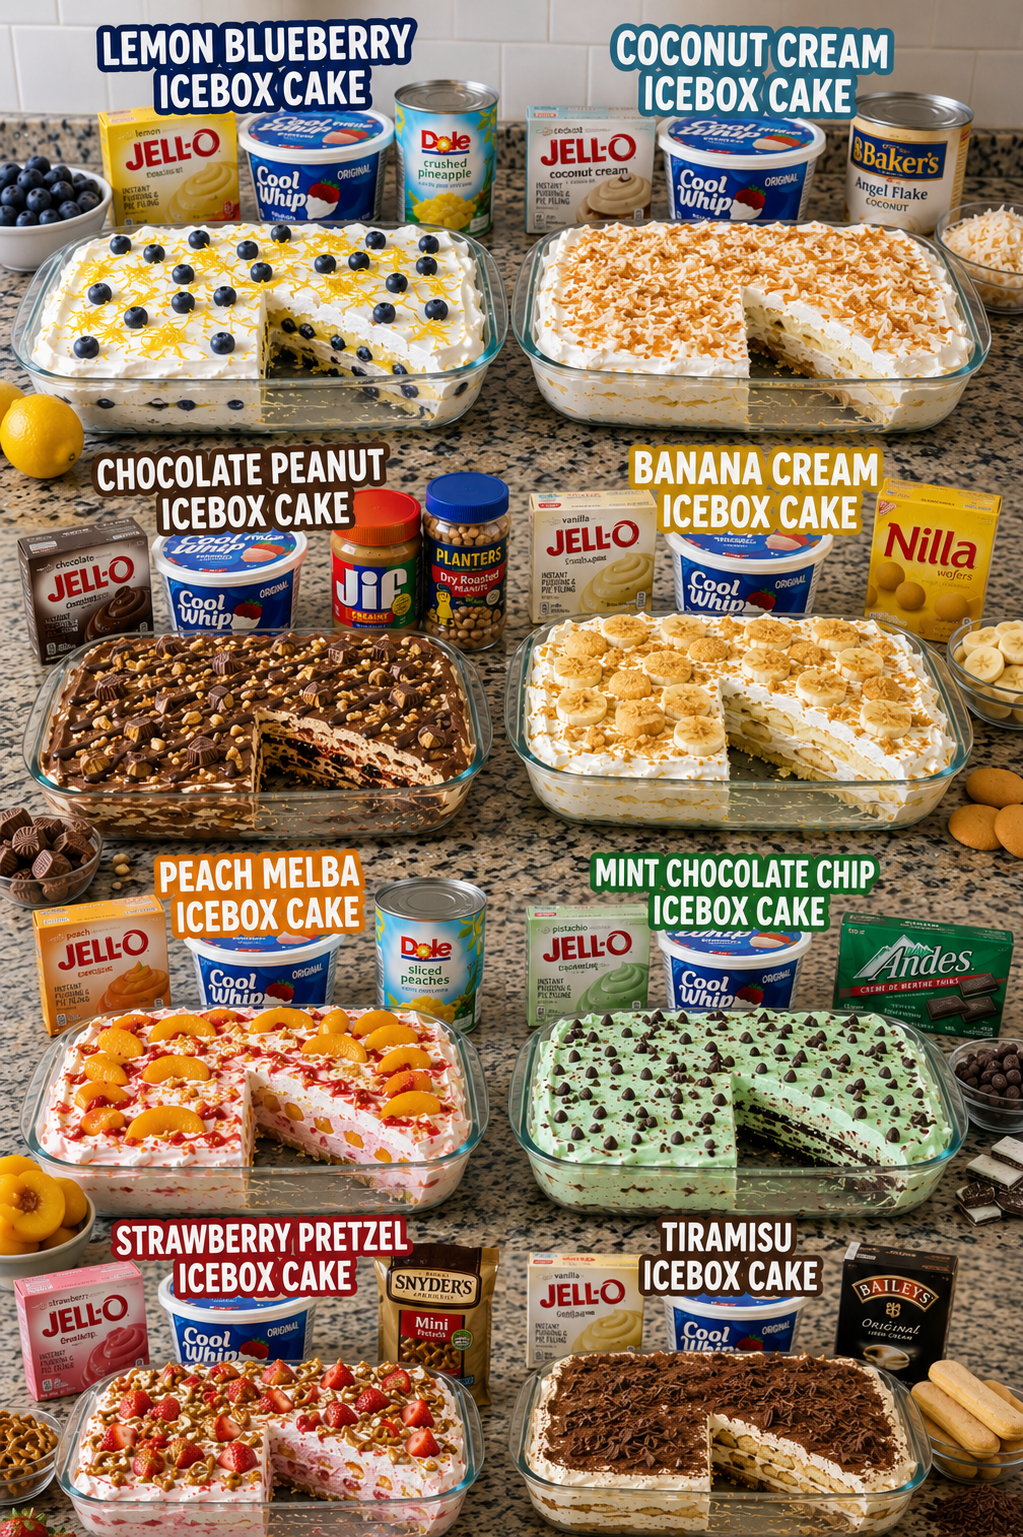
I’m so excited to share my collection of easy icebox cake recipes with you today! There’s something magical about these no-bake desserts—they’re the perfect solution when you want something impressive but don’t have the energy to turn on the oven. Whether you’re planning a summer gathering or just craving something cool and delicious, these eight recipes are absolute game-changers that I keep coming back to again and again.
What I love most about icebox cakes is how forgiving they are. You really can’t mess them up, and they actually taste better when you give them time to chill in the fridge. That means you can make them ahead, which takes so much stress out of entertaining. Plus, they’re the kind of desserts that look fancy enough to impress your guests but are honestly so simple that you’ll want to make them on a regular Tuesday night too.
I’ve rounded up eight of my favorite variations here—from classic combinations like Lemon Blueberry to fun twists like Strawberry Pretzel and Tiramisu. Save these recipes for your next dinner party, potluck, or whenever you need a crowd-pleaser that requires minimal effort. If you love discovering new recipes, Follow me on HaileeRecipes on Pinterest for more easy dessert ideas and kitchen inspiration.
1. Lemon Blueberry Icebox Cake
This bright and refreshing icebox cake combines tangy lemon with sweet blueberries in a no-bake dessert that’s perfect for warm weather gatherings. Layers of creamy filling and buttery graham crackers create a light, elegant texture that tastes like cheesecake without the fuss. It requires minimal effort and overnight chilling, making it ideal for entertaining or meal prep.
Why You’ll Love It
- No baking required—just layer, chill, and serve.
- Fresh lemon and blueberry flavors feel sophisticated yet simple.
- Perfect make-ahead dessert that actually improves overnight as flavors meld.
Ingredients
- 2 cups heavy whipping cream
- 1 package (8 ounces) cream cheese, softened
- 3/4 cup powdered sugar
- 3 tablespoons fresh lemon juice
- 1 tablespoon lemon zest
- 1 1/2 cups fresh or frozen blueberries
- 16 to 18 graham crackers
How To Make It
- Beat heavy cream until stiff peaks form, then set aside.
- In another bowl, blend softened cream cheese, powdered sugar, lemon juice, and lemon zest until smooth.
- Fold whipped cream into the lemon mixture gently, then fold in blueberries.
- Arrange a layer of graham crackers on the bottom of a 9-by-13-inch dish, breaking pieces as needed to fit.
- Spread half the lemon-blueberry mixture over the crackers, add another layer of graham crackers, then top with remaining filling and a final layer of crackers.
Variations And Substitutions
Substitute raspberries or blackberries for blueberries, or use lime juice and zest for a different citrus twist. For a chocolate version, add 2 tablespoons cocoa powder to the filling. If you prefer a firmer texture, use ladyfinger cookies instead of graham crackers.
Make-Ahead, Storage, And Serving Tips
Refrigerate for at least 8 hours or overnight before serving—this allows the graham crackers to soften slightly and flavors to develop. Store covered in the refrigerator for up to 3 days. For best results, avoid making more than 24 hours ahead, as the crackers may become too soft. Serve chilled directly from the refrigerator.
2. Coconut Cream Icebox Cake
This tropical-inspired icebox cake combines creamy coconut flavor with a light, airy texture that’s perfect for warm weather entertaining. Layers of vanilla wafers, whipped cream, and toasted coconut create a dessert that tastes elegant but requires zero baking. The result is a refreshing, make-ahead treat that impresses guests without demanding time in the kitchen.
Why You’ll Love It
- No oven required—just layers, chill time, and coconut magic.
- Naturally gluten-free option when using certified GF wafers.
- Feeds a crowd and tastes even better after overnight chilling.
Ingredients
- 2 cups heavy whipping cream
- 1 can (14 ounces) sweetened coconut milk
- 1/4 cup powdered sugar
- 1 teaspoon vanilla extract
- 1 box (9 ounces) vanilla wafers
- 1 cup toasted coconut flakes, divided
- Pinch of salt
How To Make It
- Chill a mixing bowl for 15 minutes, then whip heavy cream, powdered sugar, and salt until soft peaks form.
- Fold in coconut milk and vanilla extract gently until fully combined and fluffy.
- Spread a thin layer of coconut cream mixture on the bottom of a 9×13-inch dish.
- Arrange vanilla wafers in a single layer over the cream, then spread another layer of coconut cream and sprinkle with toasted coconut; repeat layers, ending with cream and coconut on top.
- Cover with plastic wrap and refrigerate for at least 8 hours or overnight until wafers soften into cake.
Variations And Substitutions
Swap vanilla wafers for graham crackers for a different texture, or add a tablespoon of rum or coconut rum to the filling for an adult version. Toast your own coconut flakes in a 325-degree oven for 5-7 minutes for fresher flavor, or use unsweetened coconut if you prefer less sweetness.
Make-Ahead, Storage, And Serving Tips
Prepare this dessert up to 2 days ahead—the longer it sits, the better the flavors meld and wafers soften. Store covered in the refrigerator. Serve chilled directly from the dish or cut into squares. If the cream seems too soft after chilling, let it set for an extra hour before serving.
3. Chocolate Peanut Icebox Cake
This no-bake dessert combines rich chocolate layers with creamy peanut butter filling for an irresistible treat. The graham cracker crust softens into the filling as it chills, creating a cake-like texture that’s both decadent and surprisingly light. Perfect for summer entertaining or when you need an impressive dessert without turning on the oven.
Why You’ll Love It
- Requires no baking, just layering and chilling overnight.
- Classic chocolate-peanut butter combination appeals to most guests.
- Can be made up to two days ahead, reducing last-minute stress.
Ingredients
- 2 cups graham cracker crumbs
- 6 tablespoons melted butter
- 1 cup creamy peanut butter
- 1 cup powdered sugar
- 8 ounces cream cheese, softened
- 2 cups heavy whipping cream
- 1.5 cups chocolate sauce or melted chocolate
How To Make It
- Mix graham cracker crumbs with melted butter and press firmly into the bottom of a 9×13-inch dish to form the crust.
- Beat together peanut butter, powdered sugar, and cream cheese until smooth, then fold in one cup of whipped cream.
- Spread the peanut butter mixture evenly over the crust as the second layer.
- Whip the remaining cream to stiff peaks and spread or layer over the peanut butter filling.
- Drizzle or spread chocolate sauce over the top, then refrigerate uncovered for at least 8 hours or overnight until set.
Variations And Substitutions
Swap peanut butter for almond butter or sunflower seed butter for a different nutty flavor. Use chocolate whipped cream instead of plain for extra richness. Add a sprinkle of crushed peanuts or chocolate chips on top before chilling for added texture and visual appeal.
Make-Ahead, Storage, And Serving Tips
Prepare this cake up to two days in advance and keep it covered in the refrigerator. Cut into squares with a hot, wet knife for clean slices. Serve cold directly from the refrigerator. Store leftovers covered for up to three days, though the crust will continue softening over time, which many prefer.
4. Banana Cream Icebox Cake
This creamy banana cream icebox cake combines layers of vanilla wafers, whipped cream, and fresh bananas for a nostalgic dessert that tastes like a classic banana pudding. The no-bake construction makes it effortless, while the overnight chilling transforms the wafers into a cake-like texture. Perfect for summer gatherings or when you need an impressive dessert without oven time.
Why You’ll Love It
- Requires no baking, making it ideal for hot weather entertaining.
- Uses pantry staples and fresh bananas for simple, accessible ingredients.
- Gets better as it sits, with flavors melding and textures softening overnight.
Ingredients
- 40 vanilla wafer cookies
- 3 cups heavy whipping cream
- 1/2 cup granulated sugar
- 2 teaspoons vanilla extract
- 4 medium ripe bananas
- 2 tablespoons fresh lemon juice
- 1/4 teaspoon salt
How To Make It
- Whip the heavy cream, sugar, vanilla extract, and salt together until stiff peaks form.
- Slice bananas and toss gently with lemon juice to prevent browning.
- In a 9×13-inch dish, spread a thin layer of whipped cream, then arrange a single layer of vanilla wafers over it.
- Continue layering with whipped cream, bananas, and wafers, ending with a whipped cream layer on top.
- Cover and refrigerate for at least 8 hours or overnight until wafers soften into a cake texture.
Variations And Substitutions
Substitute the vanilla wafers with graham crackers for a different texture, or add a layer of banana pudding mix mixed with milk for extra flavor. You can also replace fresh bananas with sliced strawberries or a combination of berries for a fruit variation.
Make-Ahead, Storage, And Serving Tips
Prepare this dessert up to 2 days ahead and store covered in the refrigerator. The wafers will continue softening, which is desirable. Serve chilled directly from the dish. If the top layer begins to brown slightly, add fresh whipped cream just before serving. Avoid making more than 2 days ahead, as the bananas may discolor.
5. Peach Melba Icebox Cake
This elegant no-bake dessert combines the classic flavors of peaches and raspberries with creamy layers of whipped cream and vanilla wafers. The result is a sophisticated icebox cake with a delicate fruit compote that softens the cookies into a cake-like texture. Perfect for summer entertaining or when you want an impressive dessert without turning on the oven.
Why You’ll Love It
- Combines two beloved dessert traditions into one elegant presentation.
- The fruit compote adds brightness and prevents the cake from feeling too heavy.
- Comes together in minutes with pantry-friendly ingredients.
Ingredients
- 2 cups heavy cream
- 3 tablespoons powdered sugar
- 1 teaspoon vanilla extract
- 30 vanilla wafer cookies
- 2 cups fresh or frozen peaches, diced
- 1 cup fresh raspberries
- 2 tablespoons honey
How To Make It
- Whip heavy cream with powdered sugar and vanilla extract until stiff peaks form.
- Combine peaches, raspberries, and honey in a bowl and let sit for 15 minutes to release juices.
- In a 9-by-5-inch loaf pan, layer vanilla wafers on the bottom, then spread a thin layer of whipped cream.
- Spoon some fruit compote over the cream layer, then repeat layers, ending with whipped cream on top.
- Refrigerate for at least 6 hours or overnight until the wafers soften into cake.
Variations And Substitutions
Swap raspberries for blackberries or blueberries, or use canned peaches in light syrup if fresh aren’t available. For a boozy version, add 1 tablespoon of peach schnapps or brandy to the fruit mixture. Substitute ladyfinger cookies for vanilla wafers for a more delicate crumb.
Make-Ahead, Storage, And Serving Tips
This cake is best made 1 to 2 days ahead, allowing flavors to meld and cookies to soften perfectly. Store covered in the refrigerator for up to 3 days. Serve chilled directly from the pan or slice carefully with a warm knife. The fruit compote may release extra liquid over time, so drain excess before serving if desired.
6. Mint Chocolate Chip Icebox Cake
This refreshing no-bake dessert combines creamy chocolate layers with bright mint flavor and crunchy cookie pieces, creating the perfect balance of textures. The combination of chocolate wafers, whipped cream, and crushed candy creates an elegant yet effortless treat that’s ideal for warm weather entertaining or when you want impressive results without turning on the oven.
Why You’ll Love It
- Requires just basic ingredients and no baking skills whatsoever.
- The contrast between cool, creamy filling and crispy cookie layers is irresistible.
- Naturally impressive presentation that looks far more complicated than it actually is.
Ingredients
- 24 chocolate wafer cookies
- 3 cups heavy whipping cream
- 1/2 cup powdered sugar
- 1 teaspoon peppermint extract
- 1/2 cup crushed peppermint candies
- 2 tablespoons unsweetened cocoa powder
How To Make It
- Line an 8-inch square baking dish with parchment paper and arrange a single layer of chocolate wafers on the bottom.
- Whip the heavy cream with powdered sugar and peppermint extract until stiff peaks form.
- Spread half the whipped cream mixture over the wafer layer, then sprinkle with half the crushed peppermint candies.
- Add another layer of chocolate wafers, then top with remaining whipped cream and remaining candies.
- Cover and refrigerate for at least 8 hours or overnight until the cookies soften and flavors meld.
Variations And Substitutions
Replace peppermint extract with vanilla or almond extract for different flavor profiles. Use crushed candy canes, chocolate chips, or brownie pieces instead of peppermint candies. Substitute vanilla wafers or graham crackers for chocolate wafers depending on your preference.
Make-Ahead, Storage, And Serving Tips
This cake actually improves when made 1 to 2 days ahead, allowing cookies to absorb moisture and flavors to deepen. Store covered in the refrigerator for up to 4 days. Cut into squares with a warm, wet knife for clean edges and serve directly from the refrigerator for the best texture.
7. Strawberry Pretzel Icebox Cake
This showstopping dessert combines sweet strawberries, salty pretzels, and creamy layers for the ultimate sweet-and-salty treat. The pretzel crust stays wonderfully crunchy against the smooth cheesecake filling and fresh strawberry topping, making it perfect for summer gatherings or when you want impressive results without baking.
Why You’ll Love It
- No-bake recipe requires just assembly and refrigeration time.
- Sweet, salty, and creamy flavors and textures in every bite.
- Feeds a crowd and looks elegant with minimal effort.
Ingredients
- 2 cups crushed pretzels
- 6 tablespoons melted butter
- 16 ounces cream cheese, softened
- 1 cup heavy whipping cream
- 3/4 cup powdered sugar
- 1 pound fresh strawberries, sliced
- 3 tablespoons strawberry jam or preserves
How To Make It
- Mix crushed pretzels with melted butter and press firmly into the bottom of a 9-by-13-inch baking dish to create the crust.
- Beat softened cream cheese until smooth, then fold in whipped cream and powdered sugar until light and fluffy.
- Spread the cream cheese mixture evenly over the pretzel crust, sealing it completely to prevent sogginess.
- Arrange sliced strawberries on top in a single layer or decorative pattern.
- Warm jam slightly and brush or drizzle over strawberries for a glossy finish, then refrigerate at least 4 hours.
Variations And Substitutions
Swap strawberries for raspberries or mixed berries, or use chocolate pretzels for a sweeter crust. You can also replace the jam glaze with a simple strawberry syrup or leave it unglazed for a lighter finish.
Make-Ahead, Storage, And Serving Tips
Prepare this cake up to 24 hours ahead, covering it loosely once the jam sets. Store in the refrigerator and add fresh strawberries just before serving if you prefer them extra crisp. Cut into squares and serve cold; the pretzel crust may soften slightly after 24 hours, which some prefer.
8. Tiramisu Icebox Cake
This elegant no-bake dessert combines the coffee-soaked ladyfinger layers and creamy mascarpone filling of classic tiramisu with the convenience of an icebox cake format. The result is a sophisticated, make-ahead treat with bold coffee flavor, silky texture, and just enough cocoa powder dusting to feel fancy. Perfect for dinner parties or when you want an impressive dessert without baking.
Why You’ll Love It
- Requires no oven, mixer, or complicated techniques—just assembly and chilling.
- Tastes even better the next day as flavors meld and layers soften.
- Looks restaurant-quality when sliced, impressing guests effortlessly.
Ingredients
- 1 cup strong brewed espresso or coffee, cooled
- 3 tablespoons coffee liqueur or brandy (optional)
- 2 tablespoons sugar
- 40 ladyfinger cookies
- 1 pound mascarpone cheese, room temperature
- 1 cup heavy whipping cream
- 3 tablespoons powdered sugar, plus more for dusting
- Unsweetened cocoa powder for topping
How To Make It
- Combine cooled espresso, liqueur if using, and 2 tablespoons sugar in a shallow bowl; set aside.
- Whip heavy cream and 3 tablespoons powdered sugar until stiff peaks form, then gently fold into room-temperature mascarpone until combined.
- Quickly dip each ladyfinger into the coffee mixture for one second per side, then arrange in a single layer in a 9×13-inch dish.
- Spread half the mascarpone cream over the ladyfinger layer, then repeat with another layer of dipped ladyfingers and remaining cream.
- Cover with plastic wrap and refrigerate at least 8 hours or overnight, then dust generously with cocoa powder and powdered sugar before serving.
Variations And Substitutions
Replace coffee liqueur with rum, brandy, or omit entirely for a non-alcoholic version. Substitute regular cream cheese mixed with sour cream if mascarpone is unavailable. Add a layer of chocolate shavings or finely crushed amaretti cookies between the cream layers for extra flavor and texture.
Make-Ahead, Storage, And Serving Tips
Prepare this cake up to three days ahead; cover tightly to prevent it from absorbing refrigerator odors. Dust with cocoa powder only just before serving to keep it from becoming damp. Cut with a hot, wet knife wiped between each slice for clean portions. Serve chilled directly from the refrigerator.
Final Thoughts
Icebox cakes are the perfect solution when you want something impressive without spending hours in the kitchen. Whether you’re drawn to the classic chocolate and vanilla combination or eager to experiment with fresh fruit and unique flavors, there’s a recipe here that will become your go-to dessert. The beauty of these no-bake treats is that they’re forgiving, flexible, and absolutely delicious every single time.
We encourage you to pick one recipe that speaks to you and give it a try this week. Start with whichever flavor combination makes you most excited, gather your simple ingredients, and let your refrigerator do the heavy lifting. Your family and friends will be amazed at how elegant and delicious your homemade icebox cake turns out to be.
Lemon Blueberry Icebox Cake
Ingredients
Method
- Mix graham cracker crumbs, melted butter, and sugar in a bowl until combined.
- Press the mixture firmly into the bottom of a 9x13-inch baking dish.
- Whisk together condensed milk, lemon juice, and lemon zest in a large bowl until thickened.
- In a separate bowl, whip heavy cream and powdered sugar until stiff peaks form.
- Gently fold the whipped cream into the lemon mixture until no white streaks remain.
- Fold in 1.5 cups of blueberries, reserving some for topping.
- Pour the lemon cream filling over the crust and smooth the top.
- Refrigerate for at least 6 hours or overnight, then top with remaining blueberries before serving.