Strawberry Shortcake Icebox Cake Recipe
Strawberry Shortcake Icebox Cake Recipe
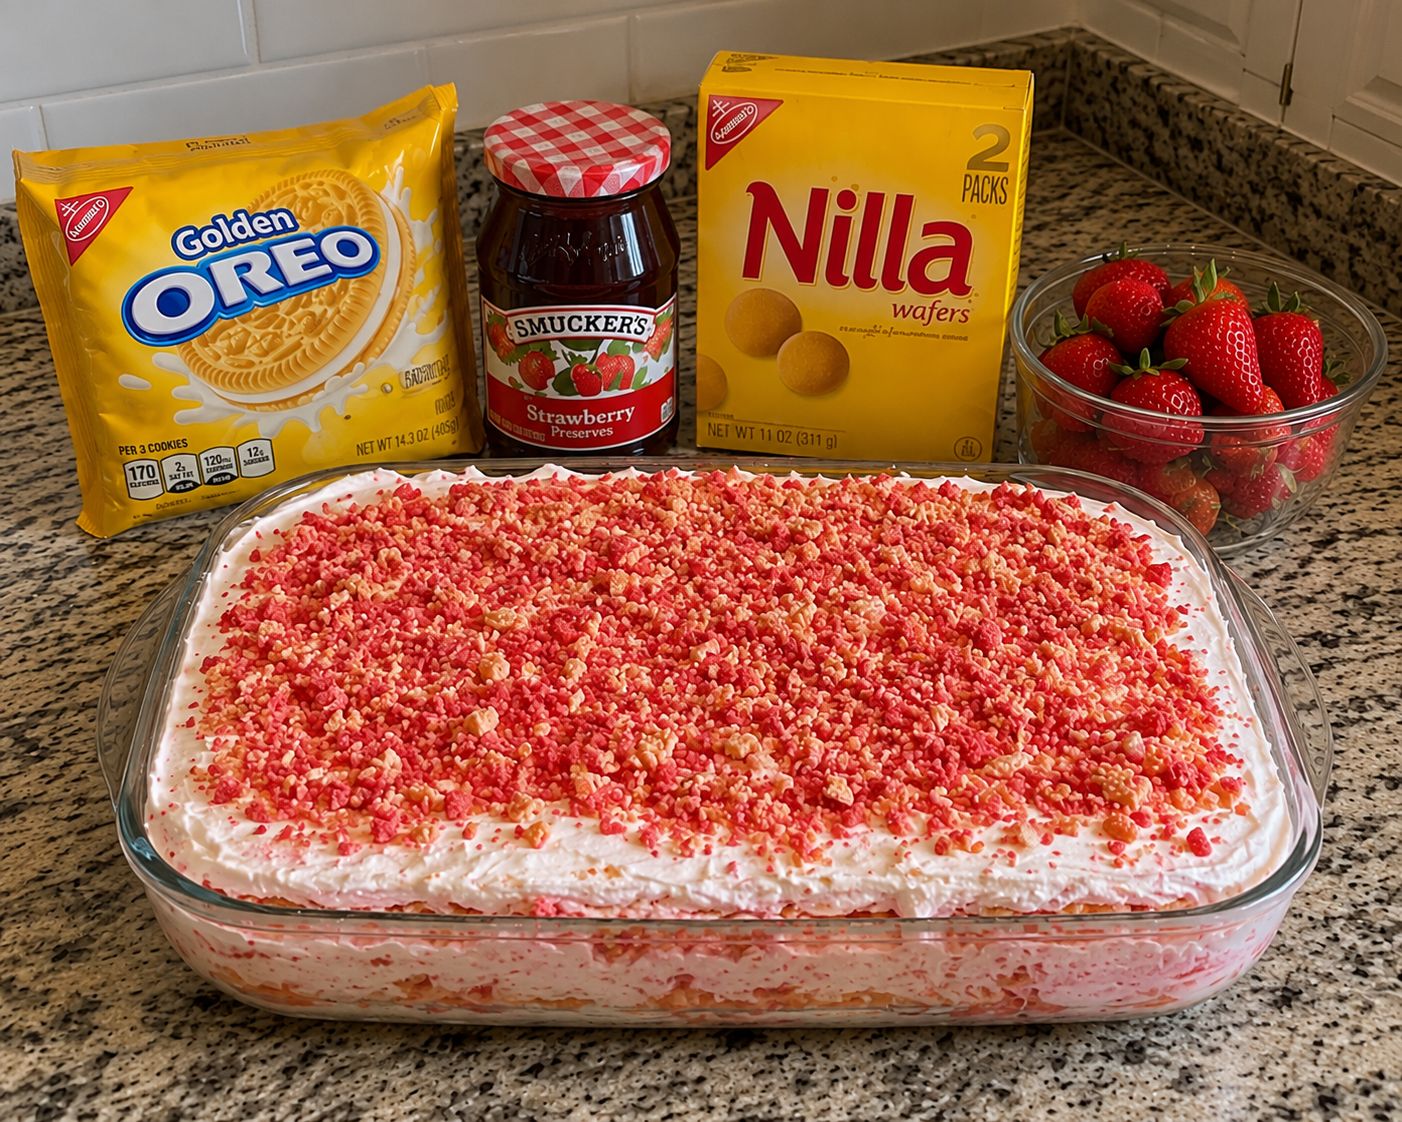
Strawberry Shortcake Icebox Cake: No-Bake Elegance That Tastes Like Summer
I made this strawberry shortcake icebox cake for the first time on a sweltering July afternoon when my oven was the last thing I wanted to turn on. My sister was coming over, I had a craving for something light and summery, and I was honestly too tired to fuss with actual baking. So I raided my pantry, grabbed some whipped cream and vanilla wafers, and basically threw together what I thought would be a casual dessert. Three hours in the fridge later, I pulled out something that looked like it belonged in a fancy bakery case.
That’s the magic of an icebox cake, honestly. You’re not actually baking anything. Instead, you’re layering simple ingredients and letting time and cold do all the heavy lifting. The wafers soften into something cake-like, the cream gets silky and stable, and the strawberries stay bright and fresh. It’s the kind of dessert that makes you look like you spent hours in the kitchen when really you spent about fifteen minutes assembling things.
This strawberry shortcake icebox cake is perfect if you’re tired of traditional baking, if you’re avoiding heating up your kitchen, or if you just want something that tastes like summer but doesn’t require a ton of skill or fuss. It’s also genuinely impressive to serve, which I love. People always ask how I made it, and when I tell them it’s no-bake, they’re shocked. It’s a total crowd-pleaser for potlucks, dinner parties, or just quiet nights when you want something special without the stress.
If you’re looking for more easy dessert inspiration, follow me on HaileeRecipes on Pinterest where I share all kinds of no-fuss treats that actually taste incredible.
Why You’ll Love This Recipe
Let me be real with you: this recipe checks a lot of boxes. It’s genuinely simple to make, which means even if you’re not a confident baker, you can absolutely nail this. There’s no yeast, no rising time, no worrying about whether your cake is baked through. You literally just layer and refrigerate.
The texture is something special too. The vanilla wafers soften from the whipped cream without turning mushy, creating this almost-mousse-like consistency that’s elegant but still approachable. The strawberries stay fresh and juicy, and the cream is stable enough to slice cleanly but still feels light and airy.
It’s also incredibly forgiving. Made a mistake with the layers? You’re refrigerating it anyway, so just keep going. Want to change up the flavors? The basic framework works with almost anything. And because it’s no-bake, you can make it a day ahead without any stress about how it’ll hold up.
Plus, it genuinely tastes like strawberry shortcake. That’s not an exaggeration. You get the cake texture, the cream, the fresh fruit, and all those flavors combine into something that feels like a proper dessert, not a shortcut.
Ingredients
- Vanilla wafers: 40 to 50 cookies (about one 11-ounce box). These are your cake base, so don’t skip them or substitute with something too hard or too soft.
- Heavy whipping cream: 2 cups, cold. This is non-negotiable if you want the cake to hold its shape. Half-and-half won’t work here.
- Powdered sugar: 3 tablespoons. This sweetens the cream without adding graininess like granulated sugar would.
- Vanilla extract: 1 teaspoon. Use real vanilla if you can. The flavor difference matters.
- Fresh strawberries: 1.5 pounds, hulled and sliced. Pick ones that are ripe but still firm. Soft berries will make the cake weep.
- Granulated sugar: 2 tablespoons. This goes on the strawberries to draw out their juices slightly and sweeten them.
- Fresh lemon juice: 1 tablespoon. This brightens the strawberries and keeps them from tasting flat.
Optional Add-Ins and Variations
This is where you can make the recipe your own. I love the simplicity of the classic version, but I also get bored easily, so here are some things I’ve tried:
- A pinch of cardamom or almond extract in the whipped cream adds a subtle sophistication that people can’t quite put their finger on.
- A splash of strawberry liqueur (like Chambord) mixed into the cream makes it feel grown-up and fancy.
- Crushed freeze-dried strawberries sprinkled between layers adds texture and intensifies the strawberry flavor.
- A drizzle of balsamic reduction on top brings out the strawberries’ natural sweetness in an unexpected way.
- Whipped mascarpone instead of all whipped cream creates a tangier, richer filling.
Step-by-Step Method
Step 1: Prepare your strawberries
Slice your strawberries into roughly quarter-inch pieces. I like them thick enough to hold their shape but thin enough to layer nicely. Put them in a bowl and toss with the granulated sugar and lemon juice. Let them sit for about ten minutes. This releases some of their juices, which is actually great because those juices will help soften the wafers. Don’t skip this step thinking it’s extra—it’s genuinely important.
Step 2: Whip your cream
Pour your cold heavy cream into a bowl. I use an electric mixer because I’m lazy, but you can absolutely use a whisk and some elbow grease if you want. Beat the cream until it starts to thicken, then add your powdered sugar and vanilla extract. Keep beating until you get stiff peaks. This usually takes me about three to four minutes with a mixer. Be careful not to over-beat or you’ll end up with butter, which I’ve definitely done before and it’s a whole thing.
Step 3: Start layering
Find yourself a 9-by-13-inch baking dish (or honestly, any shallow dish that’s roughly that size). Spread a thin layer of whipped cream on the bottom—just enough to coat it. Now here’s the moment where things get real: dip a vanilla wafer into the strawberry juices for about one second on each side. Not longer, or it’ll fall apart. But that quick dip is key. Lay it down on the cream. Repeat until you have a single layer of wafers covering the bottom of the dish. They don’t have to be perfect or cover every inch. There will be gaps, and that’s fine.
Step 4: Build your layers
Spread a layer of whipped cream over your wafer layer. Then add a layer of sliced strawberries. Then another layer of dipped wafers. Then more cream. Then more strawberries. Keep going until you run out of ingredients, finishing with a layer of whipped cream on top. I usually get about three to four layers of wafers, depending on how thick I’m spreading things.
Here’s what I messed up the first time: I was way too generous with the cream. You want enough to bind everything together and create that mousse-like texture, but not so much that it’s swimming. Think of it more like a light coating between layers rather than a thick frosting.
Step 5: Refrigerate and be patient
Cover your dish with plastic wrap and stick it in the fridge for at least three hours. I usually make mine the night before because I love having dessert ready to go, and honestly, it tastes even better after sitting overnight. The flavors meld, the texture becomes more cohesive, and everything is just better.
Step 6: Serve and enjoy
Take it out of the fridge about ten minutes before serving. Cut into squares and serve with a fork. If you want to get fancy, top each serving with an extra strawberry or a tiny dollop of whipped cream, but it’s honestly beautiful as-is.
Common Mistakes to Avoid
Using wafers that are too hard or too soft: Vanilla wafers should be crisp but not rock-hard. If they’re stale, they won’t soften properly. If they’re already soft, they’ll turn to mush. Store them in an airtight container and use them within a reasonable timeframe.
Not dipping the wafers: I know I mentioned this, but I’m saying it again because it matters. Those wafers need to absorb some moisture or they’ll stay crunchy and separate from everything else. A quick dip is all you need.
Over-whipping the cream: Once you hit stiff peaks, stop. I’ve turned perfectly good cream into butter more times than I’d like to admit. If it happens to you, just start over. It’s not worth trying to fix it.
Using soft or overripe strawberries: They’ll release too much liquid and make the whole thing soggy. Pick berries that are ripe but still firm to the touch.
Not giving it enough time to set: Three hours is the minimum. I know it’s hard to wait, but trust me. The wafers need time to soften and absorb the cream. Cutting into it too early will just be a mess.
My Tested Substitutions
If you don’t have vanilla wafers: Ladyfinger cookies work beautifully. So do thin shortbread cookies or even digestive biscuits if you’re outside the US. They’ll all soften slightly and create that cake-like texture. Avoid anything too thick or too densely packed.
If you can’t find fresh strawberries: Frozen strawberries work in a pinch, but thaw them first and drain off excess liquid. Fresh is genuinely better here because you want that bright, fresh flavor and the firm texture. If berries are out of season where you are, wait or use another berry you love.
If you want to use whipped topping instead of whipping cream: I get it, and yes, it works. But I’m going to gently suggest trying real whipped cream if you can. The flavor difference is real, and it’s not that much harder. That said, store-bought whipped topping is totally fine if that’s what you have on hand.
For a dairy-free version: Use a coconut cream whipped topping or a plant-based heavy cream alternative. The results won’t be exactly the same, but they’ll still be good. You might need to add a stabilizer to keep it from weeping.
How to Customize
Want to make this your own? Here’s how:
Change the fruit: Raspberries, blackberries, or blueberries all work. You can even do a mixed berry situation. Just adjust the sugar and lemon juice based on how sweet or tart your berries are.
Change the flavor of the cream: Add a teaspoon of almond extract instead of vanilla. Or mix in a tablespoon of coffee liqueur. Or a pinch of cinnamon. Or literally any flavoring you love.
Make it chocolate: Layer in some chocolate wafers or crushed chocolate cookies. Add a tablespoon of cocoa powder to your whipped cream. Top with chocolate shavings.
Make it boozy: Add a tablespoon of your favorite liqueur to the whipped cream. Chambord, Grand Marnier, or even simple vodka all work.
Make it smaller or bigger: This recipe scales easily. Want to serve four people instead of eight? Cut everything in half and use a smaller dish. Want to serve a crowd? Double it and use a larger pan.
Serving Ideas
This cake is beautiful on its own, but here are some ways to elevate it:
- Serve with a small glass of sparkling wine or prosecco on the side.
- Top individual servings with a fresh mint leaf for a pop of color.
- Drizzle with a little honey or strawberry jam before serving.
- Pair with a simple shortbread cookie on the side for extra texture.
- Dust the top with a tiny bit of powdered sugar right before serving for elegance.
Meal Prep and Storage
This is genuinely one of the best things about this recipe: you can make it ahead.
Make-ahead: Assemble this up to two days in advance. Just cover it tightly with plastic wrap and refrigerate. It actually tastes better on day two because everything has time to meld together.
Storage: Keep it covered in the fridge for up to two days. After that, the wafers start to get a little too soft and the whole thing gets a bit mushy. Not inedible, but not ideal.
Freezing: You can freeze it for up to one month, though the texture changes slightly when it thaws. The wafers get softer and the strawberries lose some of their firmness. It’s still good, just different.
Serving from frozen: If you do freeze it, let it thaw in the fridge for a few hours before serving. Don’t try to eat it straight from the freezer or you’ll break your teeth.
Nutritional Breakdown
Per serving (based on 8 servings):
- Calories: approximately 320
- Protein: 3 grams
- Carbohydrates: 32 grams
- Fat: 19 grams
- Fiber: 1 gram
- Sugar: 22 grams
Keep in mind that this is an estimate and can vary based on the exact brands and sizes of ingredients you use. If you’re tracking macros, the biggest variable is usually how much whipped cream you use, so adjust accordingly.
Final Thoughts
I genuinely love this strawberry shortcake icebox cake because it proves that impressive desserts don’t have to be complicated. You don’t need special skills or fancy equipment. You just need good ingredients, a little patience, and the willingness to let the fridge do the work for you.
It’s the kind of dessert that makes people think you spent all day in the kitchen when really you spent fifteen minutes assembling things. It’s perfect for summer when you don’t want to heat up your kitchen. It’s perfect for impressing people without stressing yourself out. And it’s perfect for those nights when you just want something that tastes like summer, no matter what season it actually is.
Make this for someone you love. Make it for yourself. Make it and refrigerate it overnight so you have something special waiting for you in the morning. Just make it, okay? You’re going to be so glad you did.
—
Recipe Card
Strawberry Shortcake Icebox Cake Recipe
Ingredients
Method
- Slice strawberries into quarter-inch pieces and toss with granulated sugar and lemon juice. Let sit for 10 minutes.
- Pour cold heavy cream into a bowl and beat with an electric mixer until it starts to thicken. Add powdered sugar and vanilla extract, then continue beating until stiff peaks form (about 3 to 4 minutes).
- Spread a thin layer of whipped cream on the bottom of a 9-by-13-inch baking dish.
- Quickly dip each vanilla wafer into the strawberry juices for about one second on each side, then lay in a single layer over the cream. Repeat until the bottom is covered.
- Spread a layer of whipped cream over the wafers, then add a layer of sliced strawberries. Repeat layers of dipped wafers, cream, and strawberries until all ingredients are used, finishing with a layer of whipped cream on top.
- Cover with plastic wrap and refrigerate for at least 3 hours, or preferably overnight.
- Cut into squares and serve chilled.