Cheesy Broccoli Penne Bake
Cheesy Broccoli Penne Bake
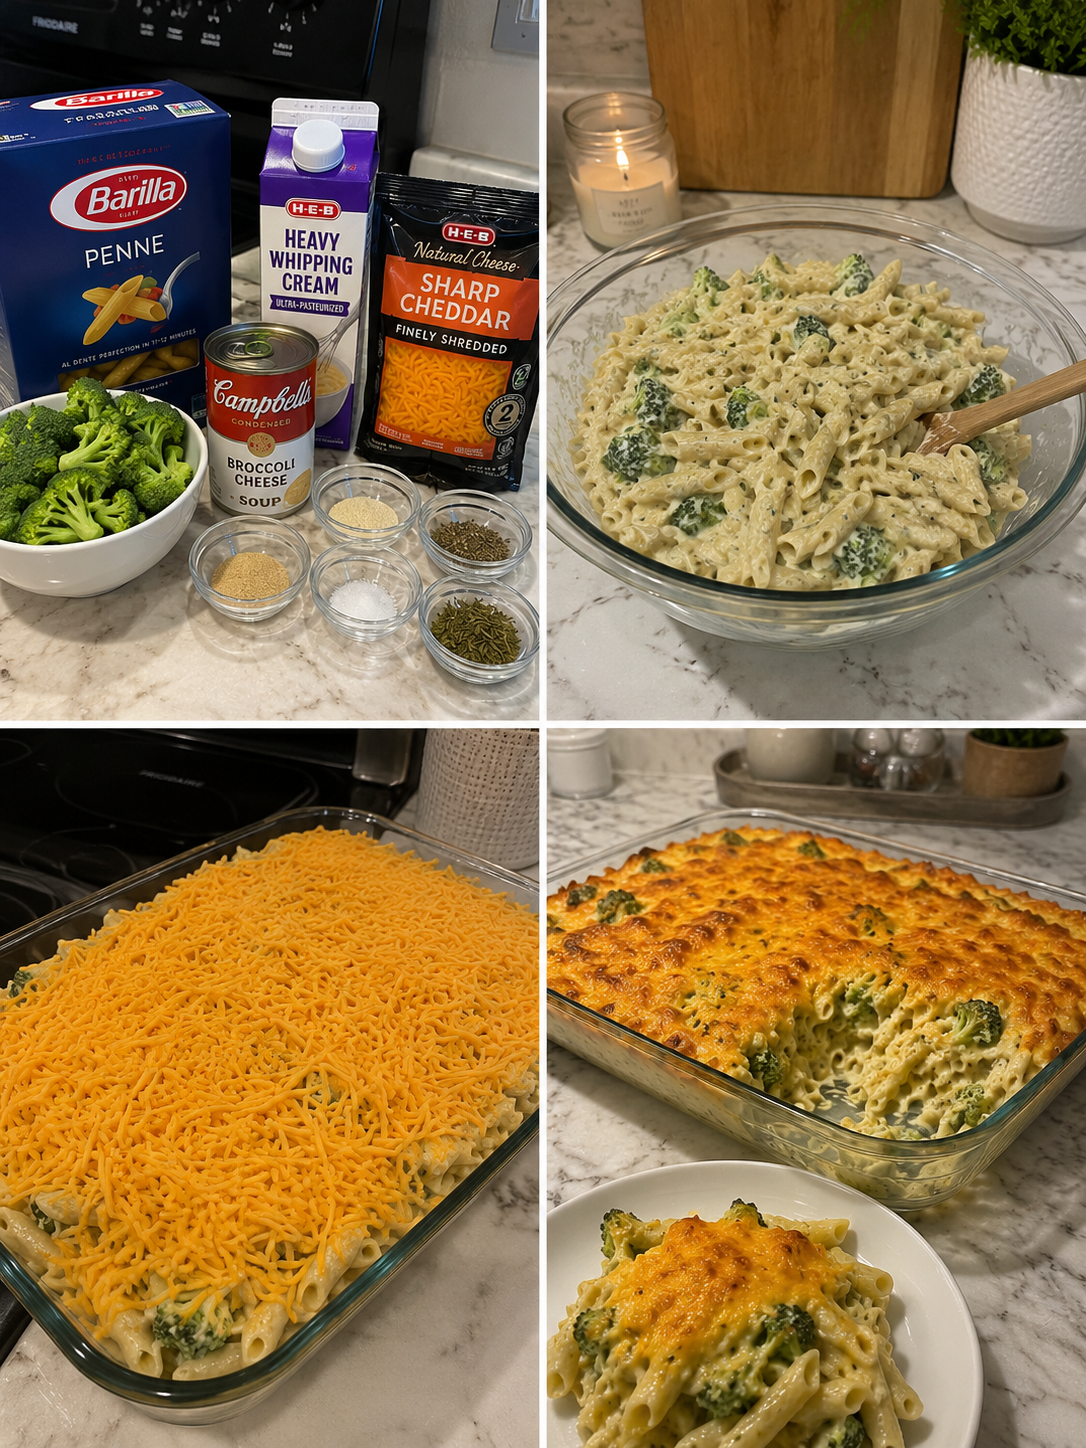
Cheesy Broccoli Penne Bake: A Weeknight Comfort Classic
There’s this thing that happens on Tuesday nights at my house around 5 p.m. My kids start asking what’s for dinner, my energy is half-gone, and I’m standing in front of the fridge wondering if I can pull off something that feels both homemade and actually edible. That’s when I reach for this Cheesy Broccoli Penne Bake.
I stumbled onto this recipe years ago during one of those phases where I was trying to sneak more vegetables into my family’s meals without starting a revolt. I’d made baked pasta dishes before, but something about the combination of tender penne, bright broccoli florets, and that creamy, melty cheese sauce just clicked. It’s the kind of dish that looks fancy enough to serve guests, tastes like a warm hug, and comes together in under an hour from start to finish.
The beauty of this recipe is that it’s genuinely foolproof. You’re not doing anything complicated here—just cooking pasta, steaming broccoli, making a simple cheese sauce, and letting the oven do the heavy lifting. It’s comfort food that actually feels manageable on a busy night, which is basically my entire cooking philosophy.
This Cheesy Broccoli Penne Bake works for so many situations. Got picky eaters? The cheese and pasta are familiar enough that even skeptical kids usually dig in. Need something to bring to a potluck? It travels beautifully and reheats like a dream. Want to meal prep for the week? Make a couple of these on Sunday and you’ve got dinner sorted. I’ve fed this to my family, my in-laws, my best friend’s crew, and even that one neighbor who’s weirdly critical about food. Everyone comes back for seconds.
If you’re looking for more everyday recipes like this, follow me on HaileeRecipes on Pinterest for tons of cozy, real-life dishes that actually work.
Why You’ll Love This Recipe
Let me break down what makes this dish special, because I think it’s worth understanding before you even start cooking.
- It’s genuinely quick. Thirty minutes of active time, tops. The oven does most of the work while you pour yourself something to drink and maybe sit down for five minutes.
- The texture is perfect. You get creamy sauce, tender pasta, and broccoli that’s cooked through but not mushy. It’s all about balance.
- It’s flexible. Vegetarian as-is, but you can add bacon, sausage, chicken, or ham if you want. I’ll get into all of that later.
- It reheats beautifully. Unlike some baked pasta dishes that dry out, this one stays creamy and delicious the next day.
- Kids actually eat the broccoli. I know, I was shocked too. Something about the cheese sauce makes it irresistible.
- It’s budget-friendly. Pasta, broccoli, cheese, and a little butter and flour. Nothing fancy or expensive here.
Ingredients
- 1 pound penne pasta
- 4 cups fresh broccoli florets (about one large head)
- 4 tablespoons unsalted butter
- 3 tablespoons all-purpose flour
- 2 cups whole milk
- 2 cups sharp cheddar cheese, shredded
- 1 cup gruyere cheese, shredded (or extra cheddar if you prefer)
- 1 teaspoon Dijon mustard
- Salt and black pepper to taste
- 1/2 teaspoon garlic powder
- 1/4 teaspoon red pepper flakes (optional, but I love them)
- 1 cup panko breadcrumbs
- 2 tablespoons melted butter (for the topping)
- 1/2 cup grated Parmesan cheese (for the topping)
- Fresh thyme or parsley for garnish (optional)
Hailee’s Tip: Use sharp cheddar, not mild. The flavor difference is huge, and you’re already making a homemade sauce—might as well make it taste amazing. If gruyere isn’t in your budget, just use extra cheddar. I’ve done it a hundred times.
Hailee’s Tip: Fresh broccoli is ideal here, but frozen works too. If you go frozen, thaw it first and squeeze out any excess moisture so your sauce doesn’t get watery.
Hailee’s Tip: Don’t skip the Dijon mustard. It’s just a teaspoon, but it adds a subtle depth that makes people say “what is that?” in the best way possible.
Optional Add-Ins and Variations
This is where you make the recipe your own. I love the vegetarian version as-is, but here’s what I sometimes throw in when I’m feeling it:
- Crispy bacon: Cook 6-8 strips, crumble it, and mix it into the pasta before baking. Game changer.
- Cooked chicken: Add 2 cups of diced cooked chicken to the pasta mixture. Suddenly it’s a complete protein situation.
- Sausage: Brown 8 ounces of Italian sausage and add it in. The fennel flavor is subtle but delicious.
- Sun-dried tomatoes: Chop up about 1/2 cup and mix them in. Adds a little tang and color.
- Spinach: Wilt 2-3 cups of fresh spinach and fold it into the sauce. Sneaky vegetable boost.
- Caramelized onions: If you have time, make these ahead and layer them in. Fancy, but worth it.
Step-by-Step Method
Step 1: Get your mise en place ready. Preheat your oven to 375 degrees Fahrenheit. Grab a 9×13-inch baking dish and lightly butter it. Have your cheese shredded, your broccoli cut into florets, and your milk measured out. I’m serious about this—it makes everything smoother.
Step 2: Cook the pasta. Bring a large pot of salted water to a boil and cook your penne until it’s just shy of al dente. You want it tender but still with a tiny bit of bite, because it’s going to cook a little more in the oven. Drain it well and set it aside in a large bowl.
Step 3: Steam the broccoli. While the pasta’s cooking, steam your broccoli florets for about 4-5 minutes. They should be bright green and just barely tender. You don’t want them soft—they’ll continue cooking in the oven. Drain them well and add them to the bowl with the pasta.
What I messed up the first time: I overcooked the broccoli in the steaming phase. It turned into mush by the time the bake came out of the oven. Now I pull it out when it’s still got a little firmness to it.
Step 4: Make the cheese sauce. This is the heart of the whole dish, so let’s take a second here. In a medium saucepan, melt 4 tablespoons of butter over medium heat. Once it’s melted and foamy, add 3 tablespoons of flour and whisk constantly for about 1 minute. You’re making a roux, and you want to cook out that raw flour taste without browning it.
Step 5: Add the milk slowly. Here’s where patience matters. Gradually pour in your 2 cups of milk while whisking constantly. Start with just a splash to create a smooth paste, then keep whisking and adding milk until it’s all incorporated. This takes about 2-3 minutes. You’re trying to avoid lumps, and whisking is your best friend here.
What I messed up the second time: I poured all the milk in at once and ended up with a lumpy sauce. I had to strain it through a fine-mesh sieve, which was annoying. Now I’m patient about the slow pour.
Step 6: Cook the sauce until it thickens. Keep the heat at medium and whisk frequently. After about 3-4 minutes, the sauce should start to thicken and coat the back of a spoon. You’re looking for a consistency that’s creamy but still pourable.
Step 7: Add the cheese and seasonings. Remove the pan from heat and add your shredded cheddar and gruyere. Stir until completely melted and smooth. Then add the Dijon mustard, garlic powder, salt, pepper, and red pepper flakes if you’re using them. Taste it and adjust the seasoning. This is your moment to make it taste exactly how you want it.
Step 8: Combine everything. Pour the cheese sauce over the pasta and broccoli. Fold it all together gently until every piece of pasta and broccoli is coated. It should look creamy and cohesive.
Step 9: Transfer to the baking dish. Pour the whole mixture into your buttered baking dish and spread it out evenly.
Step 10: Make the topping. In a small bowl, mix together 1 cup of panko breadcrumbs, 2 tablespoons of melted butter, and 1/2 cup of grated Parmesan. Toss it with a fork until it looks like wet sand. This is going to get golden and crispy in the oven, and it’s honestly the best part.
Step 11: Top and bake. Sprinkle the breadcrumb mixture evenly over the pasta. Bake for 25-30 minutes, until the top is golden brown and the edges are bubbling slightly. If your topping isn’t browning enough after 25 minutes, turn on the broiler for the last 2-3 minutes. Watch it closely though—broilers are aggressive.
Step 12: Let it rest. This is important. Let the bake sit for 5 minutes before serving. It helps everything set up a little and makes it easier to scoop without it falling apart.
Common Mistakes to Avoid
I’ve made every mistake in this recipe at least once, so let me save you the trouble.
- Overcooking the pasta initially. Remember, it cooks a bit more in the oven. Aim for just under al dente.
- Overcooking the broccoli. Same logic. You want it bright green and barely tender at the steaming stage.
- Making the sauce too thick or too thin. If it’s too thick, your bake will be gluey. If it’s too thin, it’ll be watery. The consistency should be like heavy cream—pourable but creamy.
- Skipping the resting time. Five minutes might not sound like much, but it makes a real difference in the texture and how well it holds together when you serve it.
- Not seasoning the sauce enough. Taste it before it goes into the baking dish. This is your last chance to adjust.
- Crowding the baking dish. If your pasta mixture is piled too high, the inside won’t heat through properly. Use a 9×13-inch dish, not a smaller one.
My Tested Substitutions
Life happens, and you might not have exactly what the recipe calls for. Here’s what I’ve actually swapped out and what worked:
- Half-and-half instead of milk: Works beautifully. The sauce will be richer, which is honestly great. You might need slightly less of it, so start with 1.5 cups and add more if needed.
- Whole wheat penne: Totally fine. It’s a little nuttier and holds sauce well. No other adjustments needed.
- Different cheeses: Fontina, smoked gouda, or even a mix of sharp cheddar and white cheddar all work. Avoid super soft cheeses like fresh mozzarella—they don’t melt smoothly into the sauce.
- Panko breadcrumb alternative: Regular breadcrumbs work, but you might need to add a bit more butter so they crisp up. Crushed crackers or even crushed pretzels are fun and delicious.
- Cornstarch instead of flour: If you need to go gluten-free, use cornstarch at a 1:1 ratio. The sauce will be slightly more translucent but taste the same.
How to Customize
This is really your canvas to work with. Here are some ideas for making it feel fresh or tailored to what you have on hand:
- Go Italian: Add fresh basil, sun-dried tomatoes, and a splash of balsamic vinegar. Use a mix of mozzarella and Parmesan.
- Go smoky: Use smoked gouda instead of gruyere, add crispy bacon, and a pinch of smoked paprika.
- Go creamy and luxe: Add a splash of white wine to the sauce, use all gruyere, and top with fresh thyme.
- Go spicy: Increase the red pepper flakes, add a pinch of cayenne to the sauce, and use a sharp white cheddar.
- Go garden-forward: Add spinach, mushrooms, and roasted garlic. Use a lighter hand with the cheese and add a splash of lemon juice.
Serving Ideas
The Cheesy Broccoli Penne Bake is honestly great on its own, but here’s how I like to serve it:
- With a simple green salad: Dress mixed greens with a bright vinaigrette. The acidity cuts through the richness of the bake beautifully.
- With garlic bread: Slice a baguette lengthwise, brush with butter mixed with minced garlic, and toast it. Perfect for soaking up extra sauce.
- With roasted vegetables: Roast some cherry tomatoes, zucchini, or bell peppers on the side. Adds color and nutrition without feeling like a chore.
- With a simple tomato soup: There’s something about pairing this creamy pasta with a light tomato soup that just works.
- On its own: Honestly, it’s hearty enough to be a complete meal. Scoop it into a bowl and call it dinner.
Meal Prep and Storage
This is where the Cheesy Broccoli Penne Bake really shines for busy people like us.
Make-ahead: You can assemble this entirely the night before. Just prepare everything through step 9, cover the baking dish with plastic wrap, and refrigerate. When you’re ready to bake, let it sit on the counter for 15 minutes, add the topping, and bake for 30-35 minutes (it’ll take a few extra minutes since it’s starting cold).
Storage: Leftovers keep in an airtight container in the fridge for up to 4 days. Honestly, I’ve kept it for 5 and it was still fine, but I like to be conservative.
Reheating: This is the beauty part. Reheat in a 350-degree oven for about 15-20 minutes, covered with foil. You can also microwave individual portions for 2-3 minutes, though the topping won’t be quite as crispy. If you want that crispy topping back, pop it under the broiler for a minute after microwaving.
Freezing: Yes, you can freeze this. Assemble it completely, let it cool, cover it tightly with plastic wrap and then foil, and freeze for up to 2 months. Bake from frozen at 375 degrees for 45-50 minutes, covered. Add the topping for the last 15 minutes of baking.
Nutritional Breakdown
Here’s what you’re looking at per serving (makes 6 generous servings):
- Calories: approximately 520
- Protein: 22g
- Carbohydrates: 48g
- Fat: 26g
- Fiber: 3g
- Sodium: 580mg
These numbers can vary depending on your specific ingredients and portion sizes, but this gives you a ballpark idea. The protein comes from the cheese and pasta, the