Delicious Hawaiian Poke Cake Recipe
Delicious Hawaiian Poke Cake Recipe
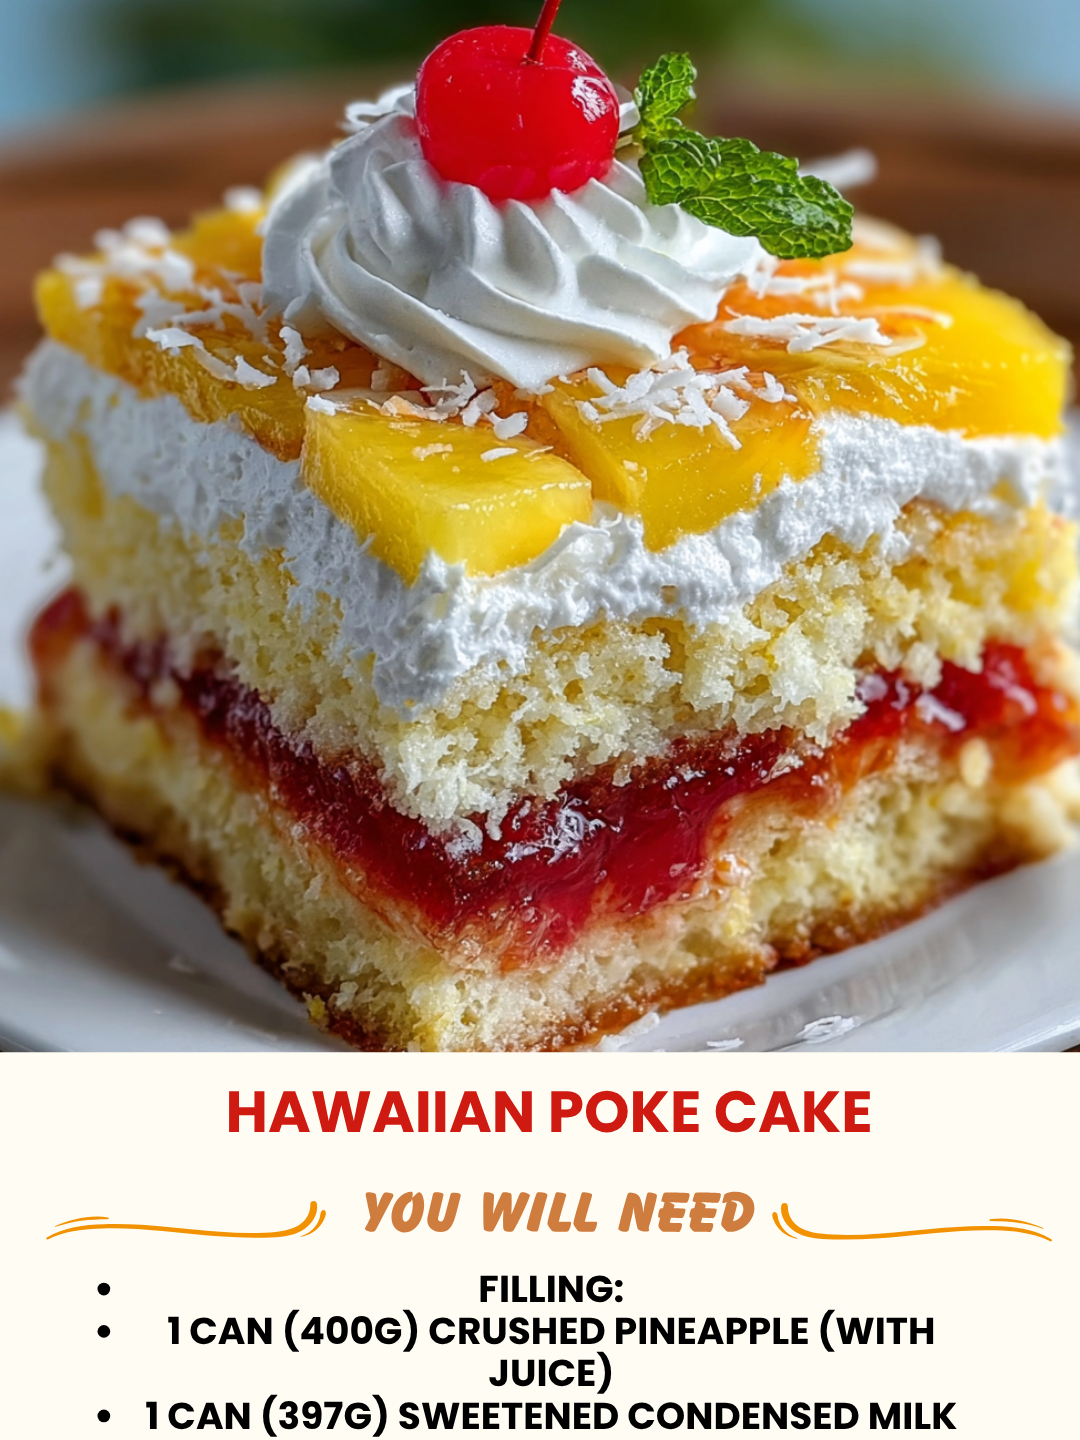
Delicious Hawaiian Poke Cake Recipe: A Tropical Escape in Every Bite
I first made a Hawaiian poke cake on a gray February afternoon when I was absolutely craving sunshine and warmth. You know that feeling—when the weather outside is miserable and you just want to transport yourself somewhere tropical? That’s exactly what happened to me. I was scrolling through old vacation photos, missing Hawaii like crazy, and I thought: why not bring that island vibe into my kitchen?
So I grabbed a box of vanilla cake mix (because let’s be real, sometimes shortcuts are our friends), poked it full of holes, and drowned it in a mixture of pineapple juice and coconut cream. The result? Pure magic. The cake soaked up all those tropical flavors, became incredibly moist and tender, and when I topped it with whipped cream and fresh pineapple, my whole family gathered around like I’d just announced a surprise trip to Maui.
Here’s the beautiful thing about this delicious Hawaiian poke cake recipe: it’s not complicated, it doesn’t require fancy ingredients you can’t pronounce, and it genuinely tastes like a vacation in dessert form. Whether you’re throwing together a weeknight treat, need something impressive for a potluck, or just want to feel a little bit closer to the islands, this cake delivers every single time.
I’ve tested this recipe dozens of times now—sometimes with homemade cake, sometimes with box mix, sometimes with fresh pineapple, sometimes with canned. Every version has been delicious. It’s forgiving, it’s flexible, and honestly, it’s the kind of dessert that makes people think you spent way more time in the kitchen than you actually did. And I’m all about that kind of magic.
If you love tropical flavors and easy desserts that feel a little bit fancy, you’re going to absolutely love this one. Follow me on HaileeRecipes on Pinterest for more cozy recipes like this that bring comfort and joy to your table.
Why You’ll Love This Recipe
Let me break down exactly why this recipe has become such a staple in my kitchen and why I think you’re going to love it too.
- It’s incredibly moist. The poke method means your cake stays tender and juicy, not dry and crumbly. That’s honestly half the battle with homemade cakes, and this recipe nails it.
- Tropical flavors without the complicated prep. You get that authentic Hawaiian taste—pineapple, coconut, that island essence—without needing to source a bunch of specialty ingredients.
- It’s flexible and forgiving. Want to use a box mix? Go for it. Want to bake from scratch? Perfect. Need to swap out an ingredient? This cake rolls with it.
- It feeds a crowd. This makes enough to serve 12 to 16 people, depending on how generous you’re feeling, which makes it perfect for gatherings.
- It looks way more impressive than the effort it requires. Seriously, people think you spent hours on this. You didn’t. You spent maybe 20 minutes of actual hands-on time.
- The flavor gets better over time. Unlike some cakes that dry out after a day, this one actually tastes even better the next day because the liquid continues to soak in.
Ingredients
- 1 box vanilla cake mix (or 2 cups all-purpose flour, 1.5 teaspoons baking powder, 0.5 teaspoon salt, 1 cup sugar, 0.5 cup butter softened, 2 eggs, 0.75 cup whole milk, 1 teaspoon vanilla extract if making from scratch)
- 1 can (20 ounces) crushed pineapple in juice, undrained
- 1 can (14 ounces) sweetened coconut milk
- 0.5 cup pineapple juice (from the can or store-bought)
- 2 cups heavy whipping cream
- 0.25 cup powdered sugar
- 0.5 teaspoon vanilla extract
- 1 cup fresh pineapple chunks or rings for topping
- 0.5 cup toasted coconut flakes for garnish
- Fresh mint leaves (optional but lovely)
Hailee’s Tip: Don’t skip the toasted coconut flakes. They add this beautiful nutty depth that really elevates the whole thing. You can toast them yourself in a dry skillet for about 3 minutes, or grab the pre-toasted ones at the store if you’re in a hurry.
Hailee’s Tip: Make sure you’re using sweetened coconut milk, not the unsweetened kind. The sweetness is part of what makes this cake so delicious. If you only have unsweetened, add an extra tablespoon of powdered sugar to your whipped cream topping.
Optional Add-Ins and Variations
This is where you get to make this recipe your own. I love the flexibility here.
- Rum or coconut rum: Add 2 tablespoons to the pineapple juice mixture for an adult version. It’s subtle but adds such a nice depth.
- Macadamia nuts: Sprinkle chopped macadamia nuts on top for crunch and authenticity. They’re expensive but so good.
- Lime zest: Add a teaspoon of lime zest to the whipped cream topping for a citrusy kick.
- Maraschino cherries: If you want that classic retro Hawaiian vibe, top with a few maraschino cherries. I’m not judging—they’re fun.
- Coconut extract: Add 0.25 teaspoon to your whipped cream for extra coconut flavor.
Step-by-Step Method
Step 1: Bake Your Cake
Follow the directions on your cake mix box, or if you’re making from scratch, cream together the butter and sugar, beat in the eggs, then alternate adding the dry ingredients and milk. Pour into a greased 9×13 inch baking pan and bake at 350°F for about 30 minutes, or until a toothpick comes out clean. Let it cool for about 10 minutes.
Hailee’s Note: I use a box mix about 70% of the time because it’s reliable and delicious, and I don’t feel bad about it. Baking is about joy, not perfectionism.
Step 2: Make the Poke Liquid
While your cake is cooling slightly, whisk together the undrained crushed pineapple, coconut milk, and pineapple juice in a bowl. This is your magic potion. Don’t skip whisking—you want it well combined so the flavors are balanced.
Step 3: Poke and Soak
Here’s where the poke happens. Using a fork or a wooden skewer, poke holes all over the warm (not hot) cake. I’m talking hundreds of little holes. Get into the corners, get the center, really go for it. Then slowly pour your pineapple mixture over the entire cake, letting it soak in as you go. This is the most satisfying part, honestly. You can literally watch the cake absorbing all that tropical goodness.
Hailee’s Note: The cake should be warm but not piping hot when you poke it. If it’s too hot, the liquid will run right off. If it’s completely cool, it won’t absorb as well. That sweet spot is about 10 minutes after it comes out of the oven.
Step 4: Chill
Let the cake cool completely, then refrigerate for at least 2 hours (or overnight if you can wait that long). This gives everything time to set and the flavors to meld together beautifully.
Step 5: Make Your Whipped Cream Topping
In a chilled bowl, whip the heavy cream with powdered sugar and vanilla extract until you get stiff peaks. Don’t overbeat or you’ll end up with butter, which I’ve definitely done before and it’s not fun.
Step 6: Assemble and Serve
Spread or dollop the whipped cream over your chilled cake. Top with fresh pineapple chunks, toasted coconut flakes, and fresh mint if you’re feeling fancy. Slice and serve cold. Watch people’s faces light up.
Common Mistakes to Avoid
I’ve made pretty much every mistake possible with this cake, so let me save you some grief.
- Poking the cake when it’s too hot: The liquid will slide right off instead of soaking in. Wait those 10 minutes.
- Not poking enough holes: I know it feels aggressive, but you need a lot of holes. The more surface area you create, the more liquid the cake absorbs. Be generous.
- Using unsweetened coconut milk: It changes the flavor profile completely. Stick with sweetened unless you want to add extra sugar.
- Skipping the chill time: I get it, you want to eat it now. But those 2 hours make a huge difference in texture and flavor. The cake firms up, the liquid sets, and everything comes together beautifully.
- Overbeating the whipped cream: Stop when you see stiff peaks forming. Another 30 seconds and you’ve got butter. It happens faster than you think.
- Using canned whipped cream instead of making your own: I’m not a snob about shortcuts, but homemade whipped cream tastes so much better and is literally five minutes of work.
My Tested Substitutions
Here’s what I’ve swapped out over the years, and what actually works.
For the cake itself: I’ve used almond cake mix, coconut cake mix, and even made it from scratch with almond flour. All delicious. The coconut cake mix version is especially good if you want to lean harder into those tropical flavors.
For the liquid: I’ve tried mango juice mixed with coconut milk, and it’s wonderful. I’ve also done half pineapple juice and half coconut cream for a richer version. Both work beautifully.
For the topping: Coconut whipped cream (add 0.5 teaspoon coconut extract to your whipped cream) is incredible. I’ve also done a cream cheese frosting mixed with a little coconut milk, which is heavier but so good.
For the garnish: Candied pineapple, passion fruit curd drizzled on top, toasted macadamia nuts, or even a sprinkle of lime zest. All of these work depending on what you have on hand.
How to Customize
The beauty of this recipe is that it’s genuinely flexible. Here are some directions you can take it.
Make it less sweet: Use unsweetened coconut milk and reduce the powdered sugar in the whipped cream topping to 2 tablespoons. Add a squeeze of fresh lime juice to balance things out.
Make it more decadent: Add rum to the poke liquid, use a chocolate cake mix as your base, and top with chocolate whipped cream instead. It sounds weird, but chocolate and pineapple are actually a beautiful combination.
Make it dairy-free: Use coconut cream instead of heavy cream for your topping, whip it the same way, and add a tablespoon of powdered sugar to compensate for the lack of sweetness.
Make it gluten-free: Swap the cake mix for a gluten-free version, and everything else stays exactly the same. I’ve done this multiple times and nobody can tell the difference.
Serving Ideas
This cake is delicious on its own, but here are some ways I like to serve it.
- As a simple dessert: Slice, serve cold, done. This is my go-to on a regular Tuesday night.
- At a potluck: Cut into squares, arrange on a platter, and watch it disappear. People always ask for the recipe.
- For a tropical-themed party: Serve with mai tais or piña coladas and some island music. You’re basically on vacation now.
- With fresh fruit on the side: A little fruit salad with mango, papaya, and passion fruit makes it feel even more special.
- For brunch: I know cake for brunch sounds indulgent, but this one is light enough that it works. Serve with coffee and fresh berries.
Meal Prep and Storage
One of my favorite things about this cake is that it actually gets better over time.
Make-ahead: You can make this cake up to 3 days ahead. In fact, I recommend it. Cover it with plastic wrap and keep it in the refrigerator. The flavors meld together beautifully, and the cake becomes even more moist.
Storage: Keep it covered in the fridge for up to 4 days. The whipped cream topping will soften over time, which is totally fine. If you prefer it firmer, add the topping the day you’re serving.
Freezing: You can freeze the cake without the topping for up to 2 months. Thaw it in the refrigerator overnight, then add your whipped cream and toppings when you’re ready to serve.
Serving from the fridge: This cake is best served cold, so don’t pull it out to sit at room temperature. Slice it straight from the fridge and enjoy it chilled.
Nutritional Breakdown
Here’s what you’re looking at per serving (based on 12 servings):
- Calories: approximately 380
- Protein: 3g
- Carbohydrates: 48g
- Fat: 18g
- Fiber: 1g
- Sugar: 38g
Note: These are estimates based on standard ingredients. Actual nutrition will vary depending on specific brands and any substitutions you make.
Final Thoughts
This delicious Hawaiian poke cake recipe has genuinely become one of my favorite things to make. It’s the dessert I reach for when I want to feel a little bit transported, when I need to impress people without a lot of fuss, or when I just want something that tastes like vacation.
What I love most about it is that it’s so forgiving. You can use a box mix or bake from scratch. You can swap ingredients based on what you have. You can make it ahead. You can customize it to your taste. It’s a recipe that works with your life, not against it.
I hope you make this cake soon, and I hope it brings you the same joy it brings me every single time. If you do, I’d love to hear about it. Come find me on Pinterest and let me know how it turned out. Until then, happy baking, friend.
—
Recipe Card
Delicious Hawaiian Poke Cake Recipe
Ingredients
Method
- Bake the cake according to package directions in a greased 9x13 inch pan. Let cool for 10 minutes.
- Whisk together undrained crushed pineapple, coconut milk, and pineapple juice in a bowl.
- Using a fork or wooden skewer, poke holes all over the warm cake.
- Slowly pour the pineapple mixture over the entire cake, allowing it to soak in.
- Cool the cake completely, then refrigerate for at least 2 hours or overnight.
- Whip heavy cream with powdered sugar and vanilla extract until stiff peaks form.
- Spread whipped cream over chilled cake and top with fresh pineapple, toasted coconut flakes, and mint.
- Slice and serve cold. **Nutrition** (per serving, based on 12