Sweet Glazed Strawberry Pound Cake
Sweet Glazed Strawberry Pound Cake
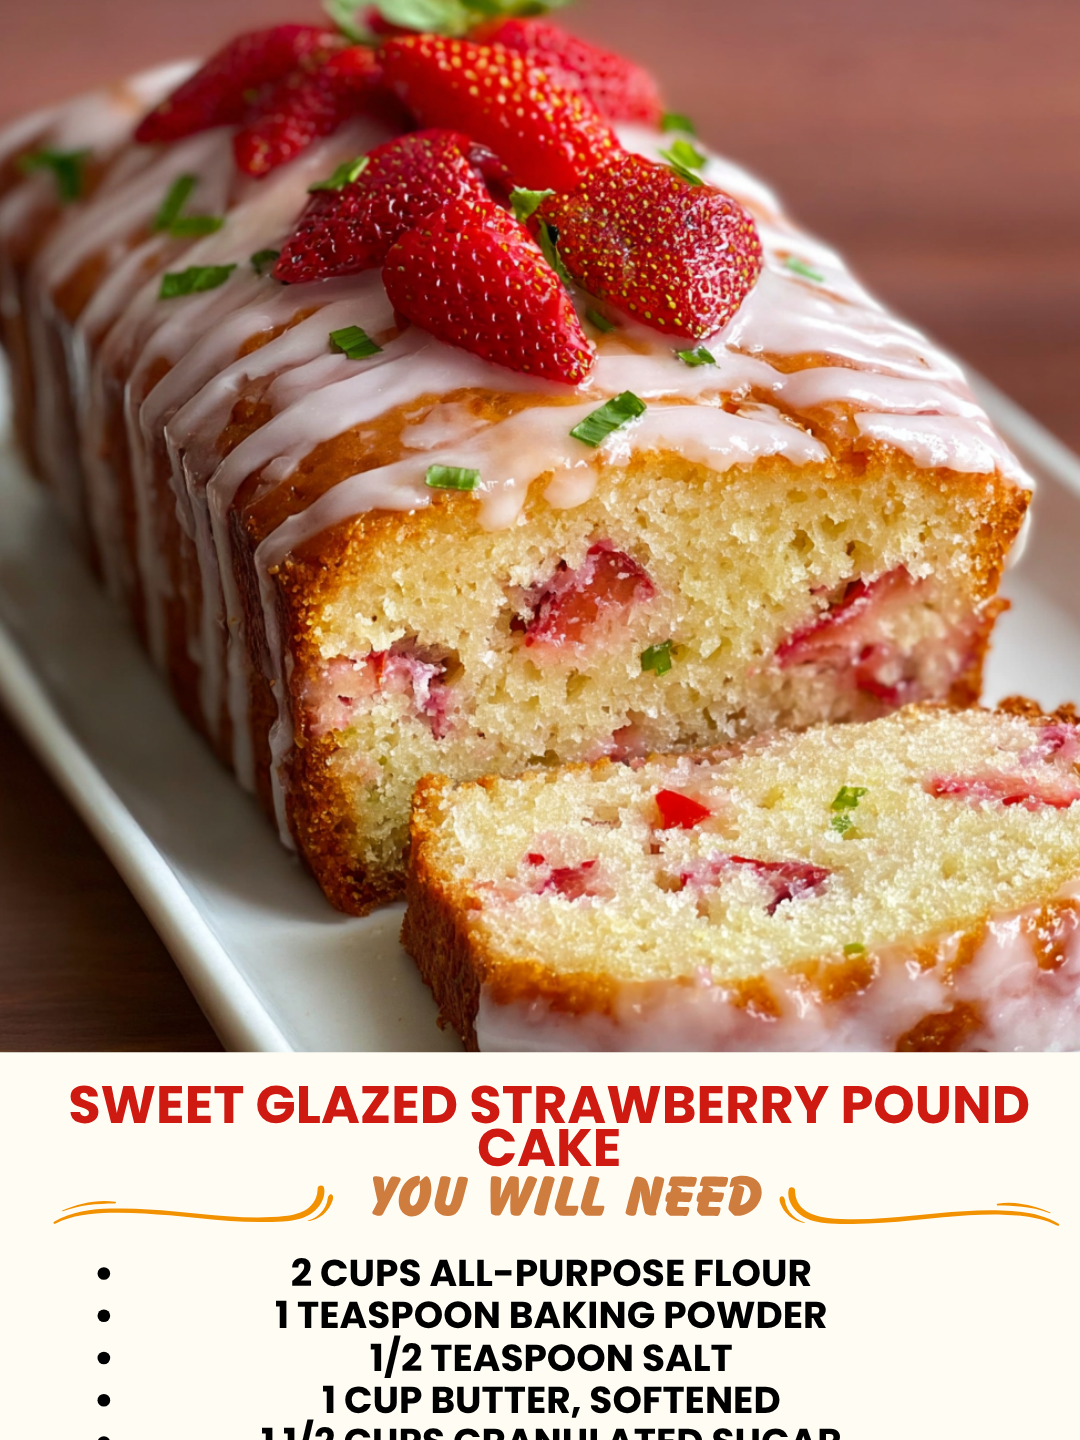
Sweet Glazed Strawberry Pound Cake
I made this cake on a Tuesday afternoon when I was craving something that felt both indulgent and comforting, but I didn’t want to spend three hours in the kitchen. You know that feeling? When you want homemade goodness without the fuss. I had a container of fresh strawberries sitting on my counter, and honestly, they were calling my name. So I started playing around with my go-to pound cake base—the one that’s buttery, dense, and impossible to mess up—and folded in some strawberry puree with a simple glaze on top.
The result? A cake that tastes like summer but feels like a warm hug. It’s tender on the inside, slightly golden on the outside, and that strawberry glaze is the kind of thing that makes people ask for the recipe before they even finish their first slice. I’ve made this Sweet Glazed Strawberry Pound Cake at least a dozen times now, and it hasn’t failed me once.
This recipe is for anyone who wants something special without the stress. It’s forgiving, it’s beautiful, and it genuinely tastes like you spent way more time on it than you actually did. Whether you’re baking for a weekend brunch, a casual dinner party, or just because you deserve a slice of something lovely, this cake delivers every single time.
Follow me on HaileeRecipes on Pinterest for more cozy baking ideas and real-life kitchen stories.
Why You’ll Love This Recipe
Let me be honest: pound cake gets a bad rap sometimes. People think it’s boring or old-fashioned, but when you do it right, it’s absolute magic. This version takes everything I love about a classic pound cake—that dense, buttery crumb—and adds bright strawberry flavor without making it taste artificial or overly sweet.
The glaze is where the real joy lives, though. It’s thin enough to drip down the sides in those gorgeous little rivulets, but thick enough to actually stick around and taste like something. No weird powdered sugar dust that disappears on your tongue. This is the kind of glaze that makes people pause mid-bite.
What really gets me is how approachable this is. You’re not tempering chocolate, you’re not doing fancy techniques, and you don’t need special equipment beyond what’s already in your kitchen. Just a mixing bowl, a cake pan, and about an hour of your time. The payoff is a cake that looks bakery-quality and tastes even better.
Ingredients
- 2 cups all-purpose flour
- 1 teaspoon baking powder
- 1/2 teaspoon salt
- 1 cup (2 sticks) unsalted butter, softened — room temperature is key here
- 1 1/4 cups granulated sugar
- 4 large eggs — also room temperature
- 1 teaspoon vanilla extract
- 1/2 cup fresh strawberries, pureed — about 6-8 medium berries
- 1/4 cup sour cream — keeps it moist
Hailee’s Tip: Don’t skip the sour cream. I know it sounds weird, but it’s what keeps this cake tender and prevents it from being dry. Trust me on this one.
For the Glaze
- 1 1/2 cups powdered sugar
- 3-4 tablespoons fresh strawberry puree — same as what goes in the cake
- 1 tablespoon heavy cream or milk — for consistency
- Pinch of salt
Hailee’s Tip: If your glaze is too thick, add milk one teaspoon at a time. If it’s too thin, add more powdered sugar. You want it to flow but not be runny.
Optional Add-Ins and Variations
This is where you get to make the cake your own. I love the simplicity of the classic version, but I also understand that sometimes you want to play around.
- Fresh strawberry chunks: Fold in about 1/2 cup of diced strawberries right before pouring the batter into the pan. They’ll create little pockets of fruit throughout.
- Lemon zest: Add 1 teaspoon of lemon zest to brighten things up. It pairs beautifully with strawberry.
- A splash of strawberry liqueur: If you’re feeling fancy, add 2 tablespoons of Chambord or another strawberry liqueur to the batter. It adds depth without making the cake taste boozy.
- Almond extract: Replace half the vanilla with almond extract for a different flavor profile. Use 1/2 teaspoon of each.
- White chocolate chips: Scatter about 1/3 cup of white chocolate chips on top before baking. They’ll melt slightly and create little pockets of sweetness.
Step-by-Step Method
Step 1: Prep Your Pan and Oven
Preheat your oven to 325 degrees Fahrenheit. This is important—pound cake likes a gentler heat. Line a loaf pan with parchment paper or grease it really well. I use both, honestly, because I’m paranoid about sticking. Let the pan sit in the oven while it preheats so it’s nice and warm.
Step 2: Make Your Strawberry Puree
Blend your fresh strawberries until completely smooth. You can use a blender, a food processor, or honestly, just mash them really well with a fork if you’re feeling rustic. Strain through a fine-mesh sieve if you want to remove the seeds, but I usually skip this step. Press down to get all the juice out. You should have about 1/2 cup of puree total (a little more is fine).
Hailee’s Note: If you’re using frozen strawberries, thaw them completely and drain any excess liquid. The moisture content matters here.
Step 3: Combine Dry Ingredients
In a medium bowl, whisk together flour, baking powder, and salt. Set aside. This step takes literally two minutes, but it prevents lumps and ensures everything is evenly distributed.
Step 4: Cream Butter and Sugar
In a large bowl, beat the softened butter and sugar together for about 3-4 minutes. You want this to be light, fluffy, and pale. This is where the air gets incorporated, which helps the cake rise and stay tender. Don’t rush this part.
What I Messed Up: The first time I made this, I didn’t cream long enough and ended up with a dense, gummy cake. Now I set a timer and actually wait. It makes a huge difference.
Step 5: Add Eggs One at a Time
Add your eggs one at a time, beating well after each addition. This takes about a minute per egg. Each one needs to be fully incorporated before you add the next. If the mixture looks slightly curdled, don’t panic—it’s normal. Just keep mixing.
Step 6: Add Vanilla
Pour in the vanilla extract and mix until combined.
Step 7: Alternate Dry Ingredients and Sour Cream
Here’s where it gets interesting. Add the dry ingredients in three parts, alternating with the sour cream. So: dry, sour cream, dry, sour cream, dry. Mix on low speed until just combined after each addition. Don’t overmix—you want the batter to come together, not be beaten to death.
Step 8: Fold in Strawberry Puree
Gently fold in your strawberry puree using a spatula. Do this carefully so you don’t deflate all the air you just worked so hard to incorporate. You want some swirls of pink throughout the batter.
Step 9: Pour and Bake
Pour the batter into your prepared pan and smooth the top with a spatula. Bake at 325 degrees for 50-60 minutes. The cake is done when a toothpick inserted in the center comes out with just a few moist crumbs—not wet batter, but not completely dry either. Every oven is different, so start checking at the 45-minute mark.
What I Messed Up: I once baked this at 350 degrees because I wasn’t paying attention, and the outside got too brown before the inside was done. Stick to 325. It’s worth the extra time.
Step 10: Cool
Let the cake cool in the pan for about 15 minutes, then turn it out onto a wire rack to cool completely. This usually takes about an hour. Don’t rush this—warm cake is fragile and the glaze won’t set properly.
Step 11: Make the Glaze
While the cake cools, whisk together powdered sugar, strawberry puree, heavy cream, and salt. Whisk until smooth. If it’s too thick, add cream one teaspoon at a time. If it’s too thin, add more powdered sugar. You want it to be pourable but thick enough to coat the back of a spoon.
Step 12: Glaze and Set
Once the cake is completely cool, pour the glaze over the top and let it drip down the sides naturally. Some people like to spread it, but I love the organic look of letting gravity do the work. Let it set for about 30 minutes before slicing.
Common Mistakes to Avoid
Using Cold Butter and Eggs
This is the number one reason cakes come out dense. Cold ingredients don’t incorporate properly. Leave your butter and eggs out for at least an hour before baking, or pop them in a warm water bath for 10 minutes.
Opening the Oven Door Too Much
I get it—you want to check on your cake. But every time you open that door, you’re releasing heat and disrupting the baking process. Check once at the 45-minute mark, then leave it alone.
Overmixing the Batter
Once you add the dry ingredients, mix just until combined. Overmixing develops gluten, which makes the cake tough. You want tender, not chewy.
Skipping the Sour Cream
I know I mentioned this already, but it’s important enough to repeat. That sour cream is what keeps this cake moist and tender. Don’t substitute it with Greek yogurt or anything else—just use regular sour cream.
Baking at the Wrong Temperature
325 degrees is specific for a reason. Higher heat will brown the outside before the inside is done. Lower heat will bake it too slowly and dry it out. Invest in an oven thermometer if you’re not sure yours is accurate.
My Tested Substitutions
Gluten-Free Flour
Use a 1:1 gluten-free flour blend. The texture will be slightly different—a bit more crumbly—but it still works. You might need to add an extra tablespoon of sour cream if the batter seems too dry.
Dairy-Free Butter
I’ve used dairy-free butter with good results. Make sure it’s a baking-friendly brand with a high fat content. Avoid the super light versions.
Greek Yogurt Instead of Sour Cream
Honestly? I wouldn’t recommend this. Greek yogurt is tangier and thinner, and it changes the texture. If you absolutely have to, use the same amount but strain it first to remove excess liquid.
Frozen Strawberries
Thaw completely and drain well. They work fine, though fresh always tastes better. The batter might be slightly wetter, so you may need to add an extra tablespoon of flour.
Almond Flour Addition
You can replace 1/4 cup of all-purpose flour with almond flour for a slightly different flavor and texture. The cake will be a bit more tender but also slightly more crumbly. It’s delicious, actually.
How to Customize
The beauty of this recipe is that it’s a great base for experimenting. Want to make it your own? Here are some ideas I’ve tried and loved.
Raspberry Version
Swap the strawberries for raspberries. Use the same amount of puree. The result is slightly more tart and equally delicious.
Strawberry-Rhubarb
Use 1/4 cup strawberry puree and 1/4 cup cooked rhubarb puree. It’s more complex and sophisticated.
Chocolate-Dipped Version
Make the cake as written, but skip the glaze. Instead, melt 1 cup of dark chocolate with 1 tablespoon of coconut oil and dip the top half of the cake in it. Let it set on parchment paper.
Mini Loaves
Divide the batter among 4 mini loaf pans and bake for 35-40 minutes. Perfect for gifting or portion control.
Serving Ideas
This cake is lovely on its own, but here are some ways I like to serve it.
- With whipped cream: A dollop of fresh whipped cream on the side is always welcome.
- With fresh berries: Serve a slice with a small handful of fresh strawberries or mixed berries on the plate.
- With ice cream: Vanilla or strawberry ice cream is incredible with a warm slice.
- For breakfast: Yes, I eat this for breakfast sometimes. No judgment here.
- With tea or coffee: This is the perfect afternoon cake—elegant enough for company but cozy enough for a solo moment.
- As a dessert: Serve after dinner with a glass of something sparkling.
Meal Prep and Storage
Room Temperature
The cake keeps beautifully on the counter for up to 3 days, covered loosely with plastic wrap or in a cake keeper. The glaze will stay set and the cake will stay moist.
Refrigerator
Store in an airtight container for up to 5 days. It actually tastes better after a day or two, once the flavors have melded together. Let it come to room temperature before serving if you prefer.
Freezer
Wrap the cooled, glazed cake tightly in plastic wrap and aluminum foil. Freeze for up to 3 months. Thaw at room temperature for about 2 hours before serving. It thaws beautifully and tastes almost as fresh as the day you made it.
Make-Ahead Tip
You can make the batter up to 4 hours ahead and keep it in the fridge. Just bring it to room temperature for about 30 minutes before baking. The glaze can be made a few hours ahead and stored in an airtight container at room temperature.
Nutritional Breakdown
Here’s what you’re looking at per slice (assuming 10 slices):
- Calories: 385
- Protein: 4g
- Carbohydrates: 48g
- Fat: 20g
- Fiber: 0.5g
- Sugar: 35g
Note: These are estimates based on standard ingredients. Actual values may vary depending on specific brands and how you measure.
Final Thoughts
I genuinely love this cake. There’s something about the combination of buttery pound cake, bright strawberry flavor, and that simple glaze that just makes me happy. It’s the kind of recipe that feels special without requiring you to be a pastry chef. It’s forgiving, it’s beautiful, and it tastes like you care—which, honestly, is the whole point of baking for people you love.
The best part? Once you make this once, you’ll feel confident making it again and again. You’ll start playing with variations, adding your