Snack Bag Desserts & Meals – Sweet Bites Inside
Snack Bag Desserts & Meals – Sweet Bites Inside
I’m so excited to share this collection of fun snack bag desserts and meals with you because honestly, they’ve become my go-to whenever I need something quick, clever, and totally craveable. There’s something magical about taking store-bought snacks and transforming them into actual desserts and full meals that feel homemade and special. These recipes prove that you don’t need hours in the kitchen to create something your family will actually ask for again and again.
What I love most about these snack bag creations is how they solve real problems in our busy lives. Whether you’re packing lunch for school, need a last-minute dessert for a gathering, or just want to shake up your snack routine, these recipes deliver. They’re portable, they’re fun to make together with kids, and they use ingredients you probably already have on hand. Plus, they’re the kind of recipes that make you look way more creative in the kitchen than you actually have to be.
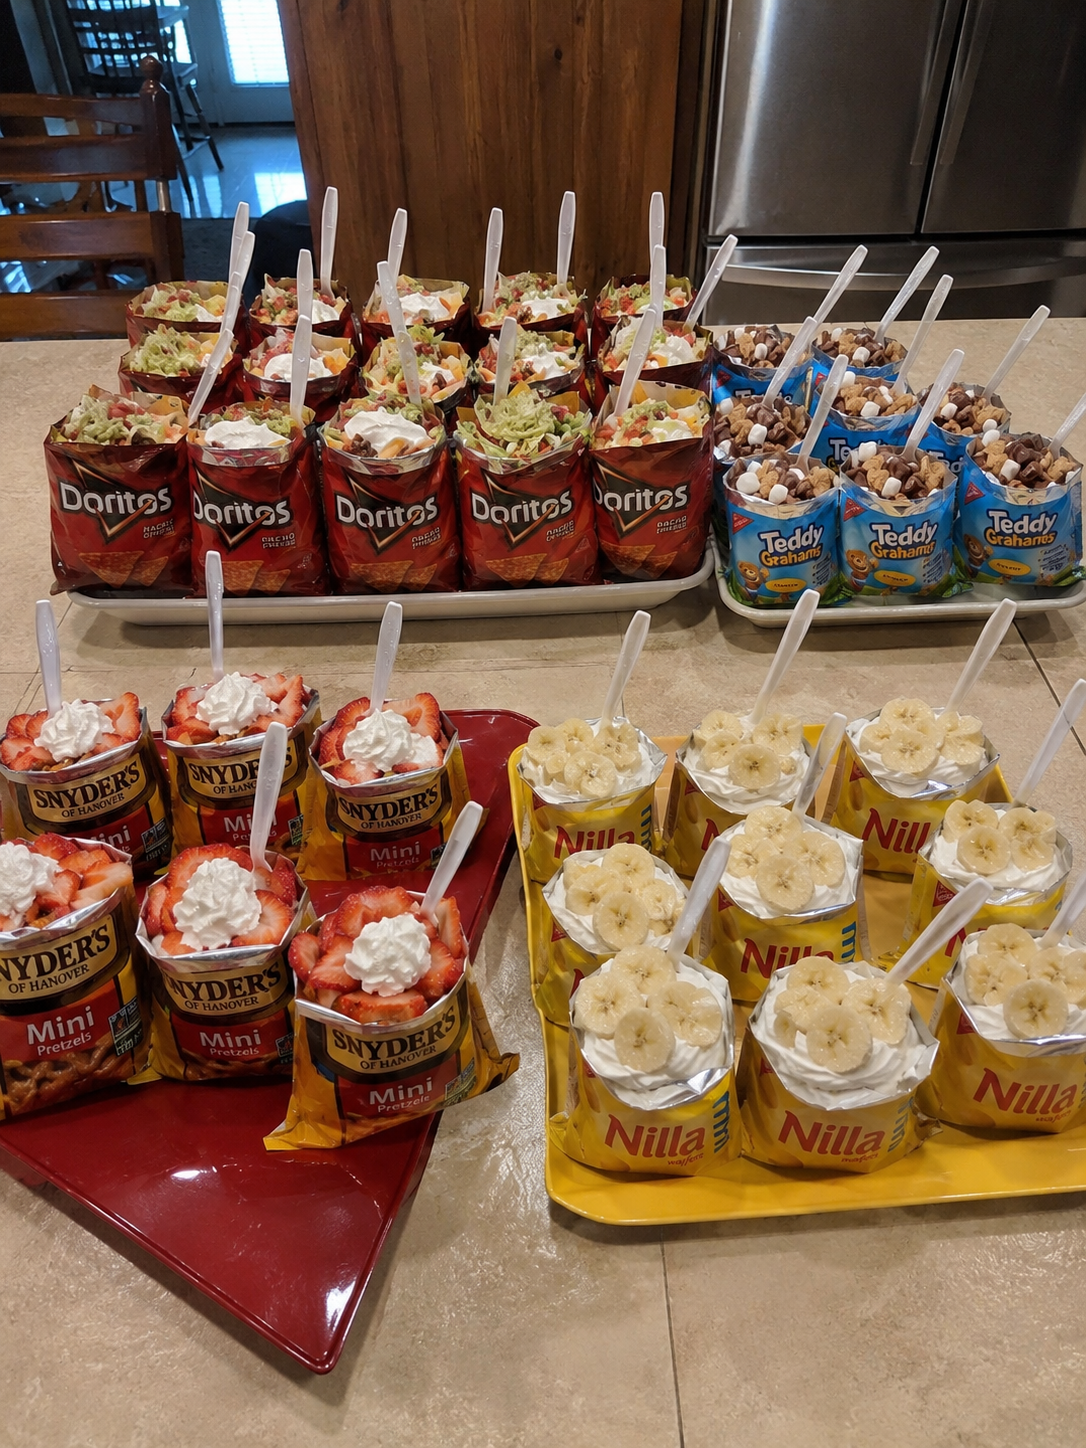
I’ve tested each of these combinations because I genuinely believe they’re worth saving and making again. From the genius simplicity of Doritos Walking Tacos to the adorable charm of Teddy Grahams Trail Mix Snack Bags, you’re going to find yourself bookmarking these. Follow me on HaileeRecipes on Pinterest for more ideas like these that make everyday eating feel a little more fun and a lot less stressful.
1. Doritos Walking Tacos
Walking tacos are a nostalgic snack that transforms a bag of Doritos into an edible container for seasoned ground beef and classic taco toppings. The combination of crunchy, flavor-packed chips with warm, savory meat, melted cheese, and fresh garnishes creates an irresistible texture contrast and satisfying meal. The beauty of this recipe is that you eat directly from the bag, making it perfect for picnics, tailgates, camping trips, or casual family dinners. It’s messy, fun, and requires minimal cleanup while delivering maximum flavor and nostalgia.
Why You’ll Love It
- Requires minimal dishes and cleanup since you eat straight from the bag.
- Customizable for each person’s preferences with a variety of toppings.
- Perfect for outdoor events, parties, and gatherings where convenience matters.
Ingredients
- 1 pound ground beef
- 1 packet taco seasoning
- 1/2 cup water
- 1 large bag Doritos (or individual bags)
- 1 cup shredded cheddar cheese
- 1/2 cup diced tomatoes
- 1/2 cup shredded lettuce
- 1/4 cup sour cream
- 2 tablespoons salsa
How To Make It
- Brown the ground beef in a large skillet over medium-high heat, breaking it into small pieces as it cooks, approximately 5 to 7 minutes until no pink remains.
- Drain excess fat from the beef and stir in the taco seasoning packet and water according to package directions.
- Simmer the seasoned beef for 2 to 3 minutes until the sauce thickens slightly.
- Open a bag of Doritos and crush the chips slightly while still in the bag to create smaller pieces and space for toppings.
- Carefully pour the warm seasoned beef directly into the Doritos bag.
- Top with shredded cheese, diced tomatoes, lettuce, a dollop of sour cream, and salsa.
- Shake the bag gently to combine all ingredients and distribute toppings evenly.
- Grab a fork and eat directly from the bag, enjoying the chip-to-topping ratio with each bite.
Variations And Substitutions
Use ground turkey or seasoned shredded chicken for a lighter option. Swap regular Doritos for Nacho Cheese, Cool Ranch, or Flamin’ Hot varieties depending on your spice preference. Add black beans, corn, jalapeños, or guacamole for extra texture and flavor. For a vegetarian version, substitute the ground beef with seasoned black beans or lentils. Use individual snack-size bags for portion control at parties, or prepare the meat ahead and assemble bags on demand for maximum freshness.
Make-Ahead, Storage, And Serving Tips
Prepare the seasoned ground beef up to 2 days in advance and reheat before serving. Keep toppings prepped in separate containers for quick assembly. Do not combine ingredients until just before eating to maintain chip crunchiness. Serve the meat warm and toppings cold for the best texture contrast. Walking tacos are best enjoyed immediately after assembly while the chips are still crispy. For parties, set up a taco bar with the meat, chips, and various toppings so guests can customize their own bags.
2. Teddy Grahams Trail Mix Snack Bags
This sweet and salty Teddy Grahams trail mix combines the nostalgic taste of honey graham cookies with chocolate chips, nuts, and dried fruit for a perfectly balanced snack. The mix of textures—from crunchy to chewy—keeps each bite interesting, while the natural sweetness of the Teddy Grahams means you don’t need added sugar. It’s ideal for lunchboxes, road trips, hiking adventures, or afternoon energy slumps. This snack works because it delivers protein from the nuts, carbs from the grahams, and just enough chocolate to satisfy sweet cravings without being overwhelming.
Why You’ll Love It
- Ready in minutes with no baking or cooking required.
- Customizable to your taste preferences and dietary needs.
- Perfect portion control when divided into individual snack bags.
Ingredients
- 2 cups Teddy Grahams honey graham cookies
- 1 cup semi-sweet chocolate chips
- 1 cup raw almonds or cashews, roughly chopped
- 3/4 cup dried cranberries or raisins
- 1/2 cup coconut flakes, unsweetened
- 1/4 cup sunflower seeds or pumpkin seeds
- 1/4 teaspoon sea salt
How To Make It
- Pour all ingredients into a large mixing bowl.
- Gently toss everything together until evenly combined, being careful not to crush the Teddy Grahams.
- Divide the mixture into individual snack bags or containers, using about 1/2 cup per bag.
- Seal each bag tightly, pressing out excess air to keep ingredients fresh.
- Label bags with the contents and date if desired.
- Store in a cool, dry place or refrigerator until ready to eat.
Variations And Substitutions
Swap the almonds for pecans, walnuts, or peanuts based on your preferences or allergies. Replace cranberries with dried blueberries, apricots, or banana chips for different fruity notes. Use white chocolate chips instead of semi-sweet for a sweeter version, or add a drizzle of melted dark chocolate before bagging for extra indulgence. For a savory twist, reduce the chocolate chips and add pretzels or cheese crackers. You can also include m&ms, mini marshmallows, or freeze-dried strawberries for variety.
Make-Ahead, Storage, And Serving Tips
This trail mix is best prepared 1 to 2 days ahead, allowing flavors to meld together. Store sealed snack bags in an airtight container at room temperature for up to two weeks, or refrigerate for extended freshness. Keep bags in a cool spot away from direct sunlight and heat to prevent chocolate from melting. For on-the-go convenience, pack individual bags in lunch boxes or backpacks. If the mixture seems dry, add a few more chocolate chips or dried fruit. If chocolate begins to stick, refrigerate bags for 15 minutes before serving.
3. Snyder's Mini Pretzels Strawberry Shortcake Bags
This delightful dessert transforms humble snack bags into an elegant strawberry shortcake experience. Crispy Snyder’s Mini Pretzels provide a salty-sweet contrast to whipped cream and fresh strawberries, creating layers of satisfying texture. The pretzel base adds a sophisticated crunch that traditional shortcake simply cannot match, while remaining light and easy to assemble. Perfect for summer gatherings, picnics, or when you want an impressive dessert that requires minimal baking skills. This recipe works wonderfully because it combines pantry staples with fresh fruit for maximum flavor impact with minimal effort.
Why You’ll Love It
- No baking required—simply assemble fresh ingredients for an instant dessert.
- The salty pretzel base elevates traditional strawberry shortcake with unexpected crunch and sophistication.
- Naturally portable and perfect for serving in individual portions or bags for easy sharing.
Ingredients
- 2 cups Snyder’s Mini Pretzels
- 1 pound fresh strawberries, hulled and sliced
- 3 tablespoons granulated sugar
- 1 cup heavy whipping cream
- 2 tablespoons powdered sugar
- 1 teaspoon vanilla extract
- 2 tablespoons melted butter
- 1 tablespoon honey
How To Make It
- Toss sliced strawberries with granulated sugar in a bowl and let sit for 15 minutes to release their juices.
- In a separate bowl, whip heavy cream with powdered sugar and vanilla extract until stiff peaks form.
- Combine melted butter and honey in a small bowl, then drizzle over the mini pretzels and toss gently to coat.
- Spread half the buttered pretzels into individual serving cups or bags, creating a base layer.
- Layer half the whipped cream over the pretzel base in each serving.
- Add a generous portion of macerated strawberries with their juices on top of the whipped cream.
- Top with remaining whipped cream and finish with a small handful of remaining pretzels for garnish and crunch.
- Serve immediately or chill for up to 2 hours before serving.
Variations And Substitutions
Swap strawberries for fresh raspberries, blueberries, or mixed berries depending on season and preference. Replace heavy cream with whipped coconut cream for a dairy-free option, or use Greek yogurt mixed with honey for a tangier, protein-rich alternative. Experiment with different pretzel varieties like whole grain or honey-roasted for unique flavor profiles. Drizzle with chocolate sauce, caramel, or berry coulis for additional sweetness and elegance.
Make-Ahead, Storage, And Serving Tips
Prepare whipped cream and macerated strawberries separately up to 4 hours ahead, storing both in the refrigerator. Assemble individual servings no more than 2 hours before serving to prevent pretzels from becoming soggy. For the best texture, add the pretzel topping just before serving. Store any leftovers in sealed containers in the refrigerator for up to 1 day, though the pretzels will soften over time. Transport easily by packing components separately and assembling on-site at picnics or outdoor events.
4. Nilla Wafers Banana Pudding Bags
This nostalgic Nilla Wafers Banana Pudding in individual snack bags brings together creamy, smooth pudding with soft vanilla wafers and fresh banana slices for a comforting handheld dessert. The combination of textures—from crispy wafers to silky pudding to tender fruit—creates a satisfying bite every time. Perfect for lunch boxes, picnics, or as a quick grab-and-go treat, these bags capture all the charm of classic banana pudding without the mess. The individual portions make them ideal for portion control and easy sharing, while the flavors only improve as the wafers soften slightly into the pudding over a few hours.
Why You’ll Love It
- Requires no baking and comes together in just minutes for instant gratification.
- Individual bags prevent waste and make serving effortless at gatherings or for weekday snacking.
- The flavors develop beautifully as they sit, making it perfect for make-ahead prep.
Ingredients
- 1 cup instant vanilla pudding mix
- 2 cups cold milk
- 3 ripe but firm bananas, sliced
- 1 box Nilla Wafers (about 40 wafers)
- 2 tablespoons granulated sugar
- 1 teaspoon vanilla extract
- Pinch of salt
How To Make It
- Whisk together the instant vanilla pudding mix and cold milk in a medium bowl, stirring for about 2 minutes until it thickens. Add vanilla extract and salt, then stir to combine.
- Slice the bananas into quarter-inch rounds and toss them gently with the granulated sugar in a separate bowl to prevent browning and enhance sweetness.
- Lay out 6 to 8 small snack bags or resealable plastic bags on a clean work surface.
- Add about 3 tablespoons of vanilla pudding to the bottom of each bag, spreading it slightly along one corner.
- Layer 4 to 5 Nilla Wafers over the pudding in each bag, breaking them in half if needed to fit.
- Add another 3 tablespoons of pudding on top of the wafers, then arrange banana slices over the pudding layer.
- Top with 3 to 4 more Nilla Wafers, pressing gently so everything settles together.
- Seal the bags and refrigerate until ready to serve.
Variations And Substitutions
Swap Nilla Wafers for vanilla sandwich cookies, crushed graham crackers, or even vanilla cake cubes for different textures. Use chocolate pudding instead of vanilla for a banana-chocolate twist, or try butterscotch pudding for deeper caramel notes. Replace fresh bananas with strawberries, blueberries, or a combination of mixed berries. For extra richness, add a dollop of whipped cream between layers, or drizzle a small amount of caramel or chocolate sauce inside each bag before sealing.
Make-Ahead, Storage, And Serving Tips
Prepare these bags up to 24 hours in advance and store them in the refrigerator. The wafers will soften slightly as they absorb pudding moisture, creating a more cake-like texture that many prefer. For the crispest wafers, assemble bags no more than 4 hours before serving. Keep sealed bags chilled until ready to eat. To prevent banana slices from browning, toss them with a squeeze of lemon juice before adding to bags. These are best eaten cold directly from the bag or scooped into a bowl with a spoon.
Final Thoughts
Snack bag desserts and meals are a game-changer for anyone looking to make eating more convenient and enjoyable. Whether you’re packing a quick lunch, preparing grab-and-go treats, or meal prepping for the week ahead, these portable options bring real flavor and satisfaction to your day. The beauty of snack bags is that they transform ordinary ingredients into something special, all while fitting seamlessly into your busy lifestyle.
We encourage you to pick just one recipe from this roundup and give it a try this week. Start with whichever option sounds most appealing to your taste buds and schedule, whether that’s a sweet treat or a savory meal. Once you discover how easy and rewarding it can be, you’ll likely find yourself creating your own variations and sharing these convenient ideas with friends and family. Happy snacking!
Doritos Walking Tacos
Ingredients
Method
- Brown the ground beef in a skillet over medium-high heat, breaking it apart as it cooks, about 5-7 minutes.
- Drain excess fat from the beef and add taco seasoning and water, stirring well.
- Simmer the beef mixture for 2-3 minutes until slightly thickened.
- Open the bag of Doritos and crush slightly to break into smaller pieces.
- Divide the crushed Doritos among 4 serving bags or bowls.
- Top each serving of Doritos with the seasoned ground beef.
- Add shredded cheese, sour cream, salsa, tomatoes, onion, and cilantro to each bag or bowl.
- Toss everything together with a fork and eat directly from the bag or bowl.