Fluffy Japanese Cheesecake
Fluffy Japanese Cheesecake
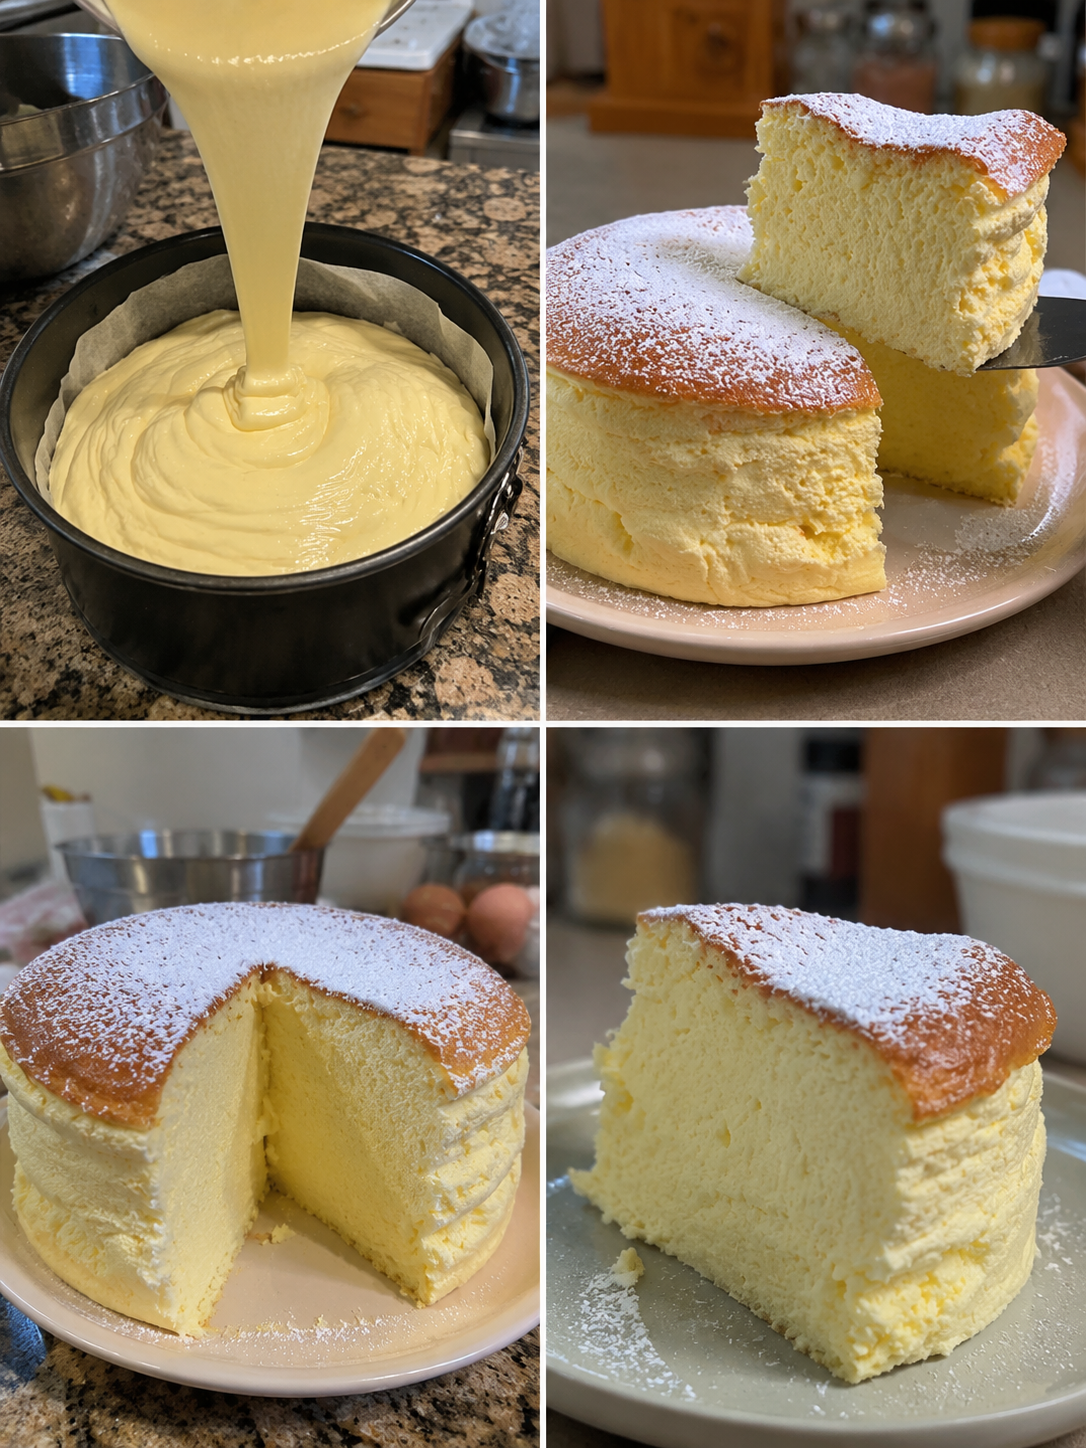
Fluffy Japanese Cheesecake: The Dessert That Changed My Life (Seriously)
I remember the exact moment I fell in love with fluffy Japanese cheesecake. It was a random Tuesday night, I was stress-eating my feelings in a tiny Tokyo-inspired café downtown, and this impossibly light, cloud-like slice arrived on my plate. One bite and I literally stopped mid-chew. It was nothing like the dense, heavy New York cheesecake I’d grown up with. Instead, it was airy, delicate, and somehow both rich and refreshingly light at the same time. I sat there like an absolute fool, just staring at this beautiful golden cake, wondering how something could taste this good and feel this ethereal.
That night, I went home and started researching. I learned that fluffy Japanese cheesecake is a totally different beast from Western cheesecake. It’s less about cream cheese dominating the flavor and more about creating this soufflé-like texture by folding whipped egg whites into a silky custard base. It’s technically a chiffon-cheesecake hybrid, and honestly, once you understand the method, it makes total sense why it works so beautifully.
Here’s the thing though: I failed spectacularly the first three times I made it. My first attempt came out dense and rubbery. The second cracked like the San Andreas Fault. The third one was honestly just sad. But I kept tweaking, testing, and learning from my mistakes, and now I’ve got a method that works every single time. This recipe is for anyone who wants to impress themselves (and maybe some lucky people in their life) with something that looks fancy but honestly isn’t as intimidating as it seems.
This fluffy Japanese cheesecake is perfect for cozy weeknights, special occasions, or when you just need to feel like you’ve got your life together for a few hours. If you love trying new things in the kitchen and want to expand your dessert repertoire, follow me on HaileeRecipes on Pinterest where I share all my favorite tested recipes and kitchen adventures.
Why You’ll Love This Recipe
Let me be real with you: this isn’t a complicated recipe, but it does require a little patience and attention. That said, here’s why it’s absolutely worth your time.
- The texture is genuinely unreal. It’s like eating a cloud that somehow tastes amazing. It’s soft, jiggly, and melts on your tongue. There’s nothing dense or heavy about it.
- It looks way fancier than it actually is. When you pull this out of the oven with that gorgeous golden top, people will think you went to culinary school.
- It’s actually lighter than most desserts. If you’re looking for something indulgent but not completely over-the-top heavy, this hits the sweet spot.
- It comes together with basic ingredients. Cream cheese, eggs, milk, flour, butter. Nothing weird or hard to find.
- It’s a total game-changer for your dessert rotation. Once you nail this, you’ll be making it constantly. Fair warning.
Ingredients
For the Cheesecake:
- 8 oz cream cheese, softened to room temperature
- 4 tablespoons unsalted butter
- 1/4 cup whole milk
- 1/4 cup all-purpose flour
- 4 large eggs, separated (this is crucial)
- 1/4 cup granulated sugar, divided
- 1 teaspoon vanilla extract
- 1/4 teaspoon cream of tartar (optional but honestly helpful)
- Pinch of salt
Hailee’s Tip: Make sure your cream cheese is actually soft. I’m talking leave-it-on-the-counter-for-30-minutes soft. Cold cream cheese will give you lumps, and lumps are the enemy of that silky texture we’re after.
For the Water Bath:
- Hot water (you’ll need enough to fill a roasting pan about halfway)
Optional Toppings:
- Powdered sugar for dusting
- Fresh berries
- Lemon curd
- A drizzle of honey
Hailee’s Tip: I always keep my eggs separated in two bowls while I’m prepping everything else. It makes the process feel more organized, and honestly, when you’re separating eggs, you really don’t want to mess it up halfway through. One tiny speck of yolk in those egg whites and your whole meringue situation falls apart.
Optional Add-Ins and Variations
The beauty of fluffy Japanese cheesecake is that it’s a pretty blank canvas. You can totally customize it without messing with the core technique.
- Lemon version: Add 1 tablespoon of fresh lemon zest and 2 tablespoons of lemon juice to your cream cheese mixture. It brightens everything up beautifully.
- Matcha moment: Replace 1 tablespoon of flour with matcha powder. You’ll get this subtle earthy flavor that’s so good.
- Chocolate swirl: Melt 2 oz of dark chocolate and drizzle it into the batter before folding in the egg whites. Create little ribbons by dragging a knife through.
- Berry compote layer: Mix fresh or frozen berries with a tablespoon of sugar and spread a thin layer on the bottom of your pan before pouring the batter.
- Brown sugar upgrade: Use light brown sugar instead of granulated for a deeper, slightly caramel-like flavor.
Step-by-Step Method
Prep Work (This Matters):
Preheat your oven to 320°F. Yes, that’s lower than you might expect, but trust me on this. We want gentle, even baking. Line a 7-inch or 8-inch round springform pan with parchment paper on the bottom and sides. I like to go a little extra and also line the outside with foil to prevent water from seeping in during the water bath.
Step 1: Build Your Base
In a small saucepan, melt your butter and cream cheese together over low heat. Stir them constantly until they’re completely smooth and combined. This usually takes about 3-4 minutes. Once it’s silky, remove it from heat and let it cool for just a minute.
Add your milk to the mixture and whisk until smooth. Then add your flour, vanilla extract, and a pinch of salt. Whisk until you have no lumps at all. This is your base, and it should be completely smooth. Set it aside and let it cool to room temperature while you work on the egg whites.
Hailee’s Tip: If you see any lumps in your base mixture, strain it through a fine-mesh sieve. I know it seems fussy, but those lumps will show up in your final texture, and we’re going for cloud-like perfection here.
Step 2: Add the Egg Yolks
Once your base has cooled slightly, whisk in your egg yolks one at a time. Make sure each yolk is fully incorporated before adding the next one. Your mixture should be pale, smooth, and gorgeous at this point.
Step 3: The Meringue Magic
This is where the fluffy happens. In a separate, completely clean bowl, add your egg whites. If there’s even a tiny speck of yolk or grease in there, your meringue won’t whip up properly, and I say this from experience. Add your cream of tartar (if using) and a pinch of salt.
Using an electric mixer on medium-high speed, whip those egg whites until stiff peaks form. This takes about 3-5 minutes depending on your mixer. You want them so stiff that if you turn the bowl upside down, they don’t budge. This is non-negotiable.
What I Messed Up: The first time I made this, I under-whipped my egg whites. I thought they looked fluffy enough, but they weren’t actually stiff. My final cake came out dense and didn’t have that cloud-like texture. Now I always go a little longer than I think I need to.
Step 4: The Folding Dance
Here’s where you need to be gentle. Add about one-third of your meringue to your cream cheese mixture and whisk it in. This lightens up the base and makes it easier to fold in the rest without deflating everything.
Now, take the remaining meringue and fold it in gently using a rubber spatula. I use a technique where I cut down the middle, sweep across the bottom, and fold over the top, rotating the bowl as I go. Do this until there are just a few white streaks visible. Don’t overmix, but also make sure everything is combined.
Step 5: Into the Pan
Pour your batter into your prepared springform pan. Tap the pan gently on the counter a few times to release any big air bubbles, but don’t go crazy with it.
Step 6: The Water Bath
Place your springform pan into a larger roasting pan. Pour hot water into the roasting pan until it comes about halfway up the sides of the springform. This gentle, moist heat is what creates that perfectly tender crumb and prevents cracking.
Step 7: The Bake
Bake for 35-40 minutes. You’re looking for the top to be set and lightly golden, but the center should still have a tiny bit of jiggle to it when you gently shake the pan. It should look like it’s barely set. This is the sweet spot.
What I Messed Up: I once baked mine until it looked completely set and firm. It ended up dry and crumbly instead of light and fluffy. The jiggle is your friend here.
Step 8: The Cool-Down
Turn off the oven and crack the door open about 2 inches. Let your cheesecake sit in the oven for 15 minutes. This gradual temperature change prevents the dreaded crack.
Remove it completely and let it cool to room temperature on a wire rack, about 30 minutes. Then pop it in the refrigerator for at least 4 hours, but ideally overnight. This resting time is essential for flavor development and texture.
Common Mistakes to Avoid
Over-whipping the meringue: If you whip your egg whites too long, they can become grainy and dry. You want stiff peaks, not a dry, separated mess.
Under-whipping the meringue: On the flip side, if your peaks aren’t stiff enough, your cake won’t be fluffy. It’ll be more like a dense pudding cake.
Skipping the water bath: I know it seems like an extra step, but the water bath is what gives you that tender, moist texture. Without it, you’ll get a dry cake with cracks.
Opening the oven door too early: This is a big one. Every time you open that door, you’re letting heat escape and potentially causing cracks. Resist the urge to peek until at least 30 minutes have passed.
Not letting it cool properly: I know you’re excited to eat it, but that gradual cool-down and overnight refrigeration are crucial. Rushing this step leads to cracks and a less-than-ideal texture.
Using cold cream cheese: Cold cream cheese won’t blend smoothly with the other ingredients, and you’ll end up with lumps. Let it sit out until it’s actually soft.
My Tested Substitutions
If you don’t have cream of tartar: You can skip it, but your meringue might take a tiny bit longer to whip up. You can also use a few drops of lemon juice as a substitute.
If you only have salted butter: Use it, but reduce the salt in the recipe to just a tiny pinch. Salted butter works fine, but you want to control your sodium level.
If you need to go dairy-free: This one’s tricky because cream cheese is pretty essential to the flavor. That said, you could try using a quality dairy-free cream cheese, but I haven’t personally tested this extensively, so I can’t promise the same results.
If you don’t have a springform pan: A regular 7-inch or 8-inch round cake pan works, but you’ll need to invert the cake to get it out, which is a little more dramatic. Line it really well with parchment.
How to Customize
Want to make this your own? Here are some fun directions you can take it.
Flavor Profile: Think about what you love. Do you want bright and citrusy? Add lemon or orange zest. Do you want rich and earthy? Try adding a teaspoon of instant coffee or a tablespoon of cocoa powder to your base.
Texture Additions: You could press a thin layer of graham cracker crumbs mixed with melted butter into the bottom of your pan before adding the batter. It gives you a little textural contrast.
Topping Game: Once it’s fully cooled and set, the top is your canvas. Fresh berries, a drizzle of caramel, a dusting of matcha powder, or even a thin spread of jam all work beautifully.
Serving Ideas
This fluffy Japanese cheesecake is honestly good on its own, but here are some ways I like to serve it.
- With fresh berries: Strawberries, raspberries, or blueberries on top add brightness and a little tartness that plays nicely with the richness.
- With a berry coulis: Make a quick sauce by blending fresh or frozen berries with a little sugar and lemon juice. Drizzle it on the plate for something elegant.
- With whipped cream: A dollop of lightly whipped cream on the side is always nice, especially if you want to amp up the indulgence.
- With tea: This cake is absolutely perfect with a cup of hot tea, especially green or oolong. It’s light enough that it pairs beautifully.
- With a fruit compote: Make a simple compote with fresh or frozen fruit, a little sugar, and a splash of lemon juice. Warm or cold, it’s delicious.
Meal Prep and Storage
In the Refrigerator: Your fluffy Japanese cheesecake will keep beautifully in the fridge for up to 4 days. Cover it loosely with plastic wrap or store it in an airtight container. The texture stays perfect.
In the Freezer: You can freeze this for up to 2 months. Wrap individual slices tightly in plastic wrap and then place them in a freezer bag. Thaw in the refrigerator for a few hours before serving.
Make-Ahead Tip: You can prepare the batter and bake the cheesecake up to 2 days ahead. Just keep it covered in the fridge until you’re ready to serve. The flavors actually develop and get even better as it sits.
Hailee’s Tip: If you’re bringing this to a potluck or party, transport it in the springform pan and remove it just before serving. It’s easier and safer than trying to move individual slices.
Nutritional Breakdown
This recipe makes about 6-8 servings depending on how generous you’re feeling. Here’s the approximate nutrition per serving (based on 8 servings):
- Calories: 210
- Protein: 6g
- Carbohydrates: 15g
- Fat: 14g
- Fiber: 0g
- Sugar: 12g
Keep in mind that these are estimates and will vary based on your specific ingredients and portion sizes.
Final Thoughts
Making fluffy Japanese cheesecake for the first time might feel a little intimidating, but honestly, once you understand what’s happening with that meringue and why the water bath matters, it all clicks into place. This recipe has become one of my absolute favorites because it looks fancy and impressive, but it’s actually totally manageable.
I love that this dessert is light enough to feel a little special and indulgent without being heavy. It’s perfect for when you want to impress someone, or when you just want to treat yourself after a rough week. The fact that you can
Fluffy Japanese Cheesecake
Ingredients
Method
- Prep Work (This Matters): Preheat your oven to 320°F. Yes, that's lower than you might expect, but trust me on this. We want gentle, even baking. Line a 7-inch or 8-inch round springform pan with parchment paper on the bottom and sides. I like to go a little extra and also line the outside with foil to prevent water from seeping in during the water bath. Step 1: Build Your Base In a small saucepan, melt your butter and cream cheese together over low heat. Stir them constantly until they're completely smooth and combined. This usually takes about 3-4 minutes. Once it's silky, remove it from heat and let it cool for just a minute. Add your milk to the mixture and whisk until smooth. Then add your flour, vanilla extract, and a pinch of salt. Whisk until you have no lumps at all. This is your base, and it should be completely smooth. Set it aside and let it cool to room temperature while you work on the egg whites. Hailee's Tip: If you see any lumps in your base mixture, strain it through a fine-mesh sieve. I know it seems fussy, but those lumps will show up in your final texture, and we're going for cloud-like perfection here. Step 2: Add the Egg Yolks Once your base has cooled slightly, whisk in your egg yolks one at a time. Make sure each yolk is fully incorporated before adding the next one. Your mixture should be pale, smooth, and gorgeous at this point. Step 3: The Meringue Magic This is where the fluffy happens. In a separate, completely clean bowl, add your egg whites. If there's even a tiny speck of yolk or grease in there, your meringue won't whip up properly, and I say this from experience. Add your cream of tartar (if using) and a pinch of salt. Using an electric mixer on medium-high speed, whip those egg whites until stiff peaks form. This takes about 3-5 minutes depending on your mixer. You want them so stiff that if you turn the bowl upside down, they don't budge. This is non-negotiable. What I Messed Up: The first time I made this, I under-whipped my egg whites. I thought they looked fluffy enough, but they weren't actually stiff. My final cake came out dense and didn't have that cloud-like texture. Now I always go a little longer than I think I need to. Step 4: The Folding Dance Here's where you need to be gentle. Add about one-third of your meringue to your cream cheese mixture and whisk it in. This lightens up the base and makes it easier to fold in the rest without deflating everything. Now, take the remaining meringue and fold it in gently using a rubber spatula. I use a technique where I cut down the middle, sweep across the bottom, and fold over the top, rotating the bowl as I go. Do this until there are just a few white streaks visible. Don't overmix, but also make sure everything is combined. Step 5: Into the Pan Pour your batter into your prepared springform pan. Tap the pan gently on the counter a few times to release any big air bubbles, but don't go crazy with it. Step 6: The Water Bath Place your springform pan into a la