Peanut Butter Cup Dump Cake
Peanut Butter Cup Dump Cake
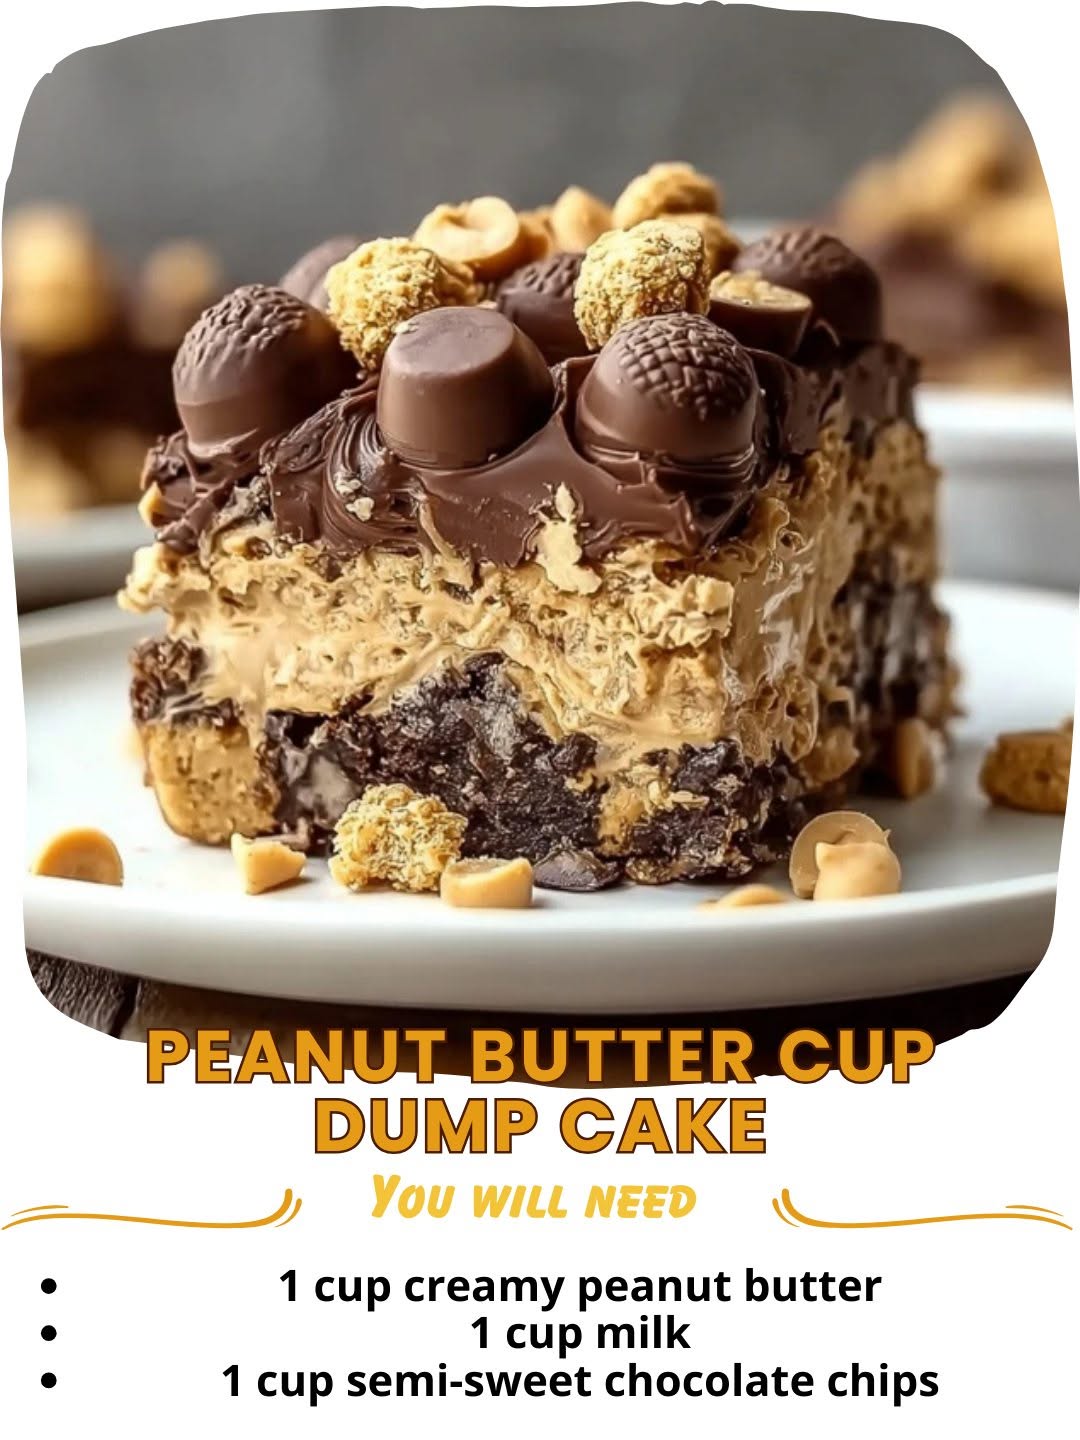
Peanut Butter Cup Dump Cake: The Easiest Chocolate-Peanut Butter Dessert You’ll Ever Make
I was having one of those weeks. You know the kind—where everything feels like it’s moving at a million miles per hour and you still haven’t figured out what’s for dinner, let alone dessert. My partner was coming home exhausted from a brutal day at work, and I wanted to do something nice without spending three hours in the kitchen or dirtying every bowl I own. That’s when I remembered this Peanut Butter Cup Dump Cake sitting in my notes from a friend’s family gathering.
I’ll be honest: I was skeptical. A “dump cake” sounded lazy, and I was worried it would taste like it. But I was also desperate and had exactly the ingredients on hand. So I dumped, I baked, and I was absolutely floored. This thing came out of the oven looking like I’d spent actual effort, tasting like a melted peanut butter cup wrapped in warm chocolate cake, and taking me maybe fifteen minutes of hands-on time. My partner literally closed his eyes while eating it. I’m not exaggerating.
Here’s what makes this recipe so brilliant: it’s a dump cake, meaning you literally layer ingredients in a baking dish and let the oven do the heavy lifting. No mixing, no measuring flour into a bowl, no fussing. But unlike some dump cakes that feel a little sad and one-note, this one is genuinely delicious. You get that gooey peanut butter center, rich chocolate cake texture, and a crispy-chewy top. It tastes indulgent without being fussy, and it works for weeknight dinners, potlucks, or when you’re hosting and want to impress without the stress.
If you love peanut butter cups, chocolate cake, or basically anything that combines chocolate and peanut butter in a warm, comforting way, this is your recipe. And if you’re someone who gets nervous about baking or thinks you’re “not a baker,” this is your permission slip to relax. I’m making this again this week, and I have a feeling you will be too. Follow me on HaileeRecipes on Pinterest for more easy desserts like this one.
Why You’ll Love This Recipe
Let me break down what makes this Peanut Butter Cup Dump Cake such a winner:
- Minimal prep time. Seriously, you’re looking at about ten to fifteen minutes before it goes in the oven. No fancy equipment, no standing mixer, no stress.
- Ingredient list you actually have. Cake mix, peanut butter, chocolate, butter, milk. These are things most of us keep around or can grab on a quick store trip.
- Foolproof results. Even if you’re not confident in the kitchen, this recipe is hard to mess up. The cake bakes evenly, the flavors come together naturally, and it looks impressive without being complicated.
- Feeds a crowd or just your family. One pan serves about eight to ten people, making it perfect for weeknight dessert or bringing to a gathering.
- Tastes homemade but feels effortless. There’s something really satisfying about a dessert that tastes like you spent hours on it when you really didn’t.
- Customizable to your preferences. Want it more chocolatey? Add chocolate chips. Want it richer? Use a chocolate cake mix instead of vanilla. This recipe is flexible.
Ingredients
- 1 box vanilla cake mix (plus ingredients called for on the box—usually oil, eggs, and water)
- 1 cup creamy peanut butter
- 1/2 cup unsalted butter
- 1 can (14 ounces) sweetened condensed milk
- 1 cup chocolate chips (semi-sweet or milk chocolate, whatever you prefer)
- 1/2 cup milk (any kind—whole, 2%, doesn’t really matter)
- Pinch of salt
Hailee’s Tip: Use creamy peanut butter here, not natural or chunky. You want it to blend smoothly with the condensed milk. If you only have natural peanut butter, that’s fine, but give it a good stir first so the oil is distributed.
Hailee’s Tip: I use a standard 9×13-inch baking dish for this. If you only have a smaller dish, the cake will be thicker, and you may need to add a few extra minutes to the baking time. A larger dish will make it thinner and cook faster.
Hailee’s Tip: Don’t skip the salt. I know it seems small, but that tiny pinch makes the chocolate and peanut butter flavors pop. Trust me on this.
Optional Add-Ins and Variations
Here’s where you can make this recipe your own. I love the simplicity of the classic version, but sometimes I like to play around:
- Extra chocolate. Add 1/2 cup more chocolate chips, or swap the vanilla cake mix for a chocolate cake mix. You’ll get a more intensely chocolate-forward dessert.
- Peanut butter swirl. Drizzle a few tablespoons of peanut butter over the top before baking for extra peanut butter pockets throughout.
- Crushed peanut butter cups. Sprinkle chopped peanut butter cup candies on top in the last five minutes of baking. They’ll melt slightly and add a fun texture.
- Caramel drizzle. After baking, drizzle warm caramel sauce over the top. Peanut butter, chocolate, and caramel is a flavor combo I could eat forever.
- Sea salt on top. A light sprinkle of fleur de sel or sea salt on the finished cake brightens everything up and makes it feel a little fancier.
- Espresso powder. Add a teaspoon to the peanut butter mixture to deepen the chocolate flavor without making it taste like coffee.
Step-by-Step Method
Step 1: Prep your baking dish and oven.
Preheat your oven to 350 degrees Fahrenheit. Grab a 9×13-inch baking dish and lightly grease it with butter or cooking spray. I like using butter because it gives a little extra flavor, but spray works just fine. Set the dish aside.
Step 2: Make your cake batter.
Follow the box directions for your vanilla cake mix. Usually this means combining the dry mix with oil, eggs, and water in a bowl and stirring until just combined. I use an electric mixer for about a minute, but honestly, stirring by hand works too. Don’t overmix—lumpy is better than overdone here. Pour this batter into your prepared baking dish and spread it out evenly. This is your foundation.
Hailee’s Note: I once forgot to add the water to my cake mix and ended up with a dense, weird layer. It actually turned out kind of interesting, but stick with the box directions the first time you make this.
Step 3: Make your peanut butter layer.
In a medium saucepan over low heat, combine the peanut butter, butter, and sweetened condensed milk. Stir constantly until everything is melted and smooth. This usually takes about three to four minutes. You’re looking for a pourable, caramel-like consistency. If it seems too thick, you can add a tablespoon or two of milk to loosen it up.
Step 4: Add chocolate to the peanut butter mixture.
Remove the saucepan from heat and stir in your chocolate chips until they’re completely melted and incorporated. The residual heat will do most of the work for you. If you’re worried about the chocolate seizing up, you can add it off the heat and just let it sit for a minute before stirring. Stir in the milk and that pinch of salt.
Step 5: Pour and swirl.
Carefully pour this peanut butter-chocolate mixture over the cake batter. Don’t stir it together—just let it settle on top. If you want, you can use a spatula to gently swirl it a bit, creating some marbling. This step is optional and mostly for aesthetics, but I like how it looks.
Step 6: Bake.
Pop the whole thing in the oven for 35 to 40 minutes. You’re looking for the edges to be set and slightly pulling away from the sides of the dish, but the center should still have a little jiggle to it. It’ll continue cooking slightly as it cools, so don’t overbake. The top should be golden brown and the peanut butter layer should be bubbling slightly around the edges.
Step 7: Cool and serve.
Let the cake cool for at least ten minutes before serving. I know it’s tempting to dig in right away, but this cooling time lets everything set up slightly so you get distinct layers instead of a mushy mess. Plus, the flavors meld together beautifully as it cools.
Hailee’s Note: The first time I made this, I was too impatient and served it warm without cooling. It was still delicious, but it was more like eating a warm peanut butter chocolate soup with cake pieces. Still amazing, but the structure was definitely better after cooling.
Common Mistakes to Avoid
Overmixing the cake batter. This is the biggest one. When you overmix, you develop too much gluten, and your cake becomes tough and dense. Stir until just combined and call it done.
Skipping the cooling time. I get it—it smells incredible and you want to eat it immediately. But ten minutes makes a huge difference in texture and presentation.
Using chunky peanut butter. It won’t blend smoothly with the condensed milk, and you’ll end up with a bumpy, uneven layer. Save the chunky stuff for your sandwich.
Not greasing the baking dish. This cake can stick, especially around the edges. A quick grease job takes five seconds and saves you heartbreak.
Baking at too high a temperature. If your oven runs hot or you crank it up to 375 degrees, the top will brown too quickly before the inside is done. Stick with 350 degrees.
Forgetting the salt. I mentioned this before, but it’s worth repeating. That tiny pinch brings everything into focus. Don’t skip it.
My Tested Substitutions
For the cake mix: You can use chocolate cake mix instead of vanilla for a more intense chocolate experience. You can also make a from-scratch cake batter if you prefer, but honestly, the box mix is part of the charm here. It’s reliable and delicious.
For the peanut butter: If you have an allergy situation, almond butter or sunflower seed butter works in a pinch. The flavor will be different, but the texture and method stay the same. Use the same amount.
For the condensed milk: I haven’t found a perfect substitute for this because condensed milk brings both sweetness and creaminess. If you absolutely must avoid it, you could use 1/2 cup heavy cream mixed with 1/2 cup sugar, but the texture won’t be quite the same.
For the chocolate chips: Any chocolate works here—semi-sweet, milk, dark, even white chocolate if you’re feeling adventurous. Use what you like to eat.
For the milk in the peanut butter mixture: You can use any milk—dairy, almond, oat, whatever. The amount stays the same. Non-dairy milks work just as well.
How to Customize
Want to make this recipe completely your own? Here are some fun directions you can take it:
Make it more decadent: Use chocolate cake mix instead of vanilla, add an extra 1/2 cup of chocolate chips, and top with a drizzle of salted caramel after baking.
Make it lighter: Use a lighter cake mix if available, reduce the chocolate chips to 3/4 cup, and use low-fat condensed milk.
Make it fancy: Add a teaspoon of vanilla extract to the peanut butter layer, sprinkle the top with crushed pretzels before baking for texture, and finish with a dusting of sea salt.
Make it extra peanut buttery: Increase the peanut butter to 1.25 cups and reduce the chocolate chips to 3/4 cup. You’ll get a more pronounced peanut butter flavor.
Make it a brownie-cake hybrid: Use a brownie mix for the base instead of cake mix. Follow the brownie directions, then top with the peanut butter-chocolate layer as written. You’ll get a denser, fudgier result.
Serving Ideas
This cake is delicious on its own, but here are some ways to dress it up:
- With whipped cream or vanilla ice cream: The cold creaminess against the warm, gooey cake is perfection.
- With a drizzle of chocolate sauce: Warm it up and let it pool on the plate around each slice.
- With a sprinkle of crushed peanut butter cups: Add this right before serving for extra texture and visual appeal.
- With a cup of coffee: The bitterness of coffee balances the sweetness beautifully.
- With a glass of cold milk: Simple, classic, and always works.
- Straight from the pan with a spoon: Sometimes the best serving method is the most casual one.
Meal Prep and Storage
How long does it keep? This cake stays fresh and delicious for up to four days in an airtight container at room temperature. After that, it starts to dry out a bit, though it’s still edible.
Can you refrigerate it? Yes, but I don’t recommend it unless you have to. Cold cake is fine, but the peanut butter layer gets a little firm. If you do refrigerate it, let it come back to room temperature before serving, or microwave individual slices for about twenty seconds.
Can you freeze it? Absolutely. Let it cool completely, wrap it tightly in plastic wrap and then foil, and freeze for up to three months. Thaw at room temperature for a few hours before serving. The texture stays pretty good, though the peanut butter layer will be slightly less gooey than fresh.
Can you make it ahead? You can prepare the cake batter and the peanut butter-chocolate layer separately the night before, then assemble and bake the next day. Keep both covered in the fridge.
Nutritional Breakdown
Here’s the nutritional information per serving, assuming eight servings per pan:
- Calories: approximately 520
- Protein: 10g
- Carbohydrates: 58g
- Fat: 26g
- Fiber: 2g
- Sugar: 44g
Keep in mind this is an estimate and can vary based on specific brands and exact measurements. If you need precise nutritional information for dietary reasons, I’d recommend using a nutrition calculator with your exact ingredients.
Final Thoughts
I genuinely love this recipe, and I think you will too. There’s something so satisfying about making a dessert that tastes like you spent hours on it when you really just spent fifteen minutes dumping ingredients into a pan. It’s the kind of recipe that makes you feel capable in the kitchen, even if baking usually stresses you out.
More than that, it’s a recipe that brings people together. My partner still talks about that first night I made it. My sister requested it for her birthday. My neighbor asked for the recipe after I brought it to a block party. That’s what good food does—it creates moments and memories.
So grab your ingredients, preheat your oven, and give this Peanut Butter Cup Dump Cake a try. I have a feeling you’re going to be making it again and again. Let me know how it turns out, and if you try any of the variations I mentioned, I’d love to hear about it. Happy baking, friend.
—
Recipe Card
Peanut Butter Cup Dump Cake
Ingredients
Method
- Step 1: Prep your baking dish and oven. Preheat your oven to 350 degrees Fahrenheit. Grab a 9x13-inch baking dish and lightly grease it with butter or cooking spray. I like using butter because it gives a little extra flavor, but spray works just fine. Set the dish aside. Step 2: Make your cake batter. Follow the box directions for your vanilla cake mix. Usually this means combining the dry mix with oil, eggs, and water in a bowl and stirring until just combined. I use an electric mixer for about a minute, but honestly, stirring by hand works too. Don't overmix—lumpy is better than overdone here. Pour this batter into your prepared baking dish and spread it out evenly. This is your foundation. Hailee's Note: I once forgot to add the water to my cake mix and ended up with a dense, weird layer. It actually turned out kind of interesting, but stick with the box directions the first time you make this. Step 3: Make your peanut butter layer. In a medium saucepan over low heat, combine the peanut butter, butter, and sweetened condensed milk. Stir constantly until everything is melted and smooth. This usually takes about three to four minutes. You're looking for a pourable, caramel-like consistency. If it seems too thick, you can add a tablespoon or two of milk to loosen it up. Step 4: Add chocolate to the peanut butter mixture. Remove the saucepan from heat and stir in your chocolate chips until they're completely melted and incorporated. The residual heat will do most of the work for you. If you're worried about the chocolate seizing up, you can add it off the heat and just let it sit for a minute before stirring. Stir in the milk and that pinch of salt. Step 5: Pour and swirl. Carefully pour this peanut butter-chocolate mixture over the cake batter. Don't stir it together—just let it settle on top. If you want, you can use a spatula to gently swirl it a bit, creating some marbling. This step is optional and mostly for aesthetics, but I like how it looks. Step 6: Bake. Pop the whole thing in the oven for 35 to 40 minutes. You're looking for the edges to be set and slightly pulling away from the sides of the dish, but the center should still have a little jiggle to it. It'll continue cooking slightly as it cools, so don't overbake. The top should be golden brown and the peanut butter layer should be bubbling slightly around the edges. Step 7: Cool and serve. Let the cake cool for at least ten minutes before serving. I know it's tempting to dig in right away, but this cooling time lets everything set up slightly so you get distinct layers instead of a mushy mess. Plus, the flavors meld together beautifully as it cools. Hailee's Note: The first time I made this, I was too impatient and served it warm without cooling. It was still delicious, but it was more like eating a warm peanut butter chocolate soup with cake pieces. Still amazing, but the structure was definitely better after cooling.