Juicy Cheese-Stuffed Burger Patties
Juicy Cheese-Stuffed Burger Patties
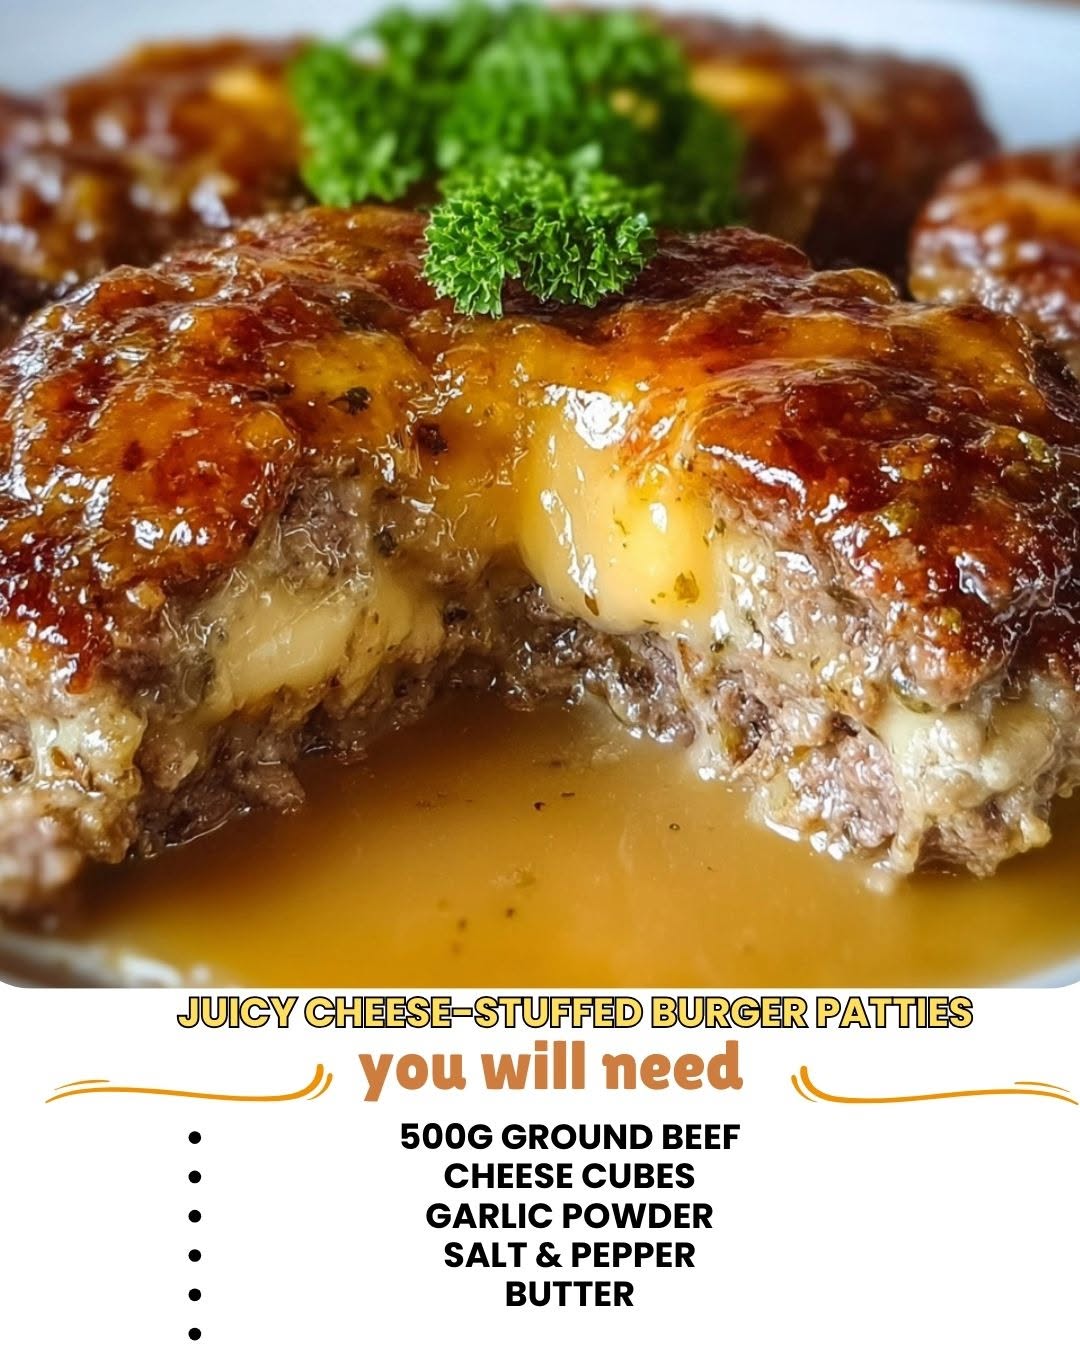
Juicy Cheese-Stuffed Burger Patties: A Game-Changing Dinner That Feels Like a Treat
I remember the exact moment I fell in love with cheese-stuffed burgers. It was a random Tuesday night, and I was standing in my kitchen feeling completely uninspired about dinner. My partner was working late, the kids were going to be home in thirty minutes, and I had ground beef thawing on the counter. Nothing fancy. Nothing exciting. Just… beef.
Then it hit me. What if I stuffed that beef with cheese? Like, really stuffed it. Not just a sprinkle on top, but a warm, melty pocket of deliciousness hiding inside each patty, waiting to surprise whoever bit into it.
I made my first batch of Juicy Cheese-Stuffed Burger Patties that night, and honestly? My kids asked me to make them again the next week. My partner literally said, “This is restaurant quality.” And the best part? They’re not complicated at all. They just feel fancy.
These burgers are for anyone who wants to elevate their weeknight dinner without spending hours in the kitchen. They’re perfect for a casual family meal, a backyard cookout with friends, or even meal prep for the week ahead. The magic is in that first bite—when the cheese oozes out and your eyes get a little wider because you weren’t expecting that level of deliciousness from something so simple.
If you’re looking for a recipe that’s reliable, actually tasty, and makes people feel special, you’re in the right place. Follow me on HaileeRecipes on Pinterest for more recipes like this one that prove home cooking doesn’t have to be complicated to be incredible.
Why You’ll Love This Recipe
Let me be real with you: there are a lot of burger recipes out there. So why should you make this one?
First, there’s the wow factor. When someone cuts into their burger and that cheese starts flowing out, it’s genuinely exciting. It transforms a regular burger into something that feels special, even though you didn’t spend any extra time making it.
Second, it’s actually juicier than a regular burger. The cheese keeps the meat moist from the inside, so even if you accidentally cook it a tiny bit longer than you meant to (and hey, we’ve all been there), it still stays tender and delicious.
Third, it’s endlessly customizable. Want to add bacon? Go for it. Prefer a different cheese? Absolutely. Want to sneak in some herbs or garlic? I do this all the time. This recipe is a foundation, not a prison.
And finally, it’s genuinely easy. If you can make a regular burger patty, you can make this. The only extra step is stuffing cheese in the middle, and that takes about thirty seconds per burger.
Ingredients
- 2 pounds ground beef (80/20 blend works best)
- 1 cup shredded cheese (I use cheddar, but more on that in a second)
- 1 teaspoon salt
- ½ teaspoon black pepper
- ½ teaspoon garlic powder
- ¼ teaspoon onion powder
- 1 tablespoon Worcestershire sauce
- Optional: ½ teaspoon smoked paprika for extra depth
Hailee’s Tip: Don’t skip the Worcestershire sauce. I know it seems small, but that umami punch is what makes these taste like they came from a restaurant kitchen, not your weeknight dinner table.
Hailee’s Tip: Use an 80/20 ground beef blend. If you go too lean, your burgers will be dry. If you go too fatty, they’ll shrink too much and get greasy. That 80/20 sweet spot is your friend.
Hailee’s Tip: Keep your cheese cold and in small chunks. Cold cheese stays inside the patty better during cooking. Warm, soft cheese wants to escape, and that’s not what we’re going for here.
Optional Add-Ins and Variations
Here’s where you can get creative without changing the core recipe:
- Bacon lovers: Mix crispy, crumbled bacon right into the ground beef before forming patties. About ¼ cup per batch is perfect.
- Herb enthusiasts: Add a tablespoon of fresh minced parsley or chives to the meat mixture. It adds brightness without being obvious.
- Garlic fans: I sometimes add an extra ½ teaspoon of minced fresh garlic to the meat. Just don’t overdo it, or it’ll overpower everything else.
- Cheese combinations: Try mixing cheddar with a little blue cheese, or use Swiss for a more sophisticated vibe. Pepper jack if you want heat.
- Mushroom lovers: Finely dice some sautéed mushrooms and fold them into the meat before forming patties.
Step-by-Step Method
Step 1: Prep your workspace and ingredients
Get your ground beef out of the fridge about ten minutes before you start. Cold meat is harder to work with. Have your cheese shredded and in small chunks (about the size of peas) and ready to go. This is important because you’re going to work quickly once you start forming patties.
Step 2: Mix your seasoning into the meat
In a large bowl, combine the ground beef, salt, pepper, garlic powder, onion powder, and Worcestershire sauce. Here’s where I need to tell you something I learned the hard way: don’t overmix. Mix just until everything is combined. Overmixing makes the meat dense and tough. You want a light touch here. I use my hands and just gently fold everything together until it’s evenly distributed. Takes about a minute.
Step 3: Divide into portions
Divide your meat mixture into eight equal portions (each one should be about the size of a golf ball). This makes four stuffed burgers, which is perfect for a family of four with maybe one extra. You can also make them smaller if you want more burgers.
Step 4: Form the first patty
Take one portion and gently flatten it in your palm into a thin disc, about the size of your hand. Don’t press too hard—you want it thin but not compressed.
Step 5: Add the cheese
Place about two tablespoons of shredded cheese in the center of the disc. Don’t go all the way to the edges—leave about half an inch of meat around the perimeter so the cheese doesn’t escape while cooking.
Step 6: Seal it up
Take another portion of meat and flatten it the same way. Place it on top of your cheese-filled patty. Now gently press the edges together, sealing them completely. This is crucial. Any gaps and your cheese will leak out. Work your way around the edges, making sure they’re sealed tight. It should look like a little meat disc with no visible cheese.
What I messed up: The first time I made these, I didn’t seal the edges well enough. I had cheese bubbling out all over my grill. It wasn’t a disaster, but it was messy and the burgers didn’t look as neat. Now I take an extra ten seconds to make sure those edges are really sealed.
Step 7: Create a little dimple
With your thumb, gently press a small dimple in the center of the top of the patty. This prevents the burger from puffing up too much while it cooks, and it keeps the shape nice and even. It’s a small step that makes a real difference.
Step 8: Cook your burgers
Heat your grill or skillet to medium-high heat. If you’re using a skillet, a little butter or oil is fine. Grill or pan-sear the burgers for about four to five minutes on the first side, until you get a nice brown crust. Flip gently (these are a little more delicate than regular burgers because of the cheese inside), and cook for another three to four minutes on the second side for medium doneness.
What I messed up: I used to flip too early and too often. These burgers need time on each side to develop a crust. Resist the urge to mess with them. Let them cook.
Step 9: Rest before serving
Let your burgers rest for two to three minutes after cooking. This keeps all that delicious cheese inside where it belongs instead of running all over your bun.
Common Mistakes to Avoid
Not sealing the edges properly: This is the number one mistake. If your edges aren’t sealed, the cheese escapes, and you lose the whole magic of the recipe. Take your time with this step.
Overmixing the meat: I mentioned this earlier, but it’s worth repeating. Overmixing makes dense, tough burgers. Gentle hands, quick work.
Using cheese that’s too warm: If your cheese is already soft and warm, it’ll leak out during cooking. Keep it cold and in small chunks.
Flipping too early: Give each side at least four minutes. You want that crust to develop.
Skipping the rest: Those two to three minutes of resting time are when the juices redistribute. Skip it and you’ll lose some of that juiciness.
Making the patties too thick: Thick patties cook unevenly and the cheese might not melt properly. Aim for about three-quarters of an inch thick.
My Tested Substitutions
Ground turkey instead of beef: You can absolutely do this, but use 93/7 turkey and add a tablespoon of olive oil to the mixture so it doesn’t dry out. Cook it at a slightly lower temperature so the outside doesn’t burn before the inside cooks through.
Different cheeses: Cheddar is my go-to, but I’ve used Swiss, Gruyère, pepper jack, and even a mix of cheddar and cream cheese. The world is your oyster here. Just avoid super soft cheeses like brie or fresh mozzarella—they’ll leak out too easily.
Gluten-free option: This recipe is naturally gluten-free, but obviously the bun isn’t. Use gluten-free buns or lettuce wraps if that matters to you.
Dairy-free cheese: I haven’t personally tested this extensively, but I imagine a good quality dairy-free cheddar would work. Just make sure it’s the kind that actually melts.
How to Customize
The beauty of this recipe is that it’s completely customizable to what you’re in the mood for.
Want a breakfast burger? Add crispy bacon and a fried egg on top, and use a sharp cheddar inside.
Going for a more upscale vibe? Use Gruyère cheese, add caramelized onions on top, and serve on a brioche bun.
Craving something spicy? Use pepper jack cheese, add jalapeños to the meat mixture, and top with a chipotle mayo.
Want to make it feel more gourmet? Add a tiny bit of truffle oil to the meat mixture and use a fancy cheese like aged cheddar or smoked gouda.
Keeping it simple? Just add your favorite toppings to a regular bun and enjoy.
Serving Ideas
These burgers are delicious on their own, but here’s what I like to serve alongside them:
- Crispy oven fries or air fryer fries
- A simple green salad with a tangy vinaigrette
- Grilled corn on the cob with herb butter
- Coleslaw for a little crunch and freshness
- Pickles and onions on the side
- A cold beverage (lemonade, iced tea, or whatever you prefer)
As for toppings on the burger itself, I keep it pretty classic: a soft bun, a little mayo or special sauce, lettuce, tomato, pickles, and maybe some crispy bacon. Let that melted cheese be the star.
Meal Prep and Storage
Making them ahead: You can form these burgers up to twenty-four hours in advance. Just place them on a parchment-lined plate, cover them loosely with plastic wrap, and refrigerate. The cold actually helps the cheese stay inside during cooking.
Freezing: These freeze beautifully for up to three months. Form them, place them on a parchment-lined baking sheet, freeze until solid, then transfer to a freezer bag. Cook them straight from frozen, just add a minute or two to the cooking time.
Storing leftovers: Honestly, these are best eaten fresh, but if you have leftovers, store them in an airtight container in the fridge for up to three days. Reheat gently in a skillet over low heat so the cheese doesn’t get weird.
My favorite meal prep hack: I form all my burgers on a Sunday, freeze them, and then I can throw them on the grill any night of the week. It’s like having a secret weapon in your freezer.
Nutritional Breakdown
Here’s the nutritional information per burger (this assumes four burgers total, without bun or toppings):
- Calories: approximately 380
- Protein: 32 grams
- Fat: 28 grams
- Carbohydrates: 1 gram
- Fiber: 0 grams
These are hearty, protein-packed burgers that’ll keep you satisfied. The cheese adds richness and calcium, and the beef provides iron and B vitamins. Not exactly diet food, but it’s real, whole food that tastes incredible.
Final Thoughts
I genuinely believe that the best recipes are the ones that make people happy without making you feel like you’ve spent all day cooking. These Juicy Cheese-Stuffed Burger Patties do exactly that.
They’re simple enough for a weeknight dinner when you’re tired and hungry. They’re impressive enough to serve to guests without feeling like you’re taking shortcuts. They’re customizable enough to make everyone in your family happy. And they’re delicious enough that you’ll find yourself making them again and again.
The next time you’re standing in front of your fridge feeling uninspired, remember that Tuesday night when I discovered these burgers. Remember that feeling of opening up a burger and finding that warm, melty surprise inside. That’s what cooking is supposed to feel like—exciting, delicious, and not too complicated.
Make these burgers. Serve them to people you love. Watch their faces light up when they bite into them. That’s the whole point, right there.
—
Juicy Cheese-Stuffed Burger Patties
Ingredients
Method
- Remove ground beef from refrigerator 10 minutes before starting.
- In a large bowl, gently combine ground beef, salt, pepper, garlic powder, onion powder, and Worcestershire sauce until just mixed.
- Divide meat mixture into 8 equal portions.
- Flatten one portion into a thin disc. Place 2 tablespoons of shredded cheese in the center, leaving half an inch around the edges.
- Flatten another portion and place on top of the cheese. Gently press edges together to seal completely.
- Create a small dimple in the center of the top with your thumb.
- Repeat with remaining portions.
- Heat grill or skillet to medium-high heat.
- Cook burgers for 4-5 minutes on the first side until browned. Flip gently and cook 3-4 minutes on the second side for medium doneness.
- Rest for 2-3 minutes before serving. Nutrition per serving (patty only, no bun) * Calories: 380 | Protein: 32g | Carbs: