Bacon-Wrapped Grilled Cheese Fingers
Bacon-Wrapped Grilled Cheese Fingers
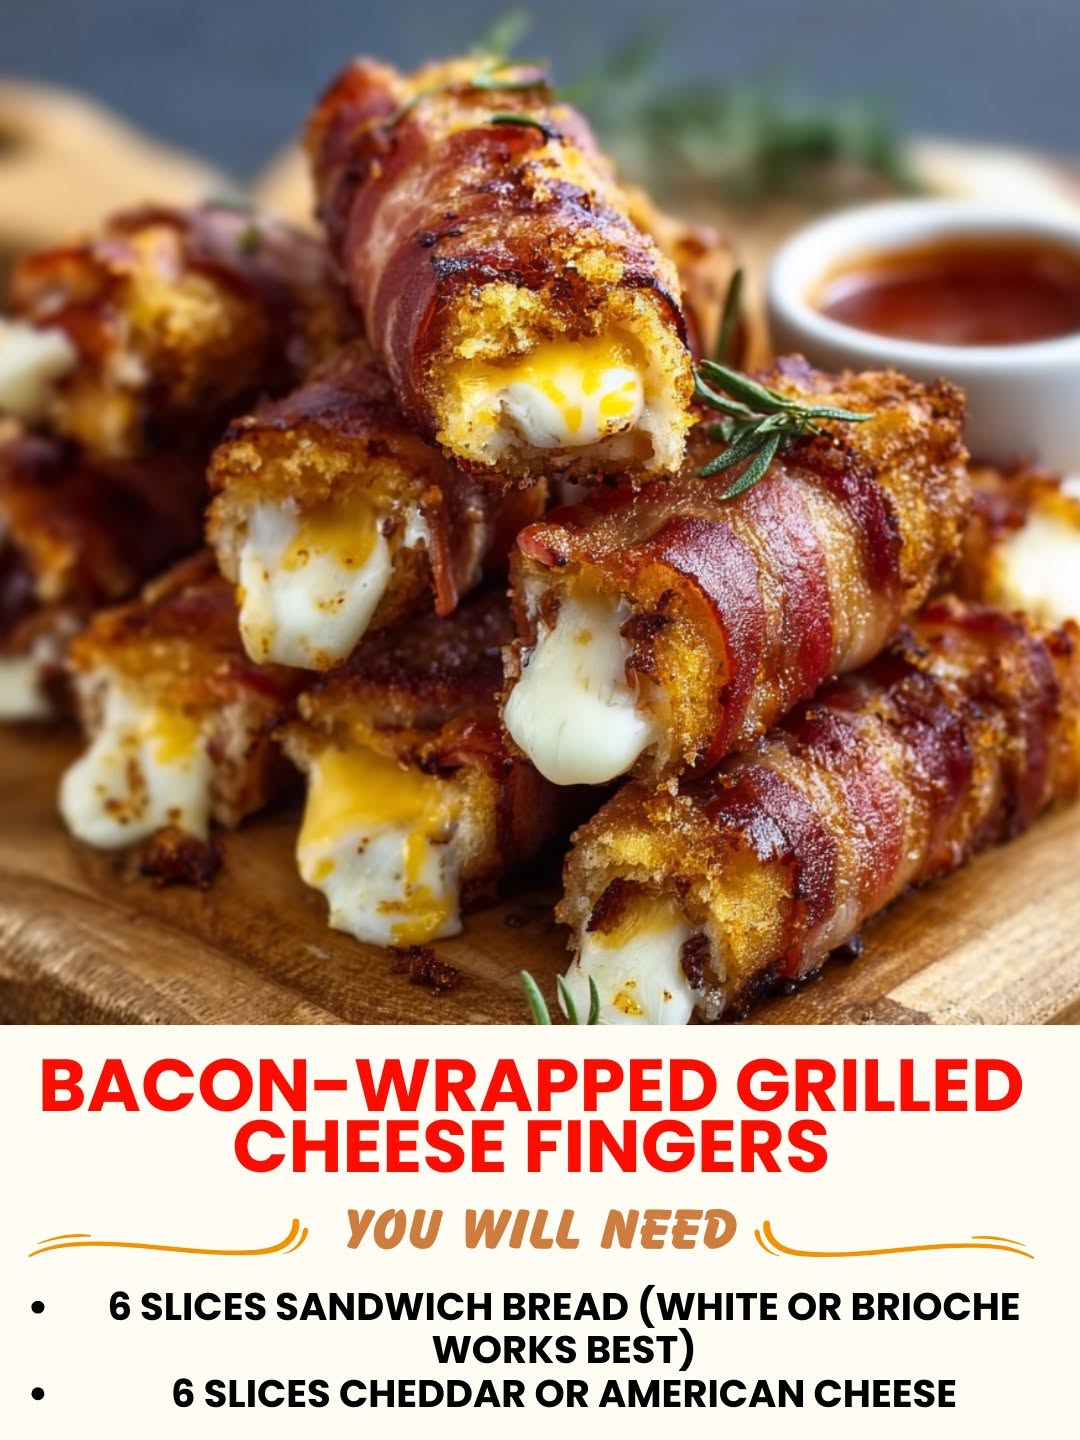
Bacon-Wrapped Grilled Cheese Fingers: The Comfort Food Mashup You Didn’t Know You Needed
I’m going to be honest with you right from the start: I created this recipe on a Tuesday night when I was feeling nostalgic and a little bit reckless in the kitchen. My partner had mentioned wanting bacon, I had leftover good bread and cheese, and something in my brain just whispered, “What if you made grilled cheese… but made it fancy?” Three hours later, I was pulling these golden, crispy, bacon-wrapped beauties from the skillet, and I genuinely couldn’t stop eating them.
The thing about Bacon-Wrapped Grilled Cheese Fingers is that they’re not trying to be something they’re not. They’re not pretentious. They’re not complicated. They’re just comfort food having a really good day. Crispy bacon hugging warm, melty cheese and buttery toast? That’s a flavor combination that works because it’s supposed to work. It’s bacon and cheese, two things that have never met a person who didn’t like them together.
These are perfect for lazy Sunday lunches, game day snacking, or when you want something that feels a little fancier than your usual grilled cheese but doesn’t require you to wear pants. They’re also genuinely impressive to serve at a casual dinner party or potluck, which is my favorite kind of food—the kind that looks like you tried harder than you actually did.
If you’re someone who loves grilled cheese, bacon, or basically anything that comes out of a cast iron skillet golden and crispy, this recipe is for you. And if you’re not sure about it yet, I promise I’ll walk you through every single step, including the mistakes I made so you don’t have to. Follow me on HaileeRecipes on Pinterest for more cozy recipes like this one.
Why You’ll Love This Recipe
Let me break down what makes this recipe genuinely worth your time and ingredients.
- It’s actually easy. This isn’t a recipe that requires special skills or fancy equipment. If you can make a grilled cheese, you can make this. You’re just wrapping it in bacon first, which sounds fancier than it is.
- It feels indulgent without being complicated. There’s something about bacon-wrapped anything that makes your brain think you’re being extra. In reality, you’re just combining three ingredients in a smarter way.
- They’re perfect for sharing (or not sharing). The “fingers” format means everyone gets their own portion, and they’re the right size for snacking, lunch, or a side dish at dinner.
- They reheat beautifully. Unlike some grilled cheese sandwiches that get sad and rubbery, these stay crispy on the outside and melty on the inside even when you warm them up the next day.
- You can customize them endlessly. Different cheeses, different breads, add-ins like jalapeños or tomato—this recipe is a jumping-off point, not a rigid rulebook.
Ingredients
- 8 slices of bacon (I use thick-cut because it holds up better)
- 8 slices of good bread (sourdough, brioche, or even Texas toast work great)
- 2 cups shredded cheese (I use a mix of sharp cheddar and gruyere, but see variations below)
- 4 tablespoons butter, softened
- 1 teaspoon garlic powder (optional but recommended)
- Salt and pepper to taste
Hailee’s Tip: The quality of your cheese matters more than you’d think. Skip the pre-shredded stuff if you can—it has anti-caking agents that prevent it from melting as smoothly. A good sharp cheddar or a gruyere blend will change your life here.
Hailee’s Tip: Don’t use thin bacon. I learned this the hard way. Thin bacon gets too crispy and breaks apart when you’re trying to wrap it. Thick-cut bacon stays pliable and wraps like a dream.
Hailee’s Tip: Room-temperature butter spreads so much more easily than cold butter. Pull it out of the fridge about 15 minutes before you start cooking, and your sandwich assembly will be way less frustrating.
Optional Add-Ins and Variations
This is where you get to have fun. Here are some combinations I’ve tested and loved:
- Spicy Version: Add sliced jalapeños between the cheese layers, or mix a pinch of cayenne pepper into your butter before spreading.
- Fancy Version: Add a thin layer of fig jam or apple butter before the cheese. It sounds weird, but trust me.
- Tomato Version: Slice a tomato thin and layer it in with the cheese. Pat it dry first so it doesn’t make everything soggy.
- Herb Version: Mix fresh thyme or oregano into your softened butter, or use herb-infused butter if you can find it.
- Breakfast Version: Add a fried egg between the layers. It gets messy but in the best way possible.
Step-by-Step Method
Step 1: Prep Your Bacon
Start by cooking your bacon until it’s about 75% done—still a little bit flexible, not completely crispy. I usually do this in a skillet over medium heat, laying the strips flat. This takes about 5-7 minutes depending on your stove. You want it to have color and be mostly cooked, but still pliable enough to wrap without snapping.
Transfer the bacon to a paper towel-lined plate to cool slightly. This is important because you need to handle it without burning your fingers, but you also want it still warm enough to be flexible.
Hailee’s Tip: If you’re cooking for a crowd, do your bacon in the oven instead. Lay it on a baking sheet lined with foil and bake at 400°F for about 12-15 minutes. It cooks more evenly, and you free up your stovetop for the actual grilled cheese cooking.
Step 2: Assemble Your Sandwich
Lay out two slices of bread. Spread a thin layer of your softened butter on the outside of both slices. This is what’s going to get golden and crispy in the skillet, so don’t skip this step.
Now, flip one slice over so the buttered side is down on your work surface. Spread about 1/2 cup of cheese on this slice. Layer your bacon strips on top of the cheese—I usually use one full strip per sandwich, but you can do more if you’re feeling wild.
Add your other cheese layer (another 1/2 cup), then top with your second slice of bread, buttered side up.
What I Messed Up: The first time I made these, I didn’t put cheese under the bacon, and it just slid around everywhere. The cheese acts as glue. Use it.
Step 3: Wrap It Up
Here’s the part that looks fancier than it is. Take another strip of bacon and wrap it around the outside of your sandwich like you’re hugging it. You can secure it with a toothpick if you’re worried, but honestly, the butter and heat will hold it together.
Step 4: Get Your Skillet Ready
Heat a cast iron skillet or non-stick skillet over medium heat. You want it hot enough that when you place your sandwich in it, it sizzles immediately, but not so hot that the outside burns before the inside melts. Medium is your sweet spot.
What I Messed Up: I once tried to make these on high heat because I was impatient. The bacon on the outside got burnt while the cheese was still cold inside. Patience is your friend here.
Step 5: Cook the First Side
Carefully place your wrapped sandwich in the hot skillet. Let it cook undisturbed for about 3-4 minutes. You’re looking for a deep golden-brown color on the outside. Resist the urge to poke it or flip it early. I know it’s hard.
Step 6: The Flip
Using a sturdy spatula, carefully flip your sandwich. This is the moment of truth. If the bacon starts to slip, gently press it back into place with your spatula. Cook the second side for another 3-4 minutes until it’s equally golden.
What I Messed Up: I once used a wimpy spatula and the whole thing fell apart in the skillet. Use a real spatula, preferably metal. Your future self will thank you.
Step 7: The Cheese Check
If you’re not sure if the cheese is melted enough, gently press the top of the sandwich with your spatula. You should feel it give slightly. If it still feels very firm, give it another minute on the heat.
Step 8: Rest and Cut
Transfer your sandwich to a cutting board and let it rest for about 2 minutes. This helps the cheese set up slightly so it doesn’t all pour out when you cut it. Then slice it diagonally into fingers—usually four pieces per sandwich.
Common Mistakes to Avoid
Using thin bacon. I already mentioned this, but it bears repeating. Thin bacon gets too crispy too fast and doesn’t wrap nicely. Thick-cut is the way to go.
Not cooking the bacon enough beforehand. If your bacon is completely raw when you wrap it, it won’t cook through by the time the cheese melts and the bread gets golden. You need that head start.
Skipping the butter on the outside of the bread. This is what makes it crispy and golden. Without it, you just have a warm sandwich. With it, you have magic.
Using pre-sliced cheese. It’s convenient, but it doesn’t melt as smoothly as shredded cheese. If you must use slices, buy the good kind from the deli counter, not the plastic-wrapped stuff.
Cooking on too high heat. This is the number one way to end up with burnt bread and cold cheese. Medium heat is your friend.
Not letting the bacon cool enough. If you try to wrap it straight from the skillet, you’ll burn your fingers and it’ll be too crispy to wrap properly. Give it a minute.
My Tested Substitutions
For the Cheese: I’ve used sharp cheddar, gruyere, gouda, and even a combination of cheddar and brie. All of them work beautifully. The only cheese I wouldn’t recommend is something very mild like American cheese—it doesn’t have enough flavor to stand up to the bacon and bread.
For the Bread: Sourdough is my go-to because it has structure and flavor, but brioche works if you want something richer, and Texas toast works if you want something more substantial. I’ve even made these with thick-cut focaccia, and they were incredible.
For the Butter: If you’re dairy-free, use a good quality plant-based butter. It browns beautifully and tastes almost identical. I’ve tested this and it genuinely works.
For the Bacon: If you don’t eat pork, turkey bacon works in a pinch, though it’s a bit less flavorful. Tempeh bacon is also surprisingly good if you’re vegetarian—it gets crispy and has a nice savory quality.
How to Customize
The beauty of this recipe is that it’s endlessly adaptable. Here are some directions you can take it:
Make it gourmet: Use aged cheddar, add caramelized onions, layer in some prosciutto along with the bacon.
Make it spicy: Add jalapeños, use pepper jack cheese instead of cheddar, mix sriracha into your butter.
Make it breakfast: Add a fried egg, some crispy hash browns, or a slice of Canadian bacon for extra richness.
Make it fancy: Add fig jam, use gruyere and brie, add fresh herbs like thyme or rosemary.
Make it simple: Stick with just bacon, cheddar, and bread. Sometimes simple is perfect.
Serving Ideas
These are incredible on their own, but here are some ways I like to serve them:
- With tomato soup: This is the obvious choice, and it’s obvious for a reason. The creamy soup and crispy sandwich are a match made in heaven.
- With a side salad: If you want to feel a little less guilty about the bacon and cheese, pair these with a crisp green salad with a sharp vinaigrette.
- With pickles: The acidity cuts through the richness beautifully. I always have a small pickle on the side.
- With chips: Sometimes you just want to lean into it. Crispy chips alongside crispy grilled cheese is never a bad call.
- With apple slices: If you added that fig jam I mentioned, serve with fresh apple slices on the side for a sweet-savory situation.
- As an appetizer: Cut them into smaller pieces and serve them at a party. People lose their minds over these.
Meal Prep and Storage
Making Ahead: You can assemble these sandwiches up to 4 hours before cooking. Wrap them individually in parchment paper and keep them in the fridge. When you’re ready to cook, just pull them out and let them sit at room temperature for about 5 minutes before putting them in the skillet. This prevents the bread from being cold and taking forever to cook.
Storing Leftovers: These keep beautifully in an airtight container in the fridge for up to 3 days. I know that sounds like a long time for a grilled cheese, but they really do stay crispy.
Reheating: I reheat these in a skillet over low heat for about 2-3 minutes per side, or in the oven at 350°F for about 5 minutes. The microwave will make them rubbery, so I don’t recommend it. A skillet is your best bet.
Freezing: You can freeze these for up to 2 months. Wrap them individually in plastic wrap and then foil, and store them in a freezer bag. Thaw them in the fridge overnight, then reheat in a skillet as described above.
Nutritional Breakdown
Here’s what you’re looking at per sandwich (makes 2 sandwiches from the recipe above, so 4 fingers per serving):
- Calories: approximately 520
- Protein: approximately 22g
- Carbohydrates: approximately 28g
- Fat: approximately 38g
- Fiber: approximately 1g
These aren’t exactly health food, but they’re not meant to be. They’re meant to be delicious and satisfying, which they absolutely are. If you want to lighten them up, use whole grain bread instead of white bread, and go easy on the butter.
Final Thoughts
I genuinely love this recipe, and not just because it tastes incredible (though it absolutely does). I love it because it’s the kind of food that brings people together. It’s not pretentious. It doesn’t require fancy ingredients or special skills. It’s just comfort food that happens to look like you tried really hard.
I love making these on lazy afternoons when I want something warm and satisfying. I love serving them at casual dinner parties and watching people’s faces light up when they bite into that crispy bacon and melty cheese. I love that my partner now asks me to make them at least once a month.
Most of all, I love that this recipe proves that some of the best food comes from just playing around in the kitchen and not being afraid to combine things that sound good together. Bacon and cheese and bread? That’s always going to work.
Try this recipe this week. Make it exactly as written, or make it your own. Either way, I think you’re going to love it. And if you do, come back and tell me about it. I’d love to hear what you think.
—
Bacon-Wrapped Grilled Cheese Fingers
Ingredients
Method
- Step 1: Prep Your Bacon Start by cooking your bacon until it's about 75% done—still a little bit flexible, not completely crispy. I usually do this in a skillet over medium heat, laying the strips flat. This takes about 5-7 minutes depending on your stove. You want it to have color and be mostly cooked, but still pliable enough to wrap without snapping. Transfer the bacon to a paper towel-lined plate to cool slightly. This is important because you need to handle it without burning your fingers, but you also want it still warm enough to be flexible. Hailee's Tip: If you're cooking for a crowd, do your bacon in the oven instead. Lay it on a baking sheet lined with foil and bake at 400°F for about 12-15 minutes. It cooks more evenly, and you free up your stovetop for the actual grilled cheese cooking. Step 2: Assemble Your Sandwich Lay out two slices of bread. Spread a thin layer of your softened butter on the outside of both slices. This is what's going to get golden and crispy in the skillet, so don't skip this step. Now, flip one slice over so the buttered side is down on your work surface. Spread about 1/2 cup of cheese on this slice. Layer your bacon strips on top of the cheese—I usually use one full strip per sandwich, but you can do more if you're feeling wild. Add your other cheese layer (another 1/2 cup), then top with your second slice of bread, buttered side up. What I Messed Up: The first time I made these, I didn't put cheese under the bacon, and it just slid around everywhere. The cheese acts as glue. Use it. Step 3: Wrap It Up Here's the part that looks fancier than it is. Take another strip of bacon and wrap it around the outside of your sandwich like you're hugging it. You can secure it with a toothpick if you're worried, but honestly, the butter and heat will hold it together. Step 4: Get Your Skillet Ready Heat a cast iron skillet or non-stick skillet over medium heat. You want it hot enough that when you place your sandwich in it, it sizzles immediately, but not so hot that the outside burns before the inside melts. Medium is your sweet spot. What I Messed Up: I once tried to make these on high heat because I was impatient. The bacon on the outside got burnt while the cheese was still cold inside. Patience is your friend here. Step 5: Cook the First Side Carefully place your wrapped sandwich in the hot skillet. Let it cook undisturbed for about 3-4 minutes. You're looking for a deep golden-brown color on the outside. Resist the urge to poke it or flip it early. I know it's hard. Step 6: The Flip Using a sturdy spatula, carefully flip your sandwich. This is the moment of truth. If the bacon starts to slip, gently press it back into place with your spatula. Cook the second side for another 3-4 minutes until it's equally golden. What I Messed Up: I once used a wimpy spatula and the whole thing fell apart in the skillet. Use a real spatula, preferably metal. Your future self will thank you. Step 7: The Cheese Check If you're not sure