PEANUT BUTTER BALLS WITH RICE KRISPIES
PEANUT BUTTER BALLS WITH RICE KRISPIES
PEANUT BUTTER BALLS WITH RICE KRISPIES
These Peanut Butter Balls with Rice Krispies are a beloved no-bake treat that balances the rich, salty-sweet depth of creamy peanut butter with the light, airy crunch of toasted rice cereal. The result is a dense yet melt-in-your-mouth confection that offers a satisfying textural contrast in every bite. Coated in a smooth layer of chocolate, these balls provide a familiar comfort flavor profile that appeals to both children and adults alike. They are an ideal choice for quick after-school snacks, lunchbox additions, or as a simple dessert when you need something sweet without turning on the oven. This recipe relies on the classic combination of butter, powdered sugar, and cereal bound together by peanut butter, creating a cohesive mixture that holds its shape perfectly once chilled.
For those who enjoy making treats that require minimal effort but deliver maximum satisfaction, this recipe is a staple. The preparation involves melting ingredients together, mixing in the cereal, rolling the mixture into uniform spheres, and finally dipping them in chocolate. It is a process that can be completed in under an hour, excluding the necessary chilling time. Whether you are hosting a casual gathering or simply craving a homemade candy, these balls offer a reliable and delicious solution. You can find more inspiration for similar sweet treats by visiting Follow Hailee Recipes on Pinterest.
Why This Recipe Works
The success of this recipe lies in the precise balance between wet and dry ingredients. The melted butter acts as a binding agent that softens the powdered sugar and helps the peanut butter adhere to the cereal without making the mixture greasy. Using a high-quality creamy peanut butter ensures a smooth texture throughout the ball, preventing any gritty chunks from interfering with the eating experience. The Rice Krispies cereal provides the essential structural integrity; because the cereal is already puffed and dry, it absorbs just enough moisture from the butter and peanut butter mixture to become pliable while retaining its signature snap.
Chilling is a critical step in this process. Unlike baked goods that set through heat, these balls rely on temperature changes to firm up. When the mixture is warm, it is too soft to roll into neat spheres. Once refrigerated, the butter solidifies, locking the cereal and peanut butter together into a stable form. This allows the chocolate coating to be applied smoothly without the balls falling apart. The final chocolate shell not only adds a layer of flavor but also acts as a protective barrier, keeping the interior moist and preventing the peanut butter from becoming sticky at room temperature.
Ingredients
To make this batch of Peanut Butter Balls with Rice Krispies, you will need a few pantry staples that work together seamlessly. The quantities below are calibrated to create approximately 30 to 35 individual balls, which is a standard yield for a family-sized batch. Ensure your peanut butter is well-stirred if it has separated, as natural oils can affect the consistency of the mixture.
- Rice Krispies Cereal: 6 cups (Kellogg’s brand recommended for optimal crispness)
- Creamy Peanut Butter: 1 cup (standard commercial style works best)
- Unsalted Butter: 1/2 cup (1 stick), melted
- Powdered Sugar: 1 cup (confectioners’ sugar)
- Vanilla Extract: 1 teaspoon (pure extract preferred for best flavor)
- Semi-Sweet Chocolate Chips: 2 cups (for the coating)
- Shortening or Coconut Oil: 1 tablespoon (optional, helps thin the chocolate for easier dipping)
How To Make PEANUT BUTTER BALLS WITH RICE KRISPIES
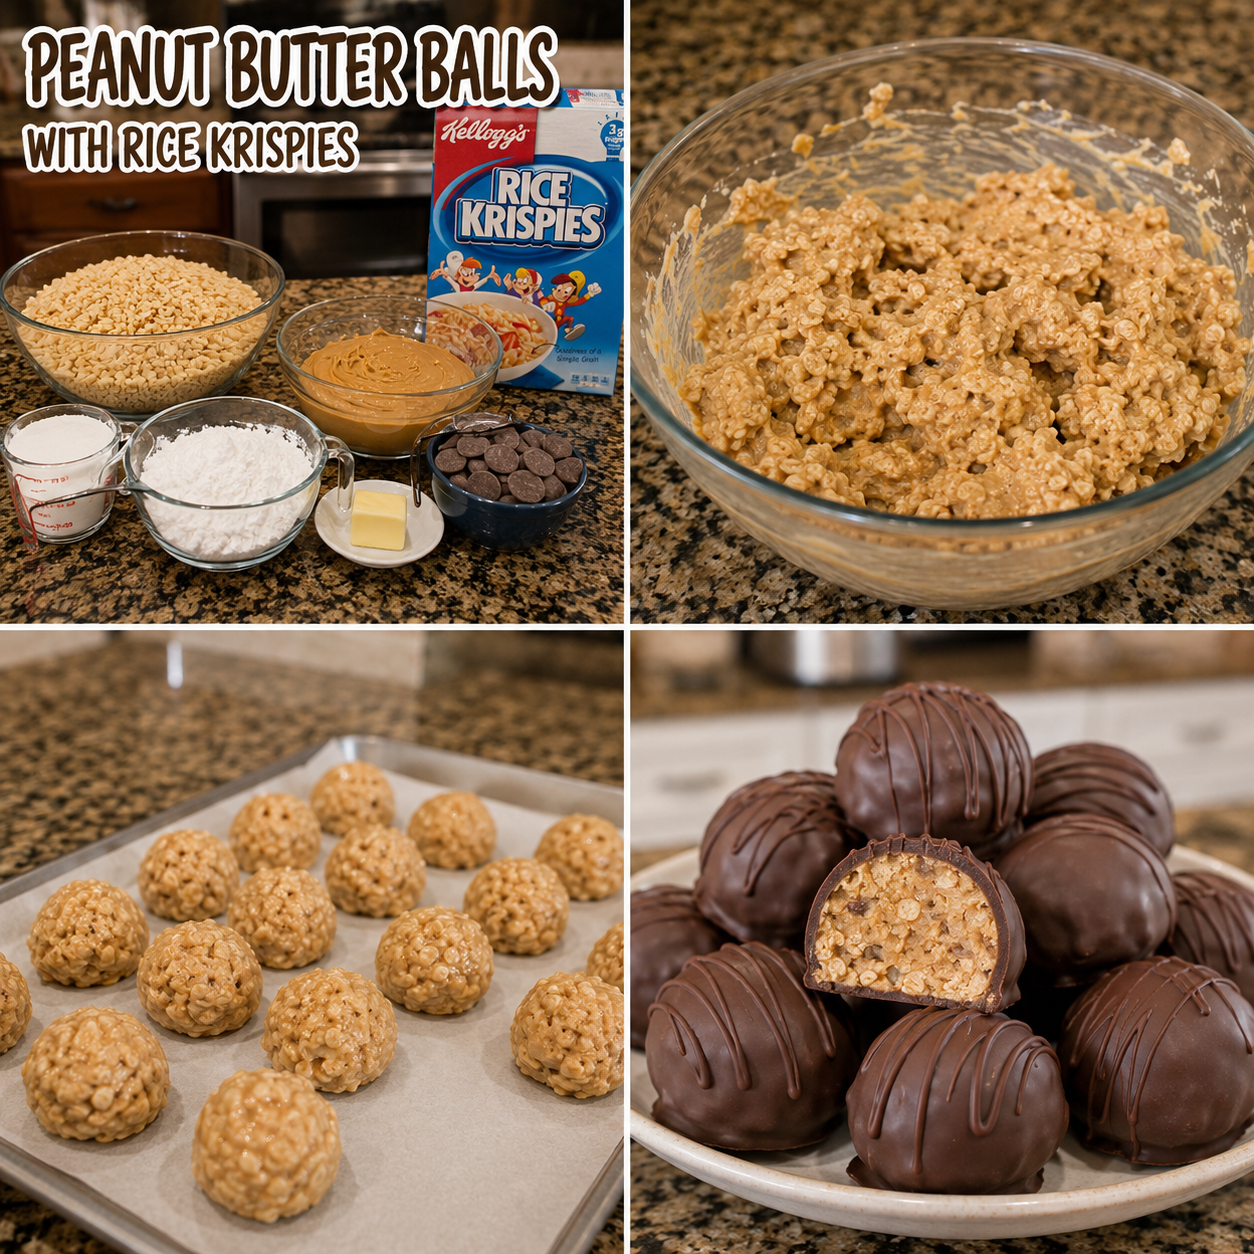
- Prepare the Mixture Base: In a large mixing bowl, combine the melted unsalted butter, creamy peanut butter, powdered sugar, and vanilla extract. Whisk these ingredients together vigorously until they form a completely smooth, homogenous paste. There should be no lumps of sugar or streaks of butter remaining. The mixture will look glossy and thick at this stage.
- Incorporate the Cereal: Gently fold the 6 cups of Rice Krispies cereal into the peanut butter mixture. Use a sturdy spatula to ensure all the cereal pieces are evenly coated. Be careful not to crush the cereal too much; you want to maintain some of the air pockets that give the balls their light texture. Continue folding until the entire bowl is filled with a sticky, textured mass that holds together when pressed.
- Chill the Dough: Cover the bowl tightly with plastic wrap and place it in the refrigerator for about 30 minutes. This step is crucial because the cold temperature will firm up the butter, making the mixture stiff enough to handle. If you skip this step, the mixture will be too soft to roll into balls, and it will likely stick to your hands excessively.
- Roll the Balls: Once chilled, remove the bowl from the fridge. Scoop out portions of the mixture using a small cookie scoop or a tablespoon. Roll each portion between your palms to form a smooth, round ball. Aim for a size roughly equivalent to a golf ball or slightly smaller. Place the finished balls onto a baking sheet lined with parchment paper or a silicone mat. Return the tray to the refrigerator while you prepare the chocolate coating.
- Melt the Chocolate: In a microwave-safe bowl, combine the semi-sweet chocolate chips and the tablespoon of shortening or coconut oil. Microwave in 30-second intervals, stirring gently between each interval, until the chocolate is fully melted and smooth. If using a double boiler, place the bowl over simmering water and stir constantly until melted. Do not overheat the chocolate, as this can cause it to seize and become grainy.
- Dip and Set: Using a fork or a dipping tool, carefully lower one chilled ball into the melted chocolate. Lift it out, allowing excess chocolate to drip back into the bowl. Gently tap the fork against the side of the bowl to remove drips. Place the coated ball back onto the prepared baking sheet. Repeat this process with all the remaining balls. Allow the chocolate to set at room temperature or place the tray in the refrigerator for 15 minutes to speed up the hardening process.
Doneness And Troubleshooting
Knowing when your Peanut Butter Balls are ready to be rolled is key to a successful outcome. The mixture should feel cool to the touch and hold its shape firmly when squeezed. If the mixture feels too soft and sticky during the rolling phase, it indicates that the initial chilling time was insufficient. Simply return the bowl to the refrigerator for another 15 to 20 minutes before attempting to roll again. Conversely, if the mixture becomes too hard to roll, it may have been chilled for too long. Let it sit at room temperature for 5 to 10 minutes to soften slightly.
If your chocolate coating appears dull or cloudy after setting, it may have been overheated or exposed to moisture. Chocolate is sensitive to water; even a single drop of water can cause it to seize. Ensure your bowls and utensils are completely dry before melting the chocolate. If the chocolate is too thick to coat the balls smoothly, add a tiny amount of additional shortening or coconut oil and stir until the desired consistency is reached. A thinner chocolate layer results in a more elegant finish and makes it easier to dip the balls without breaking them.
Substitutions And Variations
While the traditional recipe uses creamy peanut butter, you can experiment with crunchy peanut butter for added texture. Keep in mind that the nuts may make the mixture slightly harder to roll, so you might need to press the balls a bit more firmly. For a dairy-free version, substitute the unsalted butter with a plant-based butter stick and use dairy-free chocolate chips. Note that plant-based butters may have different melting properties, so monitor the consistency closely.
If you prefer white chocolate or milk chocolate for the coating, you can easily swap them for the semi-sweet chips. White chocolate is sweeter and melts more quickly, so be extra careful with the heating times. For a festive twist, you can sprinkle crushed peanuts, sprinkles, or sea salt on top of the balls immediately after dipping them in chocolate, before the coating sets. These additions add visual appeal and a burst of flavor that complements the rich peanut butter center.
Serving Suggestions
These Peanut Butter Balls with Rice Krispies are versatile enough to serve in various settings. They make excellent party favors when placed in small cellophane bags tied with ribbon. They are also perfect for school lunches, provided they are stored in a cool environment to prevent the chocolate from melting. Serve them alongside a glass of cold milk or a cup of coffee for a classic snack pairing. Because they are bite-sized, they are ideal for buffet tables where guests can pick them up without needing plates or utensils.
Storage And Reheating
Proper storage is essential to maintain the quality of these treats. Store the cooled balls in an airtight container in the refrigerator. Layer them with parchment paper if stacking them to prevent the chocolate from sticking to the balls above. They will stay fresh for up to two weeks when kept chilled. If you need to store them for longer periods, you can freeze them. Place the frozen balls in a freezer-safe bag or container; they can last for up to three months. Thaw them in the refrigerator before serving to avoid condensation forming on the chocolate.
Reheating is generally not necessary, as these are meant to be eaten cold or at room temperature. However, if the chocolate becomes too soft due to warm weather, simply return the container to the refrigerator for 15 minutes to firm up. Avoid microwaving the balls unless you intend to melt the chocolate intentionally, as the peanut butter filling could become runny.
This recipe offers a straightforward path to a crowd-pleasing dessert that requires no baking skills. By following the steps for proper mixing and chilling, you ensure a consistent texture and flavor in every batch. Enjoy the process of making these treats and sharing them with friends and family.
PEANUT BUTTER BALLS WITH RICE KRISPIES
Ingredients
Method
- Combine melted butter, peanut butter, powdered sugar, and vanilla in a large bowl; whisk until smooth.
- Fold in Rice Krispies cereal until evenly coated.
- Chill the mixture in the refrigerator for 30 minutes to firm up.
- Scoop and roll the mixture into 1-inch balls; place on a parchment-lined tray.
- Melt chocolate chips with shortening; dip each ball and let set on the tray.