Baked Caesar Chicken: A Comforting Weeknight Delight
Baked Caesar Chicken: A Comforting Weeknight Delight
Baked Caesar Chicken: Your New Weeknight Favorite
As a busy food blogger, I’m always on the lookout for easy, delicious recipes that I can whip up on even the craziest weeknights. And let me tell you, this Baked Caesar Chicken has become a total lifesaver in my household! It’s a simple, flavor-packed dish that comes together in a flash, and it’s become a regular rotation in my dinner lineup.
I first stumbled upon this recipe a few months ago when I was craving something comforting and satisfying, but didn’t have the energy for a complicated meal. I had a package of chicken breasts in the fridge and a jar of Caesar dressing in the pantry, and the idea for Baked Caesar Chicken just popped into my head. I threw it all together, popped it in the oven, and within 30 minutes, I had a delicious, restaurant-worthy dinner on the table. The chicken was juicy and tender, the Caesar topping was crispy and flavorful, and the whole dish just hit the spot in the most delightful way.
Since that first time, I’ve made this Baked Caesar Chicken more times than I can count. It’s become a go-to for busy weeknights, lazy Sundays, and even casual gatherings with friends. The best part is, it’s so easy to customize – you can switch up the seasonings, add in some veggies, or even use a different type of dressing. But no matter how you make it, this dish is guaranteed to be a hit. Follow me on HaileeRecipes on Pinterest for more easy, delicious recipe ideas like this one!
Why This Baked Caesar Chicken Recipe Works
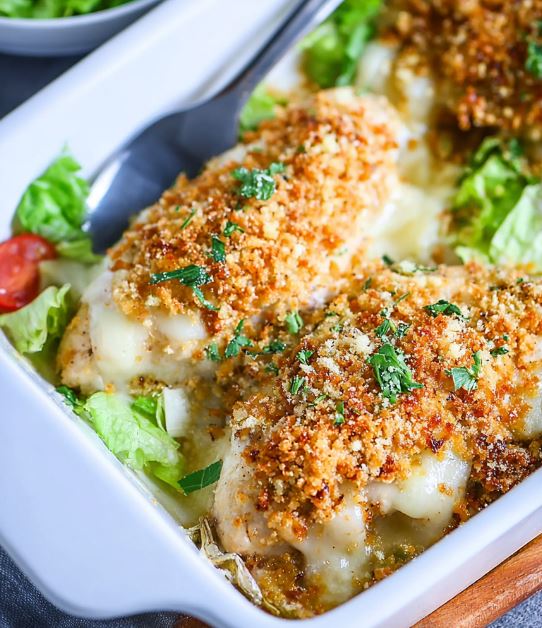
There are so many things to love about this Baked Caesar Chicken recipe. First and foremost, it’s incredibly easy to make – you literally just need a few simple ingredients and about 30 minutes of your time. But despite its simplicity, the flavors are out of this world. The juicy, tender chicken is coated in a creamy, garlicky Caesar dressing, and then topped with a crispy, golden-brown layer of Parmesan and breadcrumbs. It’s the perfect balance of savory, tangy, and crunchy, and it’s sure to become a new family favorite.
Another thing I love about this recipe is how versatile it is. You can serve it as the main course for a weeknight dinner, or you can use it as a tasty topping for salads, pasta, or even baked potatoes. It also makes a great party appetizer or game-day snack. And the best part is, it reheats beautifully, so you can easily make a big batch and enjoy the leftovers all week long.
Ingredients for Baked Caesar Chicken
- Boneless, skinless chicken breasts
- Caesar salad dressing (I like to use a creamy, garlic-based dressing)
- Grated Parmesan cheese
- Panko breadcrumbs
- Dried oregano
- Garlic powder
- Salt and pepper
Hailee’s Tip: For the best texture, I like to use a combination of Parmesan and Panko breadcrumbs for the topping. The Parmesan adds a nice salty, savory flavor, while the Panko gives you that perfect crispy crunch.
Optional Add-Ins and Variations
One of the great things about this Baked Caesar Chicken recipe is that it’s so easy to customize. Here are a few ideas for mixing things up:
- Veggie-Packed: Add in some roasted broccoli, asparagus, or cherry tomatoes for extra nutrition and flavor.
- Spicy: Sprinkle in a pinch of red pepper flakes or swap the Caesar dressing for a spicy ranch or chipotle-lime version.
- Cheesy: Top the chicken with slices of mozzarella or provolone cheese before baking.
- Herby: Mix in some chopped fresh basil, oregano, or thyme to the breadcrumb topping.
How to Make Baked Caesar Chicken
Alright, let’s get to the good stuff – the step-by-step instructions for making this delicious Baked Caesar Chicken!
- Preheat your oven to 400°F (200°C) and grease a baking dish or sheet pan.
- Pat the chicken breasts dry with paper towels and season them generously with salt and pepper.
- In a shallow bowl, mix together the Parmesan cheese, Panko breadcrumbs, oregano, and garlic powder.
- Hailee’s Tip: Make sure to use freshly grated Parmesan for the best flavor and texture.
- Dip each chicken breast into the Caesar dressing, coating it completely on all sides.
- Then, press the chicken into the Parmesan-breadcrumb mixture, making sure to coat the entire surface.
- Place the coated chicken breasts in the prepared baking dish or on the sheet pan.
- Bake for 25-30 minutes, or until the chicken is cooked through and the topping is golden-brown and crispy.
- What I Messed Up At First: I used to overbake the chicken, which made it dry and tough. Now I keep a close eye on it and pull it out as soon as the topping is nicely browned.
Common Mistakes to Avoid
While this Baked Caesar Chicken recipe is pretty foolproof, there are a few common mistakes to watch out for:
- Overcrowding the pan: Make sure to give the chicken breasts enough space in the baking dish or on the sheet pan. Overcrowding can lead to steaming instead of crisping.
- Using the wrong dressing: For the best flavor, you’ll want to use a creamy, garlic-based Caesar dressing. Avoid anything too thin or vinegary.
- Overbaking: Keep a close eye on the chicken and pull it out as soon as the topping is golden-brown and crispy. Overcooked chicken can become dry and tough.
My Tested Substitutions
While this Baked Caesar Chicken recipe is pretty perfect as-is, there are a few ingredient substitutions that can work well:
- Chicken thighs: If you prefer dark meat, you can use boneless, skinless chicken thighs instead of breasts.
- Greek yogurt: For a healthier twist, you can use plain Greek yogurt in place of the Caesar dressing.
- Gluten-free breadcrumbs: If you need a gluten-free option, swap the Panko for gluten-free breadcrumbs.
- Vegan dressing: For a dairy-free version, use a plant-based Caesar dressing.
How to Customize This Baked Caesar Chicken
As I mentioned, one of the best things about this recipe is how versatile it is. Here are a few ideas for customizing it for different diets, occasions, and flavor preferences:
- Low-Carb: Omit the breadcrumbs and serve the chicken over a bed of greens or cauliflower rice.
- Keto-Friendly: Use crushed pork rinds or almond flour instead of breadcrumbs.
- Meal Prep: Bake a big batch of the chicken and use it in salads, wraps, or over pasta throughout the week.
- Game Day: Cut the chicken into bite-sized pieces and serve as a tasty appetizer with a side of extra Caesar dressing for dipping.
Serving Suggestions for Baked Caesar Chicken
I love serving this Baked Caesar Chicken as the main course for a weeknight dinner, but it’s also incredibly versatile. Here are some of my favorite ways to enjoy it:
- Over a bed of fresh greens or roasted veggies for a complete meal
- Stuffed into a pita or wrap with some extra dressing and crunchy toppings
- Sliced and added to a Caesar salad for a heartier, protein-packed dish
- Served alongside roasted potatoes or a simple side of garlic bread
Meal Prep and Storage Tips
One of the best things about this Baked Caesar Chicken is how easy it is to meal prep and store. Here are my top tips:
- You can assemble the chicken and topping ahead of time, then bake it off when you’re ready to serve.
- Leftover baked chicken will keep in the fridge for up to 4 days. Reheat it in the oven or microwave until heated through.
- You can also freeze the baked chicken for up to 3 months. Just let it thaw in the fridge overnight before reheating.
Nutritional Information (per serving)
* Calories: 310
* Protein: 35g
* Carbohydrates: 12g
* Fat: 14g
* Fiber: 1g
I hope you love this Baked Caesar Chicken as much as I do! It’s the perfect easy, delicious, and versatile recipe for busy weeknights or casual gatherings. Follow me on HaileeRecipes on Pinterest for more tasty recipe ideas like this one. Enjoy!
**Ingredients**
* 4 boneless, skinless chicken breasts
* 1 cup Caesar salad dressing
* 1/2 cup grated Parmesan cheese
* 1/2 cup Panko breadcrumbs
* 1 teaspoon dried oregano
* 1/2 teaspoon garlic powder
* Salt and pepper to taste
**Equipment**
* Prep Time: 10 minutes
* Cook Time: 25-30 minutes
* Total Time: 35-40 minutes
**Method**
1. Preheat oven to 400°F (200°C). Grease a baking dish or sheet pan.
2. Pat the chicken breasts dry and season generously with salt and pepper.
3. In a shallow bowl, mix together the Parmesan cheese, Panko breadcrumbs, oregano, and garlic powder.
4. Dip each chicken breast into the Caesar dressing, coating it completely.
5. Press the dressing-coated chicken into the Parmesan-breadcrumb mixture, making sure to coat the entire surface.
6. Place the coated chicken breasts in the prepared baking dish or on the sheet pan.
7. Bake for 25-30 minutes, or until the chicken is cooked through and the topping is golden-brown and crispy.
**Nutrition** (per serving)
* Calories: 310
* Protein: 35g
* Carbohydrates: 12g
* Fat: 14g
* Fiber: 1g
**Notes**
This Baked Caesar Chicken is best served immediately, but leftovers can be stored in the fridge for up to 4 days. The baked chicken can also be frozen for up to 3 months. Reheat in the oven or microwave until heated through.
Table of Contents
Baked Caesar Chicken
Ingredients
Equipment
Method
- Instructions
- Prepare the Chicken:
- Preheat oven to 375°F (190°C).
- Lightly grease a baking dish with olive oil.
- Place chicken breasts in the dish and season with garlic powder and black pepper.
- Add Caesar Layer:
- Spread Caesar dressing evenly over each chicken breast.
- Top with Cheese & Crumbs:
- Sprinkle mozzarella over the chicken.
- In a small bowl, mix parmesan and breadcrumbs, then sprinkle on top.
Notes
Bake 30–35 minutes until chicken reaches 165°F (74°C) internally and topping is golden brown. Serve:
Garnish with fresh parsley and serve warm with salad or roasted vegetables.