Strawberry Cheesecake Lush Dessert Recipe
Strawberry Cheesecake Lush Dessert Recipe
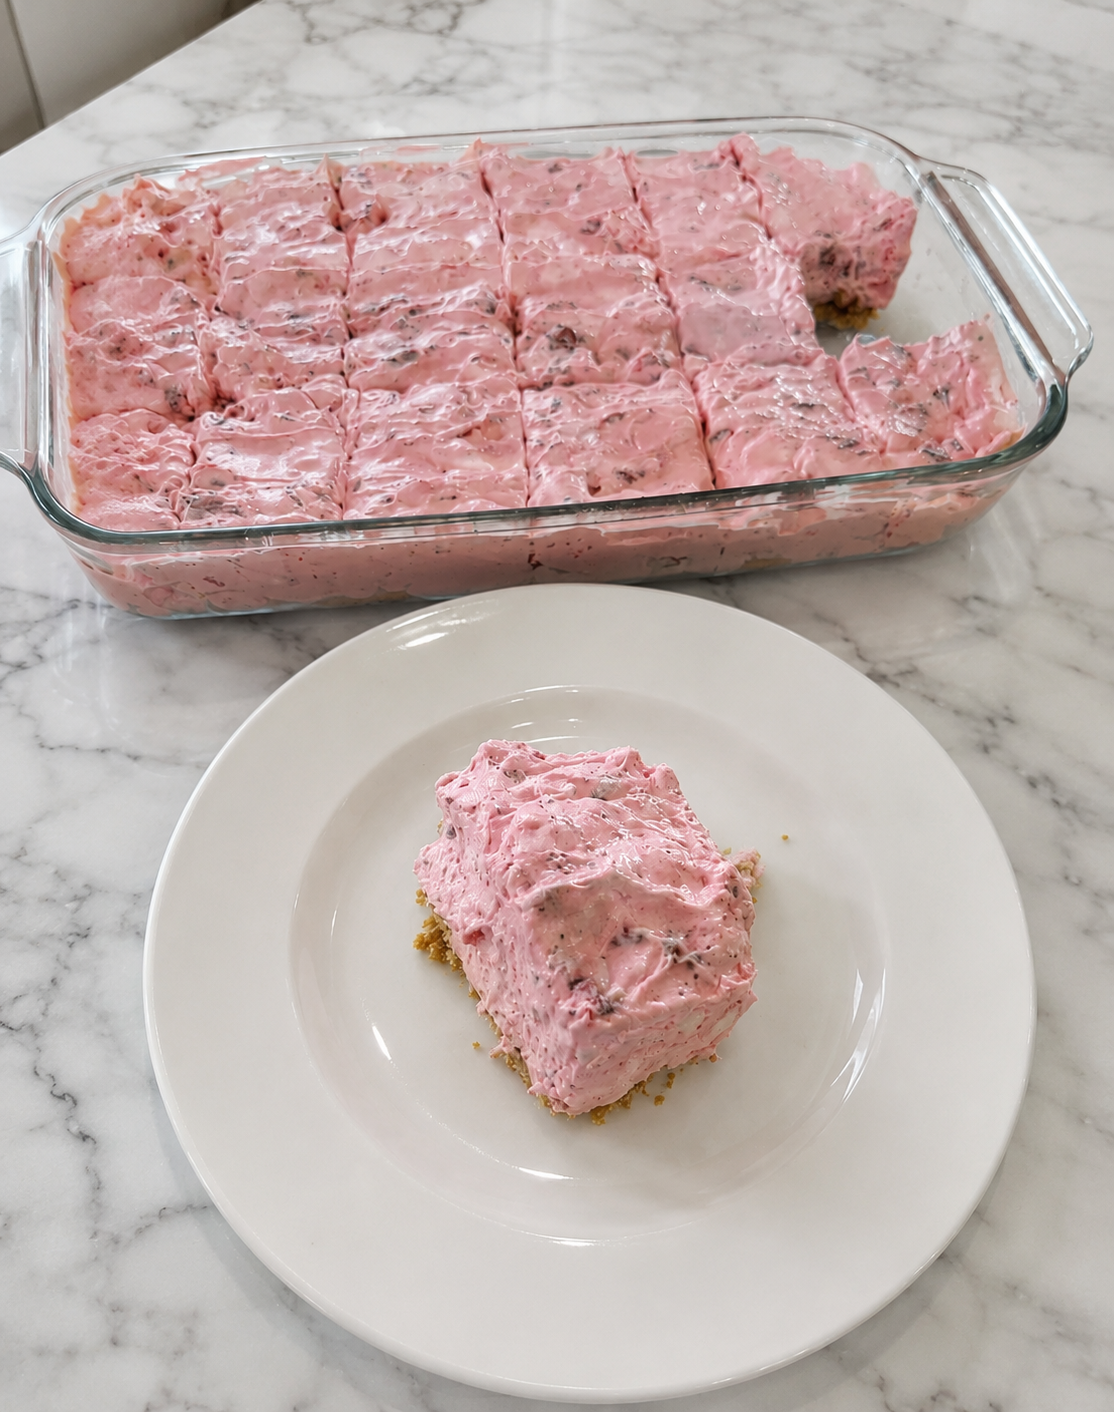
Strawberry Cheesecake Lush Dessert: The No-Bake Dream That Changed My Summer
I’m going to be honest with you—I created this strawberry cheesecake lush dessert on a Tuesday night when I was too tired to turn on my oven but absolutely craving something decadent. My kitchen was warm, my energy was low, and I had a container of fresh strawberries staring at me from the fridge. So I did what I always do: I started layering.
What came out of that late-night experiment was something I now make at least twice a month, and my friends have literally begged me for the recipe. It’s a strawberry cheesecake lush dessert—meaning it’s got all the creamy, dreamy cheesecake vibes you love, but it’s layered, it’s no-bake, and it comes together in about twenty minutes of actual work. No standing over a hot stove. No waiting for something to cool. Just you, a few simple ingredients, and a dessert that tastes like summer in a dish.
This recipe is for anyone who wants to impress people without breaking a sweat. It’s for the busy parent who needs something that looks fancy but doesn’t require fancy skills. It’s for the person who gets nervous around ovens (no judgment—I’ve been there). It’s for anyone who’s ever thought, “I wish I could eat cheesecake but make it easier.”
The beauty of this strawberry cheesecake lush dessert is that it’s forgiving. The layers are flexible. Your guests don’t need to know you made it while wearing yesterday’s yoga pants. And honestly? That’s the kind of recipe I live for. Follow me on HaileeRecipes on Pinterest if you want to save this and dozens of other no-bake desserts that’ll make your life infinitely easier.
Why You’ll Love This Recipe
Let me break down exactly why this has become my go-to dessert, and probably why it’ll become yours too.
It’s genuinely no-bake. I’m not using the term loosely. Your oven stays off. Your stovetop stays untouched. You’re using a mixing bowl, a spatula, and maybe a food processor if you’re feeling fancy. That’s it.
It tastes like an indulgent dessert but feels manageable. You get that creamy cheesecake layer, the buttery graham cracker crust, fresh strawberries, and a light whipped topping. Every element is there—it’s just assembled instead of baked.
It’s actually impressive to look at. When you bring this to a potluck or set it on your table, people assume you spent hours on it. The layers are gorgeous. The colors are naturally beautiful. You get all the credit for minimal effort.
It feeds a crowd. This recipe makes about 12 to 15 servings depending on how generous you’re feeling. One dish, one trip to the table, everyone’s happy.
It’s flexible with timing. Make it the morning of, make it the night before, make it three hours before your guests arrive. It holds up beautifully in the fridge, and it actually tastes better after the flavors have had time to settle.
Ingredients
- For the crust: 2 cups graham cracker crumbs, 6 tablespoons melted butter, 2 tablespoons sugar
- For the cheesecake layer: 16 ounces cream cheese (softened to room temperature), 1 cup powdered sugar, 1 teaspoon vanilla extract, 1 cup heavy whipping cream
- For the strawberry layer: 1 pound fresh strawberries (hulled and sliced), 3 tablespoons sugar, 1 tablespoon lemon juice
- For the topping: 1 cup heavy whipping cream, 2 tablespoons powdered sugar, ½ teaspoon vanilla extract
Hailee’s Tip: Room temperature cream cheese is non-negotiable here. Cold cream cheese will be lumpy, and lumpy cheesecake layer is not the vibe. Take it out of the fridge 30 minutes before you start, and you’ll thank me.
Hailee’s Tip: Don’t skip the lemon juice in the strawberry layer. It brightens everything up and keeps the strawberries from tasting one-note. Trust me on this one.
Hailee’s Tip: I use a 9×13 inch baking dish, which gives you nice, manageable portions. If you use something smaller, your layers will be thicker, which is honestly also delicious.
Optional Add-Ins and Variations
This is where you get to make this recipe your own, and I encourage you to do it.
- Almond extract: Add ¼ teaspoon to the cheesecake layer for a subtle almond note that pairs beautifully with strawberries.
- Liqueur: A tablespoon of strawberry liqueur or chambord mixed into the strawberry layer takes this from “weeknight dessert” to “dinner party moment.”
- Chocolate drizzle: Melt some dark chocolate and drizzle it over the top before serving. Strawberry and chocolate is never a mistake.
- Fresh mint: A few torn mint leaves scattered on top add color and a fresh flavor boost.
- Different berries: Raspberries, blueberries, or a mix work beautifully here. The technique stays exactly the same.
- Mascarpone swirl: Mix some mascarpone into the whipped cream topping for extra richness.
Step-by-Step Method
Step 1: Make the crust. Combine your graham cracker crumbs, melted butter, and sugar in a bowl. Mix until it looks like wet sand—you want everything moistened but not mushy. Press this mixture firmly into the bottom of your 9×13 baking dish. Use the bottom of a measuring cup to get it even and compact. Stick this in the fridge while you work on the next layer. This helps it set and prevents it from mixing with the cheesecake layer.
What I messed up: The first time I made this, I didn’t press the crust down firmly enough, and it got a little crumbly when people were eating it. Now I really press. Firmness is your friend here.
Step 2: Whip the cream. In a separate bowl, whip your heavy cream until stiff peaks form. This takes about 3 to 4 minutes with an electric mixer. Don’t walk away—you want it thick but not separated. Set this aside.
Step 3: Make the cheesecake layer. In another bowl, beat your room-temperature cream cheese with the powdered sugar and vanilla until smooth and creamy. This should take about 2 minutes. Now gently fold in your whipped cream. I use a rubber spatula and fold gently—I’m not trying to deflate all those air bubbles I just worked to create. The mixture should be light, fluffy, and mousse-like.
What I messed up: I used to just stir the whipped cream in, and the result was dense. Folding makes all the difference in getting that lush, cloud-like texture.
Step 4: Spread the cheesecake layer. Take your crust out of the fridge and spread the cheesecake mixture evenly over it. I use an offset spatula, but honestly, a regular spatula or even the back of a spoon works fine. Smooth it out as best you can. It doesn’t have to be perfect—rustic is charming.
Step 5: Prepare the strawberry layer. Toss your sliced strawberries with the sugar and lemon juice. Let them sit for about 5 minutes so they release some of their juices. This creates a light syrup that’s absolutely delicious.
Step 6: Layer the strawberries. Drain most of the liquid from the strawberries (save it—you can drizzle it on top later if you want). Spread the strawberries evenly over the cheesecake layer. Don’t worry about being perfect here. Nature is imperfect and beautiful.
Step 7: Make the whipped cream topping. In a clean bowl, whip your final cup of heavy cream with the powdered sugar and vanilla until stiff peaks form. Spread this over the strawberry layer. Again, imperfection is fine. I actually like a little rustic texture on top.
Step 8: Chill and serve. Cover with plastic wrap and refrigerate for at least 2 hours before serving. Overnight is even better if you have the time. When you’re ready to serve, cut into squares and plate it up.
Common Mistakes to Avoid
Using cold cream cheese: This is the number one culprit for a lumpy cheesecake layer. Take it out 30 minutes early. Your future self will be grateful.
Overmixing the whipped cream: If you keep beating after stiff peaks form, you’ll end up with something that looks more like butter. Stop when it’s fluffy and thick.
Not pressing the crust enough: A loose crust will crumble when people try to eat it. Press it down firmly with the bottom of a measuring cup.
Skipping the chilling time: I know you want to eat it now, but those 2 hours make a real difference. The layers set, the flavors meld, and everything becomes more stable.
Using strawberries that are too wet: If your strawberries are very watery, pat them dry before layering. Too much liquid can make the whole dessert soggy.
My Tested Substitutions
For the cream cheese: Honestly, I haven’t found a great substitute here. Cream cheese is pretty essential to the flavor and texture. If you need dairy-free, you could try a dairy-free cream cheese, but I haven’t tested it personally.
For the graham cracker crust: Crushed digestive biscuits work beautifully. So do vanilla wafers or even crushed pretzels if you want something salty. The ratio stays the same: about 2 cups of crumbs to 6 tablespoons butter.
For the heavy whipping cream: If you can’t do dairy, coconut cream whips up nicely. You might need to chill your bowl first, but it works. The texture will be slightly different but still delicious.
For the powdered sugar: You can use regular granulated sugar if that’s what you have, though you’ll need to dissolve it first so it doesn’t feel gritty. I’d blend it in a food processor with a tablespoon of water to make a simple syrup, then use that.
How to Customize
The beauty of this strawberry cheesecake lush dessert is that it’s a template, not a rigid rule.
Make it more indulgent: Add a layer of chocolate pudding between the crust and cheesecake layer. Or drizzle the finished dessert with salted caramel.
Make it lighter: Use Greek yogurt mixed into the cheesecake layer for extra protein and a slightly tangier flavor. Use about half cream cheese and half Greek yogurt.
Make it boozy: Add a tablespoon of strawberry liqueur or Chambord to the strawberry layer. Or add a teaspoon of rum to the cheesecake mixture.
Make it different berries: Swap the strawberries for raspberries, blueberries, blackberries, or a mixture. The technique is exactly the same.
Make it mini: Use a muffin tin and individual portions. Everything stays the same, just in smaller quantities per cup.
Serving Ideas
I love serving this strawberry cheesecake lush dessert in different ways depending on the occasion.
For a casual family dinner: Bring the whole dish to the table and let everyone serve themselves. It’s less formal, more fun, and somehow tastes better when you’re not worried about perfect plating.
For a dinner party: Cut into neat squares, plate individually, and add a fresh mint leaf or a few extra strawberry slices on top. Maybe a light dusting of powdered sugar.
For a potluck: Bring the whole thing in the dish. It travels well, stays fresh, and people can help themselves.
With coffee: This dessert is perfect alongside a strong cup of coffee or espresso. The tartness of the strawberries and the richness of the cheesecake balance beautifully with coffee.
With champagne or prosecco: If you’re feeling fancy, this pairs wonderfully with a glass of bubbly. The fruit, the cream, the bubbles—it’s a moment.
Meal Prep and Storage
Make-ahead: You can make this up to 2 days in advance. I actually think it tastes better on day two when everything has had time to settle. Just cover it tightly with plastic wrap and refrigerate.
Storage: Keep it covered in the fridge for up to 4 days. After that, the crust starts to get a little soft, but it’s still edible if you eat it straight from the dish with a spoon.
Freezing: You can freeze this for up to a month. Wrap it well in plastic wrap and then foil. Thaw it in the fridge overnight before serving. The texture will be slightly different—a bit more icy—but it’s still delicious.
Individual portions: If you want to make individual servings, use a muffin tin or small mason jars. Layer everything the same way, just in smaller quantities. These keep for 3 days in the fridge and are perfect for grab-and-go breakfasts (yes, I eat dessert for breakfast sometimes, and I’m not sorry).
Nutritional Breakdown
This is approximate since it depends on your exact ingredients and serving size. I’m calculating this for 12 servings of the full dish.
- Calories: approximately 320 per serving
- Protein: 4g
- Carbohydrates: 28g
- Fat: 22g
- Fiber: 1g
- Sugar: 22g
This is definitely a treat, not a health food, but the strawberries do add some vitamins and the cream cheese gives you a bit of protein. Balance it out with a salad at lunch and you’re good to go.
Final Thoughts
Here’s what I love most about this strawberry cheesecake lush dessert: it proves that impressive food doesn’t have to be complicated. You don’t need culinary school or fancy equipment or hours of your day. You need a mixing bowl, some good ingredients, and the willingness to layer things up.
I’ve made this for family dinners, potlucks, date nights, and just because it was Tuesday and I wanted something sweet. Every single time, people ask for the recipe. Every single time, I tell them it’s easier than they think. And every single time, they’re shocked at how simple it actually is.
That’s the kind of recipe I’m here to share with you. The kind that makes you look like you have your life together, even when you’re still in your yoga pants. The kind that tastes like summer, feels like celebration, and comes together in about twenty minutes of actual work.
Make this. Serve it. Let people think you’re some kind of dessert wizard. And then come back and tell me how it went. I’m always here for the kitchen wins.
—
Recipe Card
**Strawberry Cheesecake Lush Dessert**
Strawberry Cheesecake Lush Dessert Recipe
Ingredients
Method
- Combine graham cracker crumbs, melted butter, and 2 tablespoons sugar in a bowl until mixture resembles wet sand. Press firmly into the bottom of a 9x13