Baked Mac and Cheese Recipe | Creamy Comfort
Baked Mac and Cheese Recipe | Creamy Comfort
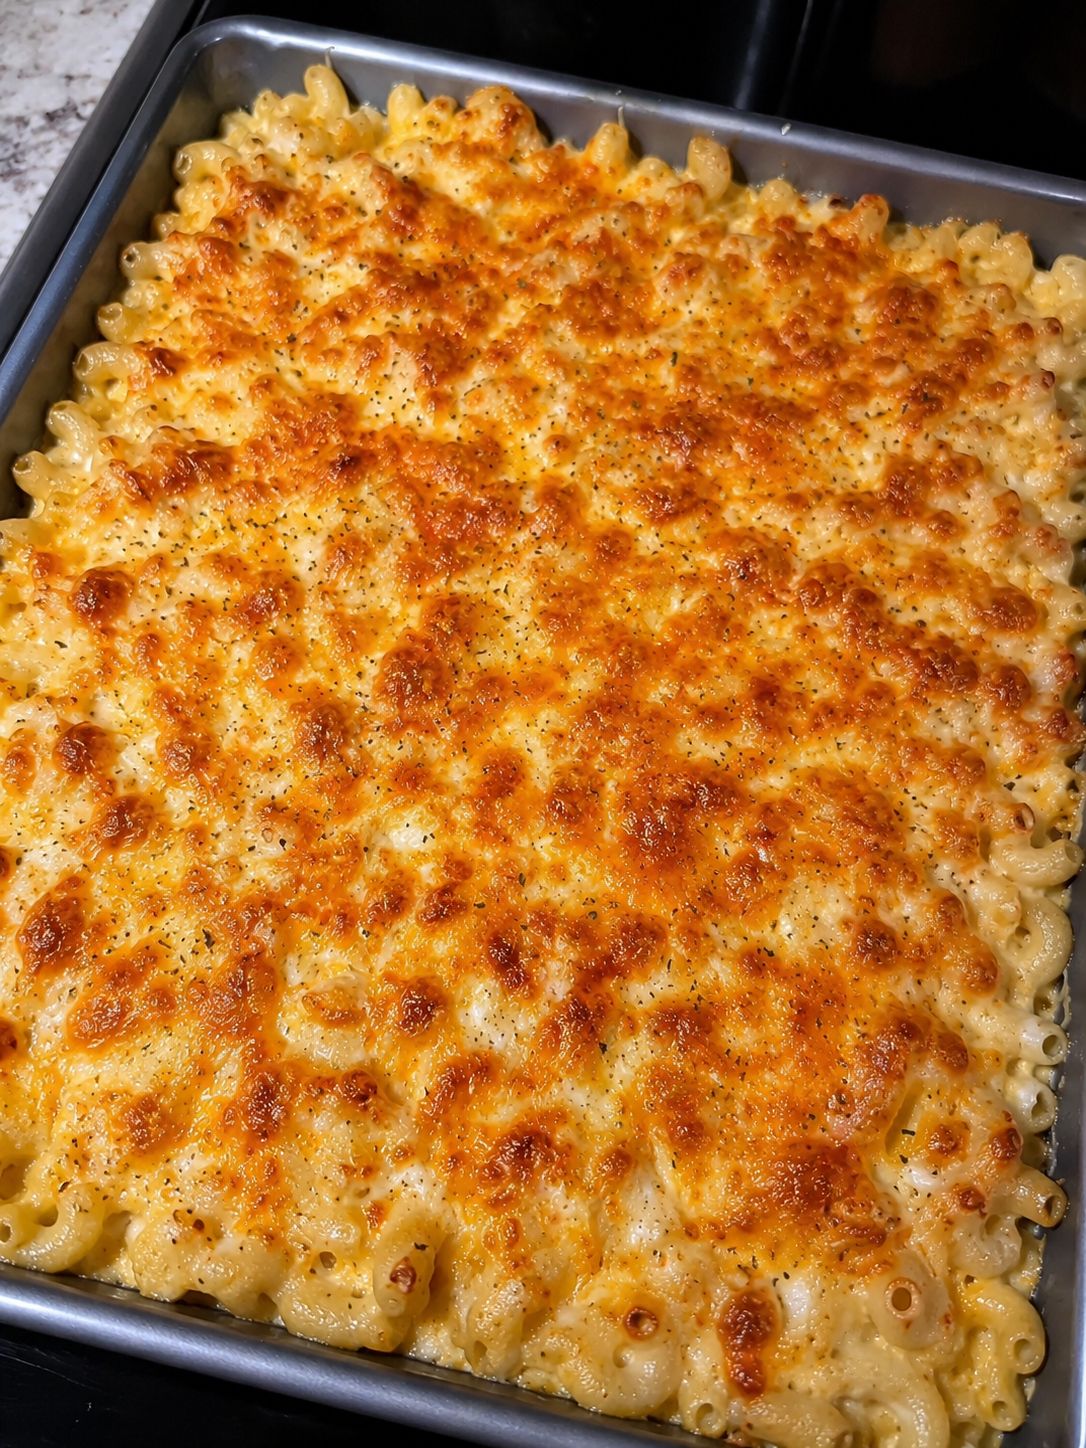
Baked Mac and Cheese: The Comfort Food That Actually Tastes Like Home
I still remember the exact moment I stopped making boxed mac and cheese. I was standing in my kitchen on a Tuesday night, absolutely exhausted from work, and I realized I was craving something that actually tasted like it came from someone who cared. Not that there’s anything wrong with the box stuff—I grew up on it, and I’ll defend it forever—but something shifted. I wanted that creamy, golden, bubbly baked mac and cheese that my grandmother used to make. The kind where you could taste real cheese, where the noodles were tender but not mushy, and where the top got crispy and golden and made you feel like you were being hugged by comfort itself.
So I started experimenting. A lot. Some batches were soupy disasters. Some were dry and sad. One time I burned the top so badly my smoke detector went off, and my cat gave me a look that said everything. But after probably thirty attempts (I’m not exaggerating), I figured out what actually works. This baked mac and cheese recipe is what I make now when I want something reliable, impressive, and genuinely delicious. It’s not fancy or fussy. It’s just real.
This recipe is for anyone who’s ever wanted homemade mac and cheese but thought it was too complicated or time-consuming. It’s not. It’s about thirty minutes from start to finish, uses ingredients you probably already have, and tastes infinitely better than anything premade. Whether you’re cooking for a weeknight family dinner, bringing something to a potluck, or just having one of those nights where you need pure comfort on a plate, this is your recipe.
If you love recipes like this, follow me on HaileeRecipes on Pinterest where I share all my go-to comfort food recipes and kitchen shortcuts.
Why You’ll Love This Recipe
Let me be honest about what makes this version different. First, the sauce is creamy without being heavy. I use a combination of cheeses—sharp cheddar for flavor, gruyere for that nutty depth, and a little cream cheese for silky texture. The cream cheese thing might sound weird, but trust me. It prevents the sauce from breaking when it bakes, and it gives you this luxurious mouthfeel that feels indulgent without being overwhelming.
Second, the pasta actually stays al dente even after baking. I know that sounds impossible, but it’s all about timing and the ratio of sauce to noodles. Too many recipes make it either crunchy or mushy, and I refuse to accept that compromise.
Third, this recipe is genuinely forgiving. You can make it ahead, freeze it, customize it with whatever you have on hand, and it still comes out great. I’ve made this for potlucks, family dinners, and quiet nights at home, and it’s never let me down.
And honestly? It tastes homemade. Not in a pretentious way, but in that warm, “someone I love made this for me” way. That’s what I’m always chasing in the kitchen.
Ingredients
- 1 pound elbow pasta or small pasta shells
- 4 tablespoons unsalted butter
- 3 tablespoons all-purpose flour
- 3 cups whole milk, warmed
- 2 cups sharp cheddar cheese, shredded
- 1 cup gruyere cheese, shredded
- 4 ounces cream cheese, softened
- 1 teaspoon dry mustard powder
- 1/2 teaspoon garlic powder
- 1/2 teaspoon smoked paprika
- Salt and black pepper to taste
- 1/4 teaspoon cayenne pepper (optional, for a little kick)
- 1/2 cup panko breadcrumbs
- 2 tablespoons melted butter (for topping)
- 1/4 cup grated Parmesan cheese (for topping)
- Fresh thyme or parsley for garnish (optional)
Hailee’s Tip: Warm your milk before adding it to the roux. Cold milk will seize up and create lumps, and nobody wants that. I microwave mine for about two minutes while I’m making the roux.
Hailee’s Tip: Use freshly shredded cheese if you possibly can. Pre-shredded cheese has anti-caking agents that make the sauce grainy. I know it’s more work, but the difference is real.
Hailee’s Tip: Don’t skip the mustard powder and smoked paprika. They’re not there to make it “spicy”—they’re there to deepen the cheese flavor and make people say, “Wow, what IS that flavor?” It’s the secret.
Optional Add-Ins and Variations
Here’s where you can make this recipe yours. The base is rock solid, but the fun part is playing around. Some of my favorite additions:
- Crispy bacon: Cook 6 slices until crispy, crumble it, and fold it into the sauce before baking. Game changer.
- Caramelized onions: I make these ahead and stir them in. They add this sweet, savory depth that’s incredible.
- Roasted broccoli or cauliflower: Toss in about 2 cups of roasted florets for something a little healthier-feeling.
- Jalapeños: Diced and stirred in raw, they add a fresh heat that cuts through the richness.
- Fresh herbs: Thyme, sage, or chives mixed into the sauce are lovely.
- Truffle oil: Just a drizzle on top before serving. Fancy and not as pretentious as it sounds.
- Different cheeses: Fontina, smoked gouda, sharp white cheddar—they all work beautifully.
Step-by-Step Method
Step 1: Get Your Mise en Place Ready
Before you start cooking, measure out all your ingredients and have them sitting in front of you. Seriously. This is the one time I’m going to sound like a cooking show, but it genuinely helps. Shred your cheeses, soften your cream cheese, warm your milk. This takes five minutes and prevents the panic moment when your roux is ready and you’re frantically looking for the cheddar.
Step 2: Cook the Pasta
Bring a large pot of salted water to a boil and cook your pasta about one minute under the package directions. You want it just barely al dente—it’s going to cook more in the oven, so this is crucial. Drain it, but don’t rinse it. The starch on the pasta helps the sauce cling to it. Set it aside in a large bowl.
Hailee’s What I Messed Up: I used to cook the pasta all the way through, and it would turn into mush in the oven. Learned that lesson the hard way.
Step 3: Make the Roux
In a medium saucepan, melt the butter over medium heat. Once it’s foaming, add the flour and whisk constantly for about one minute. You’re looking for a light golden color—this is called a blonde roux, and it’s exactly what you want for mac and cheese sauce. It cooks out the raw flour taste without browning too much.
Step 4: Build the Sauce
Slowly pour in your warm milk while whisking constantly. This is where patience matters. If you dump it all in at once, you’ll get lumps. Whisk for about three to four minutes until the sauce thickens enough to coat the back of a spoon. It should look like heavy cream, not soup.
Step 5: Add the Cheese and Seasonings
Remove the pan from heat and add the softened cream cheese first, stirring until it’s completely melted and incorporated. Then add the shredded cheddar and gruyere, stirring gently until everything is melted and smooth. Add the mustard powder, garlic powder, smoked paprika, salt, pepper, and cayenne if you’re using it. Taste it. Seriously, taste it right now and adjust seasonings. This is your moment to make it perfect for your palate.
Hailee’s What I Messed Up: I once forgot to taste before baking and ended up with underseasoned mac and cheese. You can’t fix seasoning after it’s baked, so taste now.
Step 6: Combine and Transfer
Pour the cheese sauce over the cooked pasta and fold gently until every noodle is coated. Transfer to a buttered 9×13 inch baking dish (or similar). You can make ahead up to this point and refrigerate for up to 24 hours.
Step 7: Make the Topping
In a small bowl, mix the panko breadcrumbs with melted butter and grated Parmesan. Sprinkle evenly over the top of the mac and cheese. This is what gives you that golden, crispy top.
Step 8: Bake
Preheat your oven to 350°F and bake for 25 to 30 minutes, until the top is golden brown and the sauce is bubbling around the edges. If your topping isn’t browning enough after 20 minutes, bump the oven up to 375°F for the last 10 minutes. Every oven is different, so keep an eye on it.
Step 9: Rest and Serve
Let it rest for about five minutes before serving. I know it’s hard to wait, but this helps it set slightly and makes it easier to scoop. Garnish with fresh thyme or parsley if you want to feel fancy. You’ve earned it.
Common Mistakes to Avoid
Using cold milk: Cold milk will seize the roux and create lumps. Warm it first. No exceptions.
Cooking the pasta all the way through: It continues cooking in the oven. Undercook it slightly or you’ll end up with mush.
Pre-shredded cheese: Those anti-caking agents really do affect the texture. Fresh shredded is worth the extra thirty seconds.
Skipping the seasonings: The mustard powder, garlic powder, and smoked paprika are not optional. They’re what make this taste like something special instead of just melted cheese on noodles.
Overfilling the dish: If you pack it too full, it’ll bubble over in the oven and make a mess. Use a 9×13 inch dish or go slightly larger.
Not tasting before baking: You can’t fix seasoning after it’s baked. Taste the sauce and adjust now.
My Tested Substitutions
If you don’t have gruyere: Use all sharp cheddar, or substitute with fontina or smoked gouda. They all work beautifully.
If you don’t have cream cheese: Use an extra half cup of milk and add a tablespoon of cornstarch mixed with a little cold milk to thicken the sauce. It won’t be quite as silky, but it’ll still be delicious.
If you want to use evaporated milk: You can substitute half the whole milk with evaporated milk for a richer sauce. It’s a classic trick.
If you need to go lighter: Use half-and-half instead of whole milk, or even a mix of milk and chicken broth. You’ll lose some richness, but it’s still good.
If you want to make it gluten-free: Use cornstarch or a gluten-free flour blend instead of all-purpose flour, and use gluten-free pasta. The ratio stays the same.
If you want to make it dairy-free: This is trickier, but you can use plant-based butter, plant-based milk, and dairy-free cheese. Fair warning: it won’t taste exactly the same, but it can still be tasty. Use a little more cream cheese alternative to keep it creamy.
How to Customize
The beauty of baked mac and cheese is that it’s a blank canvas. Think of the base recipe as your foundation, and then build from there based on what you’re in the mood for.
Are you making this for a weeknight family dinner? Keep it simple and maybe just add some crispy bacon.
Making it for a potluck where you want to impress? Add caramelized onions and fresh thyme, and use a fancy cheese blend.
Trying to sneak vegetables into your kids’ dinner? Roast some broccoli and fold it in. They won’t even notice.
Want something spicy? Add diced jalapeños, extra cayenne, and maybe some smoked paprika.
Feeling indulgent? Stir in crispy bacon, caramelized onions, and a drizzle of truffle oil. You deserve it.
Serving Ideas
On its own, this is a complete meal, but here are some things I love to serve alongside it:
- A simple green salad with a sharp vinaigrette to cut through the richness
- Roasted vegetables like Brussels sprouts or asparagus
- Garlic bread or crusty bread for soaking up every last bit of sauce
- Steamed broccoli or green beans for a classic combo
- A crisp white wine if you’re feeling fancy (Sauvignon Blanc is perfect)
- Sliced tomatoes with fresh basil and a little salt and pepper
Honestly, I usually just make a salad, pour myself a glass of wine, and call it dinner. Sometimes the simplest meals are the best ones.
Meal Prep and Storage
Make-Ahead: You can assemble this dish up to 24 hours in advance. Just cover it with plastic wrap and refrigerate. When you’re ready to bake, add the breadcrumb topping and bake as directed. You might need to add five to ten extra minutes since it’s coming from the fridge.
Freezing: This freezes beautifully. Assemble the whole dish, wrap it tightly with plastic wrap and then foil, and freeze for up to three months. Thaw overnight in the fridge before baking, or bake directly from frozen and add 15 to 20 minutes to the bake time.
Leftovers: Store in an airtight container in the fridge for up to four days. Reheat in a 350°F oven covered with foil for about 15 minutes, or microwave individual portions for two to three minutes. It won’t be quite as crispy on top, but it’ll still be delicious.
Reheating tip: If you’re reheating and want to restore some crispiness to the top, uncover it for the last few minutes of oven reheating.
Nutritional Breakdown
This recipe makes about 8 servings as a main course or 10 to 12 as a side dish.
Per serving (based on 8 servings):
- Calories: approximately 520
- Protein: 24 grams
- Carbohydrates: 48 grams
- Fat: 24 grams
- Fiber: 2 grams
This is comfort food, so it’s not the lightest option, but it’s also not as heavy as you might think. The whole milk and cheese provide good protein, and the pasta gives you carbs to keep you satisfied. Pair it with a vegetable and you’ve got a balanced meal.
Final Thoughts
Baked mac and cheese is one of those recipes that reminds me why I started cooking in the first place. It’s not complicated or pretentious. It’s just honest, delicious food that makes people happy. Whether you’re making this for your family, bringing it to a potluck, or just having one of those nights where you need pure comfort, I hope this recipe becomes one of your go-tos.
The most important thing I want you to know is that this recipe is forgiving. If your sauce is a little thinner than mine, it’ll still be delicious. If you use a slightly different cheese blend, it’ll still be great. If you add something unexpected, it’ll probably be amazing. Cooking should feel good, not stressful. Make this recipe yours, and enjoy every creamy, cheesy, golden bite.
I’d love to hear how it turns out for you. Come back and let me know what you added, what you changed, or just how much your family loved it. That