Caramel Apple Eclair Cake
Caramel Apple Eclair Cake
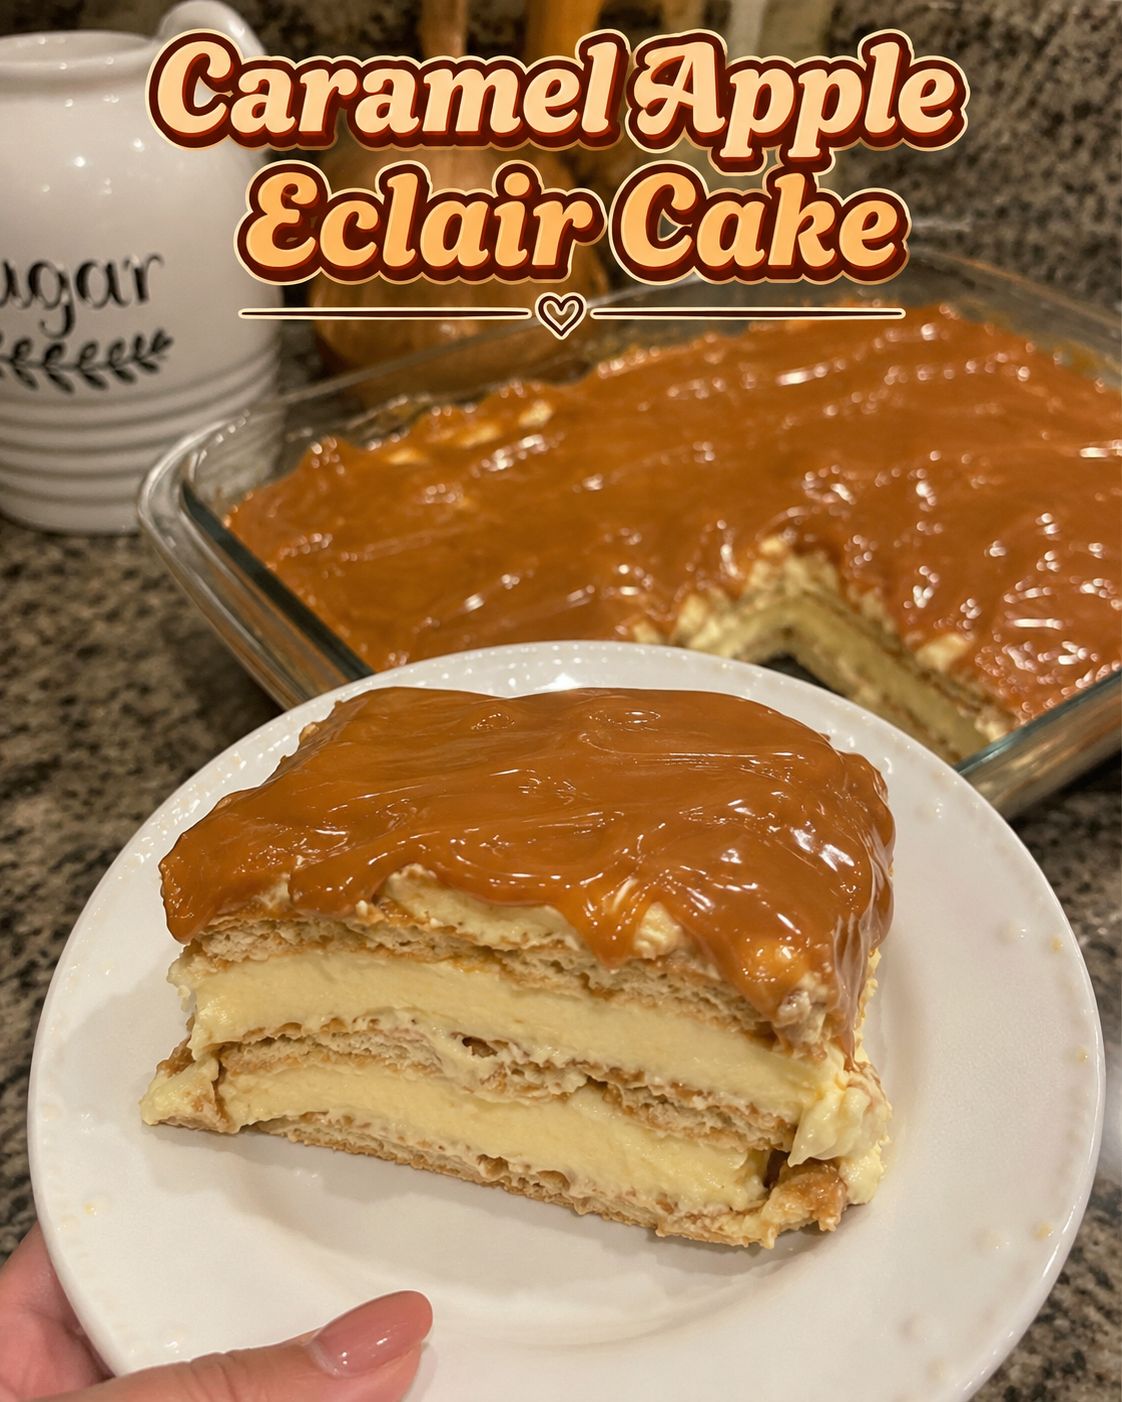
Caramel Apple Eclair Cake: The Cozy Dessert That Changed My Fall
I’m going to be honest with you—last October, I was standing in my kitchen at 10 PM on a random Tuesday, scrolling through my phone, feeling restless. You know that feeling? When you want something sweet but also want it to feel special? I’d been craving the flavors of fall: apples, caramel, that buttery pastry texture. But I didn’t want to spend three hours making something complicated. I wanted comfort. I wanted ease. That’s when this Caramel Apple Eclair Cake was born.
My husband came home from work the next day, took one bite, and literally stopped talking. That’s when I knew I had something worth sharing with you.
Here’s the thing about this recipe: it looks like you spent all day in the kitchen, but honestly? You didn’t. It’s a no-bake dessert that comes together in about 30 minutes of active time. Think of it as the love child between a French éclair and a classic apple crisp—you get that delicate choux pastry crunch, creamy custard filling, homemade caramel, and tender spiced apples all stacked into one show-stopping dessert. It’s elegant enough for company, casual enough for a Tuesday night, and absolutely foolproof if you follow along with me.
This recipe is perfect if you’re intimidated by fancy desserts but want to feel like a pastry chef. It’s ideal for fall gatherings, cozy family dinners, or when you just need to impress someone (or yourself). And if you’re looking for more recipes like this, follow me on HaileeRecipes on Pinterest where I share all my favorite comfort desserts and seasonal treats.
Why You’ll Love This Recipe
Let me break down why this Caramel Apple Eclair Cake has become my go-to dessert:
- It’s not actually complicated. I promise. No rolling, no piping skills required. You’re basically layering things that are already made or super simple to make.
- The texture contrast is incredible. Crispy pastry, creamy custard, soft apples, and that caramel drip? Every bite is interesting.
- It tastes like fall without being over the top. The spices are subtle. The apple isn’t competing for attention. Everything works together.
- You can make it ahead. I usually assemble this the morning of and it actually tastes better after a few hours in the fridge.
- It feeds a crowd. One cake serves 8-10 people easily, making it perfect for potlucks or dinner parties.
Ingredients
For the Pastry Base:
- 1 package (10 oz) frozen puff pastry sheets, thawed (2 sheets)
- 2 tablespoons melted butter
- 2 tablespoons granulated sugar
- 1 teaspoon cinnamon
For the Custard Filling:
- 2 cups heavy cream, cold
- 1 cup whole milk
- 1 package (3.4 oz) instant vanilla pudding mix
- 2 tablespoons powdered sugar
- 1 teaspoon vanilla extract
Hailee’s Tip: Don’t skip the cold cream and milk. I learned this the hard way when I used room-temperature cream once and ended up with a grainy, sad filling. Cold ingredients whip up beautifully.
For the Spiced Apples:
- 3 medium Honeycrisp or Granny Smith apples, peeled and diced into small cubes
- 3 tablespoons butter
- 3 tablespoons brown sugar
- 1/2 teaspoon cinnamon
- 1/4 teaspoon nutmeg
- 1/8 teaspoon ground cloves
- 1 tablespoon apple cider vinegar (optional but adds depth)
- Pinch of sea salt
Hailee’s Tip: Dice your apples small—about the size of peas. They cook faster and distribute better throughout the cake. If you use large chunks, they’ll sink to the bottom and you’ll get an uneven texture.
For the Caramel:
- 1 cup granulated sugar
- 6 tablespoons butter
- 1/2 cup heavy cream, room temperature
- 1 teaspoon vanilla extract
- 1/2 teaspoon sea salt
Hailee’s Tip: Make your caramel fresh on the day of assembly. Homemade caramel is so much better than store-bought, and it only takes 10 minutes. Trust me on this.
Optional Add-Ins and Variations
This is where you make the cake your own. I love the flexibility here:
- Candied pecans or walnuts: Toast them with a little butter and cinnamon sugar, then sprinkle on top before the caramel sets. Adds crunch and richness.
- A splash of bourbon or apple brandy: Add 1 tablespoon to the apples while they cook. Sounds fancy, tastes incredible.
- Salted caramel chocolate drizzle: Melt some dark chocolate and drizzle it over the caramel for extra decadence.
- Cream cheese custard: Mix 4 oz softened cream cheese into the pudding mixture for a tangier filling.
- Different apple varieties: Mix Honeycrisp with Granny Smith for complexity. Pink Lady apples work beautifully too.
Step-by-Step Method
Step 1: Prep Your Puff Pastry
Preheat your oven to 400°F. Line two baking sheets with parchment paper. Lay out your thawed puff pastry sheets and brush them lightly with melted butter. Mix together the sugar and cinnamon, then sprinkle evenly over both sheets. You want a light coating—not too much or it’ll be cloying.
Bake for 12-15 minutes until the pastry is golden and crispy. Mine usually takes exactly 14 minutes, but ovens vary, so keep an eye on it. You’re looking for a deep golden color, not pale. Let the sheets cool completely on the baking sheet—this is important because they’ll crisp up more as they cool.
What I messed up: The first time I made this, I moved the pastry to a cooling rack too early and it got soggy on the bottom. Leave it on the baking sheet until it’s completely cool to the touch.
Step 2: Make Your Spiced Apples
While the pastry cools, let’s tackle the apples. In a large skillet over medium heat, melt the butter. Add your diced apples and brown sugar. Stir frequently for about 5-7 minutes until the apples start to soften and caramelize slightly at the edges. They should still have some firmness—you’re not making applesauce here.
Add the cinnamon, nutmeg, and cloves. Stir in that apple cider vinegar if you’re using it—it brightens everything up. Cook for another 2-3 minutes until fragrant. Add a pinch of sea salt and remove from heat. Let this cool completely. You can do this step ahead and refrigerate it if you want.
What I messed up: I once cooked the apples too long and they turned into mush. You want them tender but still recognizable. If you’re unsure, pull them off the heat a minute earlier—they’ll continue to soften slightly as they cool.
Step 3: Make Your Caramel
Here’s where people get nervous, but I’m going to walk you through it. In a heavy-bottomed saucepan over medium heat, combine the granulated sugar with just a tiny splash of water—like 1 tablespoon. Let it sit undisturbed for about 2 minutes, then gently stir it together. You’re not making a slurry; you just want the sugar to dissolve slightly.
Now stop stirring. Seriously, don’t touch it. Let the sugar melt on its own, swirling the pan occasionally if you need to. After about 5-7 minutes, it’ll turn from clear to pale amber. When it reaches a medium amber color (think the color of iced tea), remove it from heat immediately. It will continue to darken slightly.
Add the butter all at once. It’ll bubble up—that’s normal and actually kind of fun to watch. Let it settle for 30 seconds, then slowly pour in the room-temperature cream while stirring gently. Be careful here; the steam is hot. Once it’s combined, stir in the vanilla and sea salt. Let it cool for about 5 minutes before using. It’ll thicken slightly as it cools.
What I messed up: Burnt caramel tastes bitter and acrid. If yours turns dark brown or black, start over. Also, if your caramel seizes up when you add the cream (turns grainy and lumpy), don’t panic. Just add another tablespoon of cream and whisk it over low heat until it smooths out.
Step 4: Make Your Custard Filling
Pour the cold heavy cream and cold milk into a large bowl. Add the vanilla pudding mix and powdered sugar. Using an electric mixer, beat on medium speed for about 2 minutes until you have stiff peaks. This is important—you want it thick and fluffy, not runny.
What I messed up: I used warm milk once and the pudding mixture turned into a weird, thin consistency. Cold is non-negotiable here.
Step 5: Assemble Your Cake
Now for the fun part. Break one cooled puff pastry sheet into bite-sized pieces and layer them in the bottom of a 9×13-inch baking dish. Don’t worry about making it perfect—this is rustic. Spread half of your custard mixture over the pastry pieces. Then add half of your cooled spiced apples, scattering them evenly.
Break up the second pastry sheet and layer it over the apples. Top with the remaining custard, then the remaining apples. Drizzle the caramel generously over the top. If you want to get fancy, you can add candied nuts or a chocolate drizzle now.
Refrigerate for at least 2 hours before serving. This helps everything set and the flavors meld together beautifully.
Common Mistakes to Avoid
- Using warm puff pastry: Thaw it in the fridge, not on the counter. Warm pastry won’t puff up properly.
- Skipping the cooling step for pastry: This is what makes it crispy, not soggy.
- Overcooking the apples: They should be tender but still hold their shape.
- Making caramel too far ahead: It thickens as it sits. Make it within an hour of serving for the best drizzly consistency.
- Not chilling the cream before whipping: This affects the texture of your filling dramatically.
- Assembling without cooling components first: If anything is warm, it’ll melt the custard and make a runny mess.
My Tested Substitutions
If you don’t have puff pastry: Use store-bought phyllo sheets brushed with melted butter and baked until crispy. It’s not quite the same, but it works in a pinch.
If you don’t have instant pudding mix: Make a quick pastry cream instead. Whisk together 1 cup milk, 3 egg yolks, 1/4 cup sugar, 2 tablespoons cornstarch, and 1 teaspoon vanilla. Cook over medium heat, stirring constantly, until thick. Let it cool, then fold it into whipped cream.
If you want to avoid raw eggs: Stick with the instant pudding mix method. It’s pasteurized and safe.
If you’re dairy-free: Use coconut cream in place of heavy cream and unsweetened almond milk in place of whole milk. Make caramel with dairy-free butter and coconut cream. It’s slightly different but genuinely delicious.
If you don’t like cinnamon-heavy flavors: Use less cinnamon and lean more into the nutmeg and cloves. They’re more subtle and sophisticated.
How to Customize
Want to make this your own? Here are some fun directions you can take it:
Spiced Pear Version: Swap the apples for pears and add a tiny pinch of ginger. Pears are softer, so cook them for less time.
Salted Caramel Chocolate Lover’s Version: Add a layer of thin chocolate ganache between the pastry and custard. Drizzle with both caramel and chocolate on top.
Brown Butter Version: Brown your butter for the pastry topping and use brown butter in your caramel. It adds a nutty complexity that’s next-level.
Boozy Version: Add a tablespoon of bourbon or apple brandy to the apples and a splash of vanilla liqueur to the custard.
Serving Ideas
This cake is beautiful on its own, but here are my favorite ways to serve it:
- With vanilla ice cream: A scoop melting on top is pure bliss.
- With whipped cream: A dollop on the side adds elegance.
- With a drizzle of extra caramel: Because why not?
- Warm or cold: This is great either way. I actually love it at room temperature after a few hours.
- Dusted with cinnamon: Just before serving, a light dusting adds a pretty finish.
Meal Prep and Storage
Make-Ahead: You can assemble this cake up to 8 hours ahead. Cover it loosely with plastic wrap and refrigerate. The flavors actually improve as they sit together.
Storage: Keep it covered in the refrigerator for up to 3 days. The pastry will soften slightly over time, but honestly, I kind of like it that way—it becomes more cake-like.
Can you freeze it? Not really. The custard filling doesn’t freeze well, and the pastry gets weird. This is a fresh-only dessert.
Individual portions: You can assemble this in individual glasses or mason jars if you’re prepping for the week. Layer pastry, custard, apples, caramel in each glass. They look adorable and are easy to grab.
Nutritional Breakdown
Per serving (out of 8 servings):
- Calories: approximately 520
- Protein: 6g
- Carbohydrates: 62g
- Fat: 28g
- Fiber: 1g
- Sugar: 48g
This is a dessert, so it’s meant to be indulgent. I don’t apologize for that. Life is short and this cake is delicious.
Final Thoughts
When I think about why I love cooking and baking, it’s moments like the one I had with my husband tasting this cake for the first time. That moment of joy, of someone experiencing something delicious that you made with your own hands—that’s the whole point, isn’t it?
This Caramel Apple Eclair Cake might look fancy, but it’s actually forgiving and flexible. It doesn’t require special skills or fancy equipment. It just requires you to follow along, trust the process, and believe in yourself. And honestly? If something goes slightly wrong, it’s still going to taste incredible.
Make this for someone you love. Make it for yourself on a random Tuesday night. Make it for a dinner party and watch people’s faces light up. Whatever you do, make it with intention and enjoy every single bite.
Let me know how it turns out. I’m always here if you have questions.
Happy baking,