No-Bake Cream Pies: Dreamy Desserts You’ll Love
No-Bake Cream Pies: Dreamy Desserts You'll Love
I’m obsessed with no-bake cream pies, and I’m so excited to share my favorite recipes with you today. There’s something magical about creating a show-stopping dessert without turning on the oven—it’s perfect for those hot summer days or when you need something impressive but don’t want to spend hours in the kitchen. Whether you’re hosting a dinner party or just craving something sweet, these pies deliver that creamy, indulgent satisfaction every single time.
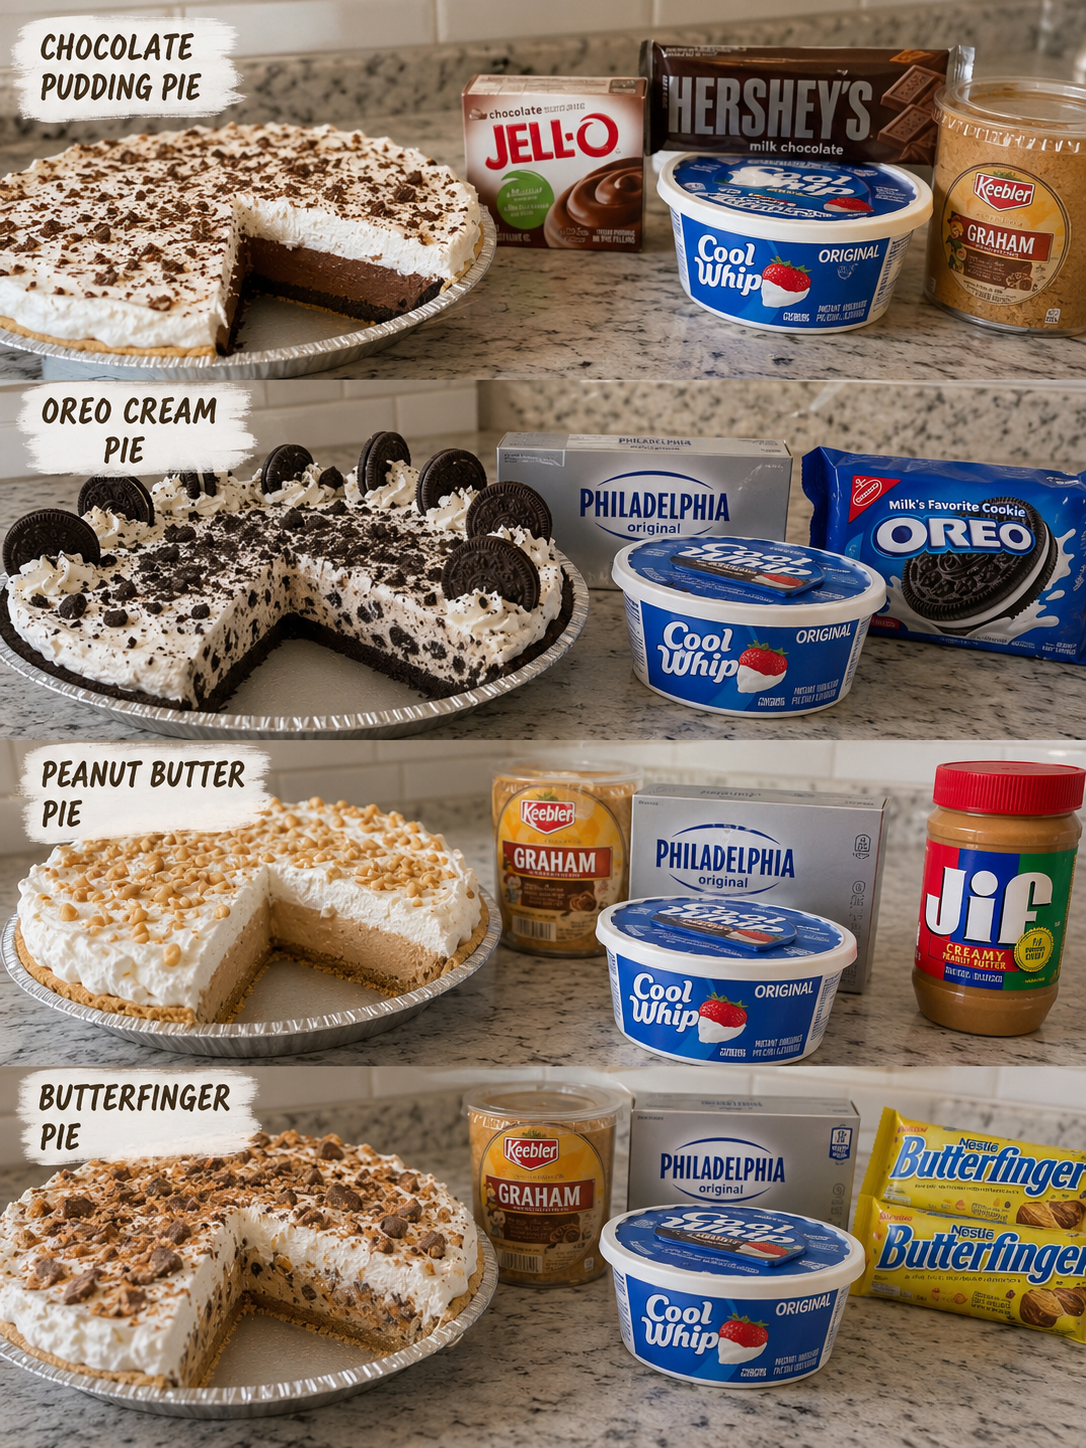
This roundup brings together four of my most-loved no-bake cream pie recipes: a silky Chocolate Pudding Pie, an irresistible Oreo Cream Pie, a rich and nutty Peanut Butter Pie, and a decadent Butterfinger Pie that’ll have everyone asking for your secret. Each one is different enough to keep your dessert rotation exciting, but they’re all easy enough that you’ll find yourself making them again and again. I’m talking minimal ingredients, straightforward steps, and maximum flavor.
Save these recipes and you’ll always have a go-to dessert ready to impress. I love having these bookmarked for when inspiration strikes, and I’d love for you to save them too. Follow me on HaileeRecipes on Pinterest for more easy recipes and dessert ideas that’ll make your kitchen feel like a dream.
1. Chocolate Pudding Pie
This classic Chocolate Pudding Pie combines a buttery graham cracker crust with silky chocolate pudding and a cloud of whipped cream topping. The result is an elegant dessert with deep chocolate flavor and luxurious texture that tastes like you spent hours in the kitchen. Perfect for dinner parties, potlucks, or whenever you need an impressive dessert without turning on the oven, this pie comes together in minutes and requires only basic ingredients you likely have on hand.
Why You’ll Love It
- No baking required, making it perfect for hot summer days or when your oven is already full.
- Ready to serve in just 15 minutes of hands-on time plus chilling.
- Impressive presentation that looks far more complicated than it actually is.
Ingredients
- 2 cups graham cracker crumbs
- 6 tablespoons melted butter
- 3 tablespoons sugar
- 2 cups whole milk
- 6 ounces semi-sweet chocolate, chopped
- 3 tablespoons cocoa powder
- 2 tablespoons cornstarch
- 1/4 teaspoon salt
- 2 cups heavy whipping cream
- 2 tablespoons powdered sugar
How To Make It
- Combine graham cracker crumbs, melted butter, and sugar in a bowl, mixing until the texture resembles wet sand. Press firmly into a 9-inch pie dish, covering the bottom and sides evenly. Refrigerate while preparing the filling.
- In a medium saucepan, whisk together milk, cocoa powder, cornstarch, and salt until smooth with no lumps.
- Heat the mixture over medium heat, stirring constantly, until it thickens and comes to a gentle simmer, about 5 to 7 minutes.
- Remove from heat and add chopped chocolate, letting it sit for 1 minute before stirring until completely melted and smooth.
- Pour the warm chocolate pudding into the prepared crust and smooth the top with a spatula. Refrigerate for at least 2 hours or until set.
- In a chilled bowl, whip heavy cream with powdered sugar until stiff peaks form.
- Top the chilled pie with whipped cream just before serving, spreading or piping it decoratively over the surface.
Variations And Substitutions
For a mocha version, replace half the milk with strong brewed coffee. Try dark chocolate instead of semi-sweet for deeper flavor, or use chocolate chips if you don’t have a chocolate bar. Swap the graham cracker crust for a chocolate cookie crust by using crushed Oreos or chocolate wafers. For a lighter topping, use whipped coconut cream or a meringue instead of traditional whipped cream.
Make-Ahead, Storage, And Serving Tips
Prepare the crust and filling up to 24 hours ahead, covering the pie with plastic wrap and storing it in the refrigerator. Add whipped cream topping no more than 2 hours before serving to prevent it from weeping. Store leftovers covered in the refrigerator for up to 3 days, though the whipped cream topping will soften over time. For best texture, let the pie sit at room temperature for 10 minutes before slicing.
2. Oreo Cream Pie
This indulgent Oreo Cream Pie combines a crunchy cookie crust with a silky, creamy filling studded with crushed Oreos, all without turning on the oven. The contrast between the buttery cookie base and the light, fluffy cream layer makes every bite satisfying. With its cookies-and-cream flavor profile, this dessert is perfect for summer gatherings, potlucks, or whenever you want an impressive treat without the baking hassle. It’s the ultimate no-bake solution for Oreo lovers.
Why You’ll Love It
- Completely no-bake, ready in under 20 minutes of hands-on work.
- Uses simple pantry staples: Oreos, cream cheese, whipped cream, and butter.
- Impressive presentation that tastes far more complicated than it actually is.
Ingredients
- 30 Oreo cookies, divided
- 4 tablespoons unsalted butter, melted
- 8 ounces cream cheese, softened
- 1/2 cup powdered sugar
- 2 cups heavy whipping cream
- 1 teaspoon vanilla extract
- 1/4 cup whole milk
- One 9-inch graham cracker pie crust or store-bought crust
How To Make It
- Crush 20 Oreos into fine crumbs using a food processor or by placing them in a sealed bag and crushing with a rolling pin. Mix the crumbs with melted butter and press firmly into the bottom of your pie crust. Set aside in the refrigerator while you prepare the filling.
- In a large mixing bowl, beat softened cream cheese and powdered sugar together until smooth and fluffy, about 2 minutes. Add vanilla extract and milk, mixing until combined.
- In a separate bowl, whip the heavy cream to stiff peaks using an electric mixer.
- Gently fold the whipped cream into the cream cheese mixture until no white streaks remain.
- Crush the remaining 10 Oreos into bite-sized pieces and fold them into the cream filling.
- Spread the Oreo cream filling evenly over the crust, smoothing the top with a spatula.
- Refrigerate for at least 4 hours, or until the filling is set and firm to the touch.
- Slice with a sharp knife dipped in hot water between cuts for clean slices. Top with additional crushed Oreos or whipped cream if desired.
Variations And Substitutions
For a chocolate twist, use a chocolate cookie crust instead of graham cracker. Substitute half the Oreos with crushed chocolate sandwich cookies like Thin Mints for variety. If you prefer a lighter filling, use Cool Whip instead of whipping your own cream. For extra richness, drizzle chocolate syrup over the top before serving. You can also add 2 tablespoons of coffee liqueur to the cream filling for a mocha-inspired version.
Make-Ahead, Storage, And Serving Tips
This pie can be assembled up to 2 days in advance and stored covered in the refrigerator. For best results, keep it chilled until serving. The pie holds up well for up to 3 days, though the crust may soften slightly. Slice while cold for cleaner cuts. If the pie becomes too soft, return it to the freezer for 30 minutes before serving. This dessert also freezes beautifully for up to 2 months; thaw in the refrigerator overnight before serving.
3. Peanut Butter Pie
This creamy peanut butter pie delivers rich, nutty flavor in every spoonful with a silky smooth filling that melts on your tongue. The graham cracker crust provides a satisfying crunch that contrasts beautifully with the velvety peanut butter layer and whipped cream topping. This dessert is perfect for peanut butter lovers and ideal for summer gatherings, potlucks, or whenever you need an impressive dessert without turning on the oven. It works wonderfully because the no-bake method keeps your kitchen cool while the combination of cream cheese and peanut butter creates an irresistibly indulgent texture that tastes like a gourmet bakery creation.
Why You’ll Love It
- Completely no-bake and ready to serve in under 20 minutes of active time.
- Rich peanut butter flavor that satisfies cravings without being overly heavy.
- Impressive presentation that looks like you spent hours in the kitchen.
Ingredients
- 2 cups graham cracker crumbs
- 6 tablespoons melted butter
- 3 tablespoons sugar
- 8 ounces cream cheese, softened
- 1 cup creamy peanut butter
- 1 cup powdered sugar
- 2 cups heavy whipping cream
- 1 teaspoon vanilla extract
- Pinch of salt
How To Make It
- Combine graham cracker crumbs, melted butter, and sugar in a bowl, mixing until the texture resembles wet sand. Press firmly into the bottom of a 9-inch pie dish, creating an even layer. Refrigerate while preparing the filling.
- Beat the softened cream cheese in a large bowl with an electric mixer until smooth and creamy, about 2 minutes.
- Add the peanut butter, powdered sugar, vanilla extract, and salt to the cream cheese. Beat until well combined and fluffy, scraping down the bowl as needed.
- In a separate bowl, whip the heavy cream to stiff peaks using an electric mixer.
- Gently fold the whipped cream into the peanut butter mixture in two additions, being careful not to deflate the cream.
- Spread the peanut butter filling evenly over the prepared crust, smoothing the top with a spatula.
- Refrigerate the pie for at least 4 hours or until firm enough to slice cleanly.
Variations And Substitutions
For a chocolate twist, drizzle melted chocolate over the filling before refrigerating or add chocolate chips to the crust. Substitute natural peanut butter if you prefer a less sweet filling, though you may want to add a tablespoon more powdered sugar for balance. Use crushed Oreos or vanilla wafers instead of graham crackers for a different flavor profile. For a lighter version, replace some of the heavy cream with Greek yogurt. Add 2 tablespoons of honey or a teaspoon of espresso powder to enhance the peanut butter flavor.
Make-Ahead, Storage, And Serving Tips
This pie can be made up to 2 days in advance and stored covered in the refrigerator. For longer storage, freeze for up to 1 month and thaw overnight in the refrigerator before serving. Slice with a warm, wet knife and wipe between cuts for clean slices. Serve chilled directly from the refrigerator. If the pie becomes too soft, simply return it to the freezer for 30 minutes before serving. Top individual slices with crushed peanuts, chocolate shavings, or a dollop of whipped cream just before serving for extra appeal.
4. Butterfinger Pie
Butterfinger Pie is a decadent no-bake dessert that combines a buttery graham cracker crust with a creamy filling studded with crushed Butterfinger candy bars. The contrast between the smooth, rich filling and the crispy, toffee-flavored candy pieces creates an irresistible texture in every bite. This dessert strikes the perfect balance between indulgent and easy, making it ideal for potlucks, holiday gatherings, or whenever you want an impressive treat without turning on the oven. The no-bake preparation means you can have this showstopping pie ready in under 30 minutes of active time.
Why You’ll Love It
- No oven required—just mix, press, and chill for a restaurant-quality dessert.
- The combination of creamy filling and crunchy Butterfinger pieces delivers irresistible texture and flavor.
- Perfect for busy schedules since it can be made ahead and stored in the refrigerator for days.
Ingredients
- 2 cups graham cracker crumbs
- 6 tablespoons melted butter
- 2 tablespoons sugar
- 8 ounces cream cheese, softened
- 1 cup heavy whipping cream
- 1 cup powdered sugar
- 1 teaspoon vanilla extract
- 6 Butterfinger candy bars, crushed (divided)
- Whipped cream for topping
How To Make It
- Mix graham cracker crumbs, melted butter, and sugar in a bowl until the texture resembles wet sand. Press firmly into a 9-inch pie dish, covering the bottom and sides evenly. Refrigerate while preparing the filling.
- In a large bowl, beat softened cream cheese with an electric mixer until smooth and creamy, about 2 minutes.
- In a separate bowl, whip heavy cream, powdered sugar, and vanilla extract together until stiff peaks form, about 3 to 4 minutes.
- Gently fold the whipped cream into the cream cheese mixture until no white streaks remain, being careful not to deflate the whipped cream.
- Reserve about 1/4 cup of crushed Butterfinger pieces for topping. Fold the remaining crushed candy into the cream mixture.
- Spoon the filling into the prepared crust and smooth the top with a spatula.
- Sprinkle the reserved Butterfinger pieces over the top and gently press them into the filling.
- Refrigerate for at least 4 hours or until firm, then slice and serve chilled.
Variations And Substitutions
For a chocolate twist, add 2 tablespoons of cocoa powder to the filling or drizzle chocolate sauce over the top. Substitute Butterfinger bars with crushed Heath bars, Toffee Bits, or even crumbled peanut brittle for different flavor profiles. If you prefer a chocolate crust, use chocolate graham crackers or mix in 2 tablespoons of cocoa powder to the original crust recipe. For a lighter version, use whipped topping instead of whipped cream.
Make-Ahead, Storage, And Serving Tips
This pie is perfect for make-ahead preparation—assemble it up to 2 days in advance and store covered in the refrigerator. The filling actually improves as it sits, allowing flavors to meld. Keep the pie chilled until serving to maintain the firm texture. Leftover pie keeps well in the refrigerator for up to 4 days in an airtight container. For longer storage, wrap and freeze for up to 3 months; thaw in the refrigerator before serving. If the filling becomes too soft, return it to the freezer for 30 minutes before slicing.
Final Thoughts
No-bake cream pies are the perfect solution when you want homemade dessert without the fuss of baking. Whether you’re drawn to the classic elegance of a chocolate cream pie, the fruity brightness of a lemon version, or something more adventurous, there’s a recipe here that will become your go-to. These pies come together quickly, chill while you focus on other things, and always impress at the table.
Pick one recipe that speaks to you and give it a try this week. Start with a flavor you already love, master the basic technique, and soon you’ll be confidently whipping up variations for every occasion. Your family and friends will be amazed at how restaurant-quality these desserts taste, and only you’ll know how simple they truly are to make.
Chocolate Pudding Pie
Ingredients
Method
- In a medium saucepan, whisk together cocoa powder, sugar, cornstarch, and salt.
- Gradually add milk to the dry ingredients, stirring constantly until smooth.
- Cook over medium heat, stirring frequently, until the mixture thickens and comes to a boil, about 8-10 minutes.
- Remove from heat and stir in chopped chocolate, butter, and vanilla extract until completely melted and smooth.
- Pour the chocolate pudding into the prepared graham cracker crust.
- Cover with plastic wrap and refrigerate for at least 4 hours or until set.
- Before serving, whip the heavy cream with 2 tablespoons sugar until stiff peaks form.
- Top each slice with whipped cream and serve chilled.