Grilled Cheese Burrito
Grilled Cheese Burrito
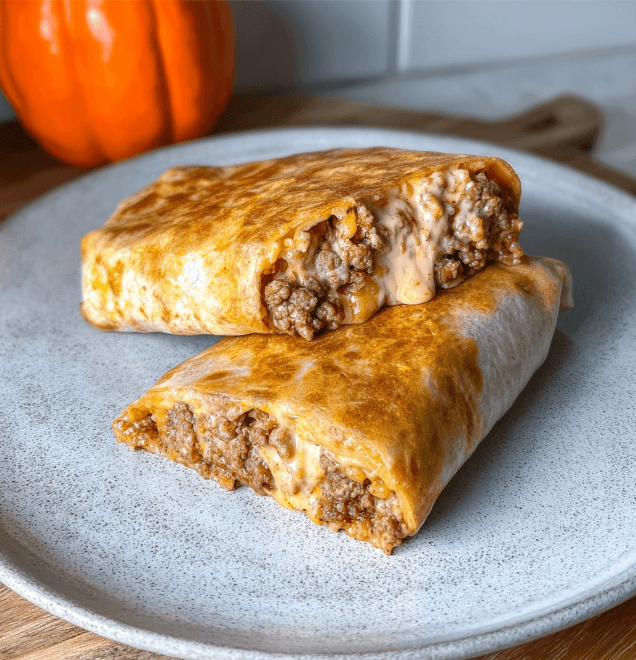
(The Crispy, Cheesy Mashup That Saved My Tuesday Night)
If you’d told me a few years ago that I’d fall head-over-heels for a burrito wrapped in a grilled cheese crust, I would’ve stared blankly while chomping a sad sandwich. Because grilled cheese and burritos don’t belong in the same sentence… right?
Plot twist: they do. And they should’ve met sooner.
This Grilled Cheese Burrito is the kind of recipe that came from sheer desperation — a little leftover taco meat, a few tortillas, and a stubborn craving for something comforting. But let me tell you, when that crispy cheese hit the skillet and wrapped around a saucy, melty burrito? My taste buds did a happy dance.
Since that night, it’s become one of my favorite lazy-but-feels-fancy meals — because it delivers every single time. It’s crunchy, gooey, saucy, satisfying… and takes about 15 minutes flat.
Let’s dig in, because you’re going to want this in your rotation.
A Little Backstory: Burrito Meets Grilled Cheese
It all started on one of those nights. You know the ones — the fridge is half-empty, dinner motivation is non-existent, and cereal is sounding more and more like a real option. I had a bit of taco meat from the night before, some shredded cheese, and a burrito-sized tortilla. Not enough for tacos, too little to make nachos. But I was hungry.
And then I had a memory. My grandma used to press cheese straight onto the outside of her quesadillas. She called it a “cheese crust,” and it was her sneaky trick for making leftovers taste indulgent.
So I borrowed her trick, packed the burrito full of what I had, then pressed it into a hot skillet with cheese underneath.
Something magical happened.
That outer layer of cheese crisped up like the edge of a grilled cheese sandwich — golden and crunchy, with just the right amount of pull. Inside, it was all comfort: warm beef, spicy sauce, crushed chips, melty cheese. Game-changer doesn’t even cover it.
Why This Grilled Cheese Burrito Is Everything
- ✅ Grilled cheese on the outside for epic texture
- ✅ Melty, beefy filling with layers of flavor
- ✅ Quick and easy — under 30 minutes
- ✅ Totally customizable — change the meat, cheese, or spice level
- ✅ Crowd-pleaser — even picky eaters love it
- ✅ Perfect for leftovers or a quick weeknight meal
What You’ll Need (Ingredient Breakdown)
This recipe is super forgiving. Swap what you have — this is a pantry-fridge-freezer kind of meal.
Filling:
- 1 lb ground beef (or turkey, or plant-based meat)
- 1 packet taco seasoning (or homemade)
- 1/4 cup water
- 1/2 cup nacho cheese sauce (I use store-bought or leftover queso)
- 1/2 cup sour cream
- 1 cup shredded Mexican blend cheese
- 1/2 cup crushed tortilla chips (for crunch!)
- 1/2 cup cooked rice (optional but filling)
Tortilla & Outer Layer:
- 4 large burrito-size flour tortillas
- 1 cup shredded cheddar or Colby Jack (for outside crust)
- Butter or oil for the skillet
How to Make the Ultimate Grilled Cheese Burrito
Prep Time: 10 minutes
Cook Time: 10–15 minutes
Total Time: ~25 minutes
Serves: 4
1. Cook the Beef
In a skillet over medium heat, cook the ground beef until browned. Drain any excess fat. Stir in taco seasoning and water. Simmer for 2–3 minutes until saucy.
2. Make the Filling
In a large bowl, combine the cooked beef, nacho cheese, sour cream, shredded cheese, crushed chips, and rice (if using). Mix until everything is creamy and well combined.
3. Roll the Burritos
Spoon the filling onto the center of each tortilla. Roll tightly like a burrito: fold in the sides, then roll from the bottom up. Don’t overfill — trust me, these are rich.
4. Create the Grilled Cheese Crust
Heat a nonstick skillet over medium heat and add a pat of butter or a drizzle of oil.
Sprinkle about 1/4 cup shredded cheese directly into the hot pan in a rough circle the size of your burrito. Let it melt and sizzle for 15–20 seconds.
Place the burrito seam-side down on top of the cheese. Press gently and cook for 2–3 minutes until the cheese forms a golden crust. Flip and repeat if you want both sides cheesy (yes, please!).
5. Serve It Up
Let the burrito rest for 1 minute to crisp and settle. Slice in half and serve with your favorite dipping sauce or just as-is. You won’t need much else.
Hailee’s Real-Life Tips (From My Messy Kitchen)
- Don’t skimp on the cheese crust. It’s the whole point.
- Use freshly shredded cheese for better melt and browning.
- Use a wide skillet — flipping these gets tricky in small pans.
- Press gently but firmly — it helps the cheese adhere.
- Make extras. You’ll thank me tomorrow.
Make It Your Own (Flavor Variations & Fun Twists)
Spicy Crunch Burrito
Add jalapeños, a drizzle of hot sauce, and pepper jack cheese.
Southwest Chicken Version
Use shredded rotisserie chicken with cumin, lime juice, and black beans.
Vegetarian Dream
Swap meat for seasoned lentils or plant-based crumbles. Add sautéed peppers and onions.
Breakfast Burrito Style
Scrambled eggs, breakfast sausage, and cheddar — with a cheese-crusted wrap.
Philly Cheesesteak Remix
Thinly sliced beef, sautéed onions, peppers, provolone — all grilled into a burrito shell.
What to Serve with a Grilled Cheese Burrito
You honestly don’t need much — but if you’re making it a meal, here’s what pairs well:
- Mexican street corn salad
- Simple side of guac or avocado slices
- Cilantro-lime rice
- Spicy ranch or chipotle mayo for dipping
- Tajin-dusted cucumber or jicama sticks
Reader Raves
Rachel in Chicago:
“I made these after seeing your post and WOW — they taste like fast food but better. My teens ask for them every week!”
Jared from Oklahoma:
“I added jalapeños and crushed Doritos inside. Holy moly. Crunchy, cheesy, spicy perfection.”
Amanda in California:
“I froze a few for lunches and they reheat like a dream in the air fryer.”
Storage + Reheating
Storing:
- Wrap leftovers tightly in foil or plastic wrap.
- Refrigerate up to 3 days.
Reheating:
- Skillet: Best for keeping that crispy outside.
- Air fryer: 350°F for 6–8 minutes.
- Microwave: Works, but wrap in a paper towel so it doesn’t get soggy.
Freezing:
- Skip the cheese crust when freezing.
- Wrap rolled burritos tightly in foil.
- Reheat from frozen in the oven or air fryer, then cheese-crust them fresh.
FAQ: You Asked, I Answered
Can I use corn tortillas?
I wouldn’t. They’re too small and not flexible enough for these big burritos.
What’s the best cheese for the crust?
I love cheddar or Colby Jack — they brown well and get crispy.
Can I make these dairy-free?
Sure! Use plant-based cheese, dairy-free sour cream, and skip the nacho sauce.
Are these kid-friendly?
Big yes. You can tone down the spice and let them dip in ketchup or sour cream.
Can I meal prep these?
Yep! Assemble and wrap them, store in the fridge, then just crust and heat when ready to eat.
Need More Cheesy, Crave-Worthy Ideas?
Try these next:
- Taco Bell-Style Crunchwrap Supremes
- Loaded Cheesy Nacho Fries with Chipotle Cream
- Cheesy Enchilada Casserole Bake
- Creamy Taco Pasta Skillet
Let’s Be Burrito Buddies
If you try this Grilled Cheese Burrito, I need to see it. Seriously. That cheese pull deserves a round of applause.
Final Thoughts
Let’s be honest: this burrito is messy. It’s cheesy. It’s not something you’d serve on fine china.
But it is ridiculously satisfying. The kind of recipe that makes you feel like a kitchen hero with almost zero effort. It’s the dinner that saves you from ordering out (again). It’s the thing your family raves about when all you did was use up leftovers.
So next time you’ve got a stray tortilla, a bit of taco meat, and a whole lotta cheese? You know what to do.
Grill. That. Burrito.