Homemade Bread & Dough Recipes | Bake With Love
Homemade Bread & Dough Recipes | Bake With Love
There’s something magical about the smell of homemade bread baking in your kitchen, and I’m so excited to share my favorite homemade bread and dough recipes with you. Whether you’re a seasoned baker or someone who’s intimidated by yeast, I promise these recipes will change the way you think about making bread at home. I’ve tested and retested each one until they were foolproof, because I wanted to give you recipes that actually work.
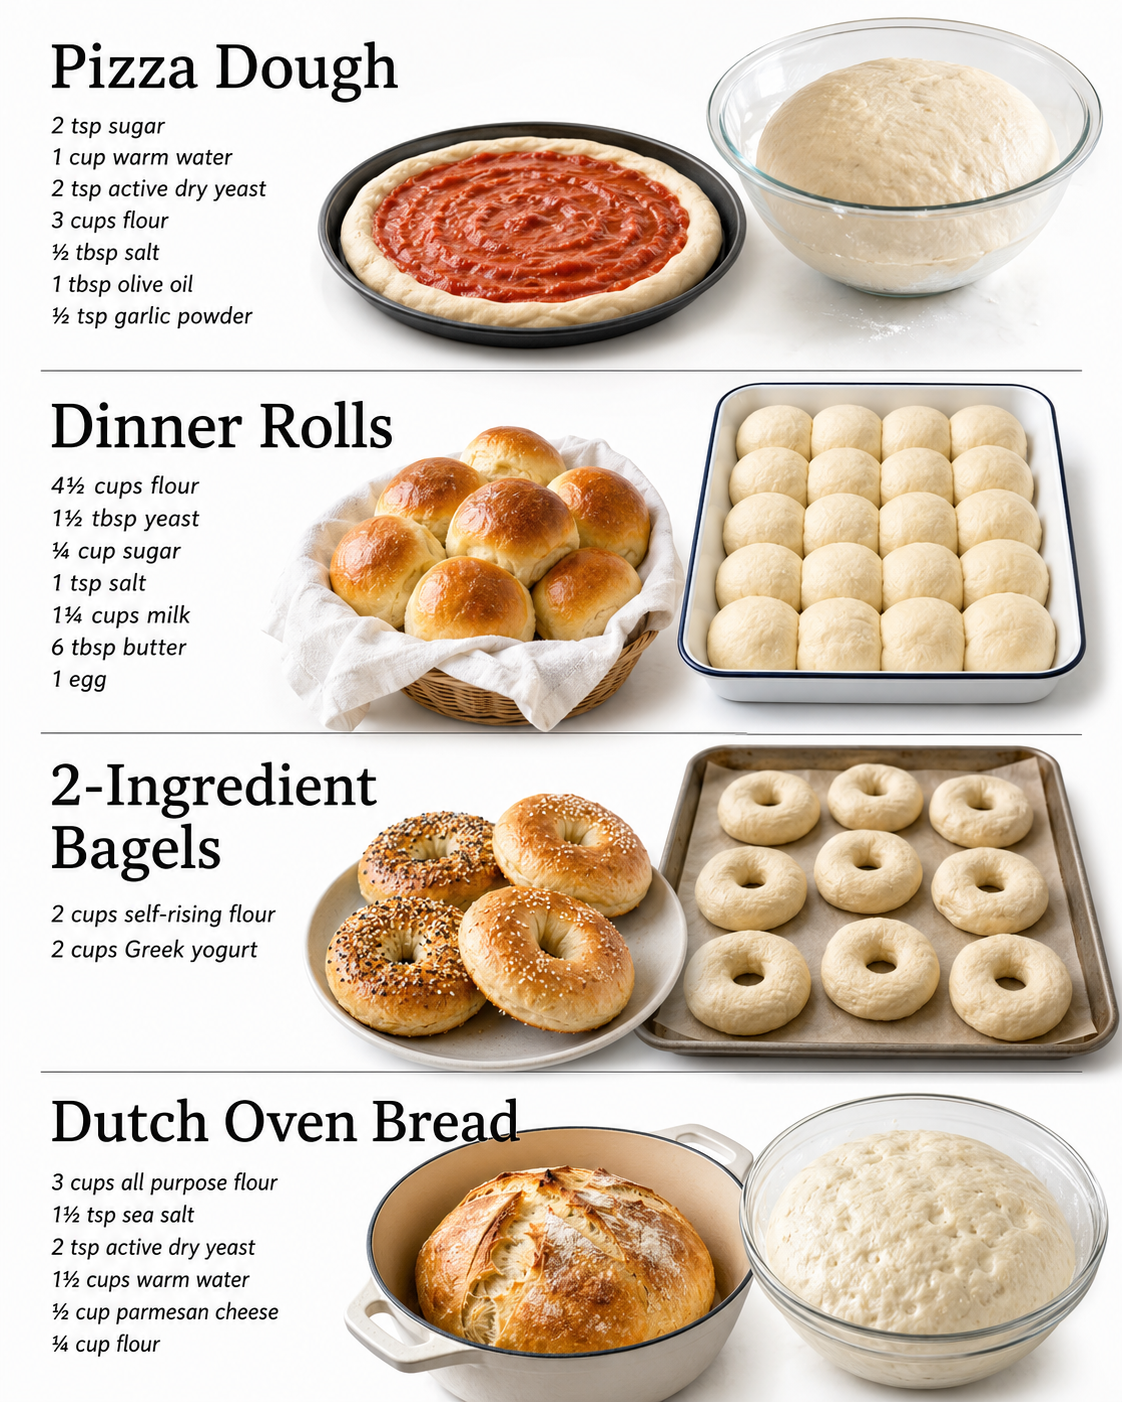
In this roundup, you’ll find four recipes that have become absolute staples in my kitchen: a reliable pizza dough that’s ready when you are, soft dinner rolls that disappear off the table, 2-ingredient bagels that seem too simple to be true (but they are), and a beautiful Dutch oven bread that looks like it came from a bakery. These aren’t complicated recipes that require special equipment or ingredients you can’t pronounce. They’re real recipes for real life.
I’m sharing these with you because once you start making your own bread, you’ll never go back to store-bought. These recipes are worth bookmarking, printing out, and making again and again. If you love finding new recipes to try, Follow me on HaileeRecipes on Pinterest where I’m constantly pinning inspiration for my kitchen adventures. Now let’s get baking!
1. Pizza Dough
This classic pizza dough delivers a perfect balance of crispy crust and chewy interior, making it ideal for both thin and thick-crust styles. With just a few simple ingredients and minimal hands-on time, you’ll create bakery-quality pizza at home. The dough develops wonderful flavor through a slow rise, whether you use it fresh or prepare it ahead. Perfect for weeknight dinners or weekend entertaining, this versatile base transforms with your favorite toppings.
Why You’ll Love It
- Makes enough dough for two 12-inch pizzas with minimal effort and affordable ingredients.
- Works beautifully with overnight refrigeration, developing deeper flavor and making timing flexible.
- Forgiving dough that’s easy to shape and stretch, even for beginner bread makers.
Ingredients
- 3 cups all-purpose flour
- 1 teaspoon instant yeast
- 1 teaspoon salt
- 1 tablespoon sugar
- 2 tablespoons olive oil
- 1 cup warm water
- Extra olive oil for greasing
How To Make It
- Combine warm water, yeast, and sugar in a large bowl. Let sit for 5 minutes until foamy, indicating the yeast is active.
- Add flour and salt to the yeast mixture, stirring until a shaggy dough forms. Drizzle in the olive oil and mix until fully incorporated.
- Knead the dough on a lightly floured surface for 8-10 minutes until smooth and elastic, or use a stand mixer with the dough hook for 6-7 minutes.
- Shape the dough into a ball and place in an oiled bowl, turning to coat all sides. Cover with a damp towel and let rise at room temperature for 1-2 hours until doubled in size.
- Divide the dough in half and shape each portion into a ball. Let rest for 10 minutes before stretching and topping.
- Stretch each ball into a 12-inch round on a floured surface or pizza peel, creating a slightly thicker edge for the crust.
- Add sauce and toppings as desired, then transfer to a preheated 475°F oven and bake for 12-15 minutes until the crust is golden and cheese is bubbly.
Variations And Substitutions
For whole wheat crust, replace up to 1 cup of all-purpose flour with whole wheat flour, though you may need slightly more water. Add 1-2 teaspoons of Italian seasoning, garlic powder, or dried oregano to the dough for extra flavor. For a thicker, pan-pizza style, press the dough into an oiled 9×13-inch baking pan and let it rise an additional 30 minutes before topping.
Make-Ahead, Storage, And Serving Tips
Prepare the dough up to 24 hours ahead by refrigerating it after the first rise, which actually improves flavor development. Remove from the refrigerator 30 minutes before shaping. Store leftover baked pizza covered at room temperature for up to 2 days, or freeze for up to 3 months. Reheat in a 350°F oven for 10 minutes. If your dough springs back too quickly when stretching, let it rest for 5 minutes and try again.
2. Dinner Rolls
These soft, pillowy dinner rolls are the perfect complement to any meal, with a tender crumb and subtle buttery flavor that melts in your mouth. The dough comes together quickly and rises beautifully, creating golden-brown rolls that look bakery-quality. Whether you’re serving them at a holiday table, alongside a weeknight dinner, or as part of a bread basket, these rolls deliver impressive results with straightforward techniques that even beginner bakers can master.
Why You’ll Love It
- Soft, pillowy texture that stays fresh for days without drying out.
- Simple ingredients and minimal hands-on time make this achievable for any skill level.
- Impressive presentation that feels special enough for entertaining but easy enough for weeknight baking.
Ingredients
- 1 cup whole milk, warmed
- 2 1/4 teaspoons active dry yeast
- 4 tablespoons unsalted butter, melted
- 3 tablespoons granulated sugar
- 1 1/2 teaspoons salt
- 1 large egg
- 3 1/2 cups all-purpose flour
- 2 tablespoons butter, softened for topping
How To Make It
- Combine warm milk, yeast, and sugar in a large mixing bowl. Let sit for 5 minutes until foamy, which confirms the yeast is active.
- Add melted butter, egg, and salt to the yeast mixture and stir until combined.
- Gradually add flour, one cup at a time, stirring until a shaggy dough forms. Mix until no dry flour remains.
- Turn dough onto a lightly floured surface and knead for 8 to 10 minutes until smooth and elastic. Place in a greased bowl, cover with a damp towel, and let rise for 1 hour until doubled in size.
- Divide dough into 12 equal pieces and shape each into a smooth ball. Place rolls in a greased 9×13-inch baking pan, cover, and let rise for 30 to 45 minutes until puffy.
- Preheat oven to 375 degrees Fahrenheit. Bake rolls for 18 to 22 minutes until golden brown on top.
- Remove from oven and brush tops with softened butter while still warm. Serve immediately or cool on a wire rack.
Variations And Substitutions
Brush rolls with an egg wash before baking for extra shine, or sprinkle with sesame seeds or everything bagel seasoning. Substitute half the all-purpose flour with whole wheat flour for a nuttier flavor and added nutrition. Add fresh herbs like rosemary or thyme to the dough, or brush finished rolls with garlic butter instead of plain butter for a savory twist.
Make-Ahead, Storage, And Serving Tips
Prepare dough up to 24 hours ahead and refrigerate after the first rise, then shape and bake as directed. Store cooled rolls in an airtight container at room temperature for up to 3 days, or freeze for up to 3 months. Reheat frozen rolls wrapped in foil at 350 degrees for 15 to 20 minutes. For tender rolls, avoid overbaking and brush with butter immediately after baking while still warm.
3. 2-Ingredient Bagels
These surprisingly simple bagels require just two basic ingredients yet deliver authentic chewy texture and satisfying flavor. Using self-rising flour and Greek yogurt creates a tender dough that boils and bakes into proper bagels with a crispy exterior and soft, pillowy interior. Perfect for weekend breakfast or brunch, these bagels come together in under an hour and taste remarkably similar to traditional versions made with yeast and multiple steps. They’re ideal for toasting and topping with cream cheese, lox, or your favorite spreads, and they prove that impressive homemade bread doesn’t always require extensive ingredients or complicated techniques.
Why You’ll Love It
- Incredibly simple with just two pantry staples you likely already have at home.
- No yeast, no rising time, and ready to eat in less than one hour from start to finish.
- Produces authentic chewy bagels that rival bakery versions without special equipment.
Ingredients
- 2 cups self-rising flour
- 1 cup plain Greek yogurt, full-fat
- Water for boiling
- 1 tablespoon baking soda
- Coarse sea salt for topping, optional
- Sesame seeds or everything bagel seasoning, optional
- 2 tablespoons honey or sugar for boiling water, optional
- 2 tablespoons melted butter for brushing, optional
How To Make It
- Combine self-rising flour and Greek yogurt in a large mixing bowl, stirring until a shaggy dough forms. Knead for two to three minutes until the dough becomes smooth and slightly sticky.
- Divide the dough into eight equal portions. Roll each portion into a ball, then poke your thumb through the center and stretch gently to form a bagel shape with a one-inch hole.
- Preheat your oven to 400 degrees Fahrenheit. Bring a large pot of water to a boil and stir in baking soda and honey if using, which helps develop the bagel’s characteristic shine and chew.
- Carefully drop bagels into boiling water one or two at a time. They should sink initially then float to the surface. Boil for one minute on each side, then remove with a slotted spoon and place on a parchment-lined baking sheet.
- Brush the tops of boiled bagels with melted butter if desired, then sprinkle with coarse salt, sesame seeds, or everything bagel seasoning according to your preference.
- Bake for fifteen to twenty minutes until the bagels are golden brown and sound hollow when tapped on the bottom.
- Cool on a wire rack for at least ten minutes before slicing and serving.
Variations And Substitutions
Create cinnamon sugar bagels by rolling the dough in a cinnamon-sugar mixture before boiling. For everything bagel seasoning, combine dried minced garlic, dried minced onion, sesame seeds, poppy seeds, and coarse salt. You can also add vanilla extract, almond extract, or lemon zest to the dough for subtle flavor variations. For a tangier bagel, substitute half the Greek yogurt with sour cream or full-fat ricotta cheese.
Make-Ahead, Storage, And Serving Tips
Store cooled bagels in an airtight container at room temperature for up to three days, or freeze for up to three months. To refresh, wrap frozen bagels in foil and warm in a 350-degree oven for fifteen minutes. These bagels are best sliced horizontally with a serrated knife and toasted before serving. If the dough feels too sticky to handle, dust your work surface and hands lightly with flour. For best results, use full-fat Greek yogurt, as low-fat versions may produce denser bagels.
4. Dutch Oven Bread
Dutch Oven Bread is a rustic, artisanal loaf with a beautifully crispy crust and tender, open crumb interior. The magic happens when steam trapped in a covered Dutch oven during baking creates the perfect conditions for oven spring and crust development. This no-knead or minimal-knead bread has a subtle tang from a long fermentation, making it ideal for breakfast toast, sandwiches, or serving alongside soups and stews. It’s the perfect project for home bakers seeking bakery-quality results without extensive hands-on work.
Why You’ll Love It
- Minimal hands-on time with impressive results that taste and look professional.
- Long fermentation develops complex flavor and improves digestibility naturally.
- The Dutch oven technique eliminates the need for specialty baking equipment or steam pans.
Ingredients
- 3 cups all-purpose flour or bread flour
- 1.5 teaspoons salt
- 0.5 teaspoon instant yeast
- 1.5 cups lukewarm water
- Extra flour for dusting
- Cornmeal or additional flour for the Dutch oven
How To Make It
- Mix flour, salt, and yeast in a large bowl. Add water and stir until a shaggy dough forms with no dry flour remaining. Cover and let rest at room temperature for 12 to 18 hours.
- Turn dough onto a lightly floured surface and gently fold it over itself a few times to build tension. Shape into a round or oval loaf, being careful not to deflate it.
- Place a piece of parchment paper on a work surface, dust with flour, and set the shaped dough on top. Cover loosely with plastic wrap and let rise for 1 to 2 hours until puffy.
- Preheat your oven to 450 degrees Fahrenheit with a Dutch oven inside for 30 minutes. Carefully transfer the dough using the parchment into the hot Dutch oven.
- Score the top of the dough with a sharp knife or bread lame in a crosshatch or single slash pattern to control expansion and create an attractive appearance.
- Cover with the Dutch oven lid and bake for 30 minutes, then remove the lid and bake for an additional 15 to 20 minutes until the crust is deep golden brown.
- Remove from the oven and transfer to a wire rack. Let cool for at least 30 minutes before slicing to allow the crumb to set properly.
Variations And Substitutions
Add whole wheat flour for nuttier flavor and denser texture by replacing up to one-third of the all-purpose flour. Mix in seeds like sesame or sunflower seeds, or fresh or dried herbs such as rosemary before the long fermentation. For a tangier sourdough flavor, substitute the instant yeast with active sourdough starter or extend the fermentation to 24 hours. You can also incorporate olives, sun-dried tomatoes, or cheese into the dough during shaping.
Make-Ahead, Storage, And Serving Tips
Prepare the dough up to 24 hours ahead and refrigerate after shaping to develop even more flavor and allow flexibility in your baking schedule. Store cooled bread in an airtight container at room temperature for up to 3 days, or slice and freeze for up to 3 months. If the crust becomes soft during storage, refresh it by placing the whole loaf in a 350-degree oven for 5 to 10 minutes. For a crispier crust, store uncovered on the counter for the first day. If your crust is too thick or hard, reduce the uncovered baking time by 5 minutes.
Final Thoughts
Making homemade bread and dough from scratch is one of the most rewarding kitchen adventures you can undertake. Whether you’re drawn to the simplicity of a classic white loaf, the nuttiness of whole wheat, or the tanginess of sourdough, these recipes offer something for every skill level and taste preference. The process itself becomes a meditation—mixing, kneading, watching the dough rise—and the aroma filling your home is simply unbeatable.
We encourage you to pick just one recipe to start with rather than trying them all at once. Perhaps begin with the easiest no-knead option to build your confidence, or jump straight to your favorite bread style if you’re feeling adventurous. Once you’ve mastered one dough, the others will feel more approachable. Your family will thank you, and you’ll soon find yourself reaching for your mixing bowl instead of the bakery bag.
Pizza Dough
Ingredients
Method
- In a large mixing bowl, combine flour, instant yeast, salt, sugar, garlic powder, and dried oregano.
- Add olive oil and warm water to the dry ingredients and stir until a shaggy dough forms.
- Knead the dough on a floured surface for 8-10 minutes until smooth and elastic.
- Place dough in a greased bowl, cover with a damp cloth, and let rise for 1-2 hours until doubled in size.
- Punch down the dough and divide into two equal portions.
- Shape each portion into a ball, then stretch or roll into your desired pizza thickness.
- Top with sauce and toppings, then bake at 475°F for 12-15 minutes until golden brown.