
Mini Ghost Cupcakes Recipe
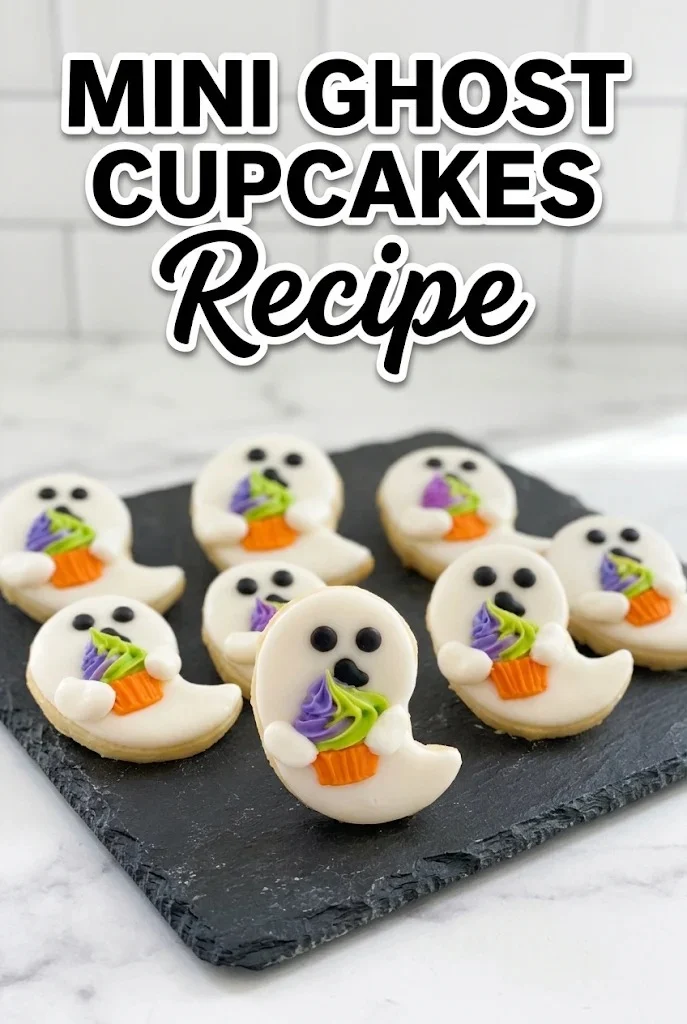
Dry, bland cupcakes are a common letdown, but these Mini Ghost Cupcakes stay tender and vanilla-sweet under their soft buttercream swirl and little white chocolate ghost. They are easy to scale for parties and class treats, and the decorating stays manageable with a few simple steps.
Yield: 12 mini cupcakes | Active time: 30 min | Total time: about 1 hr 15 min, including cooling and chilling
Mini Ghost Cupcakes Ingredients

For the cupcakes
- 1 cup flour — Flour gives the cupcakes their structure. Spoon it lightly into the measuring cup and level it off so the crumb stays tender rather than dense.
- 1/2 cup granulated sugar — Granulated sugar sweetens the batter and helps the edges brown lightly.
- 3/4 cup butter — Butter adds richness and flavor to the crumb. I’d soften it first so it creams easily with the sugar.
- 1 large egg — Egg binds the batter and helps the cupcakes rise evenly. Let it sit out until it’s soft enough to blend without lumps.
- 1/2 cup milk — Milk loosens the batter to a smooth, scoopable consistency.
- 2 tsp vanilla extract — Vanilla extract rounds out the flavor of the cupcakes.
- 1 tsp baking powder — Baking powder provides the lift. Check that it is fresh, since old baking powder can leave the cupcakes flat.
- 1/4 tsp salt — Salt balances the sweetness and brings out the buttery flavor.
For the buttercream
- 1 1/2 cups powdered sugar — Powdered sugar sweetens and thickens the buttercream. Add it gradually so the frosting stays smooth.
- 2 tbsp heavy cream — Heavy cream makes the buttercream soft and easy to pipe.
- 2 tsp vanilla extract — Vanilla extract flavors the frosting.
- Purple & green food coloring, as needed — Food coloring tints the buttercream swirls. Gel colors give vivid shades without thinning the frosting.
For the ghost decorations
- 7 oz (200 g) white chocolate wafers — White chocolate wafers shape the little ghosts. Wafers melt and set more predictably than chunks.
- Orange fondant, as needed — Orange fondant forms the small pots the ghosts sit in. Knead it until pliable before shaping.
- Black icing, as needed — Black icing makes the eyes and mouths. A fine-tip tube gives the cleanest lines.
Substitutions And Additions
White Chocolate Wafers
A good-quality white melting wafer or white candy melts can replace the wafers. Expect a slightly softer set, so give the ghosts a few extra minutes to firm up before handling.
Orange Fondant
Orange candy clay or tinted white fondant can replace the orange fondant. The pots will look slightly different in color and texture, but they hold their shape well.
Butter
Salted butter can be used in place of unsalted butter. Reduce any added salt slightly, since the cupcakes and frosting will taste saltier.
How To Make This Mini Ghost Cupcakes Recipe
- Bake the cupcakes. Preheat the oven to 350°F (175°C). Line a 12-cup mini muffin tin with paper liners. Make the cupcake batter by creaming the 3/4 cup butter with the 1/2 cup granulated sugar until light and fluffy, then beat in the egg and 2 tsp vanilla extract. Whisk the 1 cup flour, 1 tsp baking powder, and 1/4 tsp salt together, then add them to the batter alternately with the 1/2 cup milk, mixing just until smooth. Fill each liner about two-thirds full and bake for 15-18 minutes, until the tops spring back lightly and a toothpick comes out clean.
Pro Tip: Check at 15 minutes, since mini cupcakes can go from done to dry quickly. Once the flour is in, mix only until it’s combined, or the crumb turns tough. Let the cupcakes cool in the tin for 5 minutes, then move them to a rack to cool completely before frosting. Warm cupcakes will melt the buttercream.

- Make the buttercream. Beat the 1 1/2 cups powdered sugar with the 2 tbsp heavy cream and 2 tsp vanilla extract until smooth and spreadable. If the frosting is too stiff to pipe, add a few drops of cream; if it is too loose, add a small spoonful of powdered sugar. Keep the frosting covered until you are ready to tint and pipe it.
Pro Tip: Beat in powdered sugar gradually to avoid a cloud of sugar and a grainy texture. Melt the white chocolate wafers in a heatproof bowl set over barely simmering water, stirring until smooth. Shape small ghost bodies from the melted chocolate on parchment and let them set. Knead the orange fondant until pliable, then shape small cup-shaped pots that will hold the swirls.
Pro Tip: Keep the melted white chocolate warm but not hot. Overheating will make it seize and turn grainy.

- Tint and pipe the swirls. Divide the buttercream and tint one portion purple and another green with the food coloring. Pipe purple and green swirls into the orange pots.
Pro Tip: Tint only small amounts at a time so you can control the shade. Add the faces. I like to use black icing to pipe eyes and mouths onto each white chocolate ghost. Let the icing set briefly before handling the ghosts.
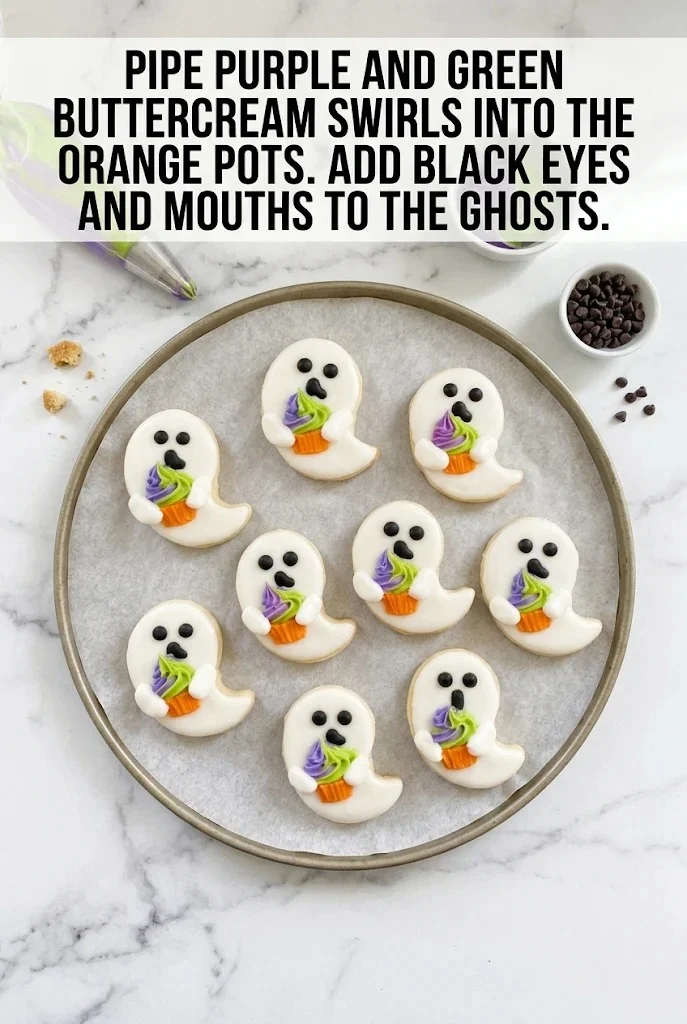
- Assemble and chill. Press a frosting-filled pot onto each cooled cupcake, then position the ghost behind the pot with its little white hands around the pot. Refrigerate the decorated cupcakes until the frosting is firm.
Pro Tip: Refrigerate only until the frosting is firm so the ghosts keep their shape without drying out.


How To Serve And Store

Serve these at room temperature on a platter for parties, or arrange them on a tray for a kids’ table. Keep them covered so the decorations stay fresh.
In The Fridge
Store decorated cupcakes in an airtight container in the refrigerator for up to 3 days. Let them sit at room temperature for about 10 minutes before serving so the frosting softens slightly.
In The Freezer
Do not freeze decorated cupcakes, since the white chocolate and fondant can become sticky and cloudy when thawed. Plain, fully cooled cupcakes can be frozen in an airtight container for up to 2 months, then decorated after thawing at room temperature.
Frequently Asked Questions
Can you make mini ghost cupcakes ahead of time?
Yes, bake the cupcakes a day ahead and store them in an airtight container at room temperature. Decorate them on the day you plan to serve them so the ghosts look their best.
Why are my ghosts sliding off?
This usually means the buttercream was too soft or the ghosts were placed before the frosting firmed up. Refrigerate the assembled cupcakes until the frosting is set, then check the ghosts before serving.
Can I use a different frosting?
Yes, but the buttercream here is what holds the ghost pots steady. A stiffer frosting will pipe more neatly, while a thinner one may slump under the decorations.
More Recipes You’ll Love
- Christmas Penguin Oreo Cupcakes
- Christmas Cupcakes with Cream Cheese Frosting
- Chocolate Witch’s Broom Treats
- Christmas Gingerbread Cheesecake Sprinkle Cups
Follow Hailee Recipes on Pinterest for more simple treats to make at home: Follow Hailee Recipes on Pinterest.
Mini Ghost Cupcakes Recipe
Ingredients
Method
- Preheat the oven to 350°F (175°C) and line a 12-cup mini muffin tin with paper liners; cream the 3/4 cup butter with the 1/2 cup granulated sugar until light and fluffy, then beat in the egg and 2 tsp vanilla extract; whisk the 1 cup flour, 1 tsp baking powder, and 1/4 tsp salt together and add them to the batter alternately with the 1/2 cup milk, mixing just until smooth; fill each liner about two-thirds full and bake for 15-18 minutes until a toothpick comes out clean, then cool 5 minutes in the tin and move to a rack to cool completely.
- Beat the 1 1/2 cups powdered sugar with the 2 tbsp heavy cream and 2 tsp vanilla extract until smooth and spreadable, adding cream or powdered sugar to adjust the consistency; melt the white chocolate wafers in a heatproof bowl over barely simmering water until smooth and shape small ghost bodies on parchment to set; knead the orange fondant until pliable and shape small cup-shaped pots.
- Divide the buttercream and tint one portion purple and another green with the food coloring; pipe purple and green swirls into the orange pots; use black icing to pipe eyes and mouths onto each white chocolate ghost and let the icing set briefly.
- Press a frosting-filled pot onto each cooled cupcake, position each ghost with its little white hands around the pot, and refrigerate the decorated cupcakes until the frosting is firm.
2 comments