No Bake Butterfinger Pie – Creamy & Crunchy
No Bake Butterfinger Pie – Creamy & Crunchy
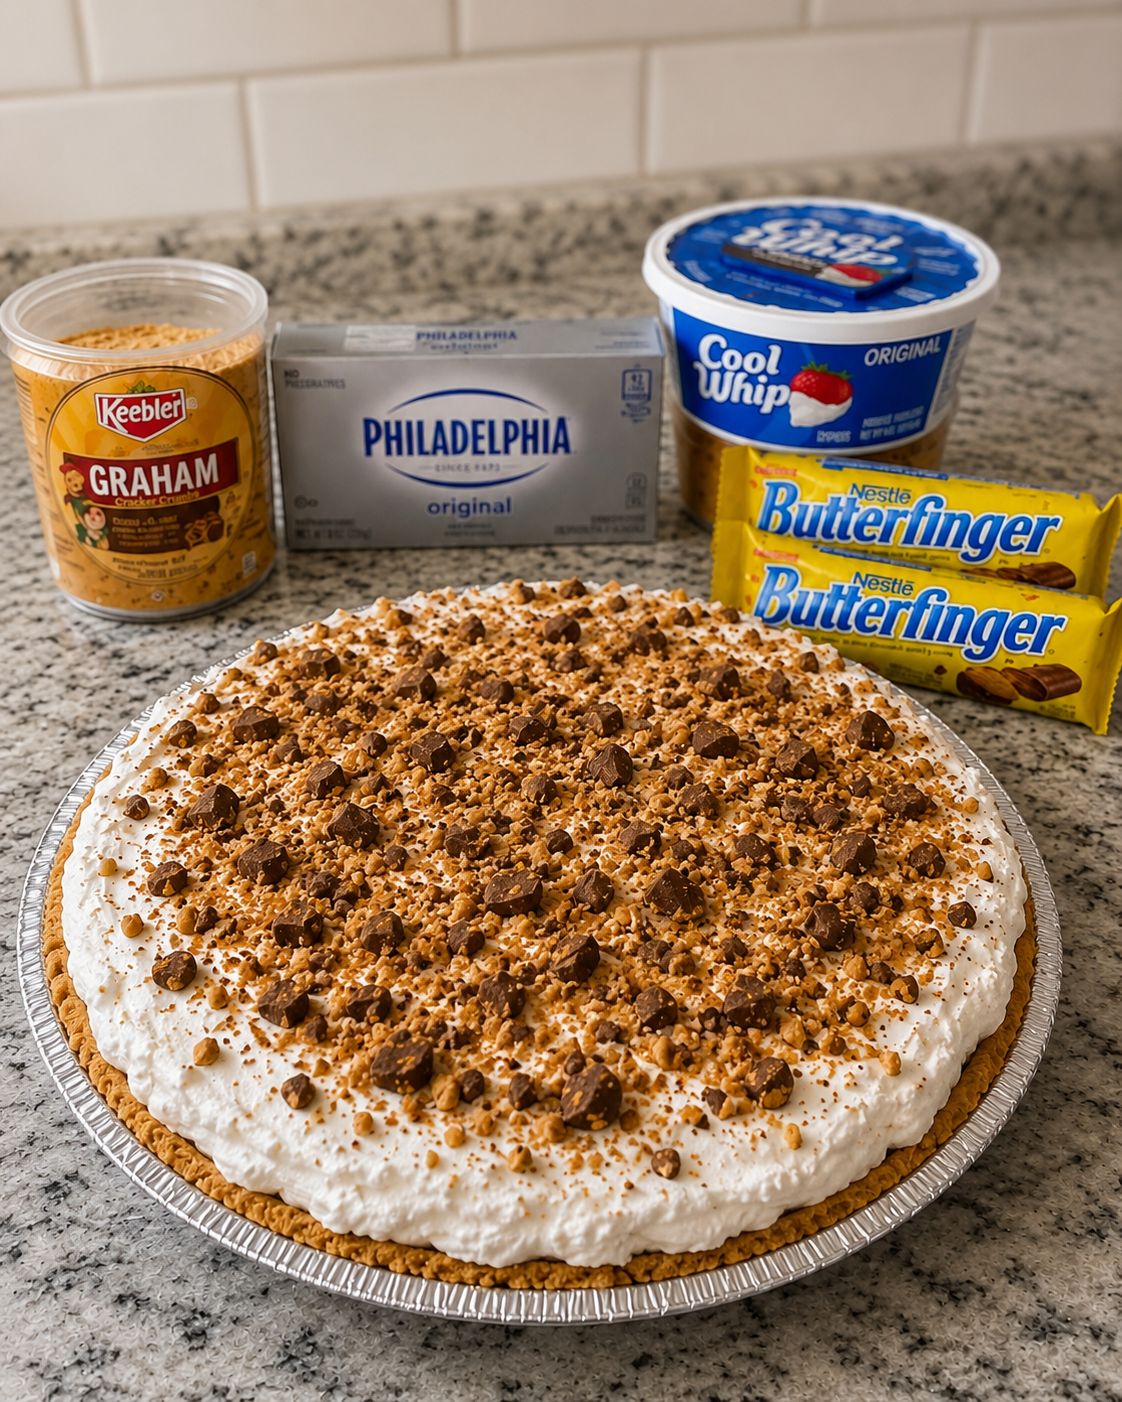
No Bake Butterfinger Cream Cheese Pie: A Dessert That Tastes Like Your Favorite Candy Bar
I created this No Bake Butterfinger Cream Cheese Pie on a Tuesday night when my brain was absolutely fried. You know that feeling? When you want something decadent and sweet, but the thought of turning on the oven feels like climbing a mountain. I was sitting on my kitchen counter with a Butterfinger bar in one hand and my phone in the other, scrolling through old family recipes, when it hit me: why not combine two of my favorite things into one ridiculously easy dessert?
The result? A pie that tastes like someone melted a Butterfinger bar into creamy, dreamy filling and tucked it into a buttery graham cracker crust. No baking required. No complicated techniques. Just pure, unapologetic comfort in dessert form.
I tested this recipe about fifteen times (yes, really), and I’m not exaggerating when I say it’s become my go-to for potlucks, family dinners, and those nights when I need to impress someone without actually trying that hard. My mom asked for the recipe after one bite. My neighbor literally asked if I’d “bought it from a bakery” because she couldn’t believe it was homemade. And my kids? They’ve stopped asking me to make other desserts.
This pie is for anyone who loves the combination of chocolate, caramel, and crispy toffee. It’s perfect for busy people, beginner bakers, or anyone who just wants something impressive without the stress. The best part? It comes together in about twenty minutes of actual work, then you just refrigerate and forget about it until dessert time. If you love easy desserts that taste way more complicated than they are, this is absolutely your recipe. Follow me on HaileeRecipes on Pinterest for more no-bake desserts and cozy kitchen moments like this one.
Why You’ll Love This Recipe
Let me be honest with you: this isn’t a health food. It’s a celebration dessert, and I’m completely okay with that. Here’s what makes it special to me.
- Zero oven time. Your kitchen stays cool, and you’re done in minutes. Perfect for hot weather or when your oven is already occupied.
- Tastes like a fancy dessert, but it’s embarrassingly easy. I’m talking five ingredients for the filling. That’s it.
- Make it ahead. This actually gets better after a day or two in the fridge. Your future self will thank you.
- Crowd-pleaser status. I’ve never met anyone who didn’t want seconds. People who claim they don’t like sweets suddenly change their minds when they try this.
- Customizable. Want to swap the Butterfinger for Heath bars? Use a different crust? Add caramel drizzle? You absolutely can, and I’ll tell you exactly how.
- Budget-friendly. This costs way less than buying a dessert from a bakery, and honestly, it tastes better.
Ingredients
For the Crust:
- 2 cups graham cracker crumbs (about 14-16 full crackers)
- 6 tablespoons melted butter
- 2 tablespoons granulated sugar
For the Filling:
- 16 ounces cream cheese, softened to room temperature
- 1 cup heavy whipping cream
- 3/4 cup powdered sugar
- 1 teaspoon vanilla extract
- 6-8 Butterfinger bars (about 1 3/4 cups crushed, plus extra for topping)
For Topping:
- 1/2 cup caramel sauce (store-bought or homemade)
- Extra crushed Butterfinger pieces
- Chocolate drizzle (optional but highly recommended)
Hailee’s Tip: Don’t skip softening your cream cheese. I know it takes an extra thirty minutes, but cold cream cheese will give you lumpy filling, and nobody wants that. I usually just leave mine on the counter while I prep everything else.
Hailee’s Tip: Buy slightly more Butterfinger bars than you think you need. I always end up eating a few while I’m working, and you’ll want plenty for crushing. Plus, the extras are never wasted in my house.
Hailee’s Tip: Graham cracker crumbs from a box work perfectly fine, but if you want to crush them fresh, just put whole crackers in a food processor or a ziplock bag and go to town with a rolling pin. It’s honestly kind of therapeutic.
Optional Add-Ins and Variations
This is where you get to make the pie your own. I love the base recipe as-is, but I also love playing around with it. Here are some of my favorite tweaks:
- Salted caramel version: Use salted caramel sauce instead of regular, and sprinkle a tiny bit of sea salt on top before serving. The salt really makes the sweetness pop.
- Chocolate crust: Swap half the graham crackers for crushed chocolate cookies. It’s like a Reese’s cup situation, and I’m here for it.
- Extra toffee crunch: Mix some of the crushed Butterfinger directly into the filling instead of just using it for topping. You’ll get little pockets of toffee throughout.
- Peanut butter swirl: Drizzle peanut butter sauce over the filling before adding the caramel. Trust me on this one.
- Chocolate ganache top: Instead of just chocolate drizzle, make a thin ganache layer on top. It looks restaurant-quality and tastes incredible.
Step-by-Step Method
Step 1: Make the Crust
Grab a 9-inch pie pan and get your crust ready. Mix your graham cracker crumbs, melted butter, and sugar in a bowl until it looks like wet sand. I use my hands for this because it’s faster and honestly more fun. Press this mixture firmly into the bottom and up the sides of your pie pan. You want it compact so it holds together when you slice it.
Hailee’s Moment: The first time I made this, I barely pressed the crust at all, and it basically fell apart when I tried to serve it. Don’t be me. Press firmly. Your future self will appreciate it.
Pop this in the freezer while you make the filling. Just ten minutes. This helps it set and prevents it from getting soggy.
Step 2: Crush Your Butterfinger Bars
This is my favorite part because you get to eat a few while you work. Unwrap your Butterfinger bars and put them in a ziplock bag. Crush them into bite-sized pieces using a rolling pin, your hands, or whatever feels satisfying. You want some bigger chunks and some smaller pieces so you get texture throughout. Don’t pulverize them into powder unless that’s your vibe, but I like the crunch.
Step 3: Whip Your Cream
Pour your heavy whipping cream into a clean bowl and whip it with an electric mixer until soft peaks form. This takes about two to three minutes. You want it fluffy but not so whipped that it turns into butter. Stop when it looks like clouds.
Step 4: Beat the Cream Cheese Mixture
In a separate bowl, beat your softened cream cheese until it’s completely smooth and creamy. This should take about a minute. Add your powdered sugar and vanilla extract, then beat for another minute until everything is combined and fluffy. Scrape down the sides of the bowl because cream cheese loves to hide in corners.
Step 5: Fold It All Together
This is where the magic happens. Gently fold your whipped cream into the cream cheese mixture using a rubber spatula. Do this slowly and carefully. You’re trying to keep all that beautiful air in the whipped cream, so don’t stir aggressively. Fold until just combined.
Now fold in about three-quarters of your crushed Butterfinger pieces, saving the rest for topping. The filling should look light, fluffy, and absolutely delicious.
Step 6: Fill Your Crust
Pull your crust out of the freezer and pour the filling into it. Smooth the top with a spatula. It should be pretty and even.
Step 7: Chill and Top
Refrigerate for at least four hours, but honestly, overnight is better. The flavors meld together, and the texture becomes even creamier. Before serving, drizzle with caramel sauce, sprinkle with your reserved Butterfinger pieces, and add chocolate drizzle if you’re feeling fancy.
Common Mistakes to Avoid
Using cold cream cheese. I mentioned this before, but it’s worth repeating. Cold cream cheese will not blend smoothly, and you’ll end up with lumps in your filling. Leave it on the counter for thirty minutes. Your pie will be so much better.
Over-whipping the cream. If you whip your heavy cream too long, it turns into butter. It’s a fine line, but you’ll know when it’s right. Stop as soon as you see soft peaks.
Not pressing the crust firmly enough. A loose crust falls apart when you slice it. Press it like you mean it.
Skipping the chill time. I know you want to eat it right now. I get it. But this pie needs time to set. Four hours minimum. Trust the process.
Adding the toppings too early. If you add caramel and Butterfinger pieces hours before serving, they get soft and lose their crunch. Add them right before you serve.
My Tested Substitutions
For the Butterfinger bars: Heath bars, Skor bars, or even crushed toffee bits work beautifully. If you want something different, try crushed Oreos mixed with caramel for a cookies-and-cream version.
For the crust: Vanilla wafers, digestive biscuits, or even crushed pretzels create a completely different vibe. I’ve done all three, and they’re all delicious.
For heavy whipping cream: If you don’t have it, you can use whipped topping like Cool Whip, but the flavor won’t be quite as rich. Fresh whipped cream is worth seeking out if you can.
For powdered sugar: Regular granulated sugar works in a pinch, but it won’t dissolve as smoothly. If that’s all you have, blend it in a food processor for a minute first.
For caramel sauce: Make your own if you have time. It’s literally just butter, brown sugar, and heavy cream simmered together. But store-bought is completely fine and saves you time.
How to Customize
Want to make this pie uniquely yours? Here’s how I think about customization: start with the base (cream cheese, whipped cream, graham crust) and then play with the candy bar flavor.
Love Reese’s cups? Use crushed peanut butter cups instead of Butterfinger and drizzle with chocolate. Into Snickers? Crush those up with some caramel and you’ve got a whole new dessert. The structure stays the same, but the flavor changes completely.
You can also change the crust flavor to complement your candy choice. Chocolate crust for peanut butter cups. Vanilla wafer crust for Snickers. Get creative here.
Serving Ideas
This pie is perfect on its own, but here are some ways I like to serve it:
- Classic slice with coffee. Honestly, this is how I eat it most often. A slice and a cup of coffee on a quiet morning.
- With whipped cream and extra caramel. If you’re feeling indulgent, add a dollop of whipped cream and another drizzle of caramel on top of your slice.
- Alongside fresh fruit. Strawberries or raspberries provide a nice contrast to all that richness.
- With a scoop of vanilla ice cream. Warm pie, cold ice cream. You know the deal.
- Mini bites for a party. Cut into small squares and serve on a platter. People will think you’re a dessert genius.
Meal Prep and Storage
This pie actually improves with time, which is my favorite kind of dessert to make ahead.
In the refrigerator: Cover your finished pie with plastic wrap and store it for up to four days. The flavors get even more blended together, and it stays perfectly creamy.
In the freezer: You can freeze this pie for up to two months. Wrap it well in plastic wrap and then aluminum foil. Thaw it in the refrigerator for about four hours before serving. The texture stays great.
Individual slices: If you want to freeze individual portions, slice the pie first, wrap each slice in plastic wrap, and store them in a freezer bag. Then you can grab one whenever you want a quick dessert.
Make-ahead tip: You can make the crust and filling separately up to two days ahead. Keep the crust in the pie pan covered in the fridge, and keep the filling in a separate container. Just fold them together a few hours before you want to serve.
Nutritional Breakdown
Let’s be real: this is a dessert, not a health food. But here’s what you’re looking at per serving (based on 10 servings):
- Calories: 485
- Protein: 6g
- Carbohydrates: 52g
- Fat: 27g
- Fiber: 1g
These numbers can vary depending on your specific brands and how much caramel and chocolate you use for topping. But this gives you a ballpark idea. It’s rich, it’s sweet, and it’s absolutely worth it.
Final Thoughts
Making this No Bake Butterfinger Cream Cheese Pie has become one of my favorite kitchen rituals. There’s something so satisfying about creating something that looks fancy and complicated when it’s actually just a few simple steps. Every time I make it, I feel like I’m getting away with something.
More than that, though, I love how this dessert brings people together. I’ve watched people’s faces light up when they take that first bite. I’ve seen it disappear at potlucks faster than anything else on the table. I’ve had friends ask for the recipe so many times that I finally just printed it out and laminated it for my mom.
That’s what I love about cooking and baking: it’s not really about the food. It’s about the moments you create, the people you feed, and the way a simple dessert can make someone’s day a little bit better.
So go make this pie. Soften that cream cheese. Crush those Butterfinger bars. Whip that cream. And then sit back and enjoy the compliments when everyone tastes it. You’ve earned them.
Happy baking, friends. I can’t wait to hear how yours turns out.
—
Recipe Card
No Bake Butterfinger Pie - Creamy & Crunchy
Ingredients
Method
- Mix graham cracker crumbs, melted butter, and sugar in a bowl until it resembles wet sand
- Press firmly into a 9-inch pie pan, covering the bottom and sides
- Freeze crust for 10 minutes while you prepare the filling
- Crush Butterfinger bars into bite-sized pieces in a ziplock bag
- Whip heavy cream in a clean bowl until soft peaks form
- Beat softened cream cheese until smooth, then add powdered sugar and vanilla extract