No-Bake Cinnamon Toast Crunch Cheesecake Bars
No-Bake Cinnamon Toast Crunch Cheesecake Bars
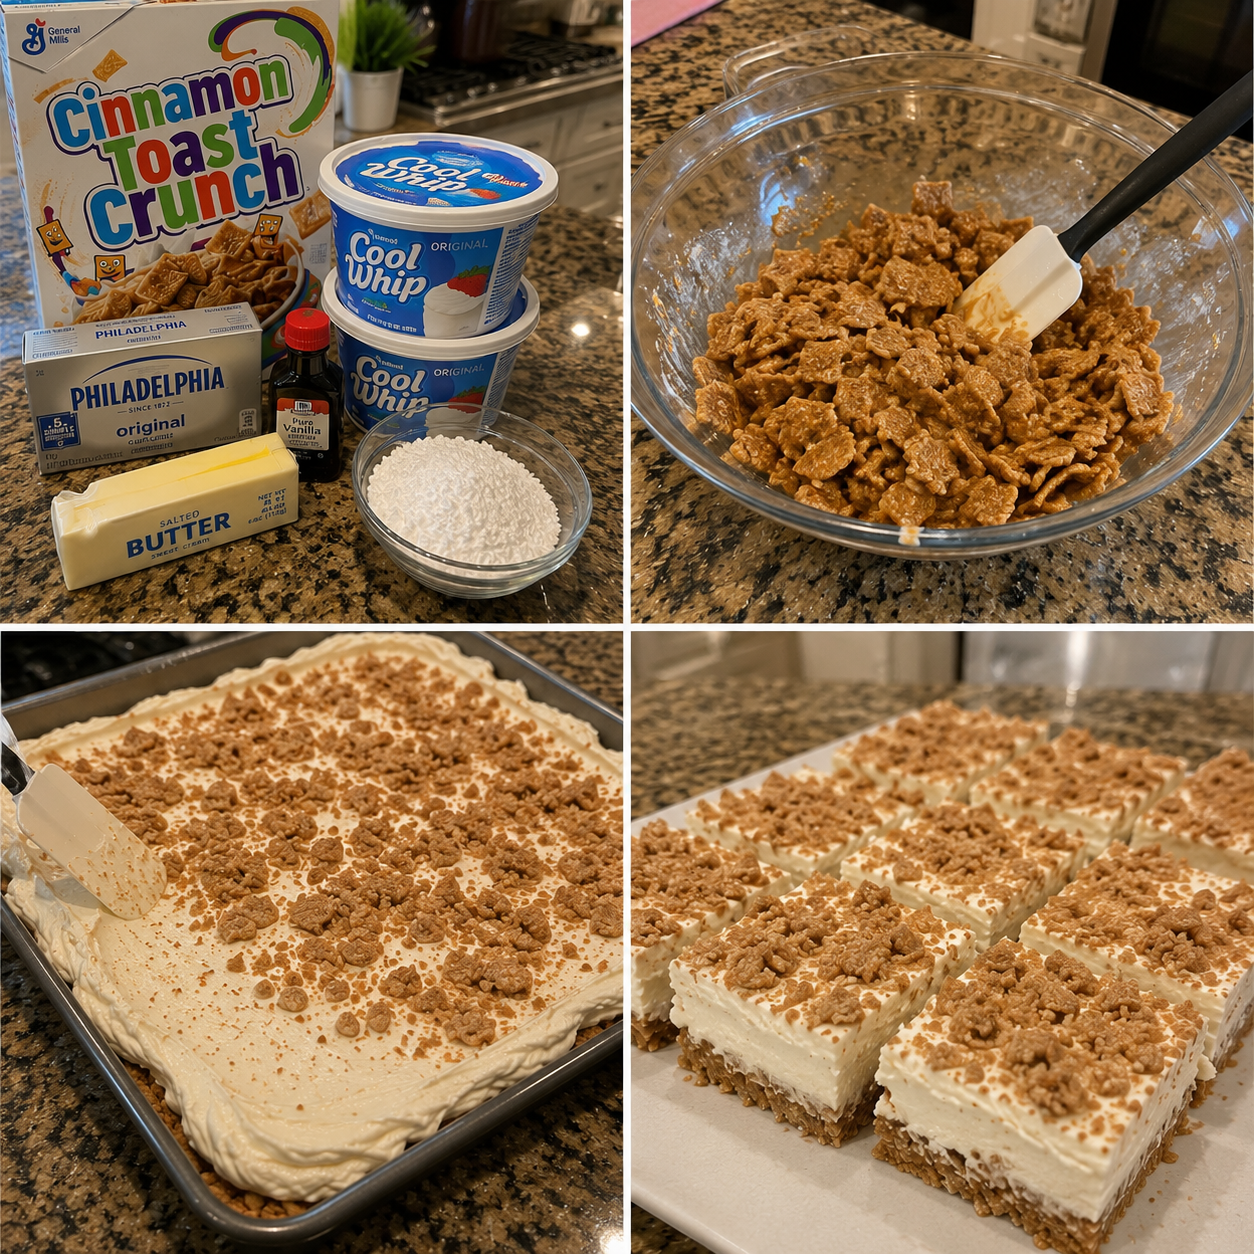
No-Bake Cinnamon Toast Crunch Cheesecake Bars: A Nostalgic Dessert That Actually Works
I have this memory from about three years ago. It was a Sunday night, the kind where you’re already thinking about Monday morning, and I was standing in my kitchen at 9 PM with a serious craving for something sweet but absolutely zero motivation to turn on my oven. My partner walked by eating a bowl of Cinnamon Toast Crunch cereal, and I literally stopped mid-thought. That specific combination of cinnamon sugar crunch and creamy dairy—it hit different. I started wondering: what if I could turn that exact feeling into a cheesecake bar? But here’s the thing—no baking required.
That night, I started experimenting. I pulled out cream cheese, crushed some cereal, grabbed some butter, and just… played around. Two hours later, I had these incredible no-bake bars sitting in my fridge, and honestly, they’ve become one of my most requested recipes from friends. People always assume they’re complicated. They’re really not.
These No-Bake Cinnamon Toast Crunch Cheesecake Bars are exactly what they sound like: a buttery, crunchy cereal crust, a thick layer of cinnamon-spiced cream cheese filling, and a topping that tastes like eating your favorite childhood cereal in the most grown-up way possible. They’re perfect for potlucks, lazy weekends, or when you want something that looks fancy but took you maybe 20 minutes of actual work. No oven anxiety. No burnt edges. Just creamy, dreamy, cinnamon-kissed perfection.
If you’re the type of person who loves nostalgic flavors, no-bake desserts, or anything involving cream cheese, this recipe is calling your name. And if you want more recipes like this, follow me on HaileeRecipes on Pinterest for all my cozy kitchen creations.
Why You’ll Love This Recipe
Let me be honest about what makes this recipe special, because I’m not here to oversell you on something that doesn’t deliver.
- Genuinely no baking involved. This means no preheating, no timer anxiety, no wondering if your oven temperature is accurate. You’re using your fridge as your oven, and it never disappoints.
- It tastes like a beloved cereal, but elevated. There’s something magical about taking a comfort food from childhood and turning it into an actual dessert that adults fight over.
- The texture is everything. You get the crunch of the cereal crust, the creamy richness of the filling, and that satisfying bite when you break through the top layer. Three textures. One bite. Pure joy.
- It’s make-ahead friendly. You can prep these days in advance, which means less stress when you’re hosting or just planning your week.
- They look impressive without the effort. Seriously, people will think you spent hours on these. You didn’t. You know the truth. That’s the best part.
Ingredients
For the Crust:
- 2 cups Cinnamon Toast Crunch cereal, crushed into fine crumbs
- 6 tablespoons unsalted butter, melted
- 2 tablespoons granulated sugar
- Pinch of sea salt
For the Filling:
- 16 ounces cream cheese, softened to room temperature
- 1 cup heavy whipping cream
- 1/2 cup powdered sugar
- 2 teaspoons vanilla extract
- 1 1/2 teaspoons ground cinnamon
- 1/4 teaspoon nutmeg
- Pinch of sea salt
For the Topping:
- 1 cup Cinnamon Toast Crunch cereal, left whole or lightly crushed
- 2 tablespoons unsalted butter, melted
- 1 tablespoon brown sugar
- 1/4 teaspoon ground cinnamon
Hailee’s Tip: The key to a smooth filling is making sure your cream cheese is actually soft. I’m talking room temperature—leave it on the counter for at least 30 minutes. Cold cream cheese will give you lumps, and lumps are the enemy of creamy perfection.
Hailee’s Tip: Don’t skip the salt in any of these layers. I know it sounds weird, but salt makes everything taste more like itself. It deepens the cinnamon flavor and keeps the sweetness from becoming one-dimensional.
Hailee’s Tip: Buy the name-brand Cinnamon Toast Crunch if you can. Generic versions don’t have the same flavor intensity, and flavor is literally the whole point of this recipe.
Optional Add-Ins and Variations
This is where you make the recipe your own, and I genuinely love when people do that. Here are some directions you could take this:
- Maple syrup swirl: Drizzle a little maple syrup into the filling before it sets. It adds this subtle autumn note that pairs beautifully with cinnamon.
- Graham cracker crunch: Mix crushed graham crackers into the crust for a s’mores-adjacent vibe. Use half cereal, half graham crackers.
- Caramel drizzle: Top the finished bars with a light caramel drizzle. The sweet-salty-caramel thing is never wrong.
- Cream cheese frosting layer: If you want extra richness, whip together 4 ounces of cream cheese with 1/4 cup powdered sugar and spread it on top before adding the cereal topping.
- Brown butter version: Brown your butter before mixing the filling. It adds this nutty, complex depth that’s honestly incredible.
Step-by-Step Method
Step 1: Prep Your Pan
Line an 8×8-inch baking pan with parchment paper. I like to let the parchment overhang on two sides so I can easily lift the whole thing out later. This is your friend for clean cuts and easy cleanup.
Step 2: Make the Crust
Pour your crushed cereal into a bowl. You want it finely crushed but not pulverized into powder—you still want a little texture. Add the melted butter, granulated sugar, and salt. Mix it all together with a fork until it looks like wet sand. Press this mixture firmly into the bottom of your prepared pan. Use the bottom of a measuring cup to really pack it down. You want it compact so it holds together when you bite into it.
What I Messed Up: The first time I made these, I didn’t press the crust down hard enough, and it fell apart when people tried to pick up the bars. Now I really commit to the pressing. Your future self will thank you.
Step 3: Chill the Crust
Pop the pan into the fridge for 15 minutes while you work on the filling. This helps the crust set so it doesn’t mix with the filling layer.
Step 4: Prepare the Filling Base
In a large bowl, beat the softened cream cheese with an electric mixer on medium speed for about 2 minutes. You want it smooth and creamy, with no lumps. This is important. Take your time here.
Step 5: Add the Dry Ingredients
Add the powdered sugar, cinnamon, nutmeg, vanilla extract, and salt to the cream cheese. Mix on medium speed until everything is fully incorporated. Stop and scrape down the sides of the bowl with a spatula—don’t let any pockets of cinnamon hide in there.
Step 6: Whip the Cream
In a separate bowl, whip the heavy cream on medium-high speed until stiff peaks form. This should take about 3-4 minutes. You want it thick and cloud-like.
What I Messed Up: I once tried to fold the cream into the filling too aggressively and deflated all my beautiful whipped cream. Now I fold gently, using a spatula and turning the bowl as I go. Patience pays off.
Step 7: Fold It Together
Gently fold the whipped cream into the cream cheese mixture in two additions. Use a rubber spatula and fold from the bottom up, rotating the bowl as you go. You want to keep as much air in there as possible. The filling should be light, fluffy, and mousse-like.
Step 8: Spread and Set
Remove your crust from the fridge and spread the filling evenly over the top. Smooth it out with a spatula. Cover the pan loosely with plastic wrap and refrigerate for at least 4 hours, but preferably overnight. The longer it sits, the better the flavors meld and the firmer it becomes.
Step 9: Make the Topping
In a small bowl, toss the whole Cinnamon Toast Crunch cereal with melted butter, brown sugar, and cinnamon. Let it sit for a minute so the butter coats everything evenly.
Step 10: Add the Topping and Chill Again
Sprinkle the cereal topping evenly over the chilled filling. Press it down gently so it adheres. Pop it back into the fridge for at least 1 hour before cutting. This helps the topping stay in place and the whole thing stay cold and firm.
Step 11: Cut and Serve
Use a sharp knife dipped in hot water (and wiped clean between cuts) to slice the bars into 12-16 pieces, depending on how generous you’re feeling. The hot knife helps you get clean cuts without dragging the filling around.
Common Mistakes to Avoid
Skipping the cream cheese softening step. I know you’re in a hurry. I get it. But lumpy filling is sad filling. Thirty minutes on the counter is worth it.
Over-mixing the filling. Once you add the whipped cream, treat it gently. Over-mixing deflates all that beautiful air you worked to create.
Not chilling long enough. I know 4 hours feels like forever, but the filling needs time to set. If you cut into it too early, it’ll be more mousse than bar, and while mousse is delicious, it’s not what we’re going for here.
Using stale cereal. If your Cinnamon Toast Crunch has been open for three weeks, buy a fresh box. Stale cereal loses its crunch and flavor, and that defeats the entire purpose.
Pressing the crust too lightly. A crumbly crust is a sad crust. Press it down like you mean it.
My Tested Substitutions
Can’t find Cinnamon Toast Crunch? Use Cinnamon Life cereal, or even crushed cinnamon graham crackers mixed with a little extra cinnamon. It won’t be exactly the same, but it’ll still be delicious.
Don’t have heavy cream? You could use whipped topping like Cool Whip, though the texture will be slightly different. Use about 2 cups of thawed whipped topping instead of whipping your own cream. The filling will still be good, just a touch less fluffy.
Dairy-free version? This is tricky because cream cheese is pretty central to the flavor. You could try dairy-free cream cheese and coconut cream (the thick part from a can of coconut milk), but I haven’t extensively tested this. If you go this route, let me know how it turns out.
Lower sugar? Reduce the powdered sugar to 1/3 cup and add a bit more vanilla extract for sweetness. The filling will be less sweet but still delicious.
How to Customize
The beauty of this recipe is that it’s a template. You’re not locked into my exact version.
Want it spicier? Add 1/4 teaspoon of cardamom or ginger to the filling. It’ll give you this warm, complex spice note that’s really special.
Want it sweeter? Add an extra 2 tablespoons of powdered sugar to the filling, or drizzle the bars with a cinnamon-sugar glaze before serving.
Want a different cereal entirely? Honestly, this formula works with any sweet breakfast cereal. Honey Nut Cheerios, Frosted Flakes, even Fruity Pebbles if you’re feeling adventurous. Just crush it up and follow the same method.
Want to make it more decadent? Add a thin layer of dulce de leche or salted caramel between the crust and the filling. It’s an extra step, but it takes these bars from great to absolutely showstopping.
Serving Ideas
These bars are perfect on their own, but here are some ways to serve them that’ll make people think you’re a genius:
- With coffee. The creamy sweetness pairs beautifully with a strong cup of coffee. This is my go-to breakfast pairing.
- With a glass of milk. Because nostalgia, obviously. It’s like eating cereal, but make it fancy.
- With fresh whipped cream and a drizzle of honey. Adds a nice lightness and a touch of floral sweetness.
- Crumbled over vanilla ice cream. Turn the bars into a sundae topping. The cold ice cream against the cold bars is incredible.
- With a cinnamon-spiced hot chocolate. Dunk them. Do it. You won’t regret it.
Meal Prep and Storage
In the Fridge: These bars keep beautifully in an airtight container in the fridge for up to 5 days. The filling stays creamy, and the crust stays crispy. It’s honestly the perfect make-ahead dessert.
In the Freezer: You can freeze these for up to 2 months. Wrap each bar individually in plastic wrap, then place them in a freezer-safe container. Let them thaw in the fridge for about 2 hours before eating. The texture stays great.
Make-Ahead Timeline: You can make the crust a day ahead and keep it in the fridge. You can make the filling a few hours ahead and keep it in a separate container. Then assemble everything the day you want to serve them. This is perfect if you’re hosting and want to spread out your prep work.
Travel Tip: These bars travel surprisingly well. Pack them in a cooler with an ice pack if you’re bringing them somewhere. They hold up better than you’d expect, and they’re the kind of dessert people actually want to eat at a potluck.
Nutritional Breakdown
Per bar (based on 12 servings):
- Calories: 285
- Protein: 4g
- Carbohydrates: 28g
- Fat: 18g
- Fiber: 0g
- Sugar: 22g
These are definitely a treat, not an everyday snack. But life is short, and sometimes you need a creamy, cinnamon-kissed bar of happiness. I don’t apologize for that.
Final Thoughts
I genuinely love this recipe because it feels special without being complicated. It’s the kind of thing you can make on a Tuesday night and feel proud of, or prep a day ahead for a weekend gathering. It tastes like comfort and nostalgia, but it looks like you spent way more effort than you actually did.
The best part? Once you make these once, you’ll have them in your regular rotation. Your friends will start requesting them. Your family will ask you to bring them to dinners. And you’ll smile quietly, knowing that you’re basically serving them a fancy version of their favorite cereal.
If you make these, I’d love to hear about it. Drop by my Pinterest board and pin this recipe, or just make a mental note to try it this weekend. You deserve something this good.
Happy baking (or, more accurately, happy chilling),
Hailee
—
Recipe Card
**No-