Oreo Klondike Milkshake with Whipped Cream and Cherry
Oreo Klondike Milkshake with Whipped Cream and Cherry
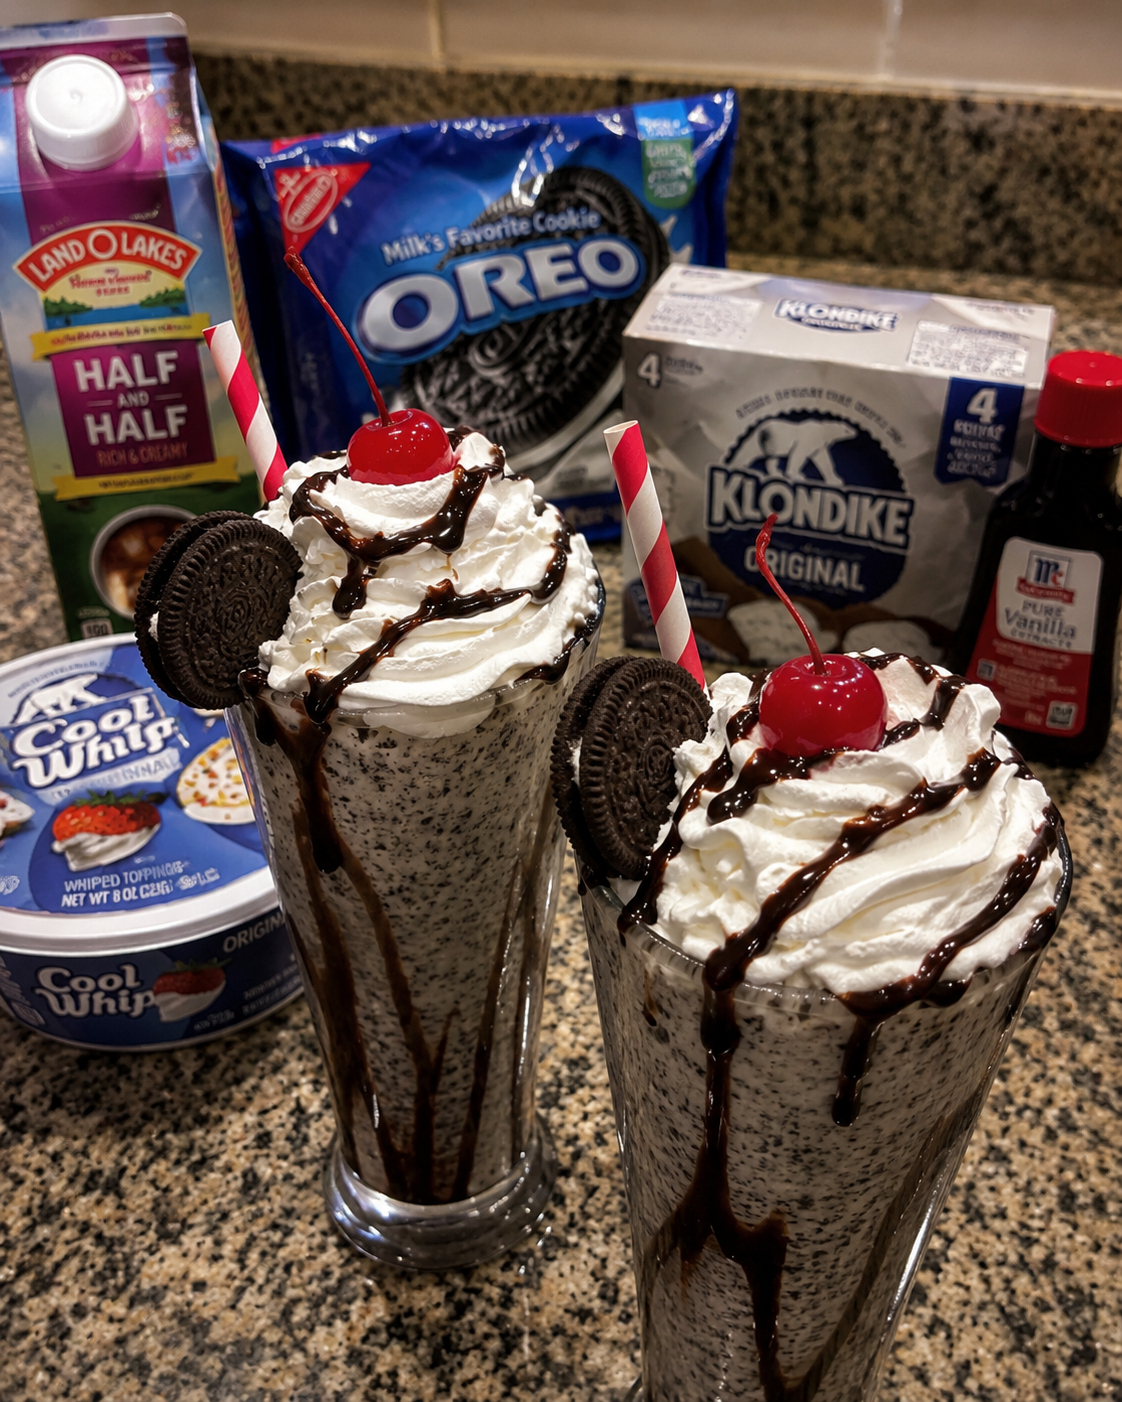
Oreo Klondike Milkshake with Whipped Cream and Cherry: A Nostalgic Treat That Hits Different
I have this memory from when I was maybe twelve years old. My dad would take me to the ice cream truck on summer evenings, and I’d always get the same thing: a Klondike bar with the chocolate coating that cracked when you bit into it. There was something so satisfying about that moment—the contrast of cold vanilla ice cream against the snappy chocolate shell. Fast forward to last month, and I’m sitting in my kitchen on a random Tuesday night, absolutely craving something sweet but also weirdly nostalgic, and that memory just hit me like a wave.
So I did what I always do when inspiration strikes: I started experimenting. What if I took that iconic Klondike feeling and turned it into a milkshake? What if I added Oreos because, honestly, Oreos make everything better? What if I topped it with actual whipped cream and a cherry, like something you’d get at a proper ice cream parlor?
The result? This Oreo Klondike Milkshake with Whipped Cream and Cherry. It’s indulgent, it’s comforting, and it tastes like summer and childhood memories had a delicious baby. This recipe is for anyone who loves classic ice cream parlor vibes, wants to impress someone special without actually having to bake anything, or just needs a pick-me-up that feels like a hug in a glass.
The beauty of this shake is that it’s simple enough for a weeknight craving but fancy enough to serve at a small gathering. And if you’re looking for more cozy food inspiration, follow me on HaileeRecipes on Pinterest where I share all my favorite comfort food recipes and kitchen adventures.
Why You’ll Love This Recipe
Let me be real with you: this milkshake is not health food. It’s not supposed to be. What it is, though, is pure joy in a glass, and sometimes that’s exactly what we need.
- It’s nostalgic without being complicated. You’re not making a three-layer molecular gastronomy situation here. You’re blending ice cream, cookies, and milk, and somehow that simplicity is the whole point.
- It comes together in literally five minutes. I’m talking from fridge to table. No standing over a hot stove, no complicated techniques. Just you, a blender, and pure happiness.
- The flavor combination actually works. Oreos and vanilla ice cream are basically soulmates. Add a hint of chocolate from the Klondike coating vibe, and you’ve got something that tastes way more sophisticated than it has any right to be.
- It’s endlessly customizable. Want it thicker? Add more ice cream. Want it thinner? Add more milk. Want to get wild? I’ve got ideas for you below.
- People go absolutely feral for it. I served this to my book club last month, and I’m not exaggerating when I say someone asked for the recipe before even finishing their first sip.
Ingredients
- 2 cups vanilla ice cream (or about 8 ounces)
- 6 Oreo cookies (I use the regular ones, but you can use Double Stuf if you’re feeling fancy)
- 1 cup whole milk (or any milk you prefer—I’ll talk substitutions below)
- 2 tablespoons chocolate syrup or chocolate sauce (this mimics that Klondike shell feeling)
- 1/2 teaspoon vanilla extract (optional, but it deepens the flavor)
- Whipped cream (store-bought or homemade)
- 1 maraschino cherry (or more, if you’re like me and eat them while you’re making the shake)
- Pinch of sea salt (this is my secret weapon—it makes everything taste better)
Hailee’s Tip: Don’t skip the chocolate syrup. I know it seems like an extra step, but it’s what gives this shake that authentic Klondike vibe. Plus, it drips down the sides of the glass and looks absolutely gorgeous.
Hailee’s Tip: Use ice cream that’s been sitting in the freezer for at least a few hours. If it’s too soft, your shake will be watery. If it’s rock hard, your blender might hate you.
Optional Add-Ins and Variations
This is where you get to have fun. The base recipe is solid, but these additions will take it in different directions depending on your mood:
- For the peanut butter lover: Add 2 tablespoons of peanut butter (creamy or chunky, your choice). Blend it in with the ice cream and milk.
- For the coffee fiend: Mix in 1 tablespoon of instant espresso powder or cold brew concentrate. It sounds wild, but it’s incredible.
- For the caramel obsessive: Drizzle caramel sauce on the inside of the glass before pouring the shake, and top with a pinch of sea salt.
- For the cookies and cream maximalist: Crush up extra Oreos and sprinkle them on top of the whipped cream. You could also add crushed Oreos to the shake itself for extra texture.
- For the boozy version: Add 1 ounce of vanilla vodka or Kahlúa. This is not a kids’ shake anymore, obviously.
Step-by-Step Method
Step 1: Prep your glass and chocolate coating
Pour about 1 tablespoon of chocolate syrup into the bottom of a tall glass. Use a spoon to spread it around the inside of the glass, coating the bottom and sides a little bit. This is purely for aesthetics and taste, but it makes a difference. Set the glass aside.
Step 2: Combine your base ingredients
In your blender, add the vanilla ice cream, Oreo cookies, milk, remaining chocolate syrup, vanilla extract, and that tiny pinch of sea salt. I like to break the Oreos in half before adding them so they blend more evenly, but you can throw them in whole if you’re feeling lazy (no judgment here).
What I messed up: The first time I made this, I didn’t break up the Oreos, and I ended up with a shake that had chunks of cookie in it. It was actually delicious, but it wasn’t smooth like I wanted. Now I do the half-break thing, and it’s perfect.
Step 3: Blend until smooth
Blend on medium-high speed for about 45 seconds to 1 minute. You want it smooth but still thick enough to hold its shape. If you’re blending longer than that, you might be aerating it too much, which can make it weirdly fluffy.
What I messed up: I once blended this for like two full minutes because I was distracted talking on the phone. The shake came out more like a Oreo soup. Still tasted good, but it wasn’t the vibe.
Step 4: Pour into your chocolate-coated glass
Slowly pour the shake into your prepared glass. The chocolate syrup you coated the glass with will mix into the shake a little bit, which is exactly what you want.
Step 5: Top with whipped cream
Add a generous dollop of whipped cream to the top. I’m talking a proper heap here, not just a timid little swirl. This is an indulgence, so let’s commit to it.
Step 6: Add your cherry and serve immediately
Place one maraschino cherry on top of the whipped cream. Serve with a long spoon and a straw, and drink it while it’s still cold and thick.
Common Mistakes to Avoid
I’ve made every mistake possible with this shake, so you don’t have to.
- Using ice cream that’s too soft. This is the number one culprit for a watery shake. If your ice cream is melting, pop it back in the freezer for a bit before you start.
- Not using enough chocolate syrup. I know it seems like a lot, but that chocolate coating is what makes this a Klondike shake and not just a regular Oreo shake. Don’t skimp.
- Blending too long. More blending doesn’t equal better. You’ll end up with something that’s more air than shake, and it’ll separate as you drink it.
- Forgetting the salt. I know it sounds weird, but that tiny pinch of sea salt is magic. It balances the sweetness and makes the chocolate flavor pop.
- Adding the whipped cream too early. If you make the shake and then let it sit while you’re doing something else, the whipped cream will melt into it and you’ll lose that textural contrast. Add it right before serving.
My Tested Substitutions
Not everyone has the exact same ingredients in their kitchen, and that’s totally fine. Here’s what I’ve tested and what actually works:
- Different types of milk: I’ve made this with whole milk, 2%, almond milk, oat milk, and even coconut milk. Whole milk makes it richest, but oat milk is a close second if you’re dairy-free. Skim milk works but makes it feel a little thin.
- Different vanilla ice creams: Fancy artisanal ice cream makes a fancy shake. Budget ice cream makes a perfectly good shake. It all works.
- Cookie variations: I’ve tried this with Double Stuf Oreos (richer, more intense), Golden Oreos (sweeter, less chocolate), and even those red velvet ones (surprisingly good). Regular Oreos are still my favorite, but experiment.
- Whipped cream: Store-bought is fine. Homemade is better. Whipped coconut cream works if you want dairy-free. Cool Whip works but tastes a bit artificial to me.
- Chocolate syrup: Use whatever you have. Hershey’s, store brand, fancy artisanal stuff—it all works. Some are thinner, some are thicker, so adjust slightly if needed.
How to Customize
Here’s the thing about this recipe: it’s a template more than a strict rulebook. Make it your own.
- Make it thicker: Add more ice cream, less milk.
- Make it thinner: Add more milk, less ice cream.
- Make it sweeter: Add an extra tablespoon of chocolate syrup or a tablespoon of simple syrup.
- Make it less sweet: Reduce the chocolate syrup by half and skip the cherry if it feels like too much.
- Make it more decadent: Rim the glass with crushed Oreos mixed with a tiny bit of melted chocolate. Add a chocolate-covered cherry instead of a regular one.
- Make it seasonal: Add peppermint extract and crushed candy canes in December. Add a tablespoon of strawberry jam in summer.
Serving Ideas
This shake is perfect on its own, but here’s how I like to serve it depending on the occasion:
- Casual weeknight: Pour it into a regular glass, top with whipped cream and a cherry, and call it a day.
- Impressing someone: Use a fancy milkshake glass, add extra whipped cream, maybe a drizzle of chocolate syrup down the side, and a cherry on top. Serve with a long spoon and a straw.
- Party situation: Make a batch and pour them into glasses just before serving. Set out toppings like crushed Oreos, extra whipped cream, and cherries so people can customize.
- Date night at home: Make two, clink glasses like you’re fancy, and enjoy together while watching something cozy.
- Dessert after dinner: Serve it in smaller portions if you’re having it after a meal. This shake is rich enough that a little goes a long way.
Meal Prep and Storage
Real talk: this shake is best consumed immediately. It’s at its best when it’s cold and thick, and that window is about 10-15 minutes from blending to finishing.
That said, here’s what you can do ahead:
- Prep your ingredients: Break up your Oreos and measure out your milk the night before. This cuts your actual shake-making time down to like three minutes.
- Make the chocolate coating: You can coat your glass with chocolate syrup a few minutes before you blend, and it’ll be ready to go.
- Chill your glass: Pop your glass in the freezer for 10 minutes before making the shake. This keeps it cold longer.
- Make a batch and freeze: If you’re making multiple shakes for a party, you can blend them all and pour them into glasses, then stick them in the freezer for up to an hour. They’ll be thicker when you serve them, which is actually kind of nice.
Storage notes: Don’t store leftover shake in a container. It’ll separate and get watery. If you have leftover shake, drink it within a few minutes or pour it into popsicle molds and freeze it for a DIY milkshake popsicle situation (which is honestly genius).
Nutritional Breakdown
Here’s the honest breakdown per serving (this recipe makes 2 servings):
- Calories: approximately 420
- Protein: 6g
- Carbohydrates: 52g
- Fat: 20g
- Fiber: 1g
- Sugar: 42g (yes, it’s sweet)
This is a treat, not an everyday drink. But sometimes a treat is exactly what we need, and I’m here for it. If you’re looking to lighten it up, use low-fat ice cream, skim milk, and skip some of the chocolate syrup. It won’t be quite as indulgent, but it’ll still be delicious.
Final Thoughts
You know what I love most about this Oreo Klondike Milkshake with Whipped Cream and Cherry? It’s not just a recipe. It’s permission to slow down and enjoy something that makes you happy. It’s a way to chase a memory, to create a new one, or to just treat yourself on a random Tuesday because you deserve it.
Cooking and baking for me have always been about connection—connecting with the past, with people I love, with myself. This shake does all of that in five minutes with ingredients you probably already have in your kitchen.
I hope you make this. I hope you love it. And I hope it brings you a little bit of that same joy it brings me every single time. If you do make it, I’d genuinely love to hear about it. Come chat with me, tell me your favorite variation, or just let me know if you added extra Oreos because honestly, who could blame you.
Happy blending, friend.
—
Recipe Card
Oreo Klondike Milkshake with Whipped Cream and Cherry
Ingredients
Method
- Pour 1 tablespoon chocolate syrup into the bottom of a tall glass and coat the sides.
- Add vanilla ice cream, Oreo cookies, milk, remaining chocolate syrup, vanilla extract, and sea salt to a blender.
- Blend on medium-high speed for 45 seconds to 1 minute until smooth and thick.
- Pour the shake into your chocolate-coated glass.
- Top with a generous dollop of whipped cream.
- Place