S’mores Crunchwrap
S'mores Crunchwrap
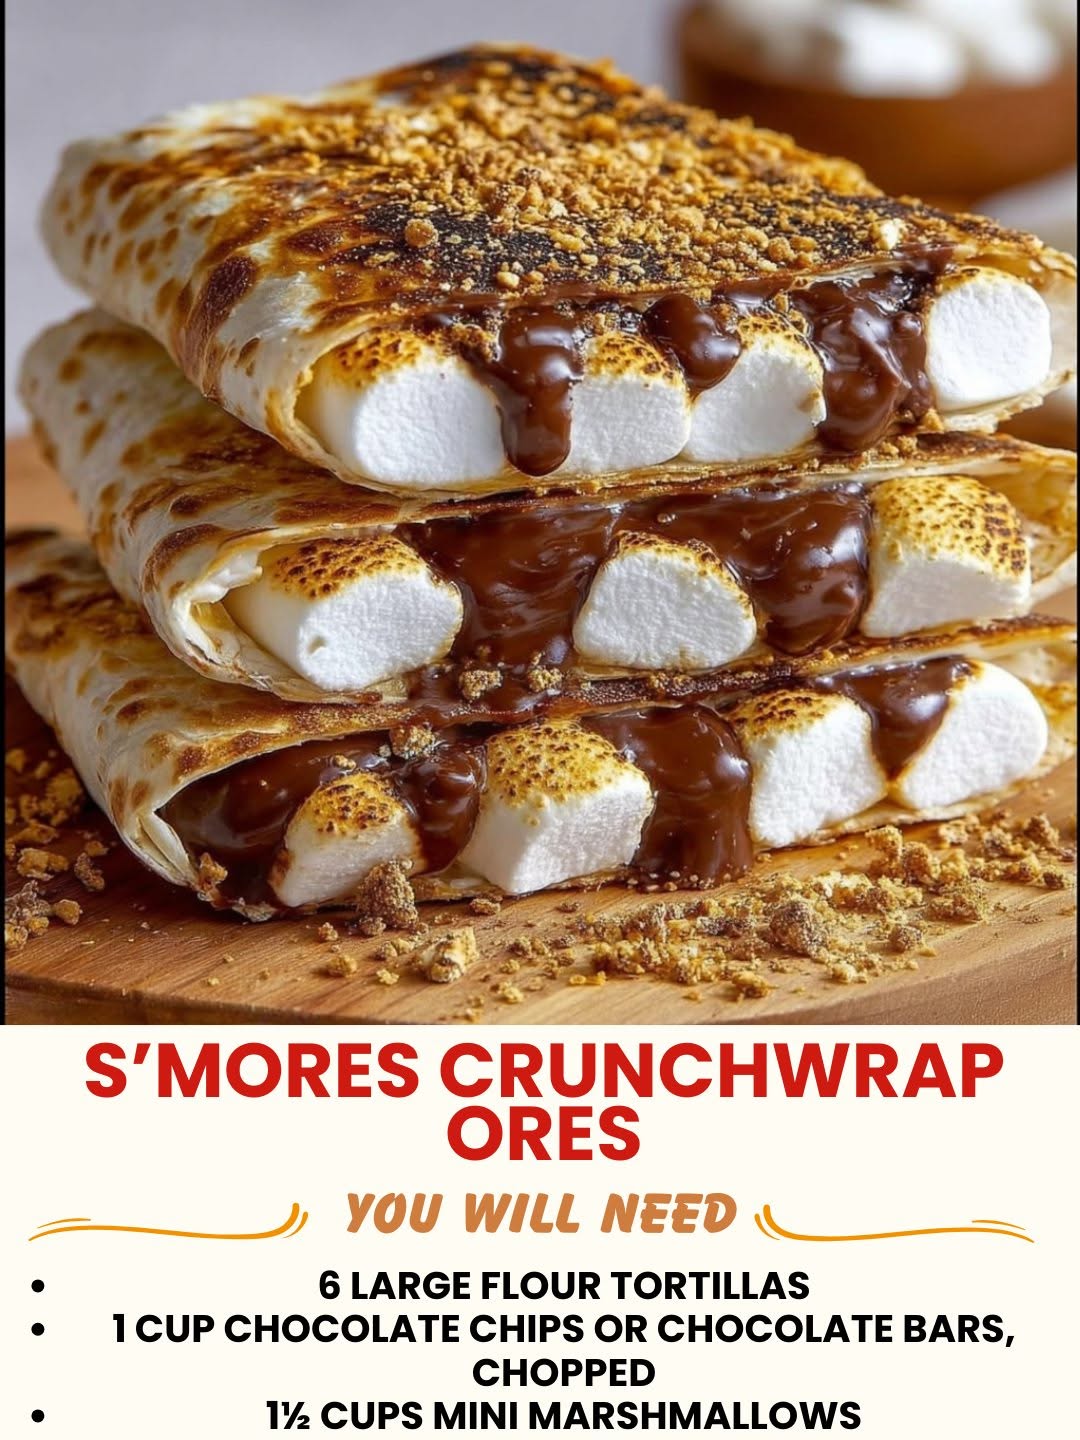
S’mores Crunchwrap: A Gooey, Crispy Campfire Dream You Can Make at Home
Last summer, my best friend Sarah texted me at 10 p.m. asking if I wanted to come over for a “s’mores emergency.” I thought she meant she’d run out of marshmallows or something equally tragic. Turns out, she’d just watched some TikTok video about a s’mores crunchwrap and was absolutely losing her mind over it. So naturally, I drove over with my apron in the passenger seat because that’s what we do.
We spent the next two hours in her kitchen experimenting with different ways to wrap up everything we love about s’mores—the gooey chocolate, the toasted marshmallow, that satisfying graham cracker crunch—but in a format that actually stayed together long enough to eat without wearing half of it. And honestly? That night changed my life in the best, most ridiculous way possible.
The S’mores Crunchwrap is basically a handheld dessert that tastes like you’ve captured campfire magic in tortilla form. It’s crispy on the outside, melty and chocolatey on the inside, with those little pockets of toasted marshmallow that make your taste buds do a happy dance. It’s perfect for when you want s’mores but don’t have a campfire, or when you’re craving something that feels fancy enough for guests but easy enough that you won’t stress in the kitchen.
I’ve made this recipe probably thirty times now—for movie nights, after-dinner treats, and once at 2 a.m. when I just couldn’t sleep and needed something comforting. It’s become my go-to when I want to feel cozy without spending hours in the kitchen. If you love s’mores, chocolate, or anything with that crispy-meets-gooey texture combo, this is absolutely for you.
If you want more easy dessert ideas like this one, follow me on HaileeRecipes on Pinterest where I share all my cozy kitchen adventures.
Why You’ll Love This Recipe
Okay, let me be real with you. This recipe works because it checks every single box for what makes dessert actually exciting to make and eat.
- It’s genuinely easy. If you can fold a tortilla and use a skillet, you can make this. No fancy equipment, no intimidating techniques.
- The texture is absolutely next-level. You get crispy, golden-brown tortilla, melted chocolate, gooey marshmallow, and graham cracker crunch all in one bite. It’s like your mouth is having a party.
- It comes together fast. From start to finish, you’re looking at about 15 minutes. Perfect for when cravings hit.
- Everyone loves it. I’ve never met a person who took one bite and didn’t immediately ask for the recipe. It’s universally beloved in a way that feels almost magical.
- You can customize it to death. Want to add peanut butter? Do it. Prefer dark chocolate? Go for it. This recipe is flexible and forgiving.
- It’s impressive without being pretentious. Your friends will think you spent way more effort than you actually did, and honestly, that’s the dream.
Ingredients
- 2 large flour tortillas (burrito-size, about 10 inches)
- 4 tablespoons unsalted butter, softened
- 1 cup mini marshmallows (or regular marshmallows, roughly chopped)
- 3/4 cup chocolate chips (semi-sweet or milk chocolate, depending on your preference)
- 4 full-size graham crackers, broken into bite-sized pieces
- 1 tablespoon granulated sugar
- 1/2 teaspoon ground cinnamon
- Pinch of sea salt
Hailee’s Tip: I use butter-flavored flour tortillas when I can find them because they add an extra layer of richness, but regular ones work beautifully too. The key is making sure they’re fresh and pliable—old, stiff tortillas will crack when you fold them.
Hailee’s Tip: For the marshmallows, mini ones are genuinely your friend here because they distribute more evenly throughout the wrap and toast faster. But if all you have are regular marshmallows, just chop them up and you’ll be fine. I promise.
Hailee’s Tip: Don’t skip the cinnamon-sugar coating on the outside. I know it seems like an extra step, but it adds this subtle warmth and crunch that makes people pause mid-bite and ask what you did differently. It’s a game-changer.
Optional Add-Ins and Variations
One of my favorite things about this recipe is how willing it is to play with other flavors. Here are some of my favorite tweaks:
- Peanut Butter Version: Spread 2 tablespoons of peanut butter on the tortilla before adding the chocolate and marshmallows. This is my personal weakness.
- Nutella Situation: Replace half the chocolate chips with Nutella spread. It gets extra fudgy and delicious.
- Salted Caramel Upgrade: Add 2 tablespoons of salted caramel sauce to the filling. I usually drizzle it right over the chocolate chips.
- Cookies and Cream: Crush up some Oreos and mix them in with the graham crackers. Trust me on this one.
- Espresso-Chocolate Combo: Sprinkle 1/2 teaspoon of instant espresso powder over the chocolate chips. It deepens the chocolate flavor without making it taste like coffee.
- Brown Butter Twist: Brown your butter before spreading it on the tortillas. It adds a nutty, sophisticated flavor that elevates the whole thing.
Step-by-Step Method
Step 1: Prep Your Station
Lay one flour tortilla flat on a clean cutting board. This is your base. Get all your ingredients within arm’s reach because once you start assembling, you’ll want to work pretty quickly so the marshmallows don’t get too warm and runny before you can cook it.
Step 2: Butter and Season
Spread 2 tablespoons of softened butter evenly over the tortilla, leaving about a half-inch border all the way around. In a small bowl, mix together the cinnamon and sugar. Set that mixture aside for now—you’ll use it on the outside of the wrap.
Step 3: Layer Your Fillings
Here’s where the magic starts. Sprinkle half your chocolate chips over the buttered tortilla. Then add half your marshmallows. Then add half your graham cracker pieces. Then repeat the layers: chocolate, marshmallows, graham crackers. This double-layering technique ensures you get all the good stuff in every bite instead of having one side that’s marshmallow-heavy and another that’s mostly tortilla. I learned this the hard way after my first attempt was tragically unbalanced.
Step 4: The Fold
This is where it becomes a “crunchwrap” instead of just a messy quesadilla. Take the bottom of the tortilla and fold it up toward the center, pressing gently. Then fold the right side in, then the top, then the left side. You’re creating a little square pocket with all your fillings tucked safely inside. If you have any filling peeking out at the seams, gently push it back in.
What I Messed Up: The first time I made this, I folded it like a burrito, and everything just fell out when I tried to flip it in the pan. The square fold is definitely the move.
Step 5: Heat Your Pan
Place a large skillet over medium heat. Let it warm for about a minute. You want it hot enough that the tortilla will sizzle when it hits the pan, but not so hot that it burns before the insides can melt. Medium heat is your sweet spot.
Step 6: First Side
Carefully place your folded wrap into the pan, seam-side down. Let it cook undisturbed for about 3 to 4 minutes. You’re looking for a beautiful golden-brown color and you should hear a gentle sizzle. Don’t be tempted to move it around—that golden crust is developing and you want to let it do its thing.
Step 7: The Flip
Using a spatula, carefully flip the wrap. This is the moment of truth. If you’re nervous, slide the spatula all the way underneath and give yourself plenty of support. Cook the other side for another 3 to 4 minutes until it’s equally golden and crispy.
What I Messed Up: I once flipped mine too aggressively and marshmallow oozed out everywhere. It still tasted amazing, but it looked like a crime scene. Flip with confidence but also with care.
Step 8: The Cinnamon-Sugar Coating
Here’s the fancy part that takes 30 seconds but makes people think you’re a genius. Remove the wrap from the pan and immediately brush it with a tiny bit of butter (you can use the butter left in the pan). Then sprinkle that cinnamon-sugar mixture all over both sides while it’s still warm. The sugar will stick to the butter and create this gorgeous, sparkly coating.
Step 9: Rest and Serve
Let your wrap cool for just 2 to 3 minutes on a plate. I know it’s hard to wait, but this gives everything a chance to set slightly so it’s easier to handle and cut. If you want to get fancy, you can slice it diagonally and serve it on a nice plate. If you want to just eat it standing over the sink while watching Netflix, I won’t judge you because I’ve definitely done that too.
Step 10: Make the Second One
Repeat the entire process with your second tortilla. The beauty of this recipe is that it makes two wraps, so you can share with someone you love or have one for now and one for later (though honestly, they’re best eaten fresh).
Common Mistakes to Avoid
Using Cold Butter
Cold butter won’t spread evenly and you’ll end up with dry spots on your tortilla. Let it sit on the counter for 10 minutes to soften, or microwave it for 10 seconds. You want it spreadable but not melted.
Overfilling
I know the urge to load it up with extra marshmallows is strong, but resist it. Too much filling makes it impossible to fold neatly and everything leaks out. Stick to the measurements and trust that there’s plenty of deliciousness in there.
Heat Too High
If your pan is screaming hot, the outside will burn before the inside has a chance to melt. Medium heat might seem slow, but it’s exactly right. Patience, my friend.
Skipping the Rest Period
I get it—it smells incredible and you want to dive in immediately. But those 2 to 3 minutes of resting time let everything set up so it’s actually manageable to eat. Otherwise you’re biting into lava.
Not Using Fresh Tortillas
A tortilla that’s been sitting in your pantry for three months will crack and break when you try to fold it. Use fresh ones and your life will be so much easier.
My Tested Substitutions
For the Marshmallows: If you can’t find mini marshmallows, regular ones work fine—just chop them into smaller pieces. You can also use marshmallow fluff in a pinch, though it spreads more like a sauce and creates a slightly different texture. Both are delicious, just different vibes.
For the Chocolate Chips: Use whatever chocolate you actually like eating. Dark chocolate, milk chocolate, white chocolate—they all work. I’ve even used chocolate chunks from a candy bar when I was out of chips. Chopped-up chocolate bars are honestly fantastic because they melt beautifully and add more richness.
For the Tortillas: Whole wheat tortillas work if you want to add a tiny bit more nutrition (though let’s be honest, this is a dessert). Spinach tortillas are fun too. Just avoid super thin ones because they tear too easily.
For the Graham Crackers: Honey graham crackers are slightly sweeter and delicious. You can also use digestive biscuits if you want something a little less sweet and more earthy. Crushed pretzels add a fun salty contrast if you’re feeling adventurous.
For the Butter: Coconut oil works as a one-to-one substitute if you’re avoiding dairy. It creates a slightly different flavor profile but still tastes amazing. Clarified butter also works beautifully.
How to Customize
The beauty of this recipe is that it’s basically a template for whatever you’re craving. Want to make it more decadent? Add a layer of fudge sauce. Want it lighter? Use dark chocolate and skip some of the marshmallows. Want to make it fancy for a dinner party? Add a drizzle of salted caramel and a sprinkle of fleur de sel on top.
You could also make a savory version if you’re feeling wild—use cheddar instead of chocolate, add some crispy bacon, and suddenly you have a completely different (but equally delicious) situation on your hands. I haven’t personally tested a savory version, but I’m genuinely curious if anyone reading this tries it.
Serving Ideas
These are incredible on their own, but here are some ways to make them feel extra special:
- Serve with a scoop of vanilla ice cream on the side. The cold ice cream against the warm, crispy wrap is *chef’s kiss*.
- Dust the plate with cocoa powder and a little powdered sugar for a café-style presentation.
- Serve with a small bowl of chocolate sauce for dipping, even though the wrap is already chocolatey.
- Pair with a glass of cold milk or a warm cup of coffee.
- Make it a dessert board situation with fresh berries, whipped cream, and your s’mores crunchwrap as the star.
- Slice it in half and serve it as part of a dessert sampler platter if you’re hosting.
Meal Prep and Storage
Can You Make These Ahead?
You can assemble them ahead and keep them in the fridge for up to 4 hours before cooking. Just wrap them in plastic wrap so they don’t dry out. When you’re ready to eat, cook them straight from the fridge—they might take an extra minute or two.
Storing Leftovers
These are honestly best eaten fresh and warm, but if you have leftovers (which rarely happens in my house), store them in an airtight container in the fridge for up to 2 days. To reheat, place them in a skillet over medium-low heat for about 2 to 3 minutes per side until they’re warmed through and crispy again.
Freezing
You can freeze uncooked wraps for up to a month. Assemble them, wrap them individually in plastic wrap, and place them in a freezer bag. When you want to eat one, cook it straight from frozen—it’ll just take about 5 to 6 minutes per side. The marshmallows might not puff up quite as much, but they’ll still taste delicious.
Nutritional Breakdown
Let’s be real—this is a dessert, not a health food. But here’s what you’re looking at per wrap:
- Calories: approximately 580
- Protein: 8g
- Carbohydrates: 72g
- Fat: 28g
- Fiber: 2g
These numbers can shift depending on your specific ingredient choices (like if you use dark chocolate instead of milk chocolate), but this gives you a general idea. The main calorie contributors are the butter, chocolate, and marshmallows, which is exactly what makes it taste so good.
Final Thoughts
Making a s’mores crunchwrap is one of those small kitchen moments that feels like pure joy. There’s something about taking all the elements you love about s’mores and turning them into something you can actually hold and eat without getting covered in chocolate that just makes me happy.
I love this recipe because it’s simple enough that anyone can make it, but special enough that it feels like you’re doing something a little fancy.
S'mores Crunchwrap
Ingredients
Method
- Step 1: Prep Your Station Lay one flour tortilla flat on a clean cutting board. This is your base. Get all your ingredients within arm's reach because once you start assembling, you'll want to work pretty quickly so the marshmallows don't get too warm and runny before you can cook it. Step 2: Butter and Season Spread 2 tablespoons of softened butter evenly over the tortilla, leaving about a half-inch border all the way around. In a small bowl, mix together the cinnamon and sugar. Set that mixture aside for now—you'll use it on the outside of the wrap. Step 3: Layer Your Fillings Here's where the magic starts. Sprinkle half your chocolate chips over the buttered tortilla. Then add half your marshmallows. Then add half your graham cracker pieces. Then repeat the layers: chocolate, marshmallows, graham crackers. This double-layering technique ensures you get all the good stuff in every bite instead of having one side that's marshmallow-heavy and another that's mostly tortilla. I learned this the hard way after my first attempt was tragically unbalanced. Step 4: The Fold This is where it becomes a "crunchwrap" instead of just a messy quesadilla. Take the bottom of the tortilla and fold it up toward the center, pressing gently. Then fold the right side in, then the top, then the left side. You're creating a little square pocket with all your fillings tucked safely inside. If you have any filling peeking out at the seams, gently push it back in. What I Messed Up: The first time I made this, I folded it like a burrito, and everything just fell out when I tried to flip it in the pan. The square fold is definitely the move. Step 5: Heat Your Pan Place a large skillet over medium heat. Let it warm for about a minute. You want it hot enough that the tortilla will sizzle when it hits the pan, but not so hot that it burns before the insides can melt. Medium heat is your sweet spot. Step 6: First Side Carefully place your folded wrap into the pan, seam-side down. Let it cook undisturbed for about 3 to 4 minutes. You're looking for a beautiful golden-brown color and you should hear a gentle sizzle. Don't be tempted to move it around—that golden crust is developing and you want to let it do its thing. Step 7: The Flip Using a spatula, carefully flip the wrap. This is the moment of truth. If you're nervous, slide the spatula all the way underneath and give yourself plenty of support. Cook the other side for another 3 to 4 minutes until it's equally golden and crispy. What I Messed Up: I once flipped mine too aggressively and marshmallow oozed out everywhere. It still tasted amazing, but it looked like a crime scene. Flip with confidence but also with care. Step 8: The Cinnamon-Sugar Coating Here's the fancy part that takes 30 seconds but makes people think you're a genius. Remove the wrap from the pan and immediately brush it with a tiny bit of butter (you can use the butter left in the pan). Then sprinkle that cinnamon-sugar mixture all over both sides while it'