Sticky Pecan Cinnamon Roll
Sticky Pecan Cinnamon Roll
Sticky Pecan Cinnamon Roll: The Recipe That Changed My Sunday Mornings
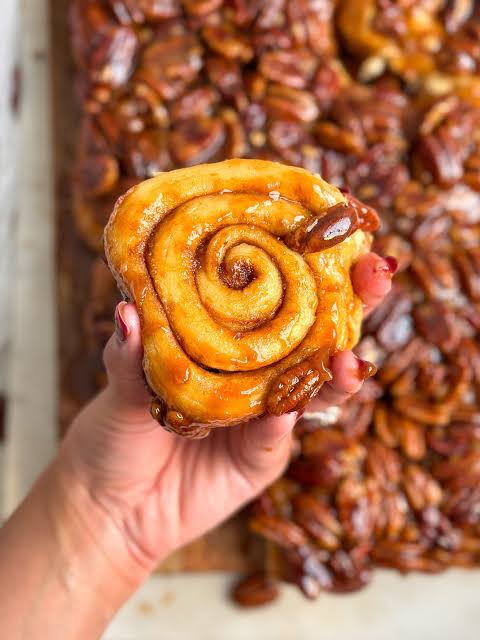
I still remember the first time I made sticky pecan cinnamon rolls from scratch. It was a Saturday morning, and my kitchen smelled like butter, cinnamon, and possibility. My partner wandered in around 8 a.m., took one look at the golden rolls glistening under their caramel glaze, and just said, “Okay, I’m marrying you all over again.” That’s when I knew I had something special.
Before that day, I’d always assumed cinnamon rolls were some kind of professional baker magic—the kind of thing you picked up from a fancy café or a tube of pre-made dough. But honestly? Making them at home is so much easier than I thought, and the results are infinitely better. These sticky pecan cinnamon rolls are soft, pillowy, and absolutely loaded with that gooey caramel-pecan situation that makes you forget about calories for at least the first bite.
This recipe is for anyone who wants to feel like a real baker without needing a culinary degree. Whether you’re hosting brunch, surprising your family on a lazy Sunday, or just craving something warm and comforting, these rolls deliver. They’re not intimidating, I promise. I’ll walk you through every single step like we’re hanging out in my kitchen together.
If you love cozy morning recipes and want to stay in the loop with my latest kitchen experiments, follow me on HaileeRecipes on Pinterest. I share all my tested recipes there, and I’d love to see what you create.
Why You’ll Love This Recipe
Let me be real with you: these sticky pecan cinnamon rolls are the kind of recipe that makes your entire home smell incredible. But beyond the aroma, here’s what makes this version special.
- They’re actually manageable. The dough comes together quickly, and most of the time is just letting it rise—which means you can prep these the night before and bake them fresh in the morning.
- The texture is everything. You get that soft, tender crumb with just the right amount of chew. Not dense, not dry, just perfect.
- The pecan-caramel topping is addictive. It’s basically buttery, nutty candy on top of your roll. I won’t apologize for that.
- They’re flexible. Make them ahead, freeze them, reheat them—they bounce back beautifully every single time.
- Your kitchen will smell like a bakery. I genuinely think this is a legitimate reason to make them.
Ingredients
For the Dough:
- 2 1/4 teaspoons active dry yeast (one standard packet)
- 1/2 cup whole milk, warmed (about 110°F)
- 1/4 cup granulated sugar
- 1/4 cup unsalted butter, melted
- 1 teaspoon salt
- 1 large egg
- 3 1/2 cups all-purpose flour
For the Filling:
- 1/4 cup unsalted butter, softened
- 3/4 cup light brown sugar, packed
- 2 1/2 tablespoons ground cinnamon
For the Sticky Pecan Topping:
- 1/2 cup unsalted butter
- 1 cup light brown sugar, packed
- 2 tablespoons honey or light corn syrup
- 1 1/2 cups raw pecan halves
- 1/4 teaspoon salt
Hailee’s Tip: Don’t skip warming your milk to around 110°F. Cold milk will slow down your yeast, and you’ll be waiting forever. I use a quick microwave check—about 30 seconds—then let it cool slightly. And please, use real butter here. It makes a difference in both flavor and texture.
Hailee’s Tip: Brown sugar has moisture that helps keep these rolls incredibly tender. Don’t substitute with white sugar if you can help it. If you must, just add a tiny splash of molasses to replicate that moisture.
Hailee’s Tip: Pecans are the star here, so buy them fresh if possible. Stale nuts will make your topping taste flat. Store them in the freezer if you’re not using them right away.
Optional Add-Ins and Variations
The beauty of this recipe is that it’s a solid foundation for your creativity. Here’s what I love playing with:
- Maple syrup instead of honey: Swap the honey in the topping for pure maple syrup. It adds a subtle earthiness that pairs beautifully with pecans.
- A pinch of nutmeg: Add 1/4 teaspoon of ground nutmeg to the cinnamon filling for warmth and depth.
- Cream cheese swirl: Mix 2 ounces softened cream cheese into your filling for a tangy twist. Honestly, it’s life-changing.
- Sea salt on top: Before baking, sprinkle a tiny pinch of fleur de sel over the topping. The contrast between salty and sweet is incredible.
- Bourbon vanilla extract: Use 1 1/2 teaspoons instead of regular vanilla in the dough. It deepens the whole flavor profile.
Step-by-Step Method
Step 1: Bloom Your Yeast
Pour your warm milk into a large mixing bowl. Sprinkle the yeast over the top and let it sit for about 5 minutes. You should see it get foamy and bubbly—that’s your sign that the yeast is alive and ready to work. If it doesn’t foam, your yeast is dead, and you need to start over with fresh yeast. This has happened to me exactly once, and I learned my lesson about checking expiration dates.
Step 2: Build the Dough
Once your yeast is foamy, add the sugar, melted butter, salt, and egg. Whisk it together until combined. Now, gradually add your flour, one cup at a time, stirring with a wooden spoon until it comes together into a shaggy dough. This is where I usually switch to my hands because it’s easier to feel the texture.
Step 3: Knead
Turn your dough onto a lightly floured surface and knead for about 8 to 10 minutes. You’re looking for a smooth, elastic dough that bounces back when you poke it. Your arms will get a little workout, but it’s worth it. If your dough is too sticky, add a tablespoon of flour at a time. If it’s too dry, add a teaspoon of water. You want it to feel like a soft earlobe—and yes, I’m aware that’s a weird comparison, but it’s accurate.
Step 4: First Rise
Place your dough in a lightly oiled bowl, cover it with a damp kitchen towel, and let it rise in a warm spot for about 1 to 1.5 hours, until it’s doubled in size. I usually put mine on top of my oven while it preheats slightly, or near a sunny window. Patience is key here.
Step 5: Prepare Your Topping
While your dough rises, make the sticky topping. In a small saucepan, melt 1/2 cup butter over medium heat. Add the brown sugar and honey, stirring until everything is combined and bubbly—about 2 minutes. Pour this mixture into a 9×13 inch baking dish, spreading it evenly. Scatter your pecans over the top. Set this aside.
Hailee’s Tip: Don’t skip this step. The topping needs to be ready to go because you’ll be moving quickly once your dough is shaped.
Step 6: Roll and Fill
Once your dough has doubled, punch it down gently (this is actually satisfying and therapeutic). Turn it out onto your floured surface and roll it into a rectangle about 16 inches long and 10 inches wide. You want it fairly thin but not so thin that it tears.
Now, spread your softened butter over the dough, leaving a small border at the edges. Mix your cinnamon and brown sugar together in a small bowl, then sprinkle it evenly over the butter. This is where I usually use my fingers to make sure it’s distributed—no cinnamon roll should feel neglected.
Step 7: Roll and Cut
Starting from the long side closest to you, roll the dough tightly toward you, creating a long log. Use a sharp knife or dental floss (seriously, floss works better than you’d think) to cut the log into 12 equal pieces. I usually mark where I want to cut first, then cut confidently. Sawing motions make them uneven.
Step 8: Second Rise
Place your rolls cut-side up in the prepared baking dish, nestled right on top of that pecan-caramel mixture. Cover loosely with a towel and let them rise for another 45 minutes to 1 hour, until they’re puffy and touching each other. This is the magic moment where they go from individual rolls to one gorgeous, cohesive pull-apart situation.
Step 9: Bake
Preheat your oven to 350°F. Once your rolls have risen, bake them for 25 to 30 minutes, until the tops are golden brown and the edges are just starting to caramelize. Your kitchen will smell absolutely insane at this point.
Step 10: The Flip
This is important: let the rolls cool in the pan for exactly 5 minutes. Not longer, or the topping will stick permanently. Not shorter, or you’ll burn yourself. Then, place a large serving platter over the top of the baking dish and flip it all over in one confident motion. The rolls should slide right out with all that gorgeous caramel and pecan situation on top. If a few pecans stick to the pan, just place them back on the rolls.
What I Messed Up: The first time I made these, I flipped them too soon and got caramel all over my oven. The second time, I waited too long and couldn’t get them to flip properly. Three’s the charm, and now I’m a flipping pro.
Common Mistakes to Avoid
Yeast that’s too hot or too cold: If your milk is above 120°F, you’ll kill the yeast. If it’s below 100°F, the yeast will be sluggish. Aim for that sweet spot around 110°F.
Not letting the dough rise enough: I know it’s tempting to rush, but underproofed rolls will be dense and heavy. Give that dough time to do its thing.
Overfilling the rolls: More filling isn’t always better. Too much cinnamon-sugar mixture will leak out during baking and make a mess. A generous but reasonable amount is perfect.
Skipping the parchment or oiling the pan: That caramel topping is sticky for a reason. Make sure your baking dish is well-prepared, or you’ll have a stuck-on situation that’s not fun to clean.
Cutting with a dull knife: Use a sharp knife or unflavored dental floss to cut your rolls. A dull knife will squish them and ruin your beautiful spiral.
My Tested Substitutions
Can I use instant yeast instead of active dry? Yes, absolutely. Use the same amount, and it might rise slightly faster. Just keep an eye on it.
What if I don’t have whole milk? Use 2% milk, or even almond milk in a pinch. The results won’t be quite as rich, but they’ll still be delicious.
Can I substitute walnuts for pecans? You can, though pecans have a buttery quality that walnuts don’t quite match. If you go with walnuts, maybe add an extra tablespoon of honey to the topping for sweetness.
What about using coconut sugar instead of brown sugar? I haven’t had great results with this personally. Coconut sugar is drier and won’t give you that same tender crumb. Stick with brown sugar if possible.
Can I make these with whole wheat flour? You can substitute up to 25% of the all-purpose flour with whole wheat. Any more than that, and the rolls become dense. They’ll still taste good, just heavier.
How to Customize
One of my favorite things about this recipe is how forgiving it is. Want to make it your own? Here’s how:
Different nuts: Macadamia nuts, almonds, or even a mix work beautifully. Just use the same amount and adjust the honey slightly if your nut choice is less sweet.
Spice variations: Try cardamom, ginger, or cloves mixed with your cinnamon. Just use sparingly—a quarter teaspoon is enough to make a difference.
Orange zest: Add the zest of one orange to your dough for brightness. It pairs unexpectedly well with cinnamon and pecans.
Chocolate chips: Scatter a handful of mini chocolate chips into your filling. It’s not traditional, but it’s delicious.
Make them mini: Cut your log into 24 pieces instead of 12 and reduce baking time to 18 to 20 minutes. Perfect for when you want one roll without committing to a full-size monster.
Serving Ideas
These sticky pecan cinnamon rolls are honestly perfect on their own, but here’s how I like to serve them:
- With coffee: Obviously. The richness of the roll pairs beautifully with a strong cup of coffee.
- With cream cheese frosting: If you want to go full indulgence, whip together 4 ounces softened cream cheese, 2 tablespoons butter, and a cup of powdered sugar. Spread it over the warm rolls. It’s not traditional, but it’s incredible.
- With whipped cream: A dollop of fresh whipped cream on a warm roll is basically heaven.
- As a brunch centerpiece: Make these the star of your brunch spread. They’re showstopping and actually easier than most brunch items.
- Alongside savory breakfast: Serve them with scrambled eggs, bacon, and fresh fruit for balance. The sweet and savory combo works.
Meal Prep and Storage
Make-Ahead Option: You can prepare these rolls through Step 8 (after the second rise), cover them tightly with plastic wrap, and refrigerate overnight. In the morning, let them come to room temperature for about 30 minutes, then bake as directed. This is honestly my favorite way to make them because I get to sleep in and still have fresh rolls for breakfast.
Freezing: After baking and cooling completely, you can freeze these rolls individually or as a whole batch. Wrap them tightly in plastic wrap and foil, and freeze for up to 3 months. Thaw at room temperature for 2 to 3 hours, then reheat gently in a 300°F oven for 10 minutes.
Storing at Room Temperature: Keep baked rolls in an airtight container for up to 3 days. They’ll stay soft and delicious. After that, they start to dry out slightly, though they’re still edible.
Refrigerator Storage: Store in an airtight container for up to 5 days. Reheat in a 300°F oven for 10 to 15 minutes before serving.
Reheating: The best way to reheat is gently in a 300°F oven for 10 to 15 minutes, covered loosely with foil so the tops don’t brown too much. Microwaving works in a pinch but can make them a bit rubbery.
Nutritional Breakdown
Here’s what you’re looking at per roll (based on 12 servings):
- Calories: approximately 420
- Protein: 6g
- Carbohydrates: 52g
- Fat: 21g
- Fiber: 2g
- Sugar: 28g