Homemade Dairy Staples: Fresh From Your Kitchen
Homemade Dairy Staples: Fresh From Your Kitchen
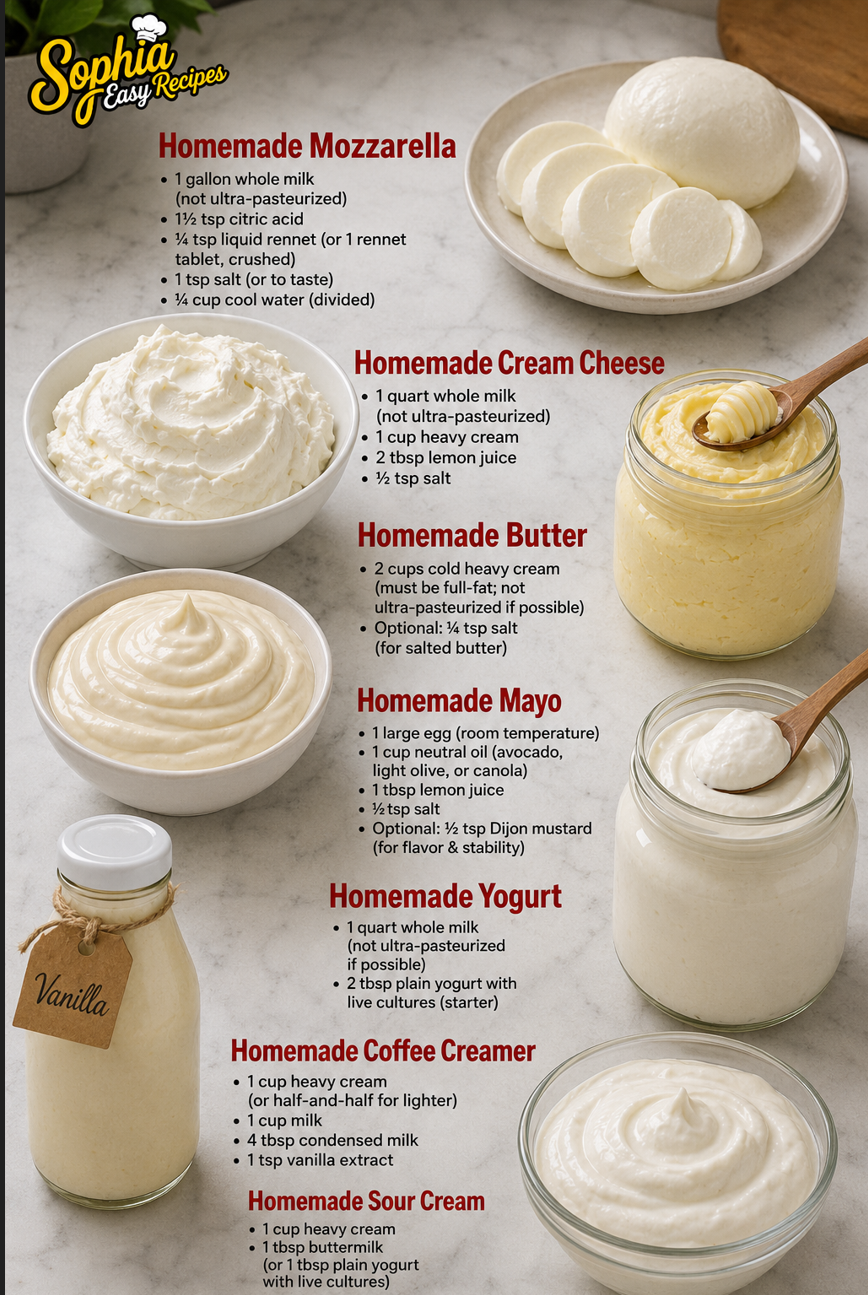
I’ve been making homemade dairy staples for years now, and honestly, it’s one of the best kitchen skills I’ve picked up. There’s something so satisfying about creating your own mozzarella, cream cheese, butter, and yogurt from scratch, and the best part is that these recipes are actually simpler than you’d think. Once you realize how easy it is to make these basics at home, you’ll wonder why you ever bought them pre-made.
This roundup is here to help you ditch the store-bought versions and start building confidence in your kitchen. I’m sharing seven of my go-to recipes for homemade dairy staples, including homemade mayo, coffee creamer, and sour cream, so you can stock your fridge with ingredients you actually made yourself. These recipes are totally worth saving because they’re not just delicious and fresher than anything you’ll find on a shelf, but they also save you money in the long run.
Whether you’re a seasoned cook or just curious about trying something new, these recipes are designed to be approachable and forgiving. I’d love for you to save these and come back to them whenever you need a reminder that you can make this stuff at home. Follow me on HaileeRecipes on Pinterest for more recipes and kitchen tips that’ll make you feel like the confident cook you are.
1. Homemade Mozzarella
Homemade mozzarella is a stretchy, mild cheese with a delicate texture that’s perfect for fresh applications. Made with just a few pantry staples and citric acid, this cheese comes together in under an hour. Serve it warm with olive oil and fresh basil, or use it in caprese salads, pasta dishes, and pizza. It’s an impressive dairy project that yields restaurant-quality results and tastes infinitely better than store-bought.
Why You’ll Love It
- Ready in under an hour with minimal equipment needed.
- Uses just five basic ingredients you likely have on hand.
- Stretches beautifully and tastes noticeably fresher than commercial versions.
Ingredients
- 1 gallon whole milk (not ultra-pasteurized)
- 1.5 teaspoons citric acid dissolved in 1/4 cup cool water
- 1/4 teaspoon liquid rennet diluted in 1/4 cup cool water
- 1 teaspoon salt
- Ice water for cooling
How To Make It
- Pour milk into a stainless steel pot and add the citric acid solution, stirring gently for one minute. Heat to 90°F, then add the diluted rennet and stir for one minute. Let sit undisturbed for five minutes until curds form.
- Cut the curds into 1/4-inch cubes using a long knife, making horizontal and vertical cuts. Let rest for two minutes.
- Slowly heat the curds to 105°F over 30 minutes, stirring occasionally. Once at temperature, maintain heat for five minutes, then pour curds into a cheesecloth-lined colander to drain.
- Transfer drained curds to a microwave-safe bowl and heat in 30-second intervals, stirring between each, until the curds reach 90°F and become smooth and stretchy. Add salt and stretch like taffy until glossy.
- Shape into a ball or braid while still warm, then immediately plunge into an ice bath to set the shape.
Variations And Substitutions
For smoked mozzarella, add liquid smoke during the final stretch. Create burrata by filling a mozzarella shell with warm curds mixed with heavy cream. For a firmer cheese, reduce the final stretch time or skip the ice bath for a softer, ricotta-like texture.
Make-Ahead, Storage, And Serving Tips
Fresh mozzarella is best eaten the same day but keeps refrigerated in salted water for up to five days. Serve at room temperature to enjoy its full flavor and texture. If curds don’t stretch smoothly, the temperature may be too low; reheat gently. Ultra-pasteurized milk won’t form proper curds, so use standard pasteurized milk for success.
2. Homemade Cream Cheese
Homemade cream cheese is tangy, smooth, and luxuriously rich, perfect for spreading on bagels, swirling into cheesecakes, or dolloping onto desserts. This simple cultured cheese requires just milk, cream, and a starter culture, transforming basic ingredients into restaurant-quality results. The slight sourness and velvety texture make it far superior to store-bought versions, and you’ll know exactly what went into it.
Why You’ll Love It
- Made with just five ingredients and no mysterious additives or stabilizers.
- Costs significantly less than premium store-bought cream cheese.
- Ready in about 24 hours with minimal hands-on time.
Ingredients
- 1 quart whole milk
- 1 cup heavy cream
- 1/4 teaspoon liquid rennet diluted in 1/4 cup cool water
- 1/4 teaspoon mesophilic starter culture
- 1/2 teaspoon salt
How To Make It
- Heat milk and cream to 72°F, then stir in starter culture and let sit for 1 hour to ripen.
- Add diluted rennet, stir gently for 1 minute, then let curds set undisturbed for 30 minutes.
- Cut curds into small pieces and slowly heat to 90°F over 30 minutes while stirring occasionally.
- Line a colander with cheesecloth, pour curds and whey through, then hang the bundle to drain for 8-12 hours.
- Blend drained curds with salt until smooth and creamy, then refrigerate in an airtight container.
Variations And Substitutions
Add fresh herbs like dill or chives, blend in honey for a sweet spread, or incorporate smoked salt for depth. If mesophilic culture is unavailable, use buttermilk as a substitute, though results will vary slightly.
Make-Ahead, Storage, And Serving Tips
Cream cheese keeps refrigerated for up to two weeks in an airtight container. Make it several days ahead for entertaining. If the texture seems grainy, blend in a tablespoon of heavy cream. Bring to room temperature for 30 minutes before serving for the best flavor and spreadability.
3. Homemade Butter
Transform heavy cream into rich, creamy butter in minutes using just one ingredient and a jar. This silky, luxurious homemade butter has superior flavor compared to store-bought versions and a fresher, more delicate texture. Perfect for spreading on warm bread, melting over vegetables, or using in baking. Making butter at home is surprisingly simple and rewarding, giving you complete control over quality and taste.
Why You’ll Love It
- Requires only heavy cream and a few minutes of shaking or blending.
- Tastes noticeably fresher and richer than commercial butter.
- You’ll have fresh buttermilk as a bonus byproduct for baking.
Ingredients
- 2 cups heavy cream, cold
- 1/4 teaspoon salt, optional
How To Make It
- Pour cold heavy cream into a jar with a tight-fitting lid, filling it about halfway.
- Seal the jar and shake vigorously for 8 to 10 minutes until the cream separates into butter solids and liquid buttermilk.
- Pour the mixture through a fine-mesh strainer to separate the buttermilk from the butter solids.
- Rinse the butter under cold water while pressing with a spoon to remove excess buttermilk and extend shelf life.
- Mix in salt if desired, then transfer to a container and refrigerate.
Variations And Substitutions
Use a food processor or blender instead of shaking for faster results. Add fresh herbs like chives or dill, honey, or lemon zest to the finished butter for flavored versions. Try cultured cream for tangy, complex-flavored butter.
Make-Ahead, Storage, And Serving Tips
Store homemade butter in an airtight container in the refrigerator for up to two weeks, or freeze for three months. Save the buttermilk for pancakes, biscuits, or baking. Bring butter to room temperature before spreading on bread for easier application.
4. Homemade Mayo
Creamy, tangy, and infinitely customizable, homemade mayo rivals any store-bought version. This silky emulsion comes together in minutes with just egg yolks, oil, and acid. Perfect for sandwiches, dips, or as a base for flavored spreads, homemade mayo tastes fresher and costs less than commercial varieties. Once you master the basic technique, you’ll never go back.
Why You’ll Love It
- Complete control over ingredients—no additives or preservatives.
- Costs significantly less than premium store-bought brands.
- Ready in under five minutes with a whisk or food processor.
Ingredients
- 1 large egg yolk, room temperature
- 1 teaspoon Dijon mustard
- 1 tablespoon fresh lemon juice or white vinegar
- 3/4 cup neutral oil (vegetable, canola, or light olive oil)
- 1/4 teaspoon salt
- Pinch of white pepper
How To Make It
- Whisk together the egg yolk, mustard, lemon juice, salt, and pepper in a medium bowl until combined.
- Add the oil one drop at a time while whisking constantly until the mixture begins to thicken and emulsify, about 30 seconds.
- Once the emulsion starts, add the remaining oil in a thin, steady stream while whisking vigorously until thick and creamy.
- Taste and adjust seasoning with additional salt, pepper, or lemon juice as desired.
- Transfer to a clean jar and refrigerate until ready to use.
Variations And Substitutions
Create aioli by adding minced garlic; make sriracha mayo by stirring in hot sauce; try herb mayo with fresh basil or dill; use half olive oil and half neutral oil for a Mediterranean twist; substitute lime juice for lemon for a brighter flavor.
Make-Ahead, Storage, And Serving Tips
Store in an airtight container in the refrigerator for up to two weeks. If mayo breaks during preparation, start with a fresh egg yolk and slowly whisk in the broken mayo to rescue it. Use at room temperature for best flavor. Ensure all ingredients are room temperature to prevent separation.
5. Homemade Yogurt
Homemade yogurt is a creamy, tangy cultured dairy that’s easier to make than you’d think. With just milk and a starter culture, you’ll achieve that perfect balance of smooth texture and bright flavor. Serve it plain with granola, use it as a base for marinades, or enjoy it with fresh fruit. Making yogurt at home costs a fraction of store-bought and lets you control the thickness and tang to your preference.
Why You’ll Love It
- Dramatically cheaper than store-bought yogurt over time.
- No additives, stabilizers, or excess sugar unless you add them.
- Customizable thickness and tanginess to suit your taste.
Ingredients
- 1 quart whole milk (or 2 percent)
- 1/4 cup plain yogurt with live active cultures (as starter)
- 2 tablespoons powdered milk (optional, for thicker yogurt)
How To Make It
- Heat milk to 180 degrees Fahrenheit, stirring occasionally to prevent scorching. Cool to 110 degrees Fahrenheit.
- Whisk the plain yogurt starter with a small amount of warm milk until smooth, then stir into the remaining milk.
- Pour into clean jars and place in an insulated cooler filled with 110-degree water, or use a yogurt maker set to 110 degrees.
- Incubate undisturbed for 6 to 12 hours, depending on desired tanginess.
- Refrigerate immediately once set; yogurt will continue to thicken as it cools.
Variations And Substitutions
Use Greek yogurt as a starter for thicker results. Add vanilla extract, honey, or jam after culturing for flavored yogurt. Substitute half the milk with non-dairy milk if desired, though results vary. For extra-thick yogurt, strain through cheesecloth for several hours to remove whey.
Make-Ahead, Storage, And Serving Tips
Yogurt keeps refrigerated for up to two weeks. Reserve 1/4 cup of your finished batch to use as starter for the next batch up to five times before making a fresh starter purchase. If yogurt doesn’t set, the culture may have died; ensure incubation temperature stays steady at 110 degrees. Serve cold with toppings, or use in baking and cooking right away.
6. Homemade Coffee Creamer
This silky, customizable coffee creamer rivals store-bought versions without artificial additives. Made from simple pantry staples, it delivers rich flavor and creamy texture that transforms your morning cup. Perfect for those seeking control over ingredients, this creamer works beautifully in hot or cold coffee and keeps for weeks in the refrigerator.
Why You’ll Love It
- Skip artificial ingredients and create a creamer tailored to your taste preferences.
- More economical than premium store-bought creamers over time.
- Ready in minutes with ingredients you likely already have on hand.
Ingredients
- 1 cup heavy cream
- 1 cup whole milk
- 2 tablespoons sweetened condensed milk
- 1 teaspoon vanilla extract
- Pinch of sea salt
How To Make It
- Pour heavy cream and whole milk into a clean glass jar or container.
- Add sweetened condensed milk, vanilla extract, and sea salt.
- Seal the jar tightly and shake vigorously for 30 seconds until well combined.
- Refrigerate for at least 2 hours to allow flavors to meld.
- Shake gently before each use, as separation is normal.
Variations And Substitutions
Try almond milk or oat milk for a lighter version, add cinnamon or nutmeg for spiced flavor, substitute maple syrup for condensed milk, or infuse with a splash of coffee liqueur for depth. Coconut cream creates a tropical twist.
Make-Ahead, Storage, And Serving Tips
Store in a sealed glass jar in the refrigerator for up to two weeks. Shake before each use since natural separation occurs. For creamier results, use at room temperature. If it separates significantly, simply shake again before pouring.
7. Homemade Sour Cream
This tangy, creamy sour cream rivals store-bought versions with its rich texture and bright flavor. Made from just two ingredients, it develops its signature tang through fermentation, making it perfect for topping baked potatoes, tacos, soups, and baked goods. Homemade sour cream tastes fresher and costs significantly less than commercial brands.
Why You’ll Love It
- Requires only heavy cream and a starter culture—no complicated techniques.
- Ready in 12-24 hours with minimal hands-on time.
- Customizable tanginess and thickness to your preference.
Ingredients
- 2 cups heavy cream, room temperature
- 2 tablespoons fresh buttermilk or sour cream with live cultures
- 1/4 teaspoon salt (optional)
How To Make It
- Pour heavy cream into a clean glass jar and add buttermilk or existing sour cream as your starter culture.
- Stir well to combine the starter throughout the cream.
- Cover loosely with a cloth or paper towel secured with a rubber band to allow airflow while keeping dust out.
- Leave at room temperature (68-75°F is ideal) for 12-24 hours until it thickens and develops a tangy flavor.
- Stir in salt if desired, then refrigerate in an airtight container.
Variations And Substitutions
For tangier sour cream, ferment longer or use more starter culture. Greek yogurt or crème fraîche can substitute as starters. Add fresh herbs, garlic, or dill for flavored versions. If your home is cold, use a yogurt maker or warm oven with the light on to maintain consistent temperature.
Make-Ahead, Storage, And Serving Tips
Store in the refrigerator for up to two weeks in an airtight container. The flavor continues developing slightly in cold storage. Use as a topping for soups, baked potatoes, and desserts, or as a baking ingredient. If it separates slightly, simply stir before serving. Reserve 2 tablespoons to use as starter culture for your next batch.
Final Thoughts
Making your own dairy staples at home is more rewarding than you might think. Whether you’re drawn to the simplicity of fresh yogurt, the richness of homemade butter, or the satisfaction of creating your own cheese, these recipes prove that you don’t need fancy equipment or years of experience to succeed. The best part? Your homemade versions will taste noticeably better than store-bought alternatives, and you’ll know exactly what went into every bite.
If you’re new to dairy making, start with whichever recipe excites you most. Many people find yogurt to be the perfect entry point since it requires minimal ingredients and delivers results quickly. Once you’ve mastered one staple, you’ll have the confidence to explore the others. Your kitchen is about to become a little creamery, and your family will absolutely notice the difference.
Homemade Mozzarella
Ingredients
Method
- Dissolve lipase powder in cool water and let sit for 10 minutes, then add to milk at 90 degrees Fahrenheit
- Dilute liquid rennet in 0.25 cup cool water and add to milk, stirring gently for 1 minute
- Let milk rest for 5 minutes, then cut curds into 0.25-inch cubes
- Slowly heat curds to 105 degrees Fahrenheit over 5 minutes while stirring gently
- Maintain temperature for 5 minutes, then drain whey through cheesecloth
- Heat curds to 110 degrees Fahrenheit and stir for 5 more minutes
- Place curds in microwave-safe bowl, heat for 1 minute, drain whey, then stretch curds until smooth and shiny
- Form into balls and place in ice water to cool