No-Bake Holiday Desserts for Cozy Gatherings
No-Bake Holiday Desserts for Cozy Gatherings
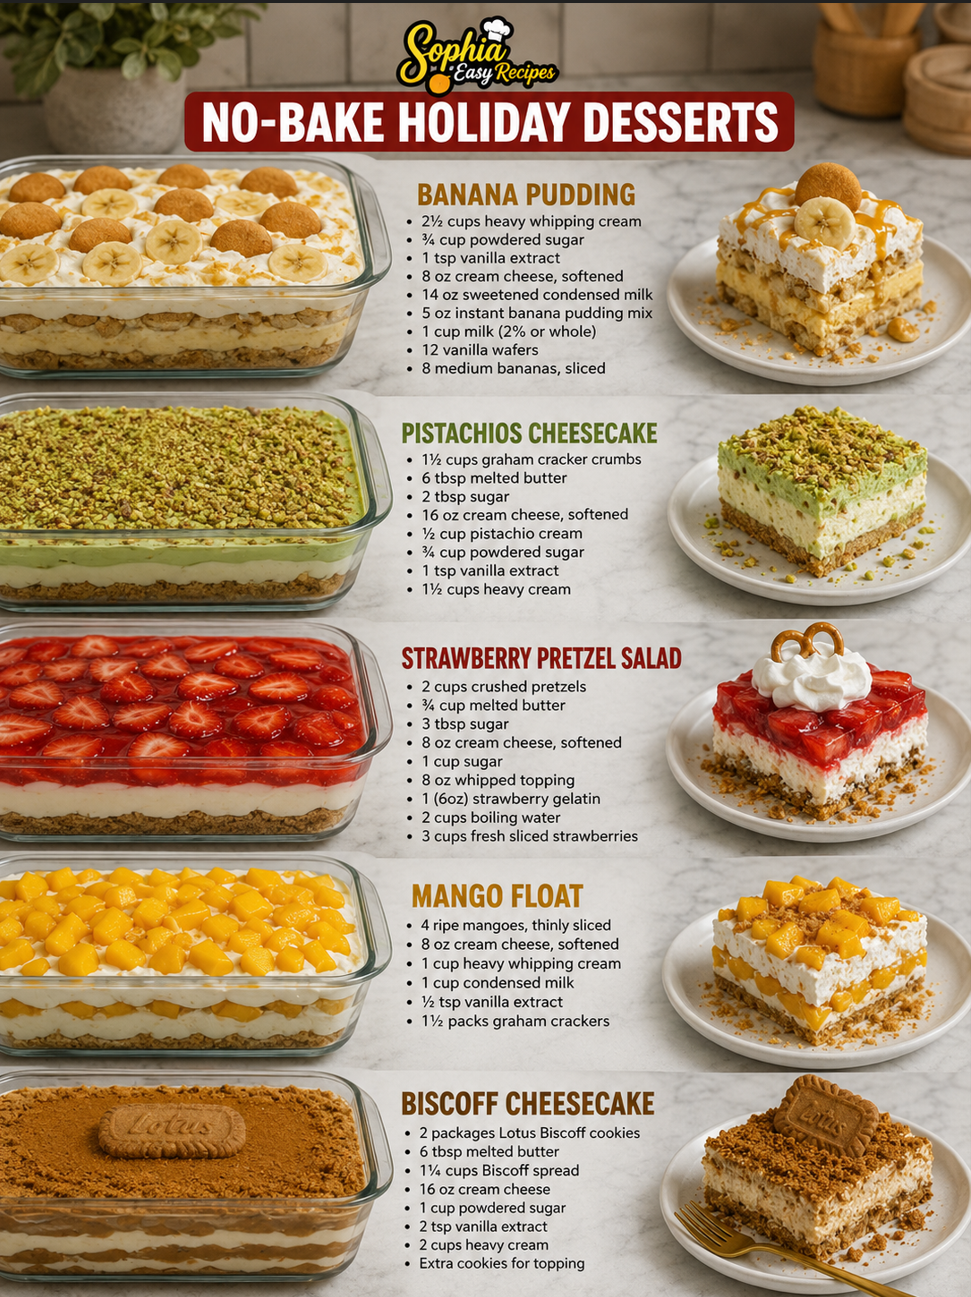
The holidays are busy enough without spending hours in the kitchen, which is exactly why I’m sharing my favorite no-bake holiday desserts with you today. These five recipes are absolute game-changers when you want something impressive on the dessert table without the stress of baking, cooling, and decorating. Whether you’re hosting a gathering or bringing a dish to a friend’s house, you’ll have more time to enjoy the season when you skip the oven.
I’ve tested and loved every single recipe in this roundup, and I keep coming back to them year after year. From the creamy comfort of Banana Pudding to the elegant layers of Strawberry Pretzel Salad, these desserts feel fancy but come together so easily. They’re the kind of recipes that make people ask for your secret, and honestly, the secret is just smart shortcuts and quality ingredients.
Save these recipes for your holiday planning, and I promise you’ll be reaching for them again next year. If you love easy, delicious desserts like these, Follow me on HaileeRecipes on Pinterest for more ideas that fit your real life. Let’s make the holidays delicious and manageable together.
1. Banana Pudding
This classic banana pudding is a creamy, comforting dessert that combines soft vanilla wafers, ripe bananas, and a luscious custard-based pudding layer—all without requiring any baking. The result is a silky, indulgent treat with delightful textural contrasts that feels fancy yet incredibly simple to assemble. Perfect for holiday gatherings, potlucks, or when you want an impressive dessert that doesn’t heat up your kitchen, banana pudding comes together in minutes and tastes even better when chilled overnight, making it ideal for stress-free entertaining.
Why You’ll Love It
- Completely no-bake, requiring just a few minutes of hands-on preparation and no oven time.
- Uses humble pantry staples and creates an elegant dessert that impresses guests effortlessly.
- Can be assembled hours or even a day ahead, making it perfect for busy holiday schedules.
Ingredients
- 1 box vanilla wafers (about 40 cookies)
- 3 cups whole milk
- 1 package instant vanilla pudding mix (5.1 ounces)
- 8 ounces cream cheese, softened
- 1 cup heavy whipping cream
- 3 tablespoons powdered sugar
- 4 ripe but firm bananas
- 1 teaspoon vanilla extract
How To Make It
- Whisk together the milk and instant pudding mix in a large bowl for about 2 minutes until thickened, then stir in the softened cream cheese until smooth and combined.
- In a separate bowl, whip the heavy cream with powdered sugar and vanilla extract until stiff peaks form.
- Gently fold the whipped cream into the pudding mixture until no white streaks remain, creating a mousse-like base.
- Slice the bananas into quarter-inch rounds and toss them gently with a squeeze of lemon juice to prevent browning.
- In a large trifle dish or 9-by-13-inch baking dish, spread a thin layer of the pudding mixture on the bottom.
- Layer vanilla wafers over the pudding, then add a layer of banana slices, followed by more pudding mixture; repeat layers until all ingredients are used, ending with pudding on top.
- Chill the dessert for at least 4 hours or preferably overnight before serving.
Variations And Substitutions
For a boozy version, add 2 tablespoons of rum or bourbon to the pudding mixture. Substitute the vanilla wafers with crushed gingersnaps for a spiced twist, or use ladyfinger cookies for a lighter texture. If you prefer a lighter dessert, replace half the heavy cream with Greek yogurt. For a chocolate lover’s variation, drizzle chocolate sauce between layers or dust the top with cocoa powder.
Make-Ahead, Storage, And Serving Tips
Assemble this dessert up to 24 hours in advance; the flavors meld beautifully overnight and the wafers soften perfectly. Store covered in the refrigerator for up to 3 days. To prevent the bananas from browning if making ahead, slice and add them no more than 4 hours before serving, or toss slices in lemon juice and add them just before presenting. Serve chilled directly from the dish with a spoon, and add a few extra wafers on top for garnish if desired.
2. Pistachios Cheesecake
This elegant pistachio cheesecake delivers a stunning pale green hue and nutty sophistication without requiring any baking. The creamy filling sits atop a buttery graham cracker crust and is topped with a smooth sour cream layer, creating luxurious texture contrasts. The natural pistachio flavor pairs beautifully with subtle vanilla notes, making this an impressive centerpiece for holiday dessert tables. Perfect for entertaining, it comes together in minutes and impresses guests with its restaurant-quality appearance and rich, indulgent taste.
Why You’ll Love It
- No oven required, making it ideal for busy holiday schedules and small kitchens.
- Elegant presentation with a naturally beautiful pale green color that requires no food coloring.
- Make ahead friendly, allowing you to prepare it days in advance without stress.
Ingredients
- 1.5 cups graham cracker crumbs
- 6 tablespoons melted butter
- 2 tablespoons sugar
- 16 ounces cream cheese, softened
- 1 cup roasted salted pistachios, finely ground
- 0.5 cup powdered sugar
- 1 teaspoon vanilla extract
- 1 cup heavy whipping cream
- 0.5 cup sour cream
- 2 tablespoons honey
How To Make It
- Combine graham cracker crumbs, melted butter, and 2 tablespoons sugar in a bowl, then press firmly into the bottom of a 9-inch springform pan. Refrigerate while preparing the filling.
- Beat softened cream cheese with an electric mixer for 2 minutes until smooth and creamy, scraping down the bowl as needed.
- Add ground pistachios, powdered sugar, and vanilla extract to the cream cheese, mixing until well combined and no lumps remain.
- In a separate bowl, whip heavy cream to stiff peaks using clean beaters, then gently fold into the pistachio mixture in two additions.
- Spread the pistachio filling evenly over the prepared crust and smooth the top with a spatula.
- Stir together sour cream and honey until smooth, then spread or dollop over the cheesecake filling.
- Refrigerate for at least 6 hours, preferably overnight, until the filling is completely set and chilled.
- Remove from the refrigerator 15 minutes before serving, then carefully run a thin knife around the edges and release the springform.
Variations And Substitutions
For a darker pistachio flavor, use roasted unsalted pistachios and add a pinch of sea salt to the filling. Substitute the sour cream topping with Greek yogurt mixed with honey for a tangier finish. Add 1 tablespoon of pistachio extract for intensified flavor. Create a chocolate-pistachio version by drizzling dark chocolate over the top before serving. For a gluten-free option, use gluten-free graham crackers or almond flour mixed with melted butter for the crust.
Make-Ahead, Storage, And Serving Tips
Prepare this cheesecake up to 3 days ahead and store covered in the refrigerator for optimal flavor development. The crust can be made and pressed into the pan the day before. Store leftovers in an airtight container in the refrigerator for up to 5 days. For individual servings, prepare in mason jars with layers of crust, filling, and sour cream topping. If the filling seems too soft when spreading, refrigerate for 30 minutes before topping with the sour cream layer. Garnish with crushed pistachios or a light dusting of powdered sugar just before serving.
3. Strawberry Pretzel Salad
Strawberry Pretzel Salad is the ultimate no-bake dessert that delivers the perfect trifecta of textures: a buttery pretzel crust, creamy middle layer, and fresh strawberry topping. This dessert combines sweet and salty elements with a cool, refreshing taste that makes it ideal for summer gatherings and holiday parties. The combination of crunchy, chewy, and fruity creates an irresistible treat that feels indulgent without requiring any baking. It’s a crowd-pleaser that can be prepared hours ahead, making it perfect for busy holiday entertaining.
Why You’ll Love It
- No oven required—just mix, layer, and chill for a stress-free dessert.
- The salty-sweet pretzel crust pairs beautifully with creamy and fruity layers.
- Can be made up to 24 hours ahead, perfect for advance holiday planning.
Ingredients
- 2 cups crushed pretzels
- 6 tablespoons melted butter
- 3 tablespoons sugar
- 8 ounces cream cheese, softened
- 8 ounces whipped topping, thawed
- 1 pound fresh strawberries, sliced
- 6 ounces strawberry gelatin
- 2 cups boiling water
- 16 ounces cold water
How To Make It
- Combine crushed pretzels, melted butter, and sugar in a bowl, then press firmly into the bottom of a 9-by-13-inch dish to create an even crust. Refrigerate for 15 minutes.
- Beat softened cream cheese until smooth, then fold in the whipped topping until well combined and fluffy.
- Spread the cream cheese mixture evenly over the pretzel crust, making sure to seal it completely to the edges to prevent the crust from becoming soggy.
- Dissolve strawberry gelatin in boiling water, stirring for 2 minutes until fully dissolved, then stir in cold water.
- Arrange sliced strawberries evenly over the cream cheese layer in a single layer.
- Carefully pour the cooled gelatin mixture over the strawberries, allowing it to settle around them without disturbing the layers.
- Refrigerate for at least 4 hours or until the gelatin is completely set and firm to the touch.
Variations And Substitutions
Swap strawberry gelatin for raspberry, cherry, or mixed berry for different flavor profiles. Use crushed graham crackers or gingersnaps instead of pretzels for a different crust texture. Substitute the whipped topping with homemade whipped cream for a richer flavor. For a lighter version, use Greek yogurt mixed with a small amount of whipped topping in place of the full cream cheese layer. Fresh raspberries or blueberries work beautifully as alternatives to strawberries.
Make-Ahead, Storage, And Serving Tips
Prepare this dessert up to 24 hours in advance, making it an excellent choice for holiday planning. Store covered in the refrigerator for up to 3 days. Serve chilled directly from the dish using a sharp knife dipped in hot water between cuts for clean slices. If the pretzel crust softens too much, ensure the cream cheese layer completely seals it by spreading it all the way to the edges. For easier serving, cut into squares and transfer to plates using a spatula rather than trying to lift from the pan.
4. Mango Float
Mango Float is a beloved Filipino no-bake dessert that combines creamy, fruity layers with a delightful crunch. This tropical treat features graham crackers soaked in evaporated milk, topped with sweetened mango puree and whipped cream, creating a dessert that’s both light and indulgent. The contrast between soft, custardy layers and crispy cookie pieces makes every spoonful interesting. It’s the perfect make-ahead dessert for holiday gatherings, requiring just a few pantry staples and minimal effort. Mango Float works beautifully as a refreshing finale to heavy holiday meals, especially during warm weather celebrations.
Why You’ll Love It
- Completely no-bake and requires no special equipment or cooking skills.
- Uses simple, affordable ingredients that are easy to find year-round.
- Can be assembled hours ahead, making it perfect for stress-free entertaining.
Ingredients
- 1 can (14 ounces) evaporated milk
- 1 can (14 ounces) sweetened condensed milk
- 1 cup fresh mango puree or 1 can (15 ounces) mango pulp
- 1 package (10.5 ounces) graham crackers, whole sheets
- 1 cup heavy whipping cream, chilled
- 2 tablespoons granulated sugar
- 1 teaspoon vanilla extract
- Fresh mango slices for garnish (optional)
How To Make It
- Combine evaporated milk and sweetened condensed milk in a shallow bowl, stirring until well blended.
- Quickly dip each graham cracker sheet into the milk mixture for 2-3 seconds per side, ensuring it’s moistened but not soggy. Arrange dipped crackers in a single layer in a 9×13-inch baking dish.
- Pour the mango puree evenly over the graham cracker layer, spreading gently to distribute uniformly.
- In a chilled bowl, whip the heavy cream with sugar and vanilla extract until stiff peaks form, about 2-3 minutes.
- Spread or dollop the whipped cream over the mango layer, creating an even or decorative top.
- Cover with plastic wrap and refrigerate for at least 4 hours, preferably overnight, allowing flavors to meld and the texture to set properly.
- Before serving, garnish with fresh mango slices if desired, then cut into squares with a sharp knife dipped in hot water for clean edges.
Variations And Substitutions
Substitute the mango with other tropical fruits like pineapple, papaya, or a combination of fruits for different flavor profiles. Use store-bought whipped cream in a can if time is limited. Try ube or chocolate pudding mixed into the cream layer for Filipino-inspired variations. For a lighter version, replace heavy cream with whipped coconut cream. Coconut milk can replace part of the evaporated milk for added tropical flavor.
Make-Ahead, Storage, And Serving Tips
Mango Float actually improves with time, so assemble it up to 24 hours ahead. Store covered in the refrigerator for up to 3 days. The dessert is best served chilled directly from the fridge. If the top becomes watery, drain excess liquid before serving. For transporting to potlucks, keep it refrigerated until the last moment and serve from the baking dish. Cut into portions just before serving to maintain clean, attractive squares. Individual portions can be made in small cups or glasses for easier serving and plating.
5. Biscoff Cheesecake
This creamy Biscoff cheesecake combines the beloved caramel-spiced flavor of Biscoff cookies with a rich, no-bake filling that requires zero oven time. The buttery cookie crust pairs perfectly with a smooth cheesecake layer infused with Biscoff spread, creating a dessert that’s both indulgent and elegant. With its stunning presentation and sophisticated flavor profile, this dessert is ideal for holiday gatherings, dinner parties, or when you want an impressive treat without the fuss of baking. The no-bake method makes it perfect for busy holiday schedules.
Why You’ll Love It
- Completely no-bake, requiring only a refrigerator instead of oven time.
- Impressive enough for holiday entertaining yet simple enough for beginners to master.
- The Biscoff flavor is unique and instantly recognizable, making it a standout dessert.
Ingredients
- 2 cups Biscoff cookie crumbs (about 20 cookies)
- 6 tablespoons melted butter
- 16 ounces cream cheese, softened
- 1 cup heavy whipping cream
- 3/4 cup Biscoff spread
- 1/4 cup powdered sugar
- 1 teaspoon vanilla extract
- Pinch of sea salt
How To Make It
- Combine Biscoff cookie crumbs with melted butter and press firmly into the bottom of a 9-inch springform pan. Refrigerate for 30 minutes.
- In a large bowl, beat softened cream cheese until smooth and creamy, about 2 minutes.
- Add Biscoff spread, powdered sugar, vanilla extract, and sea salt to the cream cheese. Beat until fully combined and no lumps remain.
- In a separate bowl, whip heavy cream to stiff peaks using an electric mixer.
- Gently fold the whipped cream into the Biscoff mixture in two additions, being careful not to deflate the cream.
- Pour the filling over the prepared crust and smooth the top with a spatula.
- Refrigerate for at least 6 hours or overnight until set and firm.
- Before serving, optionally drizzle with additional Biscoff spread or sprinkle crushed Biscoff cookies on top.
Variations And Substitutions
For a chocolate twist, swirl melted chocolate into the filling before refrigerating. If you prefer a firmer texture, add 2 tablespoons of cream cheese to the mixture. You can also substitute the cookie crust with a graham cracker base mixed with Biscoff spread for extra flavor. For those avoiding dairy, use dairy-free cream cheese and coconut whipping cream with the same measurements.
Make-Ahead, Storage, And Serving Tips
This cheesecake can be made up to 3 days in advance, making it perfect for holiday planning. Store it covered in the refrigerator to prevent it from absorbing odors. For best results, remove from the refrigerator 15 minutes before serving to allow the flavors to fully develop. You can freeze the entire cheesecake for up to 2 weeks; thaw overnight in the refrigerator before serving. If the filling seems too soft after folding in whipped cream, refrigerate for an additional 2 hours before serving.
Final Thoughts
No-bake holiday desserts are a game-changer for anyone juggling a busy season. Whether you’re short on time, oven space, or simply want to skip the stress of baking, these recipes deliver impressive results with minimal effort. The best part? Your guests won’t believe they didn’t require hours of preparation or a hot kitchen.
Pick one recipe that speaks to you and make it your go-to this holiday season. Start with whichever sounds most delicious or uses ingredients you already have on hand. Once you master one, you’ll feel confident tackling the others. Your dessert table—and your sanity—will thank you.
Banana Pudding
Ingredients
Method
- In a large bowl, beat softened cream cheese until smooth and creamy.
- Add sweetened condensed milk and whole milk to the cream cheese, stirring until well combined.
- Fold in whipped topping and vanilla extract until the mixture is light and fluffy.
- Slice bananas into 1/4-inch rounds and gently fold into the pudding mixture.
- In a 9x13-inch dish, layer vanilla wafers on the bottom.
- Pour half of the pudding mixture over the wafers.
- Add another layer of vanilla wafers, then top with remaining pudding mixture.
- Crush remaining wafers and sprinkle over the top as garnish.